background image

71

Manual

www.kraun.it

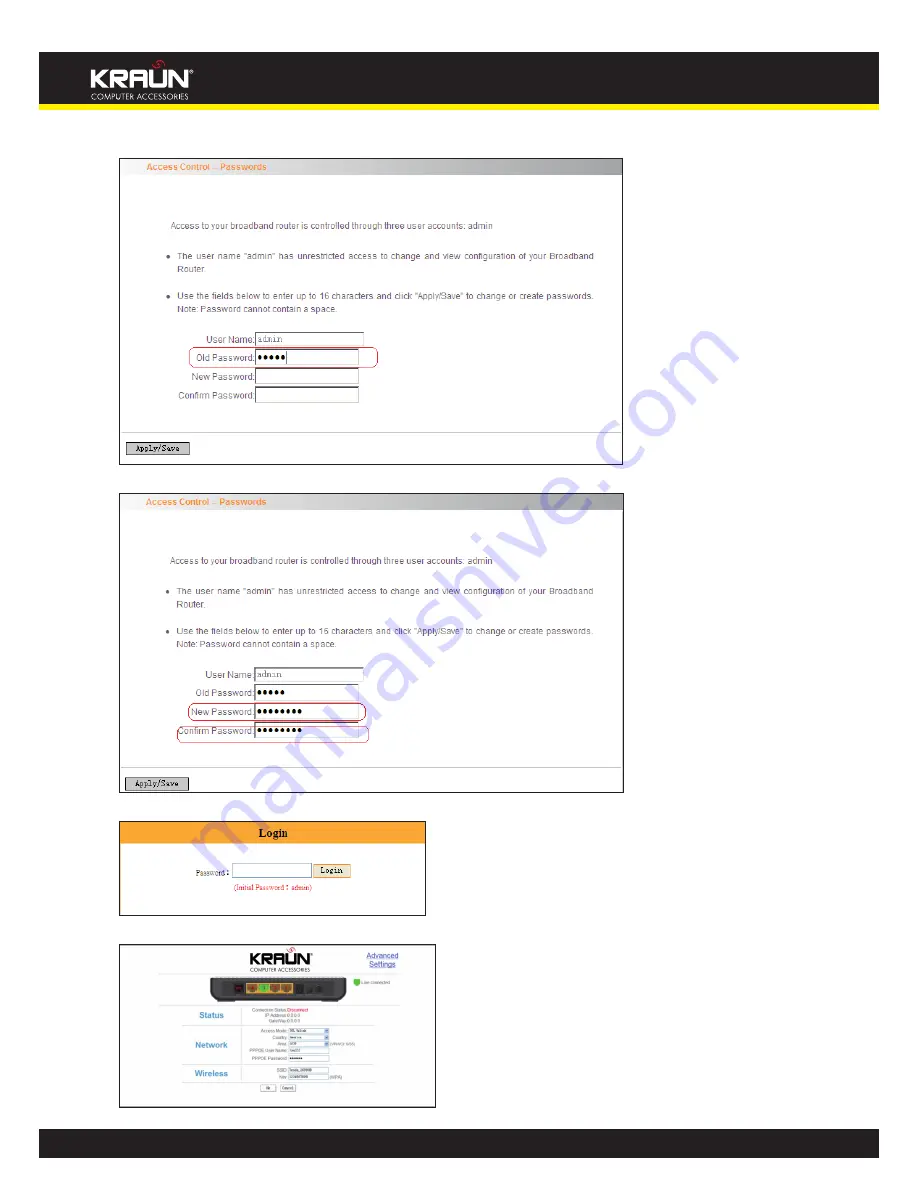
2. Enter the router’s current login password in the old password textbox.

3. Enter the password you wish to set in the new password and confirm password textboxes.

4. After clicking Apply/Save, the login dialog will pop up. 

5. Enter the new password you have set to re-enter the router’s setup wizard screen.

Содержание KN.2R

Страница 1: ...acturer is under no circumstances liable for any unauthorised modifications made to the product by the user or any other parties which may compromise its conformity and safety Cod KN 2R User s Manual ADSL2 2 Wireless N Router 150Mbps plus ...

Страница 2: ...Device Information 14 4 2 Advanced Setup 17 4 2 1 Connection mode 17 4 2 2 WAN Service 19 1 WAN Configuration in DSL Mode 19 PPP over Ethernet PPPoE 19 IP over Ethernet 23 Bridging 27 PPPOA 28 IPOA 32 2 WAN Configuration in Ethernet Mode 35 PPP over Ethernet PPPoE 35 IP over Ethernet 38 4 2 3 LAN 41 4 2 4 DHCP setting 41 DHCP Server 41 DHCP client 42 4 2 5 NAT 43 Virtual Server 43 4 2 6 Port Trigg...

Страница 3: ...ion Info 67 4 4 Diagnostics 68 4 5 Management 68 4 5 1 System log 69 4 5 2 Internet Time 70 4 5 3 Access Control 70 4 5 4 Backup 72 4 5 5 Update 72 4 5 6 Restore default 73 4 5 7 Update Software 74 4 5 8 Reboot 75 4 6 Exit 76 4 7 Back to Wizard 76 Appendix 1 77 3 Setting the IP of your PC manually 77 4 PC dial up 77 Appendix 2 81 5 Troubleshooting 81 6 Verifying the Connection 81 7 FAQ 83 8 VPI VC...

Страница 4: ...p wizard installation software provided by Kraun offers you easy installation and fast shared internet access In a word with fast wireless speed and large coverage Kraun ADSL2 2 Wireless N Router 150Mbps plus is the best choice for families student dorms and small sized enterprises etc to access Internet wirelessly 1 1 Product Features Complies with IEEE802 11b g n IEEE802 3 IEEE802 3u ADSL ADSL2 ...

Страница 5: ...above listed items is missing or damaged please contact your Kraun reseller for im mediate replacement 1 3 Factory Defaults Item Default Value Common Default Settings Username admin Password admin IP Address 192 168 1 1 Subnet Mask 255 255 255 0 Wireless SSID KRAUN_XXXXXX KRAUN_the last 6 characters of MAC address example KRAUN_123456 Wireless Security Enable Security Type WPA PSK WPA2 PSK Encrypt...

Страница 6: ... The device has no power or power adapter is damaged SYS Green Flashing System functions correctly WLAN Green Flashing Packets are being transferred Off Wireless is disabled ADSL Green Slow Flashing ADSL Link has not been established Fast Flashing ADSL Link is being established Always On ADSL Link has already been established LAN 1 2 3 4 Green Off Unconnected Flashing Packets are being transferred...

Страница 7: ...AN1 2 3 4 LAN network cable interface It is used to connect Hub Switch or computer in a LAN When the access way is changed into community broadband LAN4 can be used as the wireless Router s WAN port DSL RJ11 interface for telephone line connection It does not function when the device is configured to use Ethernet uplink mode as access mode 2 2 Hardware Connection Follow the diagram below to connec...

Страница 8: ...gh a browser installed in your PC 3 1 Logging on to your router through Web browser Before entering the web browser you need to verify the connectivity between the router and your computer First click the start menu on the lower left corner of your computer desktop Then input cmd in the search programs and file texts box and press enter Finally Open the dos window and enter ping 192 168 1 1 and pr...

Страница 9: ...een successfully established which means you can log on to the router s web based utility 1 Open the IE Browser as shown below 2 Input http 192 168 1 1 in the address field and press Enter to enter router s management interface 3 The router s management interface is displayed as below ...

Страница 10: ...ce 1 VPI VCI 2 PPPOE User name 3 PPPOE Password VPI VCI Different areas and ISPs have different VPI VCI For the convenience of its users the device has integrated many important VPI VCI Therefore you only need to select your ISP and area and the device will provide you with an auto matched VPI VCI in accordance with your area However if your ISP provides you with a special VPI VCI then select Manu...

Страница 11: ... your choice including spaces and punctuation Note 1 The wireless network name SSID of this device is KRAUN_the last 6 characters of MAC address for example KRAUN_051609 You can check it by clicking Advanced Setup Wireless Basic Setting tabs After all settings are finished and status shows Connected Congratulations You can access In ternet now Launch a web browser enter http www kraun it in the ad...

Страница 12: ... in the figure below Then click KRAUN_051609 select Connect to go to the dialogue box below Enter the key KRAUN_KN 2R and click OK system will automatically connects with your wireless network in a while Advanced settings provide you more powerful functions such as filter QoS and port range forward ing Continue to read the Advanced Settings section below if necessary ...

Страница 13: ...he right top corner as shown in the figure below After you enter the advanced settings screen you can set the advanced settings for the router to satisfy your requirements There are seven main menus on this screen Device Info Advanced Setup Wireless Diagnostics Management Exit and Back to wizard as shown in the below picture ...

Страница 14: ... www kraun it 4 1 Device Information There are five submenus Summary WAN Statistics Route and ARP Summary It displays system information current status of WAN connection and Wireless as shown in the figure below ...

Страница 15: ...istics It gathers the received and transmitted packets on LAN WAN ports Statistics LAN It displays the received and transmitted packets of the device s LAN ports as shown in the figure below Note eth0 eth1 and eth2 are respectively LAN port1 2 and 3 of the device and wl0 is a wireless port Statistics WAN It displays the received and transmitted packets of the device s WAN port as shown in the figu...

Страница 16: ...on including mode traffic type status and other ADSL parameters as shown in the below figure Route displays routing table of the device as shown in the figure below ARP displays the device s LAN ports IP and MAC addresses of the PCs that are wirelessly connected as shown in the figure below ...

Страница 17: ... and Multicast as shown in the figure below 4 2 1 Connection mode Connection Mode This router supports two connection modes DSL mode and Ethernet mode Select DSL mode if you access Internet through telephone line and Ethernet mode through network cable By default system is in DSL mode To enter the connection mode interface click Advanced Setup Connection Mode Select a proper connection mode and th...

Страница 18: ...rel evant parameters On this page you can configure VPI and VCI values consult your local ISP if you are not clear For other options keep the defaults and click the Apply Save button 2 In Ethernet modes you are required to configure parameters for Ethernet interface To enter the ETH Interface page click Advanced Setup Connection Mode Select Ethernet mode and click Apply WAN Service ETH Interface A...

Страница 19: ...k Advanced Setup Connection mode Select DSL mode and click Apply WAN Service ATM Interface Keep default DSL link type EOA unchanged and click the Apply Save button For details refer to 4 2 1 1 Connection Setting to enter WAN service setup interface page1 and then click the Add button there to select a WAN service type on page 2 Page 1 Page 2 Select PPP over Ethernet PPPoE modify the service descri...

Страница 20: ...page to work as the WAN MAC address of the router Dial on Demand Automatically connects or disconnects Internet according to the use of the network It is recommended when your ISP limits network use time PPP IP extension The IP addresses of all packets including management packets that egress WAN port will be converted to the WAN port s IP address once this feature is enabled Enable PPP Debug Mode...

Страница 21: ...fault values if you are not clear about them and then click the Next button to display the following screen page 4 Page 4 This page allows you to configure the gateway address for WAN connection We recommend you to keep the default values and click the Next button on page 4 to enter the following page page 5 page 5 ...

Страница 22: ...e recommend you to keep the default values if you are not clear about it and click the Next button on page 5 to enter the following page page 6 Page 6 This page displays the configuration information After confirmation please click Apply Save to save it You can access Internet once PPPoE dialup succeeds ...

Страница 23: ...lick the Next button Obtain an IP address automatically WAN port will automatically obtain an IP address for accessing Internet from the ISP if this feature is selected Use the following Static IP address select this feature if your ISP provides you an IP address WAN IP Address the IP address provided by your ISP for accessing Internet WAN Subnet Mask the subnet mask address provided by your ISP f...

Страница 24: ...4 Manual www kraun it Enter the IP subnet mask gateway IP address provided by your ISP or select Obtain an IP address automatically and click the Next button on page 1 to enter page 2 below Page 1 Page 2 ...

Страница 25: ...nged and click the Next button on page 2 to enter the screen page 3 below Page 3 This page allows you to configure the gateway address for WAN connection We recommend you to keep the default values and click the Next button on page 3 to enter the following page page 4 Page 4 ...

Страница 26: ...mmend you to keep the default values if you are not clear about it and click the Next button on page 4 to enter the following page page 5 Page 5 This page displays the configuration information After confirmation please click Apply Save to save it You can access Internet once the configured connection succeeds ...

Страница 27: ...broadband service with other users you can first configure your router s WAN service type as bridg ing and then use your PC or other devices for dialup connection Modify the service description if necessary and then click Next This page displays the configuration information After confirmation please click Apply Save to save it ...

Страница 28: ...gure the needed number of ATM interfaces and then follow the above corresponding configuration proce dures PPPOA First click Advanced Setup Connection Mode select DSL Mode and click Apply WAN Service ATM Interface to enter ATM PVC Configuration interface Then select PPPoA and click Apply Save there as shown in the figure below Click Connection Setting to enter WAN service setup interface Click the...

Страница 29: ...uto if you are not sure about it Clone MAC This feature clones the MAC address of the PC that is currently entering the router s management page to work as the WAN MAC address of the router Dial on Demand Automatically connects or disconnects Internet according to the use of the network It is recommended when your ISP limits network use time Enable PPP Debug Mode This feature can be enabled only w...

Страница 30: ...options keep the default values if you are not clear about them and then click the Next button to display the following screen This page allows you to configure the gateway address for WAN connection We recommend you to keep the default values and click the Next button to enter the following page ...

Страница 31: ...e WAN port We recommend you to keep the default values if you are not clear about it and click the Next button to enter the following page This page displays the configuration information After confirmation please click Apply Save to save it You can access Internet once PPPoA dialup succeeds ...

Страница 32: ...ly WAN Service ATM Interface to enter ATM PVC Configuration interface Then select PPPoA and click Apply Save there as shown in the figure below Click Connection Setting to enter WAN service setup interface Click the Add button Modify the service description if necessary and then click the Next button ...

Страница 33: ...rovided by your ISP for accessing Internet Enter the IP subnet mask provided by your ISP and click the Next button We recommend you to keep the default settings unchanged and click the Next button This page allows you to configure the gateway address for WAN connection We recommend you to keep the default values and click the Next button ...

Страница 34: ... IP address for the WAN port Enter the DNS server IP address provided by your ISP and click the Next button This page displays the configuration information After confirmation please click Apply Save to save it You can access Internet once the configured connection succeeds ...

Страница 35: ...oE PPP over Ethernet PPPoE Click Advanced Setup WAN Service Connection Setting to enter WAN service setup inter face page 1 and then click the Add button to go to page 2 and select a proper WAN service type Page 1 Page 2 Select PPP over Ethernet PPPoE on page 2 modify the service description if necessary and then click Next to enter page 3 ...

Страница 36: ... when your ISP requires a fixed MAC for your Internet access Dial on Demand Automatically connects or disconnects Internet according to the use of the network It is recommended when your ISP limits network use time This feature can help you to save the Internet fee PPP IP extension The IP addresses of all packets including management packets that egress WAN port will be converted to the WAN port s...

Страница 37: ...ure the gateway address for the WAN connection We recommend you to keep the default values and click the Next button to enter the following page This page allows you to configure the DNS server s IP address for the WAN port We recommend you to keep the default values if you are not clear about it and click the Next button to enter the following page This page displays the configuration information...

Страница 38: ...to configure your PC to obtain an IP address automatically to access Internet you need to select IP over Ethernet IPoE as the WAN service type Modify the service description if necessary and then click the Next button Obtain an IP address automatically WAN port will automatically obtain an IP address for accessing Internet from the ISP if this feature is selected ...

Страница 39: ...sing Internet WAN gateway IP Address the gateway IP address provided by your ISP for accessing Internet Enter the IP subnet mask gateway IP address provided by your ISP or select Obtain an IP address automatically and click the Next button We recommend you to keep the default settings unchanged and click the Next button This page allows you to configure the gateway address for WAN connection We re...

Страница 40: ...s for the WAN port We recommend you to keep the default values if you are not clear about it and click the Next button This page displays the configuration information After confirmation please click Apply Save to save it You can access Internet once the configured connection succeeds ...

Страница 41: ...address to log on to the router s Web based management interface and the default gateway of all computers that connect to the router s LAN ports have to be set to the new IP address for normal Internet access 4 2 4 DHCP setting DHCP Server This router enables DHCP server function by default DHCP refers to Dynamic Host Control Proto col With an internal DHCP server the Router can automatically conf...

Страница 42: ...e IP address to any other host computer Note To use the Router s DHCP server function you must set the TCP IP protocol of the computers in LAN to Obtain an IP address automatically DHCP client This page displays DHCP client s information such as host name MAC address IP address and lease time Hostname The name of a PC or a network device that has successfully obtained an IP address from the DHCP s...

Страница 43: ...server interface click NAT Virtual Server And then click the Add button to add rules for accessing the server Use Interface It indicates which WAN connection the configured rules are to be applied to When there is only one configured WAN connection available system will select it automatically Service Name There are two options available 1 Select a Service allows you to select an existing service ...

Страница 44: ...ected to the router s LAN port the virtual server page will display UPNP interface is being used For example you have created two servers on the router s LAN side 1 FTP server Port 21 for transferring files is at the IP address of 192 168 1 100 2 Web server port 80 is at the IP address of 192 168 1 110 And you want your Internet friends to access your FTP and Web servers respectively via port 21 a...

Страница 45: ... network business such as network game video conference etc can not work with simple NAT router due to the isolation caused by router s built in firewall Therefore proper configuration is needed When application program initiates a connection toward the trig gering port all correspondingly open ports will be enabled to implement successful connection and service Click Advanced Setup à NAT à Port T...

Страница 46: ...s TCP UDP and TCP UDP We recommend you to select TCP UDP if you are not sure about which protocol to choose Open Port Start Open Port End the port range that will be automatically enabled by the built in firewall when connections initiated by application programs succeed For example you have created a server on router s LAN side that can automatically download mate rial from Internet via port 9090...

Страница 47: ... Address the IP address of a PC to be set as a DMZ host DMZ host must be connected to the router s LAN port Note The router s firewall cannot have effect on the DMZ host once it is enabled Therefore net work security problem may occur Thus we recommend you to enable this function only when nec essary and delete the corresponding settings as soon as you are not using it For example if you want the ...

Страница 48: ...b browser address field to access your Web server 4 2 8 Security IP Filter IP filter function can block LAN PCs from communicating with Internet PCs by preventing specific IP addresses from accessing external network through router via specific a port number or range 1 Click Advanced Setup Security IP Filtering to display the page above and then click the Add button to enter the page below to add ...

Страница 49: ...the instructions below First click Advanced Setup Security IP Filtering to enter the IP filtering setup page and then click the Add button to enter the page below to configure needed parameters as below Then click the Apply Save button to save your setting Note Principle of using IP Filter funciton to prohibit BT download when you use BT software to download data it needs to send request for conne...

Страница 50: ...dd there to enter the page below to configure needed parameters URL Address Enter the domain name that rejects LAN PCs access Port Number It indicates the port used by Web server 80 by default Then click the Apply Save button to save your settings As a result all LAN PCs can not access www sina com cn Note After you have added the URL filter rule if you previously accessed this URL then you need t...

Страница 51: ... click the Add button there to enter the screen below to configure needed parameters User Name Enter the defined user name by you Browser s MAC Address The MAC address of the PC that is currently accessing the router s management interface it is automatically added by system Other MAC Address The MAC address whose Internet access time you want to restrict Enter it manually Start Blocking Time hh m...

Страница 52: ...to guarantee a certain level of performance to a data flow Select the Advanced Setup Quality of Service menu to enter the following screen Select the Enable QoS Checkbox and select Default DSCP Mark Value then Click Save Apply to save and activate the rule Queue Configuration Click Advanced Setup Quality of Service Queue config to display the configured QoS rule ...

Страница 53: ...r networks When there are multiple WAN connections the gateway must be specified oth erwise your computer may not be able to communicate with computers on other networks When there is only one WAN connection just keep the default settings Click Advanced Setup Routing Default Gateway to enter the screen below Available Routed WAN Interfaces Current existed WAN connection Selected Default Gateway In...

Страница 54: ...ding rate of the data packets IP address subnet mask and gateway can be set to specify a routing item Destination IP address and subnet mask can be used to specify an object network host Then the Router will send the packets to the specific object network host Click Add to enter the screen below Click Apply Save to display the current configured static route information ...

Страница 55: ...ed to map the domain name and it can be automatically obtained when you con nect to the ISP or it can also be manually configured After entering the DNS server IP address click Apply Save to save the settings Note After saving the settings you need to reboot the router to bring the new configuration into effect Please keep the default settings if there is no special requirement for incorrect DNS s...

Страница 56: ...to register from the DDNS provider Password Enter the password that you use to register from the DDNS provider Click Apply Save to save the settings 4 2 13 DSL To be applicable for different environments DSL advanced setting screen provides multiple ASDL modulation modes for users to choose Click the checkbox to enable corresponding modulation modes and then click Apply Save to complete the settin...

Страница 57: ...t been guaranteed please close it when you do not need it 2 Only the application programs that support UPnP protocol can use this function MSN Messenger may need to be supported by Operating Systems such as Windows XP ME 3 UPnP function needs the support from Operating Systems such as Windows XP ME 4 2 15 Interface Grouping If your ADSL line supports multi WAN connection there are multiple groups ...

Страница 58: ...ou are not clear about the IGMP we recom mend using the default configuration If you want to modify the configured parameters please make sure whether the router s IGMP feature is enabled 4 3 Wireless Setting Wireless function includes Basic Security MAC Filter Wireless Bridge and Station Info 4 3 1 Basic Setting Enable Wireless check uncheck to enable disable the wireless function ...

Страница 59: ...It can divide a wireless LAN into several sub networks that requires different identity authentication and allows itself to be scanned by other wireless devices through broadcast The name displayed in View available wireless networks under Windows is a SSID Hide SSID If you do not want wireless network to be searched by other users via SSID name then you had better prohibit SSID broadcast As a res...

Страница 60: ...ireless net work and select Manually create a network profile on the page below Step5 Enter the required wireless network information on the page below and then click Next Network name It is the name of the wireless network to add SSID Security type It is authentication method of the wireless network Security key It is the security key of the wireless network ...

Страница 61: ...un it Step6 Click the Close button and you have finished the operations of manually adding wireless network Step7 Now you can go to check the added wireless network on the page below by clicking Man age wireless network ...

Страница 62: ...onnected to the wireless network is 16 and system default is 8 You can modify it manually The Max number is 16 Channel wireless signal needs to be transferred through a certain channel If two transmission signals are using the same channel then mutual interference will be caused to decrease communication efficiency There are 13 channels 1 to 13 for your option Thus to avoid interferences you are r...

Страница 63: ...eeds then the WPS LED remains always on A wireless client is successfully connected PIN To use PIN you must know wireless client s PIN code and input it in its text box then save this configuration Meanwhile use the same PIN code in the client for connection Enable WPS check uncheck to enable disable the WPS function It is disabled by default Note The WPS feature only functions with wireless netwo...

Страница 64: ...d to add a MAC address click the Add button To delete an added MAC address first check the Remove box behind the MAC address in list and then click the Remove button Example 1 If you want to allow the PC with MAC address of 00 1A 3D 9C BB 23 only to access your wireless network then follow the instructions below Click the Add button in the above screen to enter the page below and enter the MAC add...

Страница 65: ...reless network then follow the instructions below 1 Enter the Wireless MAC filter page and click the Add button to enter the page below and enter the MAC address 00 c2 a5 67 d4 23 in the text box as shown in the below figure Then click the Apply Save button on the above screen to save the parameter 2 Select Deny on the page below ...

Страница 66: ...2 is configured as a wireless access point to establish a wireless bridge with Kraun ADSL2 2 Wireless N Router 150Mbps plus 1 In the meantime the AP function reserved in Kraun ADSL2 2 Wireless N Router 150Mbps plus 2 enables PC3 and PC4 to communicate with Kraun ADSL2 2 Wireless N Router 150Mbps plus 2 and access Internet through wireless network adapters 2 Wireless bridge Here in this mode wirele...

Страница 67: ...unction You need to know the MAC address of a re mote bridge and enter it manually 4 MAC addresses of remote bridges can be saved to simultane ously establish bridges with 4 APs Enabled Scan Select it to enable wireless bridge function In the meantime system will automati cally scan MAC addresses of available wireless devices See the figure below You only need to check the wireless network that yo...

Страница 68: ...lays a PASS otherwise it displays a FAIL click To enter the page below click the Diagnostics tab on the left navigation menu column If you are not clear about the test result please click Help for more details 4 5 Management Management settings include system log TR 069 client Internet time access control backup up date restore default update software and reboot as shown in the picture below ...

Страница 69: ... such as ADSL dial up procedure and data packets records and so on To view the log please follow the steps below 1 Click System Log to enter the System Log screen and click the radio button before Enable Note The function is disabled by system default 2 Click View System Log and you can check the logs on the appearing screen ...

Страница 70: ...default setting selects Automatically synchronize with Internet time servers as shown in the picture below Note NTP time server is used to update the time Select Time zone offset as the time zone where you are 4 5 3 Access Control This screen allows you to change the device s login password which is admin by default 1 Click Access Control to enter the Access Control Passwords screen ...

Страница 71: ...ssword in the old password textbox 3 Enter the password you wish to set in the new password and confirm password textboxes 4 After clicking Apply Save the login dialog will pop up 5 Enter the new password you have set to re enter the router s setup wizard screen ...

Страница 72: ...to enter the Settings Backup screen 2 Click the Backup settings button and click Save on the appearing File Download dialog to export the router s configuration file 4 5 5 Update This function enables you to import the previous backup file with ease The steps are as follows 1 Click the Update menu to display the Tools Update Settings screen ...

Страница 73: ...ot 4 5 6 Restore default If you have made some illegal operation on the device you will be unable to access the Internet This feature enables you to restore the device to factory default settings 1 Click Restore Default to display the Tools Restore Default Settings screen 2 Click the Restore Default Settings button and click Ok on the appearing dialog ...

Страница 74: ... Ok you will see the procedure bars 4 5 7 Update Software Update Software enables you to upgrade the device to improve its system stability The upgrade steps are as follows 1 Click Update Software to display the Tools Update Software screen ...

Страница 75: ...pgrade file and then click Update Software 3 After clicking the Update Software it comes to the upgrade screen The progress takes about 2 minutes 4 5 8 Reboot To reboot the router click Management Reboot to enter the page below and then click the Reboot button there ...

Страница 76: ...Select the Exit menu and click Ok on the appearing dialog to log out from the router s web based utility 4 7 Back to Wizard Click Back to Wizard menu you will come back to the router s setup wizard screen as shown in the screen below ...

Страница 77: ...g in bridging mode Kraun ADSL2 2 Wireless N Router 150Mbps plus connects with internet via dial up software the third party software With multiple built in VPI VCI there is no need for any configuration and only an installed dial up program will enable access to internet Different ISP may use different dial up software Use the included dial up software of Windows to access internet if you are a PP...

Страница 78: ...icon on the left bottom of the PC s desktop and then click Control Panel Enter Control Panel page and click Network and Sharing Center as below Enter Network and Sharing Center and select Set up a new connection or network as below ...

Страница 79: ...79 Manual www kraun it Choose Connect to the Internet and click Next on the page below e Select Dialup on the appearing page below ...

Страница 80: ...80 Manual www kraun it f Enter User name and password provided by your ISP on the page below g And then click Connect h If you get the screen below in a while then you can access Internet ...

Страница 81: ...is right LAN LINK Off Check the Ethernet cable is OK Make sure the PC s NIC indicator is ON Make sure the NIC works normally Can t access the Internet Make sure the above troubles are clear Make sure the dial up connection is established and set up Make sure the user name and password are right If the dial up is OK please make sure the IE proxy server is configured properly Please try opening mult...

Страница 82: ...our computer has already been connected to the router Now the direct link between your computer and the router has been successfully established which means you can log on to the router s web based utility If the screen shows as below it indicates the connection hasn t been established Then please check the previous settings the power of the Router and the cables between the Router and the com put...

Страница 83: ...he chance to be disconnected Q I opened ADSL service but can I use ADSL2 Modem A Absolutely ADSL2 can comply with all the ADSL services When your ISP offers you ADSL2 service you avoid buying another modem In addition the price of ADSL2 is almost the same as ADSL so ADSL2 is a reasonable choice Q What are VPI VCI A VPI Virtual Path Identifier and VCI Virtual Channel Identifier are to identify ATM ...

Страница 84: ...on tower electric welding machine electric car or electric transformer may disturb the wireless signals or devices 6 The weather may affect the outdoor wireless signals greatly The signals attenuate sharply in lightning storm or gloomy weather However the signals in sunny weather can transmit farther Q How can I improve signal transmitting quality A 1 Choose a proper place for wireless Router The ...

Страница 85: ... South Region 1 32 PPPoE LLC Colombia EMCALI 0 33 PPPoA VC MUX Columbia ETB 0 33 PPPoE LLC Costa Rica ICE 1 50 1483 Routed IP LLC Denmark Cybercity Tiscali 0 35 PPPoA VC MUX France 1 8 35 PPPoE LLC France 2 8 67 PPPoE LLC France 3 8 35 PPPoA VC MUX Germany 1 32 PPPoE LLC Hungary Sci Network 0 35 PPPoE LLC Iceland Islandssimi 0 35 PPPoA VC MUX Iceland Siminn 8 48 PPPoA VC MUX Israel 8 35 PPPoA VC M...

Страница 86: ...n Telia 8 35 1483 Routed IP LLC Switzerland 8 35 PPPoE LLC Trinidad Tobago TSTT 0 35 PPPoA VC MUX Turkey 1 8 35 PPPoE LLC Turkey 2 8 35 PPPoA VC MUX United States 4DV Net 0 32 PPPoA VC MUX United States All Tel 1 0 35 PPPoE LLC United States All Tel 2 0 35 1483 Bridged IP LLC United States August net 1 0 35 1483 Bridged IP LLC United States August net 2 8 35 1483 Bridged IP LLC United States BellS...

Страница 87: ...ations 1 0 34 1483 Bridged LLC Snap United States SureWest Communications 2 0 32 PPPoE LLC United States SureWest Communications 3 0 32 PPPoA LLC United States Toast Net 0 35 PPPoE LLC United States US West 0 32 PPPoA VC MUX United States Verizon 1 0 35 PPPoE LLC United States Verizon 2 0 35 1483 Bridged IP LLC United Kingdom 1 0 38 PPPoA VC MUX United Kingdom 2 0 38 PPPoE LLC United Kingdom AOL 0...

Страница 88: ...so con la seguente restrizione l uso all aperto è limitato a 10 mW EIRP nella banda 2454 2483 5 MHz Short Declaration of conformity We hereby declare that this product is compliant with the current regulations and meets the essential requirements of Directive 1999 5 CE Radio Telecom munication Terminal Equipments R TTE This device must be used in strict accordance with the regulation Use in France...

Отзывы: