18
Editing
Editing program parameters
Programs consist of a large number of parameters. In order
to create a program from scratch, you will need to under-
stand all of these parameters. Instead of this, we suggest that
you select a factory preset program, and try editing it in
order to understand each parameter.
Basic editing procedures
The basic procedures for editing are explained below.
You can edit a program in Program Play mode or in LCD
Edit mode.
1. Editing in Program Play mode
In Program Play mode, you can not only select and play a
program, but also use the front panel knobs and keys to
edit the sound of the program as you play, for example by
adjusting the filter cutoff or slightly slowing the attack.
The parameters that correspond to each key will change
value or be switched on/off each time you press the key,
and their status will be shown by the LED or in the LCD
screen.
The parameters that correspond to each knob can be
adjusted in “analog” fashion as indicated by the markings
around the knob.
For both knobs and keys, the ORIGINAL VALUE LED will
light when their setting matches the original written value.
2. Editing in LCD Edit mode
Use LCD Edit mode to edit parameters for which there is
no knob or key, or to edit while checking the parameter
value in the LCD screen.
a. Enter LCD Edit mode
●
Press the [EDIT] key.
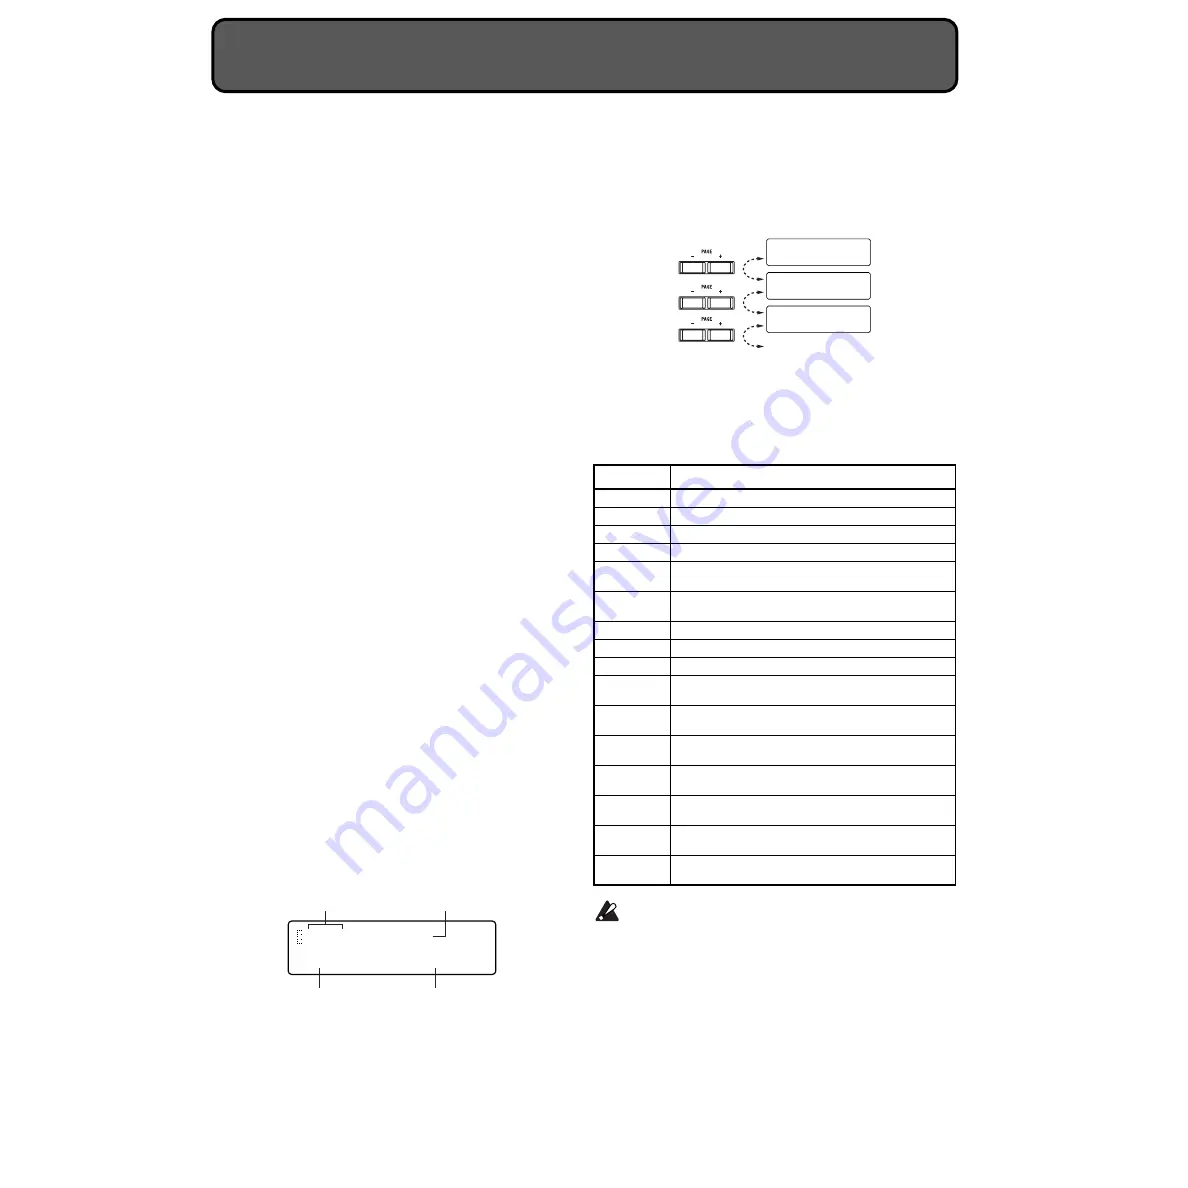
You will enter LCD Edit mode. The upper line of the
LCD screen will show the page number and the page
name. The lower line will show the parameter name and
value.
b. Select a page
LCD Edit mode consists of multiple pages. Use the PAGE
[+][–] keys and the SELECT [1]–[16] keys to select pages.
●
Press the PAGE [+] or [–] key.
Each time you press the key, the next or previous page
will appear.
●
Press a SELECT [1]–[16] key
You will move directly to the page of the desired param-
eter.
The SELECT [1]–[16] keys correspond to pages as shown
below.
There are some pages to which the SELECT [1]–[16]
keys do not correspond. To access such a page, use the
SELECT [1]–[16] keys in conjunction with the PAGE
[+][–] keys. For example if you wish to access Page
11A: EG 2 “Attack” in the LCD screen, press the
SELECT [8] key and then press the PAGE [+] key.
01A COMMON
Mode: Split
Parameter name
Page number
Parameter value
Page name
Key
Page
SELECT [1]
Page01A: COMMON “Mode”
SELECT [2]
Page03A: VOICE “Assign”
SELECT [3]
Page04A: PITCH “Transpose”
SELECT [4]
Page05A: OSC 1 “Wave”
SELECT [5]
Page06A: OSC 2 “Wave” (Single/Dual/Split)
Page06A: AUDIO IN 2 “Gate Sense” (Vocoder)
SELECT [6]
Page08A: FILTER “Type” (Single/Dual/Split)
Page08A: FILTER “Formant Shift” (Vocoder)
SELECT [7]
Page09A: AMP “Level”
SELECT [8]
Page10A: EG 1 “Attack”
SELECT [9]
Page12A: LFO 1 “Wave”
SELECT [10]
Page14A: PATCH 1 “Source: Dest” (Single/Dual/Split)
Page14A: CH LEVEL “CH: Level” (Vocoder)
SELECT [11]
Page18A: SEQ COMMON “Last STEP” (Single/Dual/Split)
Page15A: CH PAN “CH: Pan” (Vocoder)
SELECT [12]
Page22A: MOD FX “Type” (Single/Dual/Split)
Page16A: MOD FX “Type” (Vocoder)
SELECT [13]
Page23A: DELAY FX “Type” (Single/Dual/Split)
Page17A: DELAY FX “Type” (Vocoder)
SELECT [14]
Page24A: EQ “LowEQFreq” (Single/Dual/Split)
Page18A: EQ “LowEQFreq” (Vocoder)
SELECT [15]
Page25A: ARPEGGIO “Type” (Single/Dual/Split)
Page19A: ARPEGGIO “Type” (Vocoder)
SELECT [16]
Page26A: UTILITY “InitProgram” (Single/Dual/Split)
Page20A: UTILITY “InitProgram” (Vocoder)
01A COMMON
Mode: Single
02A NAME
MS2000/R
03A VOICE
Assign: Poly


