background image


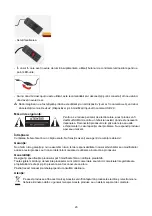
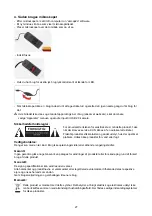
- Seta

ţ

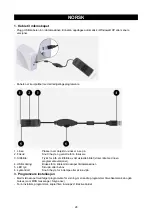
i focalizarea.   


-  În cazul în care ave

ţ

i nevoie de lumin

ă

 suplimentar

ă

, utiliza

ţ

i butonul de controlare luminozitate pentru a 

porni LED-urile.   


-  Atunci când microscopul nu este utilizat, este recomandabil s

ă

-l deconecta

ţ

ş

i s

ă

-l conecta

ţ

i din nou atunci 

când ave

ţ

i nevoie de el.   


Dac

ă

 imaginea nu a fost afi

ş

at

ă


ş

i dac

ă

 este utilizat 

ş

i un alt dispozitiv (cum ar fi o camer

ă

 web),va trebui 

s

ă

 selecta

ţ

i meniul „Devices” (Dispozitive) 

ş

i s

ă

 modifica

ţ

i input-ul în camera USB 2.0. 

M

ă

suri de siguran

ţă


Pentru a se reduce pericolul de electrocutare, acest produs va fi 
desf

ă

cut NUMAI de c

ă

tre un tehnician avizat, când este necesar

ă


depanarea. Deconecta

ţ

i produsul de la priza de re

ţ

ea sau alte 

echipamente în cazul apari

ţ

iei unei probleme. Nu expune

ţ

i produsul 

apei sau umezelii. 

Între

ţ

inere: 

Cur

ăţ

area trebuie f

ă

cut

ă

 cu o cârp

ă

 uscat

ă

. Nu folosi

ţ

i solven

ţ

i sau agen

ţ

i de cur

ăţ

are abrazivi. 

Garan

ţ

ie: 

Nu oferim nicio garan

ţ

ie 

ş

i nu ne asum

ă

m niciun fel de responsabilitate în cazul schimb

ă

rilor sau modific

ă

rilor 

aduse acestui produs sau în cazul deterior

ă

rii cauzate de utilizarea incorect

ă

 a produsului. 

Generalit

ăţ

i: 

Designul 

ş

i specifica

ţ

iile produsului pot fi modificate f

ă

r

ă

 o notificare prealabil

ă

Toate siglele m

ă

rcilor 

ş

i denumirile produselor sunt m

ă

rci comerciale sau m

ă

rci comerciale înregistrate ale 

proprietarilor de drept 

ş

i prin prezenta sunt recunoscute ca atare. 

P

ă

stra

ţ

i acest manual 

ş

i ambalajul pentru consult

ă

ri ulterioare. 

Aten

ţ

ie: 


Pe acest produs se afl

ă

 acest marcaj. Acesta semnific

ă

 faptul c

ă

 produsele electrice 

ş

i electronice nu 

trebuie eliminate odat

ă

 cu gunoiul menajer. Aceste produse au un sistem separat de colectare. 


23 

Содержание CMP-USBMICRO30

Страница 1: ...roscoop MANUALE p 10 Microscopio USB MANUAL DE USO p 12 Microscopio USB HASZN LATI TMUTAT o 14 USB mikroszk p K YTT OHJE s 16 USB mikroskooppi BRUKSANVISNING s 18 USB Mikroskop N VOD K POU IT s 20 USB...

Страница 2: ...Snapshot Press to get a snapshot of the current image does not work with some software versions 4 USB connector Used to connect the microscope to the PC 5 LED lights Turn on when needed 6 Light contro...

Страница 3: ...ician when service is required Disconnect the product from mains and other equipment if a problem should occur Do not expose the product to water or moisture Maintenance Clean only with a dry cloth Do...

Страница 4: ...r den Anschluss des Mikroskops an den PC 5 LEDs Bei Bedarf einschalten 6 Lichtregler Zum Dimmen oder Ein Ausschalten nach links oder rechts drehen 3 Installation der Software Das Mikroskop verf gt be...

Страница 5: ...htigkeit in Ber hrung kommt Wartung Nur mit einem trockenen Tuch s ubern Keine Reinigungs oder Scheuermittel verwenden Garantie Es kann keine Garantie oder Haftung f r irgendwelche nderungen oder Modi...

Страница 6: ...obtenir un clich de l image visionn e ne fonctionne pas avec certaines versions du logiciel 4 Connecteur USB Utilisez pour connecter le microscope au PC 5 Lumi re LED Allumez quand n cessaire 6 Contr...

Страница 7: ...pareil et les autres quipements du secteur s il y a un probl me Ne pas exposer l appareil l eau ni l humidit Entretien Ne nettoyez l appareil qu avec un chiffon sec N utilisez pas de solvants ou de pr...

Страница 8: ...de microscoop op de PC aan te sluiten 5 LED verlichting Aanzetten indien nodig 6 Verlichtingsregelaar Verplaats naar links of rechts om te dimmen of het licht aan uit te schakelen 3 Installatie van de...

Страница 9: ...blemen voordoen Stel het product niet bloot aan water of vocht Onderhoud Uitsluitend reinigen met een droge doek Gebruik geen reinigingsmiddelen of schuurmiddelen Garantie Voor wijzigingen en verander...

Страница 10: ...B Utilizzato per connettere il microscopio al PC 5 Luci LED Accenderle quando necessarie 6 Controllo della luce Muovere a sinistra o a destra per attenuare o accendere spegnere la luce 3 Installazione...

Страница 11: ...esporre il prodotto ad acqua o umidit Manutenzione Pulire solo con un panno asciutto Non utilizzare solventi detergenti o abrasivi Garanzia Non sar accettata alcuna garanzia o responsabilit in relazi...

Страница 12: ...nea de la imagen actual no funciona con algunas versiones de software 4 Conector USB Se utiliza para conectar el microscopio al PC 5 Luces LED Se encienden cuando es necesario 6 Control de iluminaci...

Страница 13: ...paraci n Desconecte el producto de la toma de corriente y de los otros equipos si ocurriera alg n problema No exponga el producto al agua ni a la humedad Mantenimiento L mpielo s lo con un pa o seco N...

Страница 14: ...tfelv tel Ezzel a gombbal k sz thet pillanatfelv telt az aktu lis k pr l egyes szoftververzi kn l nem m k dik 4 USB csatlakoz Ezzel kell sz m t g phez csatlakoztatni a mikroszk pot 5 LED ek Sz ks g sz...

Страница 15: ...fel Hiba eset n h zza ki a term k csatlakoz j t a konnektorb l s k sse le m s berendez sekr l Vigy zzon hogy ne rje a term ket v z vagy nedvess g Karbantart s Csak sz raz ronggyal tiszt tsa Tiszt t s...

Страница 16: ...si 3 Otos Paina ottaaksesi kuvan nykyisest n kym st ei toimi kaikilla ohjelmistoversioilla 4 USB liitin T ll liitet n mikroskooppi tietokoneeseen 5 LED valot Kytke p lle tarvittaessa 6 Valos din Liiku...

Страница 17: ...en huoltoa varten Jos ongelmia ilmenee irrota laite verkkovirrasta ja muista laitteista l altista laitetta vedelle l k kosteudelle Huolto Puhdista ainoastaan kuivalla kankaalla l k yt liuottimia tai h...

Страница 18: ...blicksbild av den nuvarande bildsekvensen fungerar inte med vissa versioner av mjukvaruprogram 4 USB kontaktdon Anv nds f r att ansluta mikrosk pet till PC 5 LED ljus Sl p n r s beh vs 6 Ljuskontroll...

Страница 19: ...s Dra ut str mkabeln fr n eluttaget och koppla ur all annan utrustning om n got problem skulle uppst Uts tt inte produkten f r vatten eller fukt Underh ll Reng r endast med torr trasa Anv nd inga reng...

Страница 20: ...ek Stiskn te pro po zen sn mku aktu ln ho obrazu s n kter mi verzemi softwaru nefunguje 4 Konektor USB Pou v se pro p ipojen mikroskopu k PC 5 Sv tlo LED V p pad pot eby zapn te 6 Ovl d n sv tla Posun...

Страница 21: ...n V p pad e dojde k z vad odpojte v robek ze s t a od jin ch za zen V robek nevystavujte vod nebo vlhkosti dr ba K i t n pou vejte pouze such had k Nepou vejte istic rozpou t dla ani abrazivn prost ed...

Страница 22: ...USB Este utilizat pentru a conecta microscopul la PC 5 LED uri Porni i le atunci c nd este nevoie 6 Controlul luminozit ii Roti i spre st nga sau dreapta pentru a diminua sau aprinde stinge lumina 3...

Страница 23: ...i probleme Nu expune i produsul apei sau umezelii ntre inere Cur area trebuie f cut cu o c rp uscat Nu folosi i solven i sau agen i de cur are abrazivi Garan ie Nu oferim nicio garan ie i nu ne asum m...

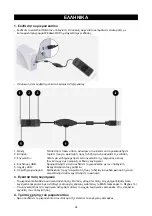
Страница 24: ...A USB 2 0 1 USB Windows XP 1 2 3 4 USB 5 LED 6 3 web web MSN messenger Skype amcap2a 4 amcap2a 24...

Страница 25: ...LED web USB 2 0 25...

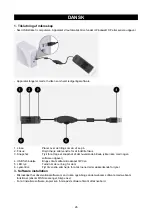
Страница 26: ...shot Tryk for at tage et snapshot af det nuv rende billede virker ikke med nogen software udgaver 4 USB forbindelse Bruges til at s tte mikroskopet til PCen 5 LED lys T nd n r der er brug for dem 6 Ly...

Страница 27: ...es af en autoriseret tekniker Frakobl produktet stikkontakten og andet udstyr hvis der opst r et problem Uds t ikke produktet for vand eller fugt Vedligeholdelse Reng r kun med en t r klud Brug ikke o...

Страница 28: ...fokusere 3 Stillbilde Trykk for f et stillbilde av det aktuelle bildet virker ikke med noen programvareversjoner 4 USB kobling Brukes for koble mikroskopet til datamaskinen 5 LED lys Skru p etter beho...

Страница 29: ...er n dvendig Koble produktet fra str mmen og annet utstyr dersom et problem oppst r Ikke utsett produktet for vann eller fuktighet Vedlikehold Rens bare med en t rr klut Ikke bruk rensemidler eller sk...

Страница 30: ...Omschrijving USB microscoop Descrizione Microscopio USB Descripci n Microscopio USB Megnevez se USB mikroszk p Kuvaus USB mikroskooppi Beskrivning USB Mikroskop Popis USB mikroskop Descriere Microscop...

Отзывы: