background image

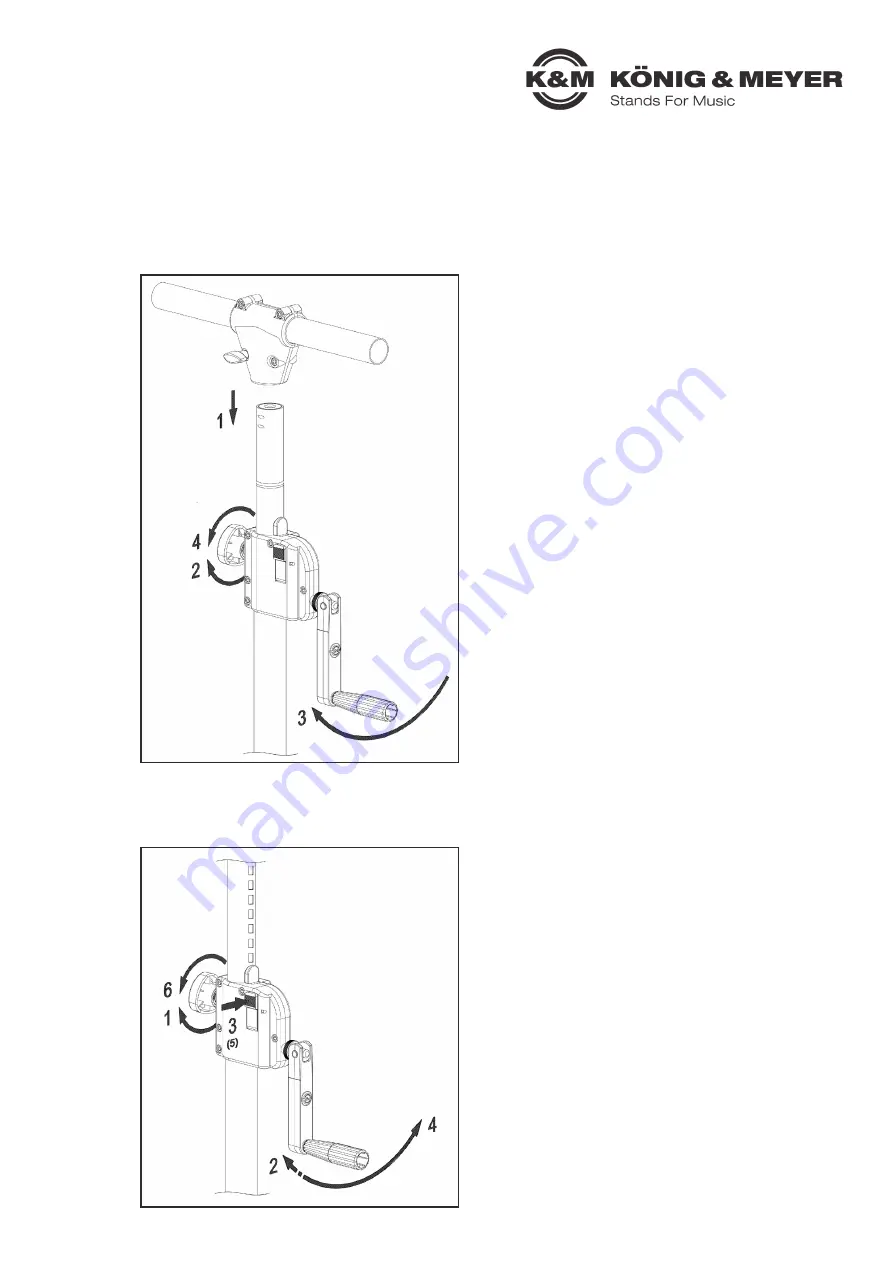
Lifting the load


 The stand is securely set up. 

 The stand tube is in the lower end position. 

 The clamping screws are tightened. 

 If the load is within the range of movement of the crank, the extension tube must be free by  

 approx. 100 mm before placing the load.

Lowering the load


 The stand is securely set up.

1

 Place the load. 

2

 Loosen the clamping screw of the crankcase. 

3

 Turn the hand crank clockwise until the desired  

3

 height is reached. 

4

 Tighten the clamping screw.

1

 Loosen the clamping screw of the crankcase. 

2

 Secure the hand crank with one hand and the  

2

 crankcase with the other. Lift the load slightly to  

2

 relieve the release button. To do this, apply pres- 

2

 sure to the crank in a clockwise direction. 

3

 Press the release button with your thumb. 

4

 Turn the hand crank anticlockwise and lower  

4

 the load. 

5

 Release the release button. 

6

 Tighten the clamping screw. 

22

Содержание 24615

Страница 1: ...ne Gestaltungsleits tze u DIN EN 82079 1 Erstellen von Gebrauchsanleitungen Gliederung Inhalt und Darstellung Zus tzlich sind Teile der folgenden Norm erf llt u DIN 56950 3 Veranstaltungstechnik Masch...

Страница 2: ...her gelegenen Orten u Au erkraftsetzung der Sicherheitsverriegelung u Aufgestelltes Stativ mitsamt Traglast verschieben u Traglast auf umgelegtes Stativ aufbringen und Stativ mitsamt Traglast aufricht...

Страница 3: ...ienungsanleitung und auf den Warnschildern am Stativ nicht beachtet werden Die Si cherheitshinweise in diesem Kapitel helfen Ihnen dabei Personen und Sachsch den zu vermei den Der Betreiber muss gew h...

Страница 4: ...n die Bedienungsanleitung Die Bedienungsanleitung u muss in der N he des Stativs aufbewahrt werden Anforderungen an das Personal Folgende Voraussetzungen durch das Bedienpersonal m ssen erf llt werden...

Страница 5: ...Artikel Nr 24615 000 55 Maximale H he 3000 mm Minimale H he 1755 mm Fu kreisdurchmesser wirksam 1550 mm Fu kreisdurchmesser Au enma 1590 mm Packma L nge Breite H he 1733 202 150 mm Gewicht 8 0 kg H he...

Страница 6: ...Aufbau 1 Auszugrohr 2 Grundrohr 3 St tzstreben 4 Stativf e 5 Klemmschraube f r Fu schelle 6 1 2 3 4 5...

Страница 7: ...6 Fingerschutz 7 Kurbel 8 Entriegelungstaste 9 Klemmschraube Kurbelgeh use 10 Kurbelgeh use 7 6 7 8 9 10...

Страница 8: ...tigkeit 40 bis 60 Lebensdauer Das Stativ ist auf eine Lebensdauer von 10 Jahren ausgelegt Die Lebensdauer ist abh ngig von der Art und H ufigkeit der Verwendung des Stativs Das Stativ darf nicht mehr...

Страница 9: ...rch Stolpern m glich u Sicherheitsbewu t arbeiten u Bewegungsbereich f r Unbefugte absperren VORSICHT Vor jeder Verwendung muss eine Sicht und Funktionspr fung des Stativs durchgef hrt werden u Stativ...

Страница 10: ...Kurbelgeh uses l sen 3 Die Kurbel im Uhrzeigersinn drehen bis die ge 3 w nschte H he erreicht ist 4 Die Klemmschraube festziehen 1 Die Klemmschraube des Kurbelgeh uses l sen 2 Mit einer Hand die Kurbe...

Страница 11: ...gesetzen Fehler Beseitigung Stativ wackelt Fu gestell in maximale Auslage bringen und Klemmschrauben anziehen Stativrohr wackelt oder f hrt unter Last Pr fen ob die Entriegelungstaste gedr ckt ist Kle...

Страница 12: ...xen Lautsprecher sowie kleinen Lichteffekten allen einschl gigen Bestimmungen der angewandten Rechtsvorschriften nachfolgend einschlie lich deren zum Zeitpunkt der Erkl rung geltenden nderungen entspr...

Страница 13: ...ry General principles for design u DIN EN 82079 1 Preparation of instructions for use Structuring content and presentation In addition parts of the following standard are fulfilled u DIN 56950 3 Enter...

Страница 14: ...ty lock u Shifting a loaded set up stand u Placing of any load on a not upright stand Users Users are familiar with the handling of stands within the scope of use and have been trained and instructed...

Страница 15: ...nstructions in the operating manual and the danger pictograms on the stand are not observed The safety instructions in this chapter will help you to avoid personal injury and damage to property The op...

Страница 16: ...have access to the operating instructions therefore they should be u kept near the stand Staff requirements The following requirements must be met by the operating staff u Persons whose ability to rea...

Страница 17: ...er Article no 24615 000 55 Maximum height 3000 mm Minimum height 1755 mm Root diameter effective 1550 mm Root diameter external dimension 1590 mm Packing size length width height 1733 202 150 mm Weigh...

Страница 18: ...Assembly 1 Extension tube 2 Base tube 3 Cross braces 4 Tube legs 5 Clamping screw for base clamp 18 1 2 3 4 5...

Страница 19: ...6 Finger guard 7 Hand crank 8 Release button 9 Clamping screw for crankcase 10 Crankcase 19 6 7 8 9 10...

Страница 20: ...nimum maximum temperatures 30 C bis 80 C Humidity 40 bis 60 Service life The stand is designed for a service life of 10 years though depending on type and frequency of use Do not use the stand if sign...

Страница 21: ...ssible injuries due to tripping u Work in a safety conscious manner u Close off movement area for unauthorized persons CAUTION It is mandatory to carry out a visual and functional check of the stand b...

Страница 22: ...clamping screw of the crankcase 3 Turn the hand crank clockwise until the desired 3 height is reached 4 Tighten the clamping screw 1 Loosen the clamping screw of the crankcase 2 Secure the hand crank...

Страница 23: ...ult Remedy Stand wobbles Extend legs to a maximum and tighten the clamping screws Stand tube wobbles or moves under load Check whether the release button is pressed Tighten the clamping screws Height...

Страница 24: ...ble in height by means of crank mechanism It is designed to hold speakers and small lighting effects complies with all relevant provisions of the applied legal regulations hereinafter including their...

Страница 25: ...die folgende Vorlage verwenden Testing obligation The stand is a mechanical device and must therefore be inspected When delivered the stand is fully tested and ready for immediate use For further use...

Страница 26: ...7 years Datum Date Pr fer Auditor Unterschrift Signature Stempel Stamp Pr fung durch Sachkundigen Expert inspection Pr fung durch Sachkundigen Expert inspection Pr fung durch Sachkundigen Expert insp...

Страница 27: ...ren After 14 years Datum Date Pr fer Auditor Unterschrift Signature Stempel Stamp Nach 15 Jahren After 15 years Datum Date Pr fer Auditor Unterschrift Signature Stempel Stamp Nach 16 Jahren After 16 y...

Отзывы: