background image

Making Copies

5

Konica 7115/7118

5-3

5.2

Selecting the Paper

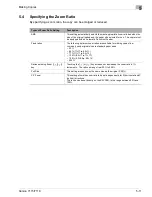
Before making a copy, you must select the tray containing the paper you wish to use.
The paper source is either selected automatically when the size of the original is detected, or 
you specify the specific paper source manually.

G

APS:
When “APS” is selected, the tray containing the most suitable size of paper is selected 
based on the size of the original and the set zoom ratio.

G

Manual paper selection:
The tray containing the paper you want to use can be manually selected.

Note
The copier must be equipped with an Automatic Document Feeder to use “APS.”

Using “APS”

1

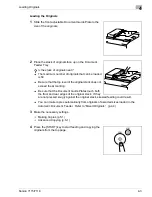
Load the originals in the Automatic Document Feeder.

Original Loading (p.4-1)

2

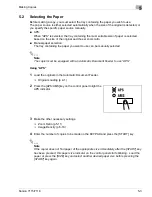
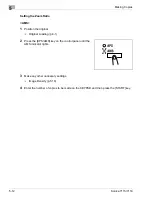
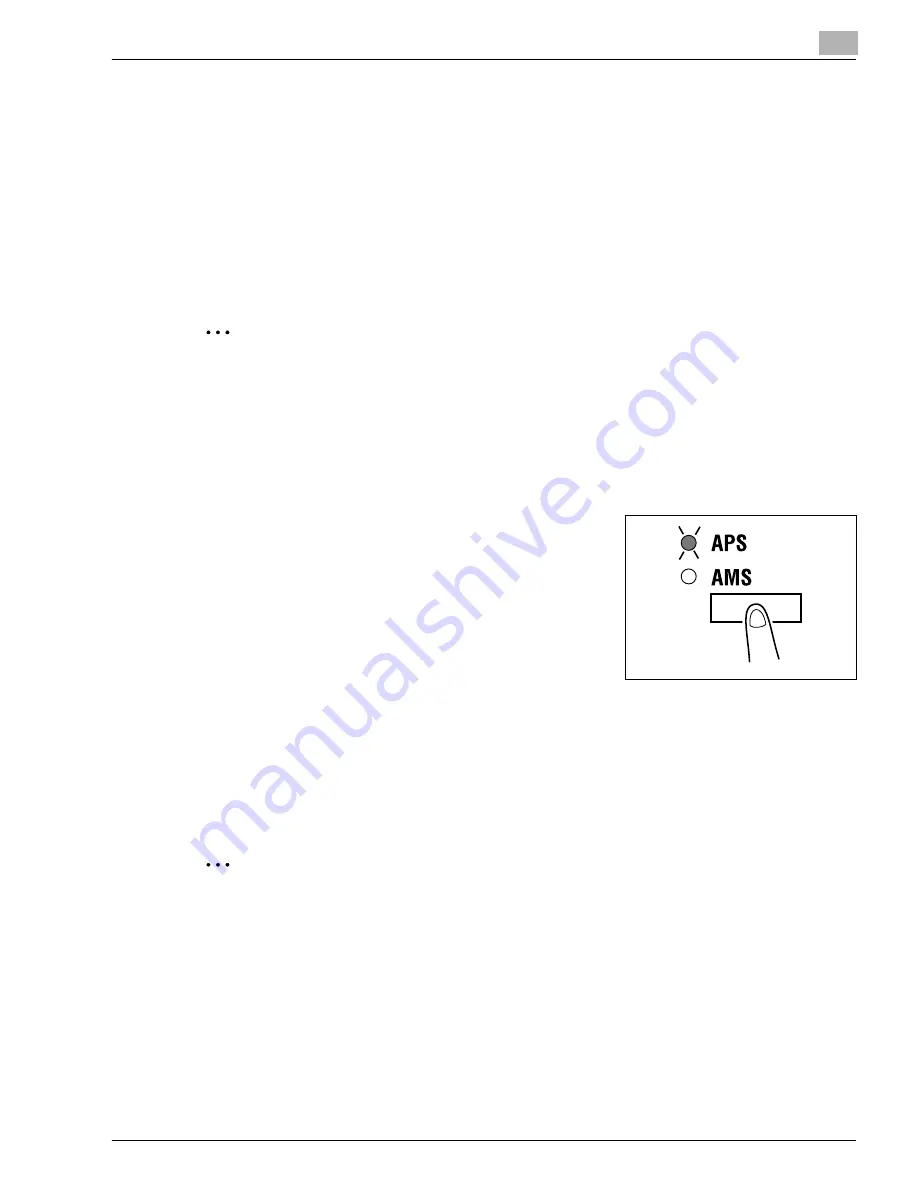
Press the [APS/AMS] key on the control panel to light the 
APS indicator.

3

Make the other necessary settings.

Zoom Ratio (p.5-11)

Image Density (p.5-16)

4

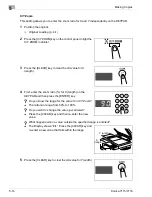
Enter the number of copies to be made on the KEYPAD and press the [START] key.

Note
If the copier does not find paper of the appropriate size immediately after the [START] key 
has been pressed, this paper size indicator on the control panel starts blinking.  Load the 
paper or press the [SIZE] key and select another desired paper size before pressing the 
[START] key again.

Konica7115_7118.book  Page 3  Friday, October 19, 2001  12:02 PM

Содержание Printer Copier

Страница 1: ......

Страница 2: ......

Страница 3: ...c has made every effort to ensure that the information in this manual is complete and accurate However constant efforts are also being made to improve and update the product Therefore Konica Business...

Страница 4: ...it to automatically switch to a low power mode after a period of inactivity An ENERGY STAR product uses energy more efficiently saves you money on utility bills and helps protect the environment Trade...

Страница 5: ...Release 1 10 1 2 About the User s Manual 1 11 Explanation of Manual Conventions 1 11 key 1 11 1 3 Explanation of Basic Concepts and Symbols 1 11 Paper Feeding 1 12 Width and Length 1 13 Paper Orienta...

Страница 6: ...l Computer 3 21 Sending and Receiving Faxes Using the Copier 3 21 3 7 Copy Paper 3 22 Paper Specifications 3 22 4 Loading Originals 4 1 Two Ways to Load the Original 4 1 Specific Types of Originals 4...

Страница 7: ...y Auto 7 6 Exposure Level Priority Manual 7 7 Output Priority 7 7 Crisscross Mode 7 7 4 in 1 Copy Order 7 7 Book Binding Position 7 7 IMAGE SHIFT Width Adjust 7 7 Erase Setting Left Upper and Frame 7...

Страница 8: ...ing Tips 9 1 When This Type of Copy is Produced 9 1 9 2 When the Copier is not Operating Correctly 9 3 10 Appendix 10 1 Specifications 10 1 Copier Konica 7115 7118 10 1 Automatic Document Feeder DF 21...

Страница 9: ...erating procedures precautions and basic troubleshooting for the Konica 7115 7118 copier Before using this copier be sure to read the User s Manual thoroughly in order to ensure that you use the copie...

Страница 10: ...lease read the next section before using this device It contains important information related to user safety and preventing equipment problems Make sure you observe all of the precautions listed in t...

Страница 11: ...from the power outlet and then call your authorized service representative In principle do not use an extension cord Use of an extension cord could cause fire or electrical shock Contact your authoriz...

Страница 12: ...re susceptible to mag netism They could cause these products to malfunction The inside of this product has areas subject to high temperature which may cause burns When checking the inside of the unit...

Страница 13: ...e down as poor image quality could result Do not throw or drop a toner unit or PC drum unit as poor image quality could result Do not use this product in an area where ammonia or other gases or chemic...

Страница 14: ...harmful interference in which case the user will be required to correct the interference at his own expense WARNING The design and production of this unit conform to FCC regulations and any changes or...

Страница 15: ...phase of user operation This machine is certified as a Class 1 laser product This means the machine does not produce hazardous laser radiation Internal Laser Radiation Maximum Average Radiation Power...

Страница 16: ...ological Health CDRH of the U S Food and Drug Administration of the U S Department of Health and Human Services DHHS This means that the device does not produce hazardous laser radiation The label sho...

Страница 17: ...Introduction 1 Konica 7115 7118 1 9 WARNING LABEL...

Страница 18: ...that the room is well ventilated REMARQUE Placer l appareil dans une pi ce largement ventil e Une quantit d ozone n gligable est d gag e pendant le fonctionnement de l appareil quand celui ci est uti...

Страница 19: ...copier Note May also appear as Important or Tip Text highlighted in this manner contains useful information and tips to ensure safe use of the copier and serve as supplementary information It is reco...

Страница 20: ...of words and symbols in this manual are explained below Paper Feeding During printing paper is supplied from the right side of the copier and fed into the Exit Tray on top with the printed surface of...

Страница 21: ...the illustration and the second to the length shown as B A Width B Length Paper Orientation Lengthwise If the width A of the paper is shorter than the length B the paper has a vertical or portrait or...

Страница 22: ...1 Introduction 1 14 Konica 7115 7118...

Страница 23: ...ct sunlight A location out of the direct airflow of an air conditioner or heater and not exposed to ex tremely high or low temperatures A well ventilated location A location that is not exposed to hig...

Страница 24: ...sure to allow a clearance of 3 9 in 100 mm or more at the back of the copier for the ventilation duct and 5 9 in 150 mm or more at the right of the copier for the removal of the misfed papers 39 2 995...

Страница 25: ...aper misfeed could result Never bring any magnetized object near the copier Never use flammable sprays or liquids near the copier Always make sure that the power plug is completely plugged into the el...

Страница 26: ...g the copier supplies toner paper etc Store the supplies in a location that meets the following requirements Free from direct sunlight Away from any heating apparatus Not subjected to high humidity No...

Страница 27: ...certificates Legal Documents G Food stamps G Postage stamps canceled or uncanceled G Checks or drafts drawn by government agencies G Internal revenue stamps canceled or uncanceled G Passports G Immigr...

Страница 28: ...2 Precautions 2 6 Konica 7115 7118...

Страница 29: ...aking Copies 3 1 Available Features The main copy settings available with this copier are listed below For details on their operation refer to the pages indicated Copies G 1 sided copies p 6 1 G 2 in...

Страница 30: ...Full Size Enlarge p 5 11 Output G Sort p 6 6 G Group p 6 8 Note The Sort and Group functions are available when the copier is equipped with an Automatic Document Feeder 16MB Memory for Copier or 32MB...

Страница 31: ...ations G Margin Erase p 6 10 G Reverse Image p 6 13 G X Y Zoom p 5 14 G Image Shift p 6 14 Mixed Orig Detection G Mixed Originals p 4 4 Note The Mixed Orig Detection function is available when the cop...

Страница 32: ...c Document Feeder DF 217 option G Automatically feeds originals one page after another for scanning and copying Paper Feed Cabinet PF 121 option G Capable of holding up to 250 sheets of paper Shifting...

Страница 33: ...oller IP 413 option G A built in type printer controller that allows the copier to be used as a printer with the copier connected to a personal computer Network Interface Card KN 305 option G Allows t...

Страница 34: ...3 Before Making Copies 3 6 Konica 7115 7118 3 3 Parts Names and Their Functions Copier The above illustrations represent a copier mounted with the optional Original Cover Kit 6 1 2 3 5 4 8 7 9 10 11...

Страница 35: ...of paper The paper is fed one sheet at a time Special paper can be used p 5 6 5 Lock Relase Cover Use to unlock the Side Cover 6 Side Cover Open to clear a misfed sheet of paper 7 Power Switch Use to...

Страница 36: ...Description 1 Imaging Unit Forms a copy image The Imaging Unit is to be replaced only by your authorized Konica Service Representative 2 Toner Bottle Holder Open to replace the Toner Bottle 3 Pressure...

Страница 37: ...o the size of the originals p 4 3 3 Document Feeder Cover Doc Feed Cover Open when clearing an original that has been misfed p 8 18 4 Document Feeder Tray Load the originals to be copied face up on th...

Страница 38: ...ription 7 2nd Tray Up to 250 sheets of plain paper can be loaded p 8 6 Konica 7118 accepts a Paper Feed Cabinet of four trays Konica 7115 accepts a Paper Feed Cabinet of one tray 8 3rd Tray 9 4thTray...

Страница 39: ...ray Receives copy sets sorted No Part Name Description 13 Copy Tray Indicator Lights up when paper is fed into the Upper Copy Tray 14 Upper Copy Tray Receives printed pages produced via the personal c...

Страница 40: ...Press to display the Total Counter or Size Counter value 4 REVERSE IMAGE Press to copy an original with the original tonal arrangements reversed 5 ORIGINAL Press to select the Mixed Original or Book c...

Страница 41: ...pier into the Power Saver mode 18 INTERRUPT Press to interrupt a copy job 19 AUTO RESET Press to reset all copy functions and settings to their defaults Holding down the key for 3 seconds or more will...

Страница 42: ...tion Indicator Lights up when a malfunction occurs in the copier Maintenance Indicator Blinks or lights up when the time approaches that copier needs maintenance service Call your authorized Konica Se...

Страница 43: ...ly enters the Energy Saver mode 15 min after it has been touched last It enters the Auto Shut OFF mode automatically 30 min after it has been touched last The time for the copier to enter the Energy S...

Страница 44: ...ll indicate the default settings which serve as the reference for all control panel settings to be made later Default settings G Number of copies 1 G Exposure Auto G Zoom ratio 100 full size G Paper A...

Страница 45: ...previous copy job press the AUTO RESET key to return all functions and settings to their defaults before making any setting for your current job Auto Panel Reset Without pressing the AUTO RESET key t...

Страница 46: ...the copier enters the Power Saver mode can be set between 1 min and 240 min For more details refer to User s Choice p 7 2 p 7 8 Auto Shut OFF If a set length of time elapses after the copier has been...

Страница 47: ...to the stopped job Note Depending on the specific settings made the current job may reject the Interrupt mode Also some functions are not available for the Interrupt mode For more details refer to th...

Страница 48: ...mber entry screen To use this function set Copy Track of Administrator Mode under the Utility mode p 7 20 To enter an account number 1 Enter the 3 digit account number on the KEYPAD Do you want to cor...

Страница 49: ...can be used as a printer configured to a computer network For details of operation refer to the Printer Controller User s Manual Sending and Receiving Faxes Using the Copier When the optional Fax Uni...

Страница 50: ...250 sheets Special paper 20 sheets 2nd Tray Specifications Paper Type Plain paper recycled paper 16 lbs to 24 lbs Paper Size 11 17L to Invoice L Capacity 250 sheets Manual Bypass Tray Specifications P...

Страница 51: ...e Custom Size Input Bypass Tray procedure under Making Copies p 5 9 G When loading Cards OHP transparencies or postcards in the 1st Tray change Paper Type 1st Tray in the User s Choice mode p 7 9 G Wh...

Страница 52: ...3 Before Making Copies 3 24 Konica 7115 7118...

Страница 53: ...fic Types of Originals Original Loading Original Type Original Size Automatic Document Feeder Sheet originals Weight of originals 13 1 4 lbs to 29 1 4 lbs Weight of originals of mixed sizes 16 lbs to...

Страница 54: ...g types of originals are not suitable for use in the Automatic Document Feeder as a misfeed or damaged original could result Place these types of originals on the Platen Glass G Typing paper paraffin...

Страница 55: ...f the original stack does not exceed the marking Be sure that the Document Guide Plates touch both the front and rear edges of the original stack If they are not pressed snugly against the original st...

Страница 56: ...eature can be used only if the width of the originals is the same E g Ledger and Letter Making Copies from Originals of Mixed Sizes 1 Slide the front adjustable Document Guide Plate to the front of th...

Страница 57: ...top level of the original stack does not exceed the marking Be sure that the Document Guide Plates touch both the front and rear edges of the original stack If they are not pressed snugly against the...

Страница 58: ...andard size G The copier is unable to detect the original size automatically meaning that neither APS nor AMS can be used Therefore use the SIZE key to select the paper size or the RE key to select th...

Страница 59: ...ocument Feeder 1 Raise the Automatic Document Feeder or Original Cover 2 Place the original face down on the Platen Glass 3 Position the original in the left rear corner aligned with the marker on the...

Страница 60: ...matic Document Feeder or Original Cover 2 Place the original face down on the Platen Glass 3 Position the original in the left rear corner aligned with the marker on the scale 4 Place a blank sheet of...

Страница 61: ...n the Platen Glass Do not place any object that weighs more than 6 1 2 lbs on the Platen Glass In addition do not press down hard on the book as damage to the Platen Glass could result 3 Gently lower...

Страница 62: ...4 Loading Originals 4 10 Konica 7115 7118...

Страница 63: ...lace an original and make a copy of it Making a Basic Copy 1 Position the original Original Loading p 4 1 2 Make the necessary control panel settings Selecting the Paper p 5 3 Zoom Ratio p 5 11 Image...

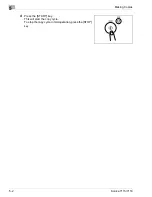
Страница 64: ...5 Making Copies 5 2 Konica 7115 7118 4 Press the START key This will start the copy cycle To stop the copy cycle in mid operation press the STOP key...

Страница 65: ...e can be manually selected Note The copier must be equipped with an Automatic Document Feeder to use APS Using APS 1 Load the originals in the Automatic Document Feeder Original Loading p 4 1 2 Press...

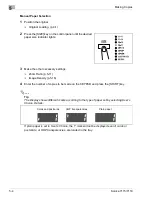
Страница 66: ...tings Zoom Ratio p 5 11 Image Density p 5 16 4 Enter the number of copies to be made on the KEYPAD and press the START key Tip The Display shows different marks according to the type of paper set by s...

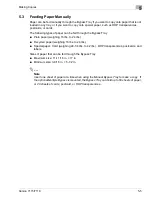
Страница 67: ...Plain paper weighing 16 lbs to 24 lbs G Recycled paper weighing 16 lbs to 24 lbs G Special paper Card weighing 24 1 4 lbs to 42 lbs OHP transparencies postcards and labels Sizes of paper that can be f...

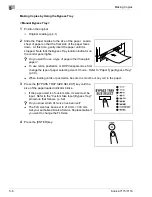
Страница 68: ...lain paper To use cards postcards or OHP transparencies first change the type of paper selecting User s Choice Refer to Paper Type Bypass Tray p 7 9 When loading cards or postcards be sure to smooth o...

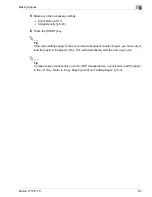
Страница 69: ...y Tip If the same settings apply to the second and subsequent sheets of paper you have only to load the paper in the Bypass Tray This will automatically start the new copy cycle Tip To make copies con...

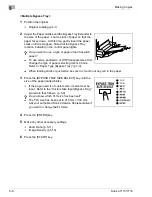
Страница 70: ...es first change the type of paper selecting User s Choice Refer to Paper Type Bypass Tray p 7 9 When loading cards or postcards be sure to smooth out any curl in the paper 3 Press the BYPASS TRAY SIZE...

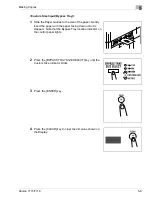
Страница 71: ...er Gently insert the paper with the paper facing down until it is stopped Note that the Bypass Tray location indicator on the control panel lights 2 Press the BYPASS TRAY SIZE SELECT key until the Cus...

Страница 72: ...stom size Note the conventions for the paper dimensions width and length 6 Press the ENTER key 7 Press the CLEAR key to clear the old value shown on the Display 8 Enter the length mm of the paper on t...

Страница 73: ...The following optimum zoom ratios are available for making copies from commonly used original sizes to standard paper sizes 50 64 11 17 8 5 11 77 11 17 8 5 14 129 8 5 11 11 17 155 5 5 8 5 8 5 14 200...

Страница 74: ...1 Position the original Original Loading p 4 1 2 Press the APS AMS key on the control panel until the AMS indicator lights 3 Make any other necessary settings Image Density p 5 16 4 Enter the number...

Страница 75: ...n the control panel until the desired zoom ratio indicator lights To set a custom zoom ratio press or key to reach the desired ratio Pressing this key changes the ratio in 1 increments 3 Make any othe...

Страница 76: ...X length 4 First enter the zoom ratio for X length on the KEYPAD and then press the ENTER key Do you know the range for the value X in X Y Zoom The ratio can range from 50 to 100 Do you want to change...

Страница 77: ...KEYPAD and then press the ENTER key Do you know the range for the value Y in X Y Zoom The ratio can range from 50 to 100 7 Make any other necessary settings Zoom Ratio p 5 11 Image Density p 5 16 8 E...

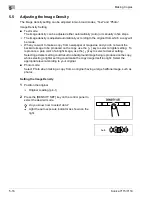
Страница 78: ...the key to select a lighter setting To reproduce a pale color of a bright image use the key to select a darker setting Selecting a darker setting could result in a background image being reproduced o...

Страница 79: ...to Light the MANUAL PHOTO indicator In the Photo mode Auto cannot be selected Do you know what to do after selecting Manual Refer to the diagram on the right for the relationship between the control p...

Страница 80: ...For more details refer to the Function Combination Table p 10 6 To Interrupt a Copy Job 1 Press the INTERRUPT key The Interrupt indicator lights and the current copy cycle pauses Do you know what set...

Страница 81: ...then press the START key This will start the interrupt copy cycle 5 After the interrupt copy has been made press the INTERRUPT key The Interrupt indicator will go out and the settings will be recover...

Страница 82: ...5 Making Copies 5 20 Konica 7115 7118...

Страница 83: ...tions 6 1 Making 1 Sided Copies 1 sided This is the ordinary 1 sided copy that this copier can make from a 1 sided original 2 in 1 Important This setting is available only when the copier is equipped...

Страница 84: ...tings for 2 in 1 and 4 in 1 Copies 1 Load the originals in the Automatic Document Feeder Original Loading p 4 1 2 Press the COMBINATION key to light either the 2 in 1 or 4 in 1 indicator 3 Make any ot...

Страница 85: ...is right bound change the setting for Book Binding Position p 7 7 3 If you want to erase the four edges or the center of the original press the MARGIN ERASE key to specify the erase position Which one...

Страница 86: ...range between 1 4 and 3 4 in 1 mm 1 16 in crements The default value is 1 2 Only 1 2 is available for the center erase width To change the setting for the frame erase width use Erase Setting in the U...

Страница 87: ...copy of each page Sort or by pages Group Three Output Types Non Sort The copies are stacked on top of each other as they are made Sort The copies are automatically divided into sets with each set con...

Страница 88: ...at is electronic sorting Important The copier must be equipped with an Automatic Document Feeder and a 16MB Memory for Copier or 32MB Memory for Copier The copies are sorted into complete sets of the...

Страница 89: ...y for Copier and Paper Feed Cabinet or Multiple Bypass Tray The sorted copy sets are stacked in a crisscross manner one set stacked lengthwise on top of another set stacked crosswise Note To enable cr...

Страница 90: ...same direc tion but in a sawtooth manner by shifting the tray for each stack What is crisscross grouping Important The copier must be equipped with an Automatic Document Feeder 16MB Memory for Copi e...

Страница 91: ...ginal Loading p 4 1 2 Press the OUTPUT key to select the desired finishing function Do you know what it means when both Sort and Group indicators are off It means that Non Sort is currently selected f...

Страница 92: ...ctions can be selected What is Left Erase A given width is erased from the left edge of the copy What is Upper Erase A given width is erased from the top edge of the copy What is Frame Erase A given w...

Страница 93: ...ook Copy has been selected p 6 3 Precautions for Erase Position Note the correct direction of positioning the original when making copies in the Erase mode For more details refer to the table given be...

Страница 94: ...e erase width for each erase function The Left Upper and Frame erase width can be set in the range between 1 4 and 3 4 in 1 mm 1 16 incre ments The default value is 1 2 Only 1 2 is available for the C...

Страница 95: ...e black part text are reversed on the copy Setting Reverse Image 1 Position the original Original Loading p 4 1 2 Press the REVERSE IMAGE key and make sure that the REVERSE IMAGE indicator lights 3 Ma...

Страница 96: ...a copy with an image shift Setting IMAGE SHIFT 1 Position the original Original Loading p 4 1 2 Press the IMAGE SHIFT key to light the IMAGE SHIFT indicator Do you know how to set the image shift wid...

Страница 97: ...User s Choice 4 Press the START key Code Name Description 1 User s Choice Allows you to select the default setting for each of the various functions 2 Drum Dehumidify Removes dewdrops that have forme...

Страница 98: ...t value of each function Code Name Setting Setting Details Default Value 1 Mixed Orig 0 Mixed Orig enabled 1 Mixed Orig disabled 2 2 Paper Priority 0 A3L 1 B4L 2 A4L 3 B5L 4 A5L 5 FLS L 6 A4C 7 B5C 8...

Страница 99: ...scross stacking enabled 2 1 Crisscross stacking disabled 9 4 in 1 Copy Order 0 Pattern A 2 1 Pattern B 10 Book Binding Position 0 Left bound 2 1 Right bound 11 IMAGE SHIFT Width Adjust 0 0 10 1 2 2 20...

Страница 100: ...Mode 2 19 Print Density 0 2 1 1 2 0 2 3 1 4 2 20 Paper Auto Detection 1st Tray 0 Inch 2 1 Metric 21 Paper Auto Detection 2nd Tray 0 Inch 2 1 Metric 22 Paper Auto Detection 3rd Tray 1 0 Inch 2 1 Metric...

Страница 101: ...Tray Switching disabled 30 Special Paper Setting 3rd Tray 1 0 APS enabled Special Paper Setting OFF 2 1 APS disabled Auto Tray Switching enabled 2 APS disabled Auto Tray Switching disabled 31 Special...

Страница 102: ...ity Choose the default mode to be selected automatically when power is turned ON or panel reset from among APS AMS or Manual G The default value is APS Density Priority Choose the image density mode t...

Страница 103: ...ode Select whether to enable or disable crisscross stacking when the conditions for crisscross stacking are met G The default value is Enabled 4 in 1 Copy Order Select the copying order in the 4 in 1...

Страница 104: ...t the time it takes the Auto Shut OFF function to be activated from 15 min to 240 min in 1 min increments To disable the Auto Shut OFF function first authorize the Disable Auto Shut OFF under the Admi...

Страница 105: ...rds or OHP transparencies G The default value is plain paper Special Paper Setting All trays can generally be chosen for the Auto Paper mode This sometimes results in a situation in which a tray loade...

Страница 106: ...g the Utility Mode to the Display p 7 1 2 Making sure that U appears on the Display enter 1 on the KEYPAD 3 Press the START key 4 Check that c appears on the Display 5 Enter the code assigned to the d...

Страница 107: ...2 to change Copy Priority to Manual Do you want to correct the setting just entered Press the CLEAR key and then enter the new setting 9 Press the START key To further change the setting for another f...

Страница 108: ...opies In such instances use the Drum Dehumidify function to dry the surface of the PC Drum Tip A copy or print cycle can be run while in the Drum Dehumidify mode The copier automatically leaves the Dr...

Страница 109: ...ase you can use Toner Replenisher to quickly restore the normal image density Note Do not turn the Power Switch OFF or open the Front Cover while the copier is replenishing toner Toner will not be rep...

Страница 110: ...put for Paper Size Detection in the User s Choice mode Tip To make sure that the correct values are entered refer to the illustration on the right to study the convention of the paper length and width...

Страница 111: ...lue Do you know the range for the paper length of custom size The length can range from 5 1 2 to 17 6 Press the START key 7 Press the CLEAR key 8 Enter the value of Y width of the paper to be loaded o...

Страница 112: ...ng to operating needs Note The administrator number is programmed by your authorized Konica Service Representative Ask him her for more details The administrator of this copier must remember the admin...

Страница 113: ...t to correct a wrong number just entered Press the CLEAR key and then enter the correct number 5 Press the START key 6 Check that Ad appears on the Display 7 Enter the code assigned to the desired sub...

Страница 114: ...AD 3 Press the START key 4 Making sure that A appears on the Display enter 1 on the KEYPAD Code Name Setting Setting Details Default Value A 1 Copy Track 0 Copy Track enabled 1 Copy Track disabled 2 A...

Страница 115: ...Select whether to enable or disable Copy Track by entering the corresponding number on the KEYPAD Do you know the code for enabling Copy Track To enable Copy Track enter 0 Do you know the code for di...

Страница 116: ...that A appears on the Display enter 2 on the KEYPAD 5 Press the START key 6 Enter the 3 digit account number on the KEYPAD Do you know the restrictions on entering the account number The account numb...

Страница 117: ...king sure that Ad appears on the Display enter 1 on the KEYPAD 3 Press the START key 4 Making sure that A appears on the Display enter 3 on the KEYPAD 5 Press the START key 6 Press or key to select th...

Страница 118: ...sure that Ad appears on the Display enter 1 on the KEYPAD 3 Press the START key 4 Making sure that A appears on the Display enter 4 on the KEYPAD 5 Press the START key 6 Press or key to select the acc...

Страница 119: ...PAD 3 Press the START key 4 Making sure that A appears on the Display enter 5 on the KEYPAD 5 Press the START key 6 Press or key to select the account number for which you want to check the Total Coun...

Страница 120: ...7115 7118 9 Press the START key Then the Display returns to the status that allows you to select the account number in step 6 Do you know how to check or reset the Total Counter of another account su...

Страница 121: ...the Administrator Mode to the Display p 7 16 2 Making sure that Ad appears on the Display enter 1 on the KEYPAD 3 Press the START key 4 Making sure that A appears on the Display enter 6 on the KEYPAD...

Страница 122: ...election of Auto Shut OFF disabled under User s Choice G The default value is not authorized Setting Disable Auto Shut OFF 1 Call the Administrator Mode to the Display Calling the Administrator Mode t...

Страница 123: ...ing the Utility Mode 7 Konica 7115 7118 7 27 5 Enter the new setting on the KEYPAD Do you know the number for authorize Disable Auto Shut OFF Enter 0 6 Press the START key This validates the new setti...

Страница 124: ...of copies or printed pages produced since the installation of the copier G Size Counter Shows the number of copies or printed pages produced on paper of a preset size The size will be set by your auth...

Страница 125: ...at Sc appears on the Display The Size Counter value is then displayed E g The Display looks like the one shown on the right when the value is 123 5 After you have checked the counter value or values p...

Страница 126: ...terrupt mode Job Storing Procedure 1 Set up the job you want to store in memory 2 Press the JOB STORE key 3 Check that Jb1 appears on the Display If you want your job stored as Jb2 change it on the Di...

Страница 127: ...Using the Utility Mode 7 Konica 7115 7118 7 31 5 The Display changes as shown on the right indicating that the job has been stored in Jb1...

Страница 128: ...1 2 Press the JOB RECALL key to show the job number to be recalled on the Display 3 Check that the Display shows the job number you want Do you know how to change the contents of the Display Each tim...

Страница 129: ...by the blinking paper size indicator or press the SIZE key to select another paper size A paper misfeed has occurred in the copier Identify the misfeed location on the control panel and remove the she...

Страница 130: ...has so far been read Memory is full when image data is received from the personal computer Press the AUTO RESET key Or turn OFF then ON the Power Switch This will erase all image data that has so far...

Страница 131: ...splays and Other Indicators 8 Konica 7115 7118 8 3 E g C0510 Fusing malfunction A malfanction has occurred in the copier Call your authorized Konica Service Representative Error Display Possible Cause...

Страница 132: ...t has run out of paper on the control panel Then following the procedure given in Adding Paper below add paper as necessary Adding Paper 1st Tray 1 Slide out the 1st Tray Do you know the special preca...

Страница 133: ...oo much paper in the tray Do not load so much paper that the top of the stack is higher than the mark 4 Slide the Edge Guide and Trailing Edge Stop against the edges of the paper stack Do you know the...

Страница 134: ...of the paper the side facing up when the package was unwrapped faces up Have you loaded too much paper in the tray Do not load so much paper that the top of the stack is higher than the mark 4 Slide t...

Страница 135: ...ow the special precautions to be used when loading the paper Be sure to face the surface to be copied onto down Do not load so much paper that the top of the stack is higher than the mark Be sure to s...

Страница 136: ...y the toner that has been manufactured specifically for this copier Never use any other types of toner as a malfunction could result For details ask your authorized Konica Service Representative Do no...

Страница 137: ...bottle 4 Shake the new Toner Bottle well 5 With the UP marking on top insert and push the bottle into position Do you know how much you need to insert the bottle Fit the protrusion on the Toner Bottle...

Страница 138: ...back in and then close the Front Cover Toner will be automatically supplied as soon as the Front Cover is closed Do you know what to do if the copy image density is still low immediately after the Ton...

Страница 139: ...d Indications and Misfeed Locations A blinking indicator indicates that there is a misfed sheet of paper Different procedures are used to clear a misfed sheet of paper depending on the location First...

Страница 140: ...ny area other than the authorized knobs CAUTION There are a number of protrusions on the backside of the guide plate To avoid possible injury be careful not to touch any areas other than the paper 1 O...

Страница 141: ...you know which part to grasp Grasp the green portions to lower the guide plate 5 Turning the knob of the roller in the direction of the arrow gently pull out the sheet of paper Do you know which part...

Страница 142: ...paper stack in the 1st Tray 9 Slide the Edge Guide and Trailing Edge Stop against the edge of the paper stack Are you informed of special precautions to be used when loading paper Be sure that the Edg...

Страница 143: ...lays and Other Indicators 8 Konica 7115 7118 8 15 Paper Feed Cabinet 1 Open the Side Cover of the Paper Feed Cabinet 2 Gently pull out the sheet of misfed paper 3 Close the Side Cover of the Paper Fee...

Страница 144: ...s and Other Indicators 8 16 Konica 7115 7118 Multiple Bypass Tray 1 Unload the paper stack from the Bypass Tray 2 Open the Side Cover of the copier 3 Gently pull out the sheet of misfed paper 4 Close...

Страница 145: ...Error Displays and Other Indicators 8 Konica 7115 7118 8 17 5 Load the paper stack back in the Bypass Tray...

Страница 146: ...ror Displays and Other Indicators 8 18 Konica 7115 7118 Automatic Document Feeder 1 Open the Document Feeder Cover 2 Unload the document from the Document Feeder Tray 3 Raise the Automatic Document Fe...

Страница 147: ...ument feed knob in the direction of the arrow gently pull out the original 5 Close the Document Feeder Cover 6 Reload the document which was unloaded in step 2 Do you know what to do if 1 is shown on...

Страница 148: ...8 Error Displays and Other Indicators 8 20 Konica 7115 7118...

Страница 149: ...ass p 4 7 The copy is blurry The paper is damp Change the paper p 8 4 The original is not placed firmly against the Platen Glass Place the original in position so that it is placed firmly against the...

Страница 150: ...io Select the zoom ratio according to the paper size p 5 13 Or use Auto Size to reduce the copy to the appropriate size p 5 12 The image on the copy is not aligned properly The original is not placed...

Страница 151: ...dure given in To enter an account number p 3 20 No copies are produced even when the START key is pressed An icon on the control panel is lit Take necessary action to correct the problem indicated by...

Страница 152: ...9 Troubleshooting Tips 9 4 Konica 7115 7118...

Страница 153: ...Paper Size 1st Tray 11x17L to Invoice Bypass Tray Width 3 9 16 in to 11 3 4 in Length 5 1 2 in to 17 in Paper Feeding System 1st Tray Plain paper recycled paper 250 sheets Special paper 50 sheets Bypa...

Страница 154: ...10 Appendix 10 2 Konica 7115 7118 Dimensions Width 23 1 4 in 590 mm Depth 24 in 611 mm Height 19 1 4 in 487 mm Weight 85 lbs Standard memory 16MB Specifications Konica 7115 Konica 7118...

Страница 155: ...rd Mode 11 17L to InvoiceL Mixed Original Detection Mode A possible combination is 11 17L and 8 5 11C or 8 5 14L and 8 5 11L Capacity of Document Feeder Tray Max 50 sheets 16 lbs Power Consumption 36...

Страница 156: ...her than 8 1 2 11 75 sheets Special paper 20 sheets Lower Copy Tray Plain paper recycled paper 8 1 2 11 100 sheets sizes other than 8 1 2 11 50 sheets max height 7 8 in Dimensions 63 W or less Specifi...

Страница 157: ...ld detergent Original Pad Wipe the surface of the Original Pad clean with a soft cloth dampened with alcohol Platen Glass Wipe the surface of the Platen Glass clean with a soft dry cloth Control Panel...

Страница 158: ...Functions Function Set Last Code Description 2 The functions can be combined The functions cannot be combined The function set first takes precedence The functions cannot be combined The function set...

Страница 159: ...100 mm 148 mm 4 5 3 4 Name Size Inch Size Metric Ledger 11 17 279 mm 432 mm 11 14 11 14 279 mm 356 mm Computer 10 1 8 14 257 mm 356 mm 10 14 10 14 254 mm 356 mm 9 1 4 14 9 1 4 14 236 mm 356 mm Legal...

Страница 160: ...m Ratio A3 297 mm 420 mm 11 3 4 16 1 2 A4 70 A5 50 B4 86 B5 61 A4 210 mm 297 mm 8 1 4 11 3 4 A5 70 A6 50 B5 86 B6 61 A3 141 B4 122 A5 148 mm 210 mm 5 3 4 8 1 4 A6 70 B6 86 A4 141 A3 200 B4 173 B5 122...

Страница 161: ...nal Size Paper Size Zoom Ratio Ledger 11 17 279 4 mm 431 8 mm 11 17 82 Legal 77 Foolscap 75 Letter 64 Invoice 50 11 15 279 4 mm 381 mm 11 14 93 Legal 77 Foolscap 77 Letter 73 Invoice 50 11 14 279 4 mm...

Страница 162: ...o Paper Size Original Size 1 Inch 25 4 mm 1 mm 0 0394 Inch 8 1 2 11 215 9 mm 279 4 mm 11 17 129 11 14 127 Invoice 5 1 2 8 1 2 139 7 mm 215 9 mm 11 17 200 11 14 164 Legal 154 Foolscap 150 Letter 129 In...

Страница 163: ...Auto Shut OFF 3 18 Auto Tray Switching 3 19 B Book Copy 6 2 C Care of the Copier 10 5 Change Account Procedure 7 22 CLEAR 3 13 Clearing a Paper Misfeed 8 12 Control Panel 3 12 Copy Paper 3 22 COUNTER...

Страница 164: ...g Originals 4 1 M Major Error Displays and Remedial Actions 8 1 Margin Erase 6 10 Misfeed Indications and Misfeed Locations 8 11 Mixed Originals 4 4 O Output Copies Sort and Group 6 5 P Panel Resettin...

Страница 165: ...oring a Job 7 30 T Toner Replenisher Auxiliary Toner Replenishing 7 13 Turn the Copier ON OFF 3 15 U User s Choice 7 2 Using APS 5 3 Using the Utility Mode 7 1 W When the Copier is not Operating Corre...

Страница 166: ...Index Index 4 Konica 7115 7118...

Страница 167: ......

Страница 168: ...Konica Business Technologies Inc 500 Day Hill Road Windsor CT 06095 Telephone 860 683 2222 July 2001 Printed in Japan OP 7115 7118 01...

Отзывы: