Konica Minolta Minoltafax 1100 Скачать руководство пользователя страница 35

3

Individual fax machine settings

3-8

MF 1100

Rev. 1.1.1/07.06.99

3.4

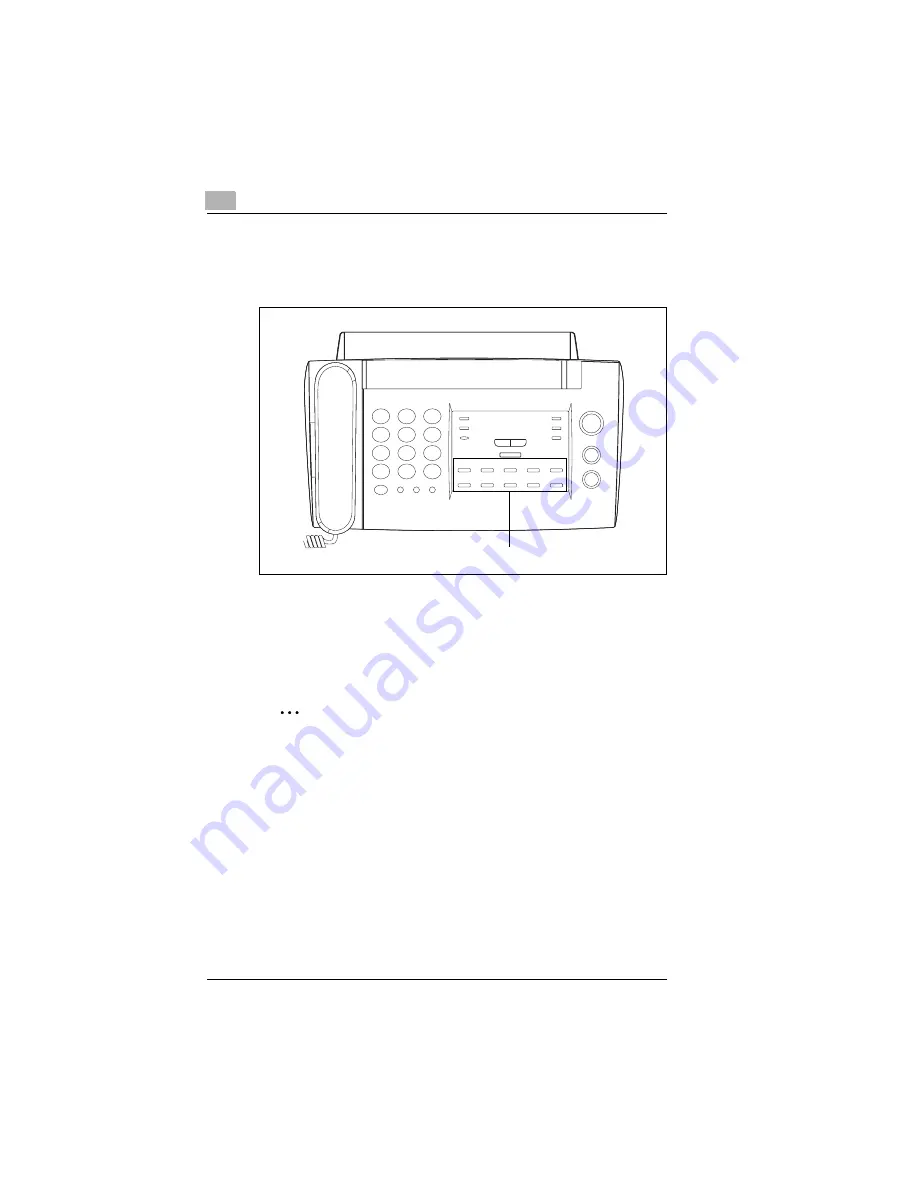
Setting the one-touch keys

The Minoltafax 1100 is equipped with 10 one-touch keys. Each key can 
be programmed with a fax or number which is frequently called.

 These one-touch keys offer:

G

One-touch number dialling.

G

Administration of up to 10 numbers.
(newly specify, change setting, delete setting)

G

Print-out of one-touch key allocation.

One-touch keys [4], [5] and [0] have double functions!
The one-touch keys [4], [5] and [0] have double functions. For some 
procedures, keys [4] and [5] are used move the cursor in the display, 
while [0] is used to delete characters:
One-touch key [4] = Cursor to left
One-touch key [5] = Cursor to right
One-touch key [0] = Delete character

One-touch keys

1

2

3

4

5

6

7

8

9

0

Содержание Minoltafax 1100

Страница 1: ...The essentials of imaging www minoltaeurope com User Manual Minoltafax 1100...

Страница 2: ...he fax machine 2 5 Ambient requirements 2 5 Location 2 5 Space requirement 2 6 Storage of consumables 2 6 2 3 Setting up the fax machine 2 7 Connecting the fax machine 2 7 Installing the ink cartridge...

Страница 3: ...anually started print out of activity report 3 21 4 Sending documents by fax 4 1 Please observe the following 4 1 Characteristics of documents to be transmitted 4 1 Interrupting a procedure 4 2 4 2 In...

Страница 4: ...ax transmission Polling 5 6 5 7 Receiving a fax with size reduction 5 7 5 8 Fax machine with external telephone 5 8 6 Copying a document 6 1 Making a single copy 6 1 6 2 Copying a document with size r...

Страница 5: ...ms with connected telephone apparatus 9 3 9 6 Problems with print out quality 9 3 9 7 Rectifying problems 9 4 Removing a jammed document 9 4 Removing a paper jam 9 5 Renewing the ink cartridge 9 6 Re...

Страница 6: ...e operation of your fax machine l Setting up your fax machine l Sending and receiving faxes l Copying documents l Trouble shooting Please read this manual thoroughly before starting up your fax machin...

Страница 7: ...1 07 06 99 This documentation must not be reproduced transferred copytyped stored in an archive or translated without the explicit prior permission in writing by Minolta Co Ltd The manufacturer reserv...

Страница 8: ...afax 1100 such as l Machine layout l Installing the fax machine l Setting up the fax machine 3 Individual fax machine setup This is where you will learn how to l Program letters and figures l Set your...

Страница 9: ...jury or damage to the machine due to incorrect operation The arrow indicates certain behaviour to prevent a dangerous situation SET Key on keypad with the designation Set ERROR Message in display show...

Страница 10: ...easily visible and accessible Do not pull on the electrical cable to disconnect the plug from the mains socket Do not connect the machine to a telephone line during a thunderstorm Do not use the fax m...

Страница 11: ...the plug out of the mains socket immediately and inform your local service centre Never place drinking cups bottles or other vessels containing liquids on the machine If liquid should nevertheless ent...

Страница 12: ...onal standards The noise level at the place of work is 75 dB A or less according to ISO 777 Machines with CE approval CTR 21 approval These machines fulfil the valid European requirements of the Counc...

Страница 13: ...1 Introduction 1 8 MF 1100 Rev 1 1 1 07 06 99...

Страница 14: ...lastic packaging is hazardous for small children Please keep the packaging out of reach of small children 1 Remove the fax machine and its accessories from the carton 2 Remove the individual packaging...

Страница 15: ...1 1 1 07 06 99 Machine layout Paper support Document support Document guide Control panel Document output Paper output Monitoring volume Ringer volume Document release lever Document transport roller...

Страница 16: ...Y Will blink when data is stored in the page memory 5 DISPLAY Shows various information l Standard display Date and time l Specific input requirements l Status message 6 PRINTER RESET To re align the...

Страница 17: ...r 11 START To start a function l Transmit l Receive 12 COPY To start l A copy function l A list print out 13 STOP To interrupt a function and eject a document 14 REDIAL P To re dial the number last di...

Страница 18: ...sily inflammable objects such as curtains l Free of objects that could block the ventilation slots in the machine housing l Easily accessible mains socket l Away from explosive gases The machine must...

Страница 19: ...Does the fax machine have enough space Ensure that there is sufficient space in front of the fax machine otherwise the ejected document or paper could become jammed Storage of consumables Store the c...

Страница 20: ...ax machine Connecting the fax machine 1 Slide the plastic noses on the paper support in the available slots 2 Connect the handset to the available connection 3 Connect the fax machine to the telephone...

Страница 21: ...ot touch the printing head on the ink cartridge Do not place the ink cartridge on its printing head Do not dismantle the ink cartridge Do not shake the ink cartridge 1 Fold the control panel forwards...

Страница 22: ...forwards The ink cartridge must engage with an audible click 6 Close the control panel cover The display will show NEW CARTRIDGE If NEW CARTRIDGE does not appear in the display Check whether the cart...

Страница 23: ...ne segment on the test print is closest to being a straight line 4 Enter the code of this line segment via the numerical keys Confirm your choice by pressing the SET key You will hear a beep The print...

Страница 24: ...alities Paper formats A4 210 297 mm Letter 216 279 mm Legal size 216 356 mm The default setting is A4 See page 8 1 for other settings Paper thickness less than 0 2 mm Paper weight 64 to 90 g m2 1 Fold...

Страница 25: ...2 Unpacking installation setup 2 12 MF 1100 Rev 1 1 1 07 06 99 4 Slide the left paper guide against the paper 5 Close the paper support Paper guide...

Страница 26: ...at the left side of the machine Select one of the settings H Ringer loud M Ringer normal OFF Ringer silent Setting the monitoring volume Set the monitoring volume as required The volume selector switc...

Страница 27: ...2 Unpacking installation setup 2 14 MF 1100 Rev 1 1 1 07 06 99...

Страница 28: ...accessible by the numerical keys are listed in three groups The table below shows how the characters are compiled The respective character will appear depending on how many times you press the numeri...

Страница 29: ...panel key in order to enter the required character see page 3 1 3 Press the one touch key 5 CURSOR RIGHT to confirm your choice The cursor will then move to the next position 4 Enter the next charact...

Страница 30: ...ave double functions The one touch keys 4 5 and 0 have double functions For some procedures keys 4 and 5 are used move the cursor in the display while 0 is used to delete characters One touch key 4 Cu...

Страница 31: ...entry G To eject an inserted document In order to carry out the above functions Press the STOP key repeatedly when necessary Setting the dialling method MFV IWV The default dialling method is MF tone...

Страница 32: ...y Confirm your choice via the SET key 3 Enter your station name max 24 characters Confirm your choice via the SET key 4 Enter your fax number max 20 digits Confirm your choice via the SET key Press th...

Страница 33: ...100 Rev 1 1 1 07 06 99 6 For PBX mode only Enter your PBX number max 4 digits Confirm your choice via the SET key A beep will be heard The setting is now stored 7 Press the STOP key to return to the s...

Страница 34: ...times Confirm your choice via the SET key 2 Press the SET key 3 Enter the date and time via the numerical keys Confirm your choice via the SET key A beep will be heard The date and time are now stored...

Страница 35: ...r dialling G Administration of up to 10 numbers newly specify change setting delete setting G Print out of one touch key allocation One touch keys 4 5 and 0 have double functions The one touch keys 4...

Страница 36: ...characters Confirm your choice via the SET key 4 Enter the number max 32 digits Confirm your choice via the SET key A beep sound will be heard The number is now stored Is the fax machine connected to...

Страница 37: ...ant to store a number Confirm your choice via the SET key 3 Press the SET key 4 Alter the designation of the number Confirm your choice via the SET key See page 3 3 5 Alter the number Confirm your cho...

Страница 38: ...T key 2 Press the one touch key 0 9 of the allocation you want to delete Confirm your choice via the SET key 3 Press the SET key 4 Press the MENU key Confirm your choice via the SET key A beep will be...

Страница 39: ...llocated one touch keys Print out a list showing the detailed allocation of each one touch key 1 Press the MEN key twice 2 Press the COPY key A list of the one touch keys will be printed 3 Press the S...

Страница 40: ...dialled numbers Activity report either daily or after 20 activities G Possibility to trace the last time and how often a number stored in the directory was called If you have not occupied all 50 stor...

Страница 41: ...ice via the SET key Is your fax machine connected to a PBX system Before entering the number press the R key to call an outside line 4 Enter the designation of the number max 16 characters Confirm you...

Страница 42: ...Alter the designation of the number Confirm your choice via the SET key 3 Press the one touch key 5 CURSOR RIGHT The respective directory number will appear in the display 4 Press the SET key 5 Alter...

Страница 43: ...tory entry has been deleted 3 Press the STOP key to return to the standard display Scrolling through the directory The entries stored in the directory is sorted according to their dialled frequency Fr...

Страница 44: ...to call additional directory information Designation of number Number Dialling frequency and date last dialled Directory entry search 1 Press the SEARCH key 2 Enter the first letter of the designation...

Страница 45: ...venient list of all entries stored in the directory can be printed 1 Select a DIRECTORY entry via the arrow keys 2 Press the COPY key while a directory entry is shown in the display The directory will...

Страница 46: ...CTORY arrow keys 2 Press the MENU key 3 Press the one touch key 0 9 which should receive the transferred entry Confirm this choice via the SET key A beep will be heard The entry has now been deleted f...

Страница 47: ...dly until ACT REPORT ON can be seen in the display Confirm your choice via the SET key 4 Enter the time of day when the activity report should be printed out Confirm your choice via the SET key or Do...

Страница 48: ...key repeatedly until ACT REPORT OFF can be seen in the display Confirm your choice via the SET key 4 Press the STOP key to return to the standard menu Manually started print out of activity report Yo...

Страница 49: ...3 Individual fax machine settings 3 22 MF 1100 Rev 1 1 1 07 06 99...

Страница 50: ...ognise this as a jammed document and stop the transmission All paper clips and staples must be removed from a document before inserting it into the fax machine Ink adhesive and correction fluid must b...

Страница 51: ...ressing the STOP key will G Stop a started procedure fax transmission photocopy etc G Leave the menu and return to the standard display G Cancel wrongly entered data G Eject an inserted document If yo...

Страница 52: ...merous documents 0 08 to 0 13 mm per document 1 Insert the document with its face downwards in the document feeder The document will be automatically recognised and then pulled into the machine 2 Adju...

Страница 53: ...for present transmission The transmission resolution grade can be set as follows 1 Insert the document into the document feeder and adjust the document guide accordingly 2 Select the required transmis...

Страница 54: ...4 Enter the code as required via the numerical keys 00 Std for standard text 01 Fine for text and graphics with fine lines 02 Super fine for text and graphics with extremely fine lines 03 Gray scale...

Страница 55: ...Confirm your choice via the SET key 3 Press the numerical keys 2 and 8 for software switch 28 Confirm your choice via the SET key 4 Enter the code as required via the numerical keys 00 for document w...

Страница 56: ...select the required transmission quality via the RESOLUTION key 3 Enter the number via the numerical keys Is your fax machine connected to a PBX system Before dialling the number press the R key to c...

Страница 57: ...r and adjust the document guide accordingly 2 If required select the required transmission quality via the RESOLUTION key 3 Press the REDIAL P key The fax transmission will start as soon as the receiv...

Страница 58: ...the RESOLUTION key 3 Press the respective one touch key under which the required number is stored The fax transmission will start as soon as the receiving fax machine sends a signal that it is ready t...

Страница 59: ...via the RESOLUTION key 3 Select the required number via the DIRECTORY arrow keys 4 Press the START key The fax transmission will start as soon as the receiving fax machine sends a signal that it is re...

Страница 60: ...Via directory Via redial The fax transmission will start as soon as the receiving fax machine sends a signal that it is ready to receive The number of the receiving fax machine will appear in the disp...

Страница 61: ...2 Press the MENU key four times Confirm your choice via the SET key 3 Enter the quantity of pages to be transmitted Confirm your choice via the SET key A beep will be heard 4 Start the fax transmissi...

Страница 62: ...SET key 4 Enter the required transmission start time via the numerical keys Confirm your choice via the SET key 5 Dial the receiving fax number Manually Via one touch key Via directory Via redial 6 Pr...

Страница 63: ...time via the numerical keys Confirm your choice via the SET key 4 If necessary press the STOP key to completely delete the old number and then dial the new number of the receiving fax machine Manuall...

Страница 64: ...sion can be deleted 1 Press the MENU key three times Confirm your choice via the SET key 2 Press the SET key A beep will be heard The transmission delay time has now been deleted 3 Press the STOP key...

Страница 65: ...s 3 and 2 for software switch 32 Confirm your choice via the SET key 4 Enter the required code via the numerical keys 00 no printed report 01 print report after every delayed transmission 02 print rep...

Страница 66: ...speed 1 Insert the document into the document feeder and adjust the document guide accordingly 2 Press the MENU key 3 Press the key A beep will be heard The fax transmission speed is now reduced 4 Sta...

Страница 67: ...2 times 1 Press the MENU key six times Confirm your choice via the SET key 2 Press the MENU key twice Confirm your choice via the SET key 3 Enter the required code via the numerical keys 05 redial wit...

Страница 68: ...Sending documents by fax 4 Rev 1 1 1 07 06 99 MF 1100 4 19 Starting manual redial function A redial function can be manually started Press the REDIAL P key The redial function will now start...

Страница 69: ...4 Sending documents by fax 4 20 MF 1100 Rev 1 1 1 07 06 99...

Страница 70: ...g call remains unanswered your machine will automatically switch over to auto fax mode Individual settings of the auto fax mode can be carried out via the software switches G Software switch 07 RINGER...

Страница 71: ...T key to receive the fax transmission The caller can start the fax transmission when the signal from your fax machine can be heard Is the incoming call an automatic fax transmission You will hear a fa...

Страница 72: ...on fax reception with an answering machine connected Press the AUTO TAD MAN key repeatedly until E MODE ANSWER appears in the display Is the incoming call an automatic fax transmission You will hear a...

Страница 73: ...e calling machine is not a one touch number The incoming fax transmission will be automatically stopped as soon as RECEIVE appears in the display The incoming fax does not have a station identificatio...

Страница 74: ...an be printed out from the incoming data store 1 Rectify the cause of the respective fault 2 Press the PRINTER RESET key The stored data will be printed Power cut while data is stored In the event of...

Страница 75: ...ccordingly 1 Press the MENU key Confirm your choice via the SET key 2 Dial the number of the other fax machine Manually Via one touch key Via directory Via redial 3 Press the SET key The transmission...

Страница 76: ...ced in size so that they fit on one page of paper 1 Press the MENU key six times Confirm your choice via the SET key 2 Press the MENU key twice Confirm your choice via the SET key 3 Enter the digits 5...

Страница 77: ...your fax machine Transferring an incoming fax transmission from your external telephone to your fax machine 1 Press the 3 key twice on your telephone 2 Place the telephone handset on the hook Your fa...

Страница 78: ...t the document with its face downwards in the document feeder The display will show the present resolution setting 2 If necessary alter the resolution grade via the RESOLUTION key 3 Press the COPY key...

Страница 79: ...a the SET key A beep will be heard The reduction factor is now programmed 3 Insert the document with its face downwards in the document feeder The display will show the present resolution setting 4 If...

Страница 80: ...chine connected to a PBX system Before dialling the required number press the R key to call an outside line 3 When you hear a reply pick up the handset and start your conversation Method 2 1 Pick up t...

Страница 81: ...2 MF 1100 Rev 1 1 1 07 06 99 7 2 Receiving a telephone call Receive a phone call as follows 1 When the telephone rings pick up the handset 2 Answer the call 3 When the conversation is finished place...

Страница 82: ...l function The last dialled number can be redialled by using the redial function Press the REDIAL P key The entered number will be dialled immediately Dialling a number via a one touch function A numb...

Страница 83: ...in the directory to find a stored number 1 Press the SEARCH key 2 Enter the first letter of the searched name or enter any letter so that the entries will appear in the display in alphabetical order...

Страница 84: ...sation The call will be put on hold 2 Place the handset on the hook 3 Lift the handset off the hook The conversation can be continued Method 2 1 Press the HOLD key during the conversation The call wil...

Страница 85: ...x 1 Lift the handset off the hook during the fax transmission After the fax transmission has ended a signal tone will sound for approximately 7 seconds 2 When the person at the other end picks up the...

Страница 86: ...ENU key twice Confirm your choice via the SET key 3 Enter the software switch code e g 55 via the numerical keys Confirm your choice via the SET key 4 Enter the code of the required feature e g 01 90...

Страница 87: ...ist of the present software settings 1 Press the MENU key six times Confirm your choice via the SET key 2 Press the MENU key twice 3 Press the COPY key A list of the software switches will be printed...

Страница 88: ...11 short signal 1 x 2 x 3 x 11 x 03 08 Possibility of remote start via connected telephone apparatus during manual fax reception 00 10 99 OFF ON Code with 2 digits 33 09 Quantity of simulated call sig...

Страница 89: ...transmission 00 01 02 OFF ON every transmission ON with errors only 00 36 Half tone quality relative to transmission speed 00 01 Fast transmission Slow transmission 01 48 Language selection 00 01 02...

Страница 90: ...pressed G An incoming call has not been received G The handset of your fax machine or a connected telephone was not lifted off the hook The display will show POWER SAVE If any of the above requiremen...

Страница 91: ...8 Setting specific features 8 6 MF 1100 Rev 1 1 1 07 06 99...

Страница 92: ...not feed in The document paper is too thin or too thick Page 4 1 A previous document is jammed in the document feeder Remove the jammed document Page 9 4 The display shows INK OUT The ink cartridge i...

Страница 93: ...2 7 It is not possible to receive a fax There is no paper in the paper holder Page 2 11 Selective reception has been activated Check setting of software switch 26 Page 5 4 The print out is very pale...

Страница 94: ...ephone will not ring Too many telephones are connected to the same line Call transfer to your fax machine will not function Software switch 08 is set at OFF Page 8 2 Problem description Problem descri...

Страница 95: ...the display shows DOCUMENT JAM 1 Fold the control panel forwards 2 Press and hold the green document release lever while pulling the jammed document slowly upwards out of the machine 3 Close the contr...

Страница 96: ...chine when the display shows CHECK PAPER 1 Fold the paper cover forwards 2 Pull the jammed paper slowly upwards out of the machine 3 Close the paper cover 4 Press the PRINTER RESET key The standard di...

Страница 97: ...k cartridge Do not place the ink cartridge on it printer head Do not dismantle the ink cartridge Do not shake the ink cartridge 1 Fold the control panel forwards The cartridge holder will move to cent...

Страница 98: ...ently press the ink cartridge forwards The ink cartridge must engage with an audible click 7 Close the control panel cover The display will show NEW CARTRIDGE If NO CARTRIDGE appears in the display Ch...

Страница 99: ...be printed out 3 Determine which line segment on the test print is closest to being a straight line 4 Enter the code of this line segment via the numerical keys Confirm your choice by pressing the SE...

Страница 100: ...e SET key A test page will be printed out 3 Compare the thin lines above and below the black strip Are the line continuous If yes the printer head nozzles are clean The cleaning procedure is complete...

Страница 101: ...tity of transmitted pages is not identical to the entered quantity of pages with page count function 27 Timer delayed transmission or document broadcasting function was interrupted or the document fee...

Страница 102: ...up to 50 pages Easily comprehensible 16 character display High resolution print out with 64 Gray scales Bubble jet printer head for normal paper with ink save feature Power save feature G Selective f...

Страница 103: ...ergent CAUTION Damage to apparatus due to using wrong cleansing substance The housing can be damaged when cleaning with substances containing alcohol or benzine Only clean the housing with a neutral h...

Страница 104: ...nel The display will show OLD CARTRIDGE 5 Confirm this via the SET key The standard display will appear Damp transport rollers will cause faulty document transport Before using your fax machine ensure...

Страница 105: ...mode 1 7 W Stand by without power save mode 5 7 W Machine dimensions Height 264 mm Width 360 mm Depth 300 mm Weight Approx 3 9 kg without consumables Ambient temperature 5 C to 35 C Sending Transmiss...

Страница 106: ...feed Scanner Scanner type Image sensor Horizontal resolution 8 pixels mm Vertical resolution Super fine resolution 15 4 lines mm Fine resolution 7 7 lines mm Standard resolution 3 85 lines mm Gray sca...

Страница 107: ...lements 1 2 and 3 Safety of telecommunication devices including electronic components EMV EN55 022 Class B 1994 A2 1997 Limit values and measuring methods for suppressing telecommunication devices EN5...

Страница 108: ...Approval symbol 1 7 Aufl sung einstellen 4 4 Automatic print out of delayed transmission report 4 16 Automatic reception Receiving faxes automatic 5 1 C Call operator 7 6 Calling a fax transmission Po...

Страница 109: ...Dialling a number via a one touch key 4 9 Dialling a number via redial 4 8 Dialling a number via the directory 4 10 Dialling and number and monitoring a call 4 11 Dialling the number via the numerical...

Страница 110: ...Entering numbers into the directory 3 14 Error codes in the printed reports 9 10 External telephone 5 8 F Faxes answering machine 5 3 automatic reception 5 1 manual reception 5 2 selected 5 4 Faxes re...

Страница 111: ...chine overview 2 2 Manual reception Receiving faxes manual 5 2 Manually started print out of activity report 3 21 Memory reception printing 5 5 Memory reception during printer problem 5 5 O One touch...

Страница 112: ...8 Printer problem memory reception 5 5 Printing a list of allocated one touch keys 3 12 Printing list of directory entry 3 18 Problems connected telephone 9 3 general 9 1 print quality 9 3 reception...

Страница 113: ...g the loudspeaker volume 2 13 Setting the one touch keys 3 8 Setting the quantity of redial attempts 4 18 Setting the ringer volume 2 13 Setting up the directory 3 13 Single copy 6 1 Size reduction re...

Страница 114: ...me 3 7 Transferring a directory entry to a one touch key 3 19 Transmission 5 6 altering delayed 4 14 delayed 4 13 delete delayed 4 15 print report 4 16 setting delayed 4 13 Transmission speed 4 17 Tra...

Страница 115: ...10 Annex 10 14 MF 1100 Rev 1 1 1 07 06 99...

Страница 116: ...fl sung einstellen 4 4 Automatic print out of delayed transmission report 4 16 Automatic reception Receiving faxes automatic 5 1 C Call operator 7 6 Calling a fax transmission Polling 5 6 Calling stat...

Страница 117: ...via a one touch key 4 9 Dialling a number via redial 4 8 Dialling a number via the directory 4 10 Dialling and number and monitoring a call 4 11 Dialling the number via the numerical keys 4 7 Digits...

Страница 118: ...into the directory 3 14 Error codes in the printed reports 9 10 External telephone 5 8 F Faxes answering machine 5 3 automatic reception 5 1 manual reception 5 2 selected 5 4 Faxes receiving 5 1 Featu...

Страница 119: ...2 Manual reception Receiving faxes manual 5 2 Manually started print out of activity report 3 21 Memory reception printing 5 5 Memory reception during printer problem 5 5 O One touch keys altering 3 1...

Страница 120: ...memory reception 5 5 Printing a list of allocated one touch keys 3 12 Printing list of directory entry 3 18 Problems connected telephone 9 3 general 9 1 print quality 9 3 reception 9 2 sending 9 2 te...

Страница 121: ...volume 2 13 Setting the one touch keys 3 8 Setting the quantity of redial attempts 4 18 Setting the ringer volume 2 13 Setting up the directory 3 13 Single copy 6 1 Size reduction receiving 5 7 Softw...

Страница 122: ...ng a directory entry to a one touch key 3 19 Transmission 5 6 altering delayed 4 14 delayed 4 13 delete delayed 4 15 print report 4 16 setting delayed 4 13 Transmission speed 4 17 Transport rollers cl...

Страница 123: ...20 Rev...

Отзывы: