background image

21


Setting Up Functions Before Taking Pictures


Under Shooting Mode 

Please set the Mode Dial at Shooting Mode (      ) before setting up 
the below functions. 

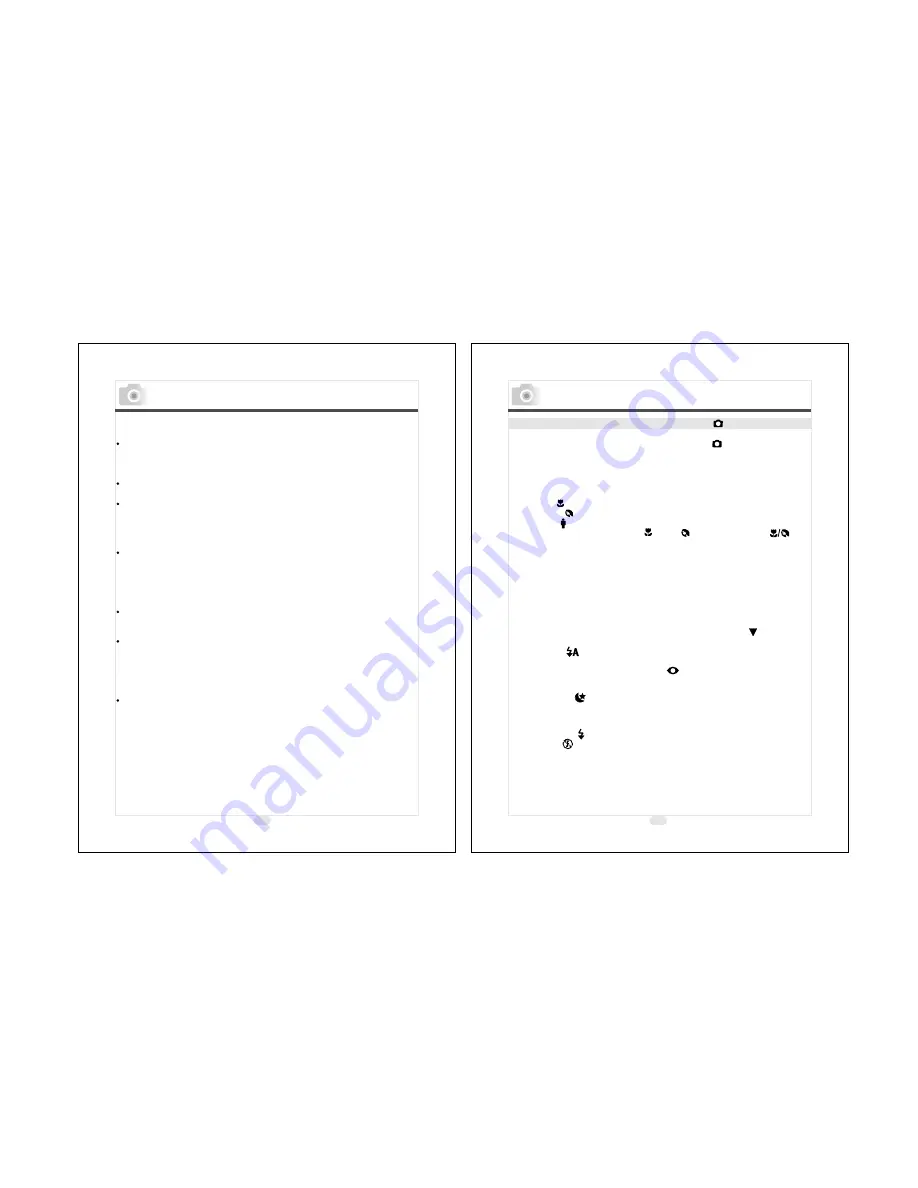
Setting Up Focus Range

Before you take pictures, please make sure you set the Focus 
Switch at the correct focus range or the image may not be clear.
a. Macro 

: 0.18m~0.25m

b. Portrait 

: 0.8m~1.3m

c. Normal

: 1.3m~infinity

If the Focus Switch is set at (      ) or (      ), the symbol of (       ) on 
the TFT LCD monitor indicates the focus is not set at normal focus


range.

Turning On Or Off The TFT LCD Monitor (Preset : On status)

The TFT LCD Monitor is automatically turned on when the 
camera is switched on. With the LCD Button, you can turn on or
off the TFT LCD monitor.

Setting Up Flash Mode (Preset : Auto Flash mode)

There are five flash modes shown below(Use Down (     )Direction 
Button to slect):

(      )

(      )

(      )

(      )

a. Auto flash

: The camera will identify the necessity of using the 

    flash. If the environment is too dark the flash will fire automatically. 
b. Auto flash with red-eye reduction

: The camera will identify the

    necessity of using the flash to reduce the occurrence  of red-eye
    symptom in the image.
c. Night scene 

: The shutter speed will become slow in order to 

    catch more light to make good images in low light circumstances.
    Under this mode, it is suggested to use a tripod to make sure the
    camera is held still while taking the picture. 
d. Fill-in-flash

: The flash will fire in any light circumstances.

e. Flash off 

: The flash will not fire in any light circumstances.

(      )

(      )

(      )

(      )

(      )

Important

  In the event of malfunction or damage, it is possible that 
  data may be lost. Konica can not accept responsibility in 
  any way for such data loss.

  Always back-up important data.

  When using SD Memory Cards on a PC, do not change the 
  attributes(read-only, etc.) of the files (image data) on the card. 
  Doing so may prevent the camera from working properly when 
  deleting images, etc.

  Do not change the file names or the directory name of image 
  data saved on an SD Memory Card using a PC or save files other 
  than image data taken by this camera. Images that have been 
  changed or added will not only play back on the camera but may 
  cause the camera to malfunction as well.

  Always format SD Memory Cards using this camera. A card 
  formatted in a PC may not operate properly.

  The SD Memory Card includes a write-protect switch.
  Sliding this switch downward prevents data from being written 
  to the card and images, etc. saved on the card are protected.
  Please note that pictures cannot be taken or deleted when the 
  writeprotect switch is on.

  When using a large-capacity card, card check and deletion may 
  take some time.

20

Preparation For Taking Pictures

Содержание KD-25

Страница 1: ...sage of this product please read this User s Manual and warranty card carefully and keep them in a safe place for future reference Before accepting the warranty card please make sure that the date of...

Страница 2: ...ng Time 27 Under Setup Mode Setting Up Beep Sound 28 21 24 27 27 Table Of Contents Setting Up Auto Power Off 28 Setting Up Date Stamp 28 Setting Up Date Type 28 Date Setup 29 Setting Up Quick View 29...

Страница 3: ...tered trademarks of Microsoft Corporation in the U S and other countries Apple Macintosh Mac OS QuickTime and Power PC are trademarks or registered trademarks of Apple Computer in the U S and other co...

Страница 4: ...s etc Do not use the camera on unstable ground Serious injury and even death may occur as a result especially when falling from high places Important Safety Precautions 6 7 Warning Do not directly loo...

Страница 5: ...A location exposed to lampblack steam high humidity vdust or vibration If dust or liquid enters the camera or if the internal parts are damaged by strong vibration overheating fire or electrical shoc...

Страница 6: ...tteries Ulead Software User Manual Camera Pouch Wrist Strap Quick Start Guide USB Cable Introduction Safety Notes External View Mode Dial Shutter Button Tripod Socket Battery Memory Card Cover Lens Fo...

Страница 7: ...tton Back 12 13 Introduction Safety Notes TFT LCD Monitor Icon Definition Memory card inside Image quality Super fine Fine Normal Image size 2048x1536 1600x1200 1280x960 640x480 Exposure Flash mode Au...

Страница 8: ...de and hold it for 1 second To switch off the camera slide the Power Switch to the side and hold it for 1 second again Loading the Batteries This camera is using 2 x AA batteries 1 Make sure the camer...

Страница 9: ...ad to burns Never open the battery card cover while the camera is accessing the card or processing images Do not leave the battery anywhere where the temperature 0 0 may reach 60C 140 F such as inside...

Страница 10: ...card will jump up 4 Take out the card and close the Battery Memory Card Cover 18 Inserting An SD Card Note This camera comes with approximately 8 MB of memory installed but if you would like to use a...

Страница 11: ...light circumstances Under this mode it is suggested to use a tripod to make sure the camera is held still while taking the picture d Fill in flash The flash will fire in any light circumstances e Fla...

Страница 12: ...preferred setting using Up and Down Direction buttons Press Right Direction Button to confirm the new setting or press Menu Button to cancel the setting When the LCD Display is back to the Still Image...

Страница 13: ...scent For fluorescent light environment Tungsten For tungsten light environment 3 Press Right Direction Button to confirm the setting AUTO Safety Notes Formatting An SD Card Please format the new card...

Страница 14: ...nction can only work with a memory card not with the built in flash memory After the above steps are done please check if the is shown on the left down corner If it is not shown please repeat the step...

Страница 15: ...ton to confirm the setting Or select Cancel to cancel auto power off function Safety Notes Setting Up Functions Before Taking Pictures Date Setup 1 Select Date Setup 2 Press Right Direction Button 3 U...

Страница 16: ...rning to remind you that the image that you are going to capture is under a low light environment It is suggested to set the Flash Mode at Auto Flash or Fill in Flash for supplementary light to compos...

Страница 17: ...se check if it shows on the left top corner of the LCD screen If is shown it means the selected thumbnail is a movie clip but not a still image Deleting Image s Please set the Mode Dial at Playback Mo...

Страница 18: ...6 Click Yes to proceed the installation of DirectX8 1 7 A license agreement appears and please read the content of the agreement If you accept the terms of the license agreement click Yes to go the ne...

Страница 19: ...t Windows 2000 1 Turn on the computer 2 Insert the CD into the CD ROM Drive If the PC is set to auto run the program simply click Driver to start the installation If the PC is not set to auto run the...

Страница 20: ...t If you accept the terms of the license agreement click Yes to go the next step Or you can click No to cancel the installation of Ulead Explorer 7 0 SE Platinum 5 The PC will start the installation o...

Страница 21: ...o to page 52 to download the stored image s onto the PC Installing Camera Driver 41 Under Mac 9 X or later This camera supports only Mac 9 X or versions later If the operating system that you are usin...

Страница 22: ...lorer 7 0 SE Platinum 3 Click Install Ulead Photo Explorer 7 0 SE Platinum 4 Choose operating language 9 languages offered can be selected which are Simplified Chinese Traditional Chinese English Fren...

Страница 23: ...to cancel the installation of Ulead Explorer 7 0 SE Platinum 7 Enter your name and your company s name and click Next 8 This software will be installed at Disk C Program Files Ulead Systems Ulead Pho...

Страница 24: ...to go to next step 11 Set up the default TV system Please select the country you are in 12 The computer will start installing Ulead Photo Explorer 7 0 SE Platinum now You can click Cancel to stop the...

Страница 25: ...stallation and restart the computer Installing Ulead Photo Explorer 49 Under Macintosh Operating System Mac 9 X or later 1 Turn on the computer 2 Insert the CD into the CD ROM Drive The computer will...

Страница 26: ...Ulead Photo Explorer If a warning window shows please visit Apple s official web site to download the latest version of CarbonLib A Key in CarbonLib in the search bar and click Search button b Downloa...

Страница 27: ...nfo ulead com tw E mail info ulead com Japan Asia Pacific Ulead Systems Inc Ulead System Inc http www ulead co jp http www asiapac ulead com E mail info ulead co jp E mail info asiapac ulead com Europ...

Страница 28: ...es videos and sounds to create a slide show Photo Explorer s Browser gives you different folder views In the Folder Tree you can switch to the Favorites list to create a collection of frequently visit...

Страница 29: ...review Pane Slider of Zoom in out Number of selected files New Open Save Save As Add Remove M o v e Rotate Slide Properties Screen Saver Slide Show Pane Export About Ulead Photo Explorer 57 Package Cr...

Страница 30: ...mpler independent applic ation and its sole purpose is only for displaying images Use Ulead Instant Viewer when you want to compare two or more full size images Each image will be opened in a separate...

Страница 31: ...nto Your PC Under Windows Operating System Windows 98 98SE 2000 ME XP Downloading Image s From Removable Disk 1 Turn on the PC 2 Switch on the camera 3 Connect the camera to the PC with USB cable unde...

Страница 32: ...Downloading Image s Onto Your PC 63 Under Macintosh Operating System Mac 9 X or later Downloading Image s From Removable Disk 1 Turn on the PC 2 Switch on the camera 3 Connect the camera to the PC wi...

Страница 33: ...e see page19 NO IMAGE There is no image stored in the memory card or built in flash memory FILE ERROR Delete this image and take the picture again MEMORY ERROR Format the flash memory see page18 CARD...

Страница 34: ...1280 x960 pixels Small 640 x480 pixels Single image AVI play Thumbnails Slide show Digital output connector USB DC power input connector 3 3V 2 0A 2 x AA Alkaline 2 pcs of Ni MH AC adapter Optional 94...

Страница 35: ...ng service If symptoms persist after having checked the table on pages 110 and 111 Troubleshooting disconnect the power supply and contact the dealer from whom you purchased the camera Note Transporta...

Страница 36: ...evision reception which can be determined by turning the equipment off and on the user is encouraged to try to correct the interference by one or more of the following measures Reorient or relocate th...

Страница 37: ......

Отзывы: