Konica Minolta IF-118 Скачать руководство пользователя страница 52

Getting Ready

3

IF-118

3-25

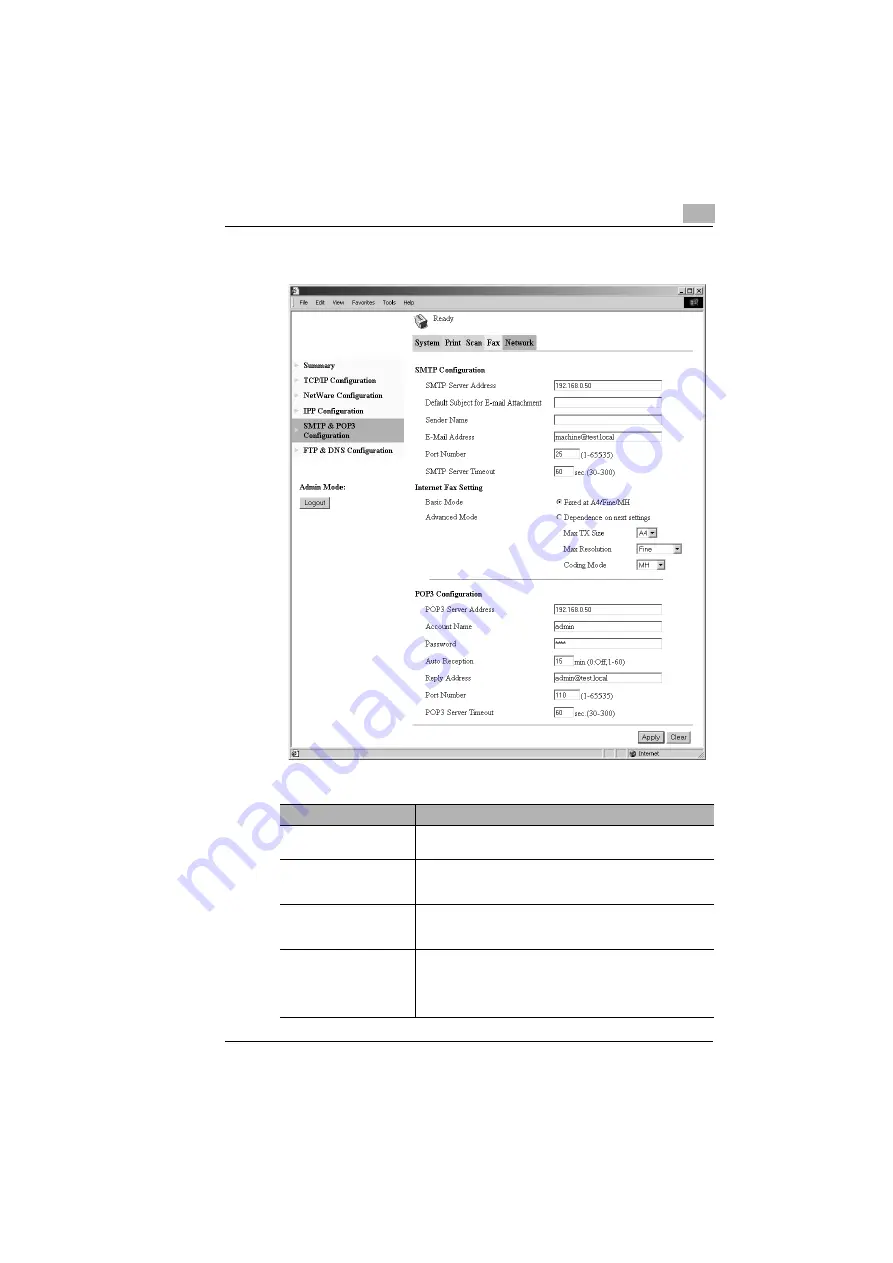
SMTP & POP3 Configuration

SMTP Configuration

Function

Description

SMTP Server Address

This function is used to specify the IP address or host name of 
an SMTP server. (Up to 64 characters)

Default Subject for E-mail 
Attachment

This function is used to specify the default subject line when 
sending scan data as an e-mail attachment. (Up to 20 
characters)

Sender name

This function is used to specify the sender’s name when 
sending scan data as an e-mail attachment. (Up to 20 
characters)

E-Mail Address

This function is used to specify the sender's e-mail address 
when sending scan data as an e-mail attachment. (Up to 64 
characters)
Always enter the e-mail address of the sender, not that of the 
copier itself.

Содержание IF-118

Страница 1: ...IF 118 User s Guide...

Страница 2: ...tions 2 7 2 6 1 Names of Control Panel Parts and Their Functions 2 7 2 6 2 About the Display 2 9 Symbol list 2 9 2 6 3 Entering Text Characters 2 10 Key Operation 2 10 Text Entry Example 2 12 Notes on...

Страница 3: ...nction 3 14 Specifying the Timeout Period for the SMTP Server SMTP TIMEOUT Function 3 14 Specifying Whether or Not To Insert a Text Description TEXT INSERT Function 3 15 Specifying the Default Subject...

Страница 4: ...the Setting for Speed Dialing FTP Server 3 46 Adding a New Speed Dial FTP Server Setting 3 46 Downloading and Uploading the Destination List 3 49 4 Using Scan to E mail Operations 4 1 Transmission Pr...

Страница 5: ...Memory Becomes Full While Scanning 6 8 6 2 Specifying the Destination Using Programmed Dialing 6 9 6 3 Sending a Document to Multiple Destinations Broadcast Transmission 6 9 6 3 1 Using Broadcast Tra...

Страница 6: ...Checking the Transmission Results 8 1 9 Operation Error Messages 9 1 Common Messages and Their Remedies 9 1 9 2 Troubleshooting 9 3 Scan to E mail Transmission 9 3 Internet Fax Transmission 9 3 Intern...

Страница 7: ...Contents vi IF 118...

Страница 8: ...t Windows and Windows NT are registered trademarks of Microsoft Corporation Netscape Communications the Netscape Communications logo Netscape Navigator Netscape Communicator and Netscape are trademark...

Страница 9: ...ht refer to Using PageScope Light on page 2 14 Note No part of this manual may be copied or reproduced either in part or in whole without prior permission The contents of this manual are subject to ch...

Страница 10: ...ored in TIFF or PDF format and can be sent to computers over a network Scan data can be sent in the following ways Select the method best suited to your network environment or purpose 2 1 Scan to E ma...

Страница 11: ...loaded as TIFF or PDF files to the specified folder on an FTP server G This method requires that an FTP server is available over the network G The scan data can also be sent to an FTP server that is a...

Страница 12: ...on the system can be set to send to as many as 10 specified recipients a notification of the FTP server address where the data was uploaded Mail Server Intranet Internet Internet Client Computer Clien...

Страница 13: ...sages and sends them to the desired Internet fax destination The Internet fax service that receives the e mail messages then prints the files when they are received G Since Internet fax uses e mail to...

Страница 14: ...so possible to check on the status of a fax transmission from your computer G The destination can be an e mail address or traditional fax phone number G In order to use the Direct Fax function the opt...

Страница 15: ...s that require a phone line connection System Requirements Functions available when the Internet Fax Network Scan Kit is installed Scan to E mail Scan to Server FTP Internet Faxing Direct Fax Required...

Страница 16: ...ays addresses programmed in one touch dial group dial and speed dial 3 FAX SET key Used to switch between different function settings screens Sending a Document to Multiple Destinations Broadcast Tran...

Страница 17: ...d to select the item above or below the current position in settings screens or lists 12 YES key Used to confirm settings 13 NO CLEAR key Used to delete characters or numbers that have been entered in...

Страница 18: ...current settings menu or option If an error occurs displays the error message During standby displays the date and the amount of memory available 2 Message area Displays messages such as operating in...

Страница 19: ...When entering numbers 1 appears in the display When entering letters or symbols A appears in the display The following lists show the characters available with each key of the 10 key pad For fax numb...

Страница 20: ...isplay 10 key pad key Available characters 1 period _ underscore hyphen 1 2 ABC ABC2abc 3 DEF DEF3def 4 GHI GHI4ghi 5 JKL JKL5jkl 6 MNO MNO6mno 7 PQRS PQRS7pqrs 8 TUV TUV8tuv 9 WXYZ WXYZ9wxyz 0 Space...

Страница 21: ...tion blinks alternately with the character at that position Press the 6 key twice Press the 5 key once Press the 0 key once Press the 6 key 3 times Press the 3 key 7 times Press the Press the 4 key 7...

Страница 22: ...character to be deleted and then press the NO key To enter a space press the 0 key on the 10 key pad When entering text press the key before entering the next character when it is the same as the cur...

Страница 23: ...by the HTTP server built into the network interface card This utility can be used with a Web browser as an interface for remotely controlling the copier and network interface card Here are some examp...

Страница 24: ...ings on page 3 8 PageScope Light is accessed directly using a Web browser 1 Start up your Web browser 2 Enter the IP address of the copier into the Address box and then press the Enter key http copier...

Страница 25: ...to change without notice 2 4 1 3 5 1 Status display Displays the current status of the copier 2 Administrator password Enter the administrator password to log in to the Administrator mode 3 Tabs These...

Страница 26: ...tor password in the Admin Password box at the left side of the screen 2 Click the Login button to log in to the Administrator mode 3 To log out click the Logout button Note The default password for Ad...

Страница 27: ...2 Overview 2 18 IF 118...

Страница 28: ...f the copier and the connector on the other end to an open port on a network hub Tip The network port is on the left side of the copier Use a Category 5 or 5E LAN cable The LAN cable is not included A...

Страница 29: ...Function Description Internet Faxing Scan to E mail Scan to Server Direct Fax Setting Control panel PageScope Light 2 Required Unnecessary As necessary 2 Possible Not possible NETWORK SETTINGS IP ADDR...

Страница 30: ...ome other DNS server located outside your local network select DISABLE Consult your network administrator for details 2 2 GATEWAY TX This function is used to enable the Direct Fax function 2 2 E MAIL...

Страница 31: ...o specify the length of time in seconds until the connection to the SMTP server times out 30 to 300 seconds 2 2 1 2 2 TEXT INSERT This function is used to specify whether or not text explaining that a...

Страница 32: ...tails 2 2 2 POP3 PORT NO This function is used to specify the port number 1 to 65535 for the POP3 server Consult your network administrator for details 2 2 2 POP3 TIMEOUT This function is used to spec...

Страница 33: ...Auto Reception function is enabled OFF 1 to 60 minutes 2 2 2 REPLY ADDRESS This function is used to specify the e mail addresse where notifications are sent if an error occurs while an Internet fax is...

Страница 34: ...File Destination This function is used to specify the FTP destination used for Scan to Server FTP operations It is used to specify the IP address of the FTP server the directory and other settings 2 2...

Страница 35: ...NET MASK G GATEWAY G DNS CONFIG G GATEWAY TX Note Be sure to consult your network administrator before specifying any of the network settings Tip If you wish to cancel a change to a network setting be...

Страница 36: ...in NVRAM must be selected in PageScope Light Select this option from the screen displayed after clicking TCP IP Configuration in the menu on the Network tab 5 Using the 10 key pad enter the IP addres...

Страница 37: ...O RESET key so that the message PLEASE RE START POWER SUPPLY OFF ON appears 5 Set the power switch of the copier to O then I to restart the copier Specifying the Default Gateway 1 From the NETWORK SET...

Страница 38: ...Using the 10 key pad enter the IP address for the DNS server 4 Press the YES key The NETWORK SETTING screen appears To register settings in the copier the copier must be turned off then on again 5 Whi...

Страница 39: ...EOUT G TEXT INSERT G DEFAULT SUBJECT G E MAIL MODE Tip If you wish to cancel a change to a setting before applying it press the NO key Press the YES key after the message STOP SETTING appears Register...

Страница 40: ...n the copier enter the e mail address of the administrator 3 Press the YES key The E MAIL SETTING 1 screen appears again Specifying the SMTP Server Address 1 From the E MAIL SETTING 1 menu in the Util...

Страница 41: ...set between 1 and 65535 Normally port number 25 is used 3 Press the YES key The E MAIL SETTING 1 screen appears again Specifying the Timeout Period for the SMTP Server SMTP TIMEOUT Function 1 From the...

Страница 42: ...then press the YES key The E MAIL SETTING 1 screen appears again Specifying the Default Subject Line 1 From the E MAIL SETTING 1 menu in the Utility mode press the 7 key on the 10 key pad to select D...

Страница 43: ...ernet fax the settings should be specified according to the receiving device If these settings are specified correctly the document will be sent with the settings appropriate for the recipient even if...

Страница 44: ...YES key is pressed the screen for specifying the maximum resolution appears 4 Press the and keys to select the maximum resolution FINE or S F and then press the YES key When the YES key is pressed th...

Страница 45: ...TION G REPLY ADDRESS G HEADER PRINT Tip If you wish to cancel a change to a setting before applying it press the NO key Press the YES key after the message STOP SETTING appears Specifying the POP3 Ser...

Страница 46: ...er the port number for the POP3 server For information on entering text refer to Entering Text Characters on page 2 10 The port number can be set between 1 and 65535 Normally port number 110 is used 3...

Страница 47: ...he YES key The E MAIL SETTING 2 screen appears again Specifying the POP3 Password 1 From the E MAIL SETTING 2 menu in the Utility mode press the 5 key on the 10 key pad to select POP3 PASSWORD 2 Enter...

Страница 48: ...terval for automatically checking for new e mail messages can be set between 1 minute and 60 minutes 4 Press the YES key The E MAIL SETTING 2 screen appears again Specifying the Address for Result Not...

Страница 49: ...Header Information HEADER PRINT Function 1 From the E MAIL SETTING 2 menu in the Utility mode press the 8 key on the 10 key pad to select HEADER PRINT 2 Press the and keys to select ON or OFF and the...

Страница 50: ...ied they are only enabled after the Apply button is clicked then the Reset button next to NIC and Printer Controller Reset on the System tab is clicked after the message Update Successful has appeared...

Страница 51: ...eady 3 24 IF 118 DHCP APIPA Select this function if the IP address is automatically assigned by a DHCP server or APIPA IP Address in NVRAM Select this function if a fixed IP address is used Function D...

Страница 52: ...n is used to specify the default subject line when sending scan data as an e mail attachment Up to 20 characters Sender name This function is used to specify the sender s name when sending scan data a...

Страница 53: ...for scan data that is to be transmitted when using the Advanced mode MH MR or MMR Function Description POP3 Server Address This function is used to specify the IP address or host name of the POP3 serv...

Страница 54: ...y This function is used to specify the port number for the proxy server 1 to 65535 FTP Server Timeout This function is used to specify the length of time 5 to 300 seconds until the connection to the F...

Страница 55: ...function is used to specify whether or not text explaining that an image has been attached to the e mail message is inserted when scan data is sent as an e mail attachment Header Print This function i...

Страница 56: ...Getting Ready 3 IF 118 3 29 3 2 3 3 Scan tab File Destination Setting 1 Click a number in the File Destination List that does not contain a file destination...

Страница 57: ...ed to specify the name for the file destination Up to 20 characters FTP Server Address This function is used to specify the host name or IP address of the FTP site where the scan data will be sent Up...

Страница 58: ...used to specify whether or not to send an e mail notification when scan data is uploaded to an FTP server Notification Address This function is used to specify the e mail addresses up to 10 where e ma...

Страница 59: ...tings for a One Touch Dial Key 1 Press the UTILITY key 2 Press the or key until FAX REGISTRATION appears 3 Press the 1 key on the 10 key pad to select ONE TOUCH DIAL 4 Press the one touch dial key whe...

Страница 60: ...tain 9 Press the and keys to select the scan mode BASIC or ADVANCED and then press the YES key If ADVANCED is selected the screen for specifying the maximum size of document that can be sent appears G...

Страница 61: ...ITY key 2 Press the or key until FAX REGISTRATION appears 3 Press the 2 key on the 10 key pad to select SPEED DIAL 4 Use the 10 key pad to enter the 3 digit speed dial number where you wish to add an...

Страница 62: ...the maximum document transmission size metric models A4 B4 or A3 inch models LT or 11 17 and then press the YES key When the YES key is pressed the screen for specifying the maximum resolution appears...

Страница 63: ...p name 6 Use the one touch dial keys and speed dial numbers to enter the address for the recipient Tip For information on changing or deleting e mail addresses that have already been registered refer...

Страница 64: ...T key when you have finished adding addresses The settings are registered To add information for other group dial keys repeat steps 4 through 8 9 Press the NO key when you have finished adding address...

Страница 65: ...4 5 1 No One touch dial number 01 to 27 2 Name The name of the destination for the one touch dial setting 3 Destination address The address programmed for the one touch dial setting Depending on the...

Страница 66: ...PageScope Light on page 2 14 2 Log in to the Administrator mode 3 Click the One Touch Dial Setting in the menu on Fax tab 4 Click the one touch dial number where you wish to add a new address The One...

Страница 67: ...nction Description Basic Mode Advanced Mode This function is used to specify the Basic and Advanced transmission modes when sending a document by Internet fax Basic Mode or Advanced Mode Max TX Size T...

Страница 68: ...ndex number to jump to the corresponding speed dial list 2 No Speed dial number 001 to 200 3 Destination Name The destination programmed with the selected speed dial number 4 Destination address The d...

Страница 69: ...g PageScope Light on page 2 14 2 Log in to the Administrator mode 3 Click the Speed Dial Setting in the menu on Fax tab 4 Click the speed dial number where you wish to add a new address The Speed Dial...

Страница 70: ...asic Mode Advanced Mode This function is used to specify the Basic and Advanced transmission modes when sending a document by Internet fax Basic Mode or Advanced Mode Max TX Size This function is used...

Страница 71: ...n page 2 14 2 Log in to the Administrator mode 3 Click the Group Dial Setting in the menu on Fax tab 4 Click the group dial number where you wish to add a new address 1 3 4 2 1 No One touch dial numbe...

Страница 72: ...e touch dialing or speed dialing can be added to the 50 destinations specified for a group dial key To select a destination select the check box to the left of the destination in the list 6 Click the...

Страница 73: ...t Refer to Using PageScope Light on page 2 14 2 Log in to the Administrator mode 3 Click File Destination Setting in the menu on the Scan tab 2 One Touch Dial Index Click an index number to jump to th...

Страница 74: ...Getting Ready 3 IF 118 3 47 4 Click the speed dial number where you wish to add a new address 5 The File Destination screen appears Enter the necessary information and then click the Apply button...

Страница 75: ...te Port Number This function is used to specify the remote port number 1 to 65535 if a proxy server is not being used Normally port number 21 is used Function Description Enable Notification This func...

Страница 76: ...copier download You can also upload a CSV file to the copier 1 3 2 1 Apply button Click this button to export to a CSV file the list of destinations programmed with one touch dial keys and speed dial...

Страница 77: ...3 Getting Ready 3 50 IF 118...

Страница 78: ...ipient In addition images are regarded as having been sent successfully on completion of their transmission to the server In order to perform this operation an IP address SMTP server and e mail addres...

Страница 79: ...des to the size of the document Load the document with the surface to be scanned face up 3 Press the 123 ABC key 4 Press the keys on the 10 key pad to enter the e mail address and then press the YES k...

Страница 80: ...esses Repeat step 6 until all of the recipients have been specified 7 After you have finished specifying the addresses for additional recipients press the YES key 8 Press the and keys to select the re...

Страница 81: ...and left side of the original glass 3 Press the 123 ABC key 4 Press the keys on the 10 key pad to enter the e mail address and then press the YES key The e mail address can also be specified using on...

Страница 82: ...600 600 dpi and then press the YES key To specify detailed settings for the scan mode press the key For information on specifying detailed settings refer to Changing the Scan Mode Settings on page 4 6...

Страница 83: ...To change other settings press the key Go to step 4 To quit making changes to the scan mode settings press the YES key The screen for selecting the document mode appears 4 Press the DENSITY SET key t...

Страница 84: ...n appears again If MANUAL is selected go to step 3 3 Press the and keys to select the scan size and then press the YES key The document mode selection screen appears again 4 1 5 Specifying the Default...

Страница 85: ...s the and keys to select the data format TIFF or PDF and then press the YES key The SCAN SETTING screen appears Specifying the Encoding Method 1 Press the UTILITY key 2 Press the or key until SCAN SET...

Страница 86: ...T key is pressed within one minute of the message appearing the scan data for the pages that have already been scanned is sent If the Automatic Document Feeder is being used the remaining pages in the...

Страница 87: ...Touch Dial Keys Note The one touch dial setting must have already been specified For information on setting up one touch dial keys refer to Adding Destinations on page 3 32 1 Press the one touch dial...

Страница 88: ...y been specified For information on setting up speed dial numbers refer to Adding Destinations on page 3 32 1 Press the SPEED DIAL key and then use the 10 key pad to enter the 3 digit speed dial numbe...

Страница 89: ...ng up group dial keys refer to Adding Destinations on page 3 32 If at least one fax number is registered as a recipient with a group dial key that group dial key cannot be used with the Scan to E mail...

Страница 90: ...e TEL BOOK PHONE BOOK key 2 Press the and keys to select LIST or SEARCH and then press the YES key If LIST is selected the detailed settings for one touch dial keys and speed dial numbers are displaye...

Страница 91: ...information on entering text refer to Entering Text Characters on page 2 10 Up to 10 characters can be entered 4 Press the YES key The recipient names that start with the characters entered in step 3...

Страница 92: ...4 IF 118 4 15 7 Press the and keys to select a destination If the desired destination does not appear in the list of found items press the NO key twice to return to the screen for entering the charac...

Страница 93: ...4 Using Scan to E mail Operations 4 16 IF 118...

Страница 94: ...notified by e mail of the FTP server address where a file was uploaded This setting can be specified using PageScope Light Refer to File Destination Setting on page 3 29 To cancel a job while the doc...

Страница 95: ...grammed with the FTP server address where you want to upload the scan data Specify a speed dial number between 201 and 210 An FTP server address can only be specified with a speed dial number In addit...

Страница 96: ...ngs refer to Changing the Scan Mode Settings on page 4 6 6 Press the and keys to select ADF 7 Press the START key The copier scans the document then connects to the FTP server and uploads the data Tip...

Страница 97: ...med with the FTP server address to which you want to upload the scan data Specify a speed dial number between 201 and 210 An FTP server address can only be specified with a speed dial number In additi...

Страница 98: ...ss the and keys to select BOOK To change the size of the scanned image press the key For information on changing the size refer to Changing the Scanned Image Size on page 4 7 7 Press the YES key Scann...

Страница 99: ...ART key is pressed within one minute of the message appearing the scan data for the pages that have already been scanned is sent If the Automatic Document Feeder is being used the remaining pages in t...

Страница 100: ...pending on the type of Internet fax at the receiving end Be sure to check the capabilities of the Internet fax device at the receiving end before sending an Internet fax If the capabilities of the Int...

Страница 101: ...size of the document Load the document with the surface to be scanned face up 3 If necessary adjust the fax resolution setting p 6 5 4 Press the 123 ABC key 5 Using the 10 key pad enter the e mail ad...

Страница 102: ...hanging the Transmission Mode Settings on page 6 6 6 Press the START key Scanning starts and the scan data is sent to the recipient 6 1 2 Using the Original Glass 1 Press the FAX key The copier switch...

Страница 103: ...smission mode settings For information on specifying these settings refer to Changing the Transmission Mode Settings on page 6 6 6 Press the START key 7 Check that the correct document size appears on...

Страница 104: ...ing the Fax Resolution 1 Press the RESOLUTION key 2 Press the and keys to select the resolution and then press the YES key The following image types are available STD Standard FINE Fine S F Superfine...

Страница 105: ...r transmission appears Go to step 3 If BASIC is selected the screen for entering the e mail address appears 3 Press the and keys to select the maximum transmission size metric models A4 B4 or A3 inch...

Страница 106: ...when the START key is pressed If a timer transmission is being performed after the START key is pressed the document is scanned but is not sent until the specified time 7 Press the and keys to select...

Страница 107: ...T key is pressed within one minute of the message appearing the scan data for the pages that have already been scanned is sent If the Automatic Document Feeder is being used the remaining pages in the...

Страница 108: ...The maximum number of destinations that can be specified at one time is 243 However only a maximum of 16 destinations can be specified by entering the information directly Tip A recipient can be speci...

Страница 109: ...on Mode Settings on page 6 6 Tip If an incorrect destination has been specified press the NO key to delete the current selection You can only delete a destination in this way if it is done before the...

Страница 110: ...transmission contain both e mail addresses and fax numbers the fax is sent to the e mail addresses before it is sent to the fax numbers When performing a broadcast transmission the transmission setti...

Страница 111: ...t at a specified time Timer transmission can be combined with broadcast transmission 6 4 1 Using Timer Transmission 1 Load the document into the copier 2 If necessary adjust the fax resolution setting...

Страница 112: ...be entered directly using the 10 key pad If the 10 key pad is being used to enter the address you can press the key after entering the e mail address to specify detailed transmission mode settings For...

Страница 113: ...transmission of the jobs queued in memory are displayed If there are no jobs stored in the memory the message NONE appears 3 Press the and keys to select the job to be deleted The following types of...

Страница 114: ...lay Broadcast Transmission If the copier has been specified as a relay station it can receive documents from another fax machine transmitting station then send the document to multiple recipients othe...

Страница 115: ...e IP address or POP3 server address have not been specified In addition a transmission error will occur if the POP3 account or POP3 password have not been specified correctly Refer to Specifying Other...

Страница 116: ...is not set to automatically retrieve messages e mail must be checked manually Refer to Manual Reception on page 6 17 Screen during auto reception 6 7 3 Manual Reception If the copier is not set to aut...

Страница 117: ...FAX SET key nine times to select INTERNET FAX RX and then press the YES key 4 Press the YES key The copier checks the POP3 server for received e mail messages then begins to print any messages that ha...

Страница 118: ...ved document is G Document size Within the size specified as the maximum size for transmission in the Advanced mode G Resolution Within the resolution range specified as the maximum resolution for tra...

Страница 119: ...estination and is also printed at the same time 5 The destination e mail address or fax number can be entered using the 10 key pad or the one touch dial keys or speed dial numbers 6 Press the YES key...

Страница 120: ...e metric models A4 B4 or A3 inch models LT or 11 17 and then press the YES key 9 Press the and keys to select the maximum transmission resolution FINE or S F and then press the YES key 10 Press the an...

Страница 121: ...6 Using Internet Faxing Operations 6 22 IF 118...

Страница 122: ...ge Pro I Net Portal must also be installed on the computer used to send the document 7 1 About Unimessage Pro I Net Portal For details about specifying the default settings for Unimessage Pro I Net Po...

Страница 123: ...7 Direct Fax Transmission 7 2 IF 118...

Страница 124: ...ATUS key 8 1 Checking the Transmission Results 1 Press the STATUS key 2 Press the key once to select TX RX RESULT and then press the YES key 3 Press the and keys to display and check the desired trans...

Страница 125: ...8 Checking the Transmission Reception Results 8 2 IF 118...

Страница 126: ...DISCONNECT XXXX Server The connection to the server was cut Consult with the network administrator WRONG PASSWORD XXXX Server The password is incorrect so the copier could not log onto the server For...

Страница 127: ...eceived e mail messages stored in the memory SERVER MEMORY FULL SMTP Server The memory of the SMTP server has become full while sending an e mail message Consult with the network administrator FTP SER...

Страница 128: ...hat they are supported by the recipient s terminal and then try sending the data again p 4 6 p 4 7 The document text was not inserted when the data was sent With some e mail applications if an e mail...

Страница 129: ...on The LAN cable is damaged Replace the LAN cable The data is received but not printed An e mail message with data of an incompatible format attached or with no data was received Ask the sender to sen...

Страница 130: ...ce is not specified correctly Specify the IP address p 3 8 The URL setting in the Web browser is incorrect In the Address box type the IP address of the specified device p 2 15 The settings in the Web...

Страница 131: ...put ordisplay area and the number of charactersthat can be registered are different Depending on the browser scroll within the input area If this is not possible this should not affect the actual sett...

Страница 132: ...H MR MMR Network Ethernet LAN 10BASE T or 100BASE TX connection Communications Protocols E mail Transmission SMTP TCP IP E mail Reception POP3 TCP IP Resolution Transmission 204 98 dpi 204 196 dpi 204...

Страница 133: ...10 Appendix 10 2 IF 118...

Страница 134: ...ions 3 21 Auto reception 3 6 3 21 6 17 Auto Photo key 2 8 Automatic document feeder E mail 4 2 FTP server 5 2 Internet faxes 6 2 B Broadcast transmission 6 9 C Canceling 6 14 Communication error 9 1 C...

Страница 135: ...nput 2 13 Entering text characters 2 10 Error indicator 2 8 F Fax key 2 8 Fax resolution 6 5 File destination 3 7 3 29 Forwarding fax documents 6 19 FTP configuration 3 7 FTP server 2 2 2 6 3 46 5 1 F...

Страница 136: ...2 3 8 3 23 No C key 2 8 O One touch dial 3 32 3 38 3 39 4 10 One touch dial keys 2 7 Original glass E mail 4 4 FTP server 5 4 Internet Faxes 6 3 Overview 2 1 P PageScope Light 2 14 Administrator 2 17...

Страница 137: ...procedures E mail 4 2 Sender name 3 3 3 12 Sending internet faxes 6 2 SMTP Port No 3 4 3 14 SMTP server 2 6 3 4 3 13 SMTP timeout 3 4 3 14 Specifications 10 1 Speed dial 3 34 3 41 3 42 3 46 4 11 Speed...

Страница 138: ...Index 11 IF 118 11 5 U Unimessage Pro I Net portal 2 6 7 1 Utility key 2 8 Y Yes key 2 8 Z Zoom key 2 8...

Страница 139: ...11 Index 11 6 IF 118...

Страница 140: ...2004 02 1 MANUFACTURER TOKYO JAPAN Printed in China 4508 7797 01 91264C051H018...

Отзывы: