background image

68

Operation of Test Print

Density Check

Check the density value according to the items to be checked shown below.

Category

Item 

Number

Item to be Checked

Density

When Checking from the Message Display Window on the Operation Panel

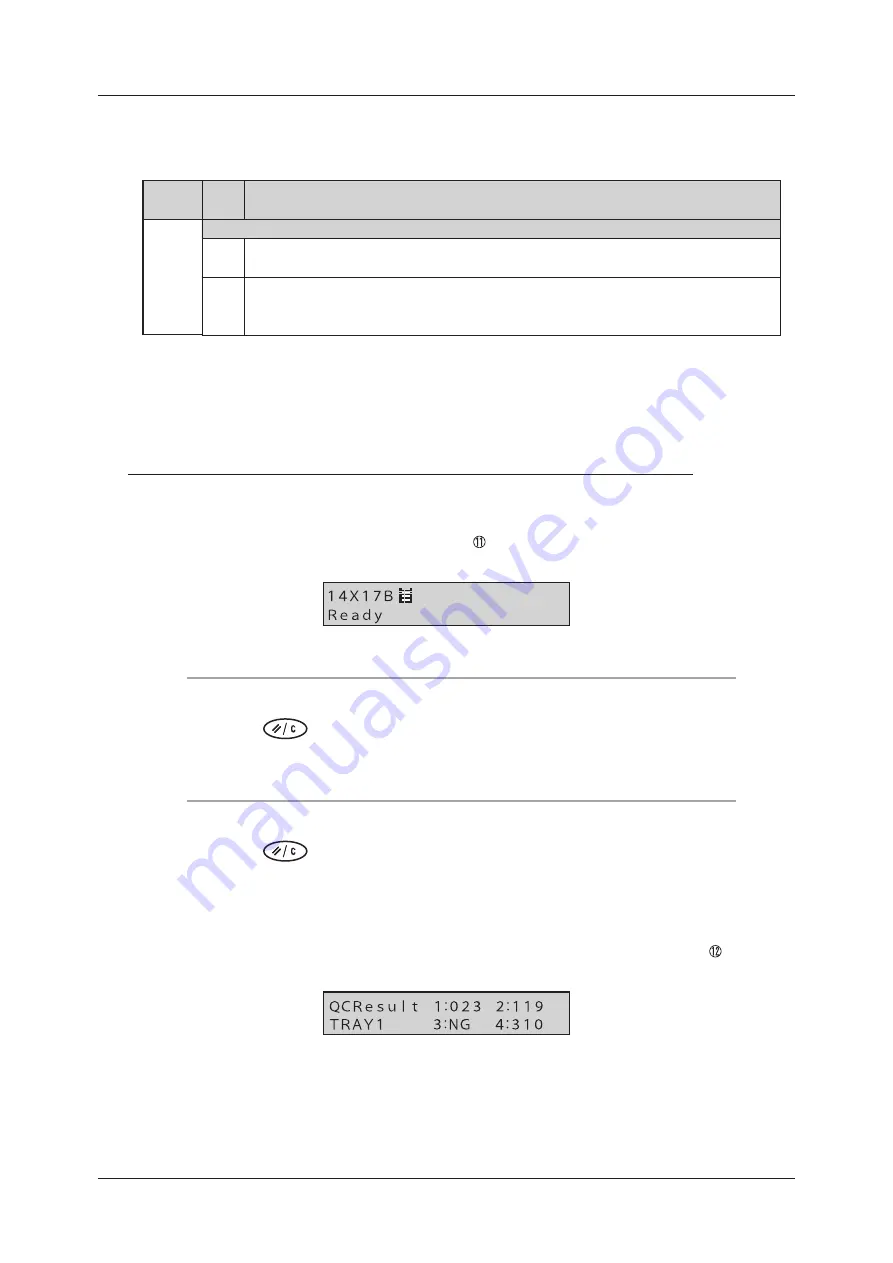
(11) After printing the QC patterns, “Dens. Error <Tray No.>” is not displayed on the DRYPRO 832 


operation panel

(12) After printing the QC pattern, “NG” is not displayed in “1” to “4” of the “QC Result” in the QC 

Results View on the DRYPRO 832 operation panel, but the correct density value (three digits) 
is displayed

Check the readout given by the densitometer built into the main unit from the operation panel of the 
main unit. 

When Checking from the Message Display Window on the Operation Panel

Check that “Dens� Error <Tray No�>” is not displayed on the DRYPRO 832  
operation panel� (Item to be checked:   )


When QC patterns are printed from the standard supply tray (tray 1)

Press the 

 [Reset/Cancel] button twice�

The QC Results View of the standard supply tray (tray 1) is displayed.

When QC patterns are printed from Lispl-832 (tray2)

Press the 

 [Reset/Cancel] button three times�

The QC Results View of the Lispl-832 (tray 2) is displayed.

Check that “NG” is not displayed in “1” to “4” of the “QC Result” and the 
correct density value (three digits) is displayed� (Item to be checked:  )

After the expiration of 30 seconds without external input, the screen is restored to 
the Current Status View. 

Содержание Drypro 832

Страница 1: ...LASER IMAGER 01 ET EN ...

Страница 2: ......

Страница 3: ...32 2 2 6 Lispl 832 Option 32 Chapter 3 Chapter 3 Operation from Main Unit 33 3 1 Starting and Shutting Down 34 3 1 1 How to Start 34 3 1 2 How to Shut Down 36 3 2 Operation Mode 37 3 2 1 Current Status Display 37 3 2 2 Status LED Display 37 3 3 Loading Films 38 3 4 Calibration 43 3 5 Test Print 45 3 6 Displaying Main Unit Information 46 3 7 Film Related Settings 48 3 7 1 Changing the Film Size fro...

Страница 4: ...4 Sisukord Appendix 75 A Specifications 76 B Test Print Check List 78 ...

Страница 5: ...tusjuhend läheb kaduma pöörduge Konica Minolta tehnilise esindaja poole Klassifikatsioon See toode on klassifitseeritud järgmiselt Klassifikatsioon elektrilöögivastase kaitse liigi põhjal Väline toiteallikas kaubanduslikuks otstarbeks I klassi seade Klassifikatsioon potentsiaalselt ohtliku vee sissepääsu vastase kaitseklassi põhjal Tavaseade kinnise korpusega seade millel ei ole kaitset vee sissep...

Страница 6: ...nõude eest mille põhjuseks on installimine teisaldamine muutmine hooldus või remonditöö mille tegi keegi teine kui Konica Minolta või Konica Minolta poolt määratud töövõtja 4 Konica Minolta Inc ei vastuta ühegi Konica Minolta toote talitlushäire ega kahjustuse nõude eest mille põhjustajaks on muu tootja tooted mille ei paigaldanud Konica Minolta 5 Konica Minolta Inc ei vastuta ühegi talitlushäire ...

Страница 7: ...lle teenusega ühendamiseks Seade tuleb ühendada selle teenusega samasse võrku 13 Seadme kasutamisel tuleb sellel seadmel ja välistel mäluseadmetel hoitavaid erinevaid kasutaja ja patsiendiandmeid hallata nõuetekohaselt ning kasutaja vastutab selle eest täielikult Konica Minolta Inc ei saa võtta mis tahes vastutust seoses kahjustustega mis tulenevad erinevate andmete lekkest nende kõrvaldamise ajal...

Страница 8: ...võtte Konica Minolta teenindusesindajat ja ELi vastavaid asutusi Kaubamärk Windows on Microsoft Corporationi registreeritud kaubamärk Ameerika Ühendriikides ja või teistes riikides Käesolevas juhendis leiduvad ettevõtete ja tootenimed on nende omanikele kuuluvad kaubamärgid või registreeritud kaubamärgid Autoriõigus 2021 Konica Minolta Inc Kõik õigused kaitstud ...

Страница 9: ...9 Peatükk 1 Hoiatused ja ettevaatusabinõud ...

Страница 10: ...evad sümbolid Üldised ette vaatusabinõud Tulekahju oht Elektrilöögi oht Kõrge tempera tuuri hoiatus Laserkiire oht Keelatud tegudele viitavad sümbolid Keelatud Ärge võtke lahti Ärge puudutage märja käega Ärge hoidke niiskes kohas Kohustuslikele või nõutavatele tegudele viitavad sümbolid Maandus Võtke toitepistik pistikupesast välja Muud sümbolid Vahelduvvool toitevool Toite kaitselüliti VÄLJAS Toi...

Страница 11: ...dele mille vältimata jätmine võib põhjustada surma või raskeid vigastusi ETTEVAATUST Viitab ohtudele mille vältimata jätmine võib põhjustada keskmise raskusastmega haavu või väikse maid vigastusi Sellega viidatakse ka varaliste kahjude ning sisestatud andmete kaotamise muutu mise või seiskumise võimalikule esinemisele Kahjustuste tõenäosus Palju Vähe Kehavigastused või varaline kahju Surm või rask...

Страница 12: ... kujutatud hoiatussilte Need tuletavad meie klientidele meelde võimalikke ohte mida võib seadme kasutamisel esineda 1 3 1 Teave hoiatussiltide kohta Laserikiire hoiatussilt Laseri võimsuse silt 1 klassi lasertoote silt Deodorantfiltri vahetamise ummistuse kõrvaldamise silt ...

Страница 13: ...1 2 3 4 5 6 7 8 9 10 11 12 13 Hoiatussildid Kile laadimise silt kilepakendi avamise hoiatussilt 1 3 2 Hoiatussiltide asukohad Sisevaade Deodorantfiltri vahetamise ummistuse kõrvaldamise silt ...

Страница 14: ...14 Hoiatussildid Vaade tagant ja paremalt Laserikiire hoiatussilt 1 klassi lasertoote silt Laseri võimsuse silt Salv Kile laadimise silt kilepakendi avamise hoiatussilt Valesti laadimise ennetussilt ...

Страница 15: ...iivis 89 336 EMÜ rakendage asjakohast direktiivi meditsiiniseadmetele kehtestatud nõuetele Need piirväärtused on ette nähtud tüüpilisse meditsiiniasutusse paigaldatud seadmete korral mõistliku kait se tagamiseks kahjulike häiringute vastu DRYPRO 832 genereerib kasutab ja võib kiirata raadiosagedus likku energiat ning kui seda ei paigaldata ega kasutata juhendi kohaselt võib see põhjustada kahjulik...

Страница 16: ...kasutamisel HOIATUS Ärge avage ega sulgege katet muutke ega kasutage seda muul otstarbel kui käesolevas dokumendis on kirjeldatud Kui puutute tahtmatult kokku tootes oleva kuuma või kõrge pinge all oleva osaga võib see põh justada põletusi või elektrilöögi Kui asendate filtreid või kõrvaldate väljastus ja veoüksuse ummistuse järgige selles dokumendis antud juhiseid Vastasel korral võite saada põle...

Страница 17: ...tud Konica Minolta tehniliste esindajate poole Ärge kunagi jätkake rikkis toote kasutamist sest see on ohtlik Selles tootes kasutatakse laserit Vältige silmade või naha kokkupuudet laserikiirega sest see võib põhjustada silmade või naha vigastusi Selles tootes on ka kõrgepingepunkte Olge ettevaatlik et te ei puutuks nendega kok ku sest see võib põhjustada elektrilöögi ETTEVAATUST Muud hooldustööd ...

Страница 18: ... 4 5 Ettevaatusabinõud käitlemisel ETTEVAATUST DRYPRO 832 põhiseadmed sh liitiumakud kaasasolevad tarvikud eraldi müüdavad tarvikud kuluma terjalid ja andmekandjad tuleb lasta käidelda volitatud tööstusjäätmete käitlusettevõttel Käitlusviis peab vastama kohaliku omavalitsuse asjakohastele eeskirjadele ja määrustele See sümbol tähendab et seda toodet ei tohi kasutuselt kõr valdades panna olmejäätme...

Страница 19: ...est eraldi elektriahelaga ühendatud pistikupessa Abi saamiseks pöörduge tootja või välitehniku poole HOIATUS Ärge kasutage selle seadme lähedal raadiosageduslikku kiirgust tekitavaid mobiilseid sidesead meid nagu mobiiltelefone ega piipareid Selliste raadiosageduslikku kiirgust tekitavate seadmete kasutamine selle seadme lähedal võib elektromagnetlainete häiringute tõttu põhjustada häireid seadme ...

Страница 20: ...kaetud puidu betoo ni või keraamiliste plaatidega Kui põrandad on kaetud sünteetilise materjaliga peab suhteline niiskus olema vähemalt 30 Toitepinge kvali teet peab vastama kaubandus või haiglakesk konnale tavapäraselt esitatavatele nõuetele 8 kV õhk 8 kV õhk Elektriline kiirsiire purse IEC 61000 4 4 2 kV vooluvõrgu liinidel 2 kV vooluvõrgu liinidel Toitepinge kvaliteet peab vastama kau bandus võ...

Страница 21: ...seeritud raadiosaatjatelt nagu mää ratud elektromagnetilise kohauuringugaa peavad olema vastavustasemest väiksemad igas sagedusvahemikusb Järgmise sümboliga tähistatud seadme lähedal võib ilmneda häiringuid MÄRKUS 80 MHz ja 800 MHz korral kehtib kõrgeima sagedusala MÄRKUS Need suunised ei pruugi igas olukorras kehtida Elektromagnetilist levi mõjutab neeldumine ja peegel dus struktuuridelt esemetel...

Страница 22: ...ele Saatja maksimaalne nimiväljundvõimsus W Saatja sagedusest sõltuv eraldusvahemaa m 150 kHz kuni 80 MHz d 1 2 P 80 MHz kuni 800 MHz d 1 2 P 800 MHz kuni 2 5 GHz d 2 3 P 0 01 0 12 0 12 0 23 0 1 0 38 0 38 0 73 1 1 2 1 2 2 3 10 3 8 3 8 8 100 12 12 23 Saatjate korral mille suurimat nimiväljundvõimsust ei ole ülalpool esitatud saab soovituslikku vahekaugust d meetrites m hinnata saatja sagedusele vas...

Страница 23: ...ade port 100 kHz kordamise sagedus Pingeimpulsid IEC 61000 4 5 0 5 kV 1 kV liinidel 0 5 kV 1 kV 2 kV liin ja maanduse vahel Raadiosageduslike väljade indutseeritud juhtivuslikud häiringud IEC 61000 4 6 3 V 0 15 MHz 80 MHz 6 V ISM ribades vahemikus 0 15 80 MHza 80 AM 1 kHz juures Nimivõrgusageduse magnet väljad IEC 61000 4 8 30 A m Pingelangused IEC 61000 4 11 0 UT 0 5 tsüklit 0 45 90 135 180 225 2...

Страница 24: ... Modulatsioon Häiringukindluse testi tase V m 385 Impulsi modulatsioon 18 Hz 27 450 FM 5 kHz kõrvalekalle 1 kHz sinusoid 28 710 Impulsi modulatsioon 217 Hz 9 745 780 810 Impulsi modulatsioon 18 Hz 28 870 930 1720 Impulsi modulatsioon 217 Hz 28 1845 1970 2450 Impulsi modulatsioon 217 Hz 28 5240 Impulsi modulatsioon 217 Hz 9 5500 5785 ...

Страница 25: ...25 Chapter 2 Product Outline ...

Страница 26: ...server Printlink5 IN and console or the like Image data is sent to DRYPRO 832 via Printlink5 IN and console or the like from the diagnostic system equipped with a communication function over DICOM Printlink5 IN DRYPRO 832 DRYPRO 832 DRYPRO 832 Printlink5 IN console Multiple console DICOM Modality ...

Страница 27: ...ance mode from Printlink5 IN Blue light ON Ready to print or sleeping Flashing red Empty not ready to print loading film or test printing from the operation unit Red light ON Exterior cover open jam error or other E F errors 3 Film ejection tray Printed films are ejected into this tray 5 3 1 Cleaning Film Ejection Tray page 69 4 Cutter pocket Holds the special cutter for opening a film package bar...

Страница 28: ...t duct 5 Air intake 7 LAN cover Num ber Name Function Refer to 1 Film ejection port Printed films are ejected 2 Exhaust duct Discharges air used to cool the inside 3 Air outlet Discharges air used to cool the inside 5 3 3 Cleaning Air Intakes Outlets page 70 4 Connector for Lispl 832 Connector for connecting Lispl 832 5 Air intake Draws air to cool the inside 5 3 3 Cleaning Air Intakes Outlets pag...

Страница 29: ...alibration press this button to confirm 3 4 Calibration page 43 3 5 Test Print page 45 4 Calibration button Press this button to print calibration sheet 3 4 Calibration page 43 5 Test print button Press this button to print QC patterns 3 5 Test Print page 45 6 Reset Cancel button Press this button to clear the error 4 3 1 Reset from Operation Panel page 56 When printing QC patterns or calibration ...

Страница 30: ...ver to remove a film stuck in the heat process unit when a jam occurs 4 4 2 Film Jam in Heat Process Unit page 60 2 Lever B Used to open the right cover 4 4 1 Film Jam between Supply Unit and Position Regulation Unit page 57 3 Deodorant filter Removes odors emitted during heat process Periodic change is needed 5 4 Changing Deodorant Filter page 71 ...

Страница 31: ...Num ber Name Function Refer to 1 LAN cover Ethernet port and UPS serial port cover 2 Air intake Draws air to cool the inside 5 3 3 Cleaning Air Intakes Outlets page 70 3 Ethernet port Used for network connection 4 UPS serial port When a backup battery is used its serial cable is connected here Ethernet Port LED Communication speed LED right side Communication speed LED condition 10Mbps OFF 100Mbps...

Страница 32: ...gulation pin fixed Regulates the film position 2 Film regulation pin mounting hole When using 14 x 14 in and 11 x 14 in films install the supplied film regulation pins 3 Intermediate plate Resin board on which films are put 4 Retaining roller Used to pull only film package barrier bag and put films in the supply tray 2 2 6 Lispl 832 Option 1 Lispl 832 Num ber Name Function Refer to 1 Lispl 832 Add...

Страница 33: ...33 Chapter 3 Operation from Main Unit ...

Страница 34: ...Perform the following steps 1 Turn on the DRYPRO 832 power supply circuit breaker If the power supply circuit breaker is already turned ON go to the next step Power supply circuit breaker 2 Press the operation switch until a beep sounds about one second Operation Switch Pressing the operation switch again shuts down In such a case press the operation switch again Initialization and warm up of DRYP...

Страница 35: ...g Down The message display window shows as follows You cannot print during warm up You can make settings during warm up It takes about 10 minutes for the machine to get ready for print However it varies according to the season and the ambient temperature ...

Страница 36: ...ircuit breaker and turn it ON again After the shutdown operation completes the deodorant fan contin ues to operate for approximately 1 hour When performing the shutdown operation do not switch the power supply circuit breaker OFF immediately To turn the power supply circuit breaker off wait approximately 1 hour after completing the shutdown operation before switching the breaker off 1 Press the op...

Страница 37: ...in progress Please wait a while The machine is clearing the error User logged in The machine is in the maintenance mode Sleep mode The machine is in the sleep mode the backlight is OFF Dens Error TRAY1 Failed to read the densitometer for the film in the tray 1 If the message says TRAY2 this means failing to read the densitom eter for the film in the tray 2 If TRAY1 2 the tray 1 2 Calibration Calib...

Страница 38: ... the steps below 1 Press the Open Enter button The following messages appear in the message display window If the target tray is optional Lispl 832 TRAY 2 is displayed The supply tray pops out by several centimeters In the following cases the supply tray will not open When there are films during the printing process The message Please wait a while appears and then the supply tray will open when pr...

Страница 39: ...not place an object on the supply tray or lean against the sup ply tray drawn forth Failure to observe this caution may cause fault 3 Take a new film package barrier bag out of the box and load it by align ing the u mark on the package barrier bag with the t mark on the sup ply tray 4 Remove the seals to extend the front and rear ends of the package bar rier bag ...

Страница 40: ...it off in either right to left or left to right direction After using the special cutter store it in the cutter pocket of the main unit After cutting it off do not open the mouth of the package barrier bag Otherwise the film may be exposed to light Cut off the package barrier bag in a straight line not to create a slanting cut off section Otherwise the package bar rier bag may not be pulled out ...

Страница 41: ...ard end of the package barrier bag protruded from the supply tray When pushing the supply tray unit in do not stop until the opera tion is completed and make sure you push the unit firmly to the back of the main unit After the following message is displayed on the message display window pull out the barrier bag ...

Страница 42: ...of the pack age barrier bag The film loading operation finishes however the indicator of the re maining quantity of films stays flashing and the message Film Empty remains to be shown in the message display window on the operation panel Perform the procedure again from step 1 Closed the tray without cutting off the back of the package bar rier bag with a cutter Pressing the Open Enter button displ...

Страница 43: ...n i e data whose density is not corrected If you check or manage the density use the the QC pattern output in test print 3 5 Test Print page 45 5 2 Operation of Test Print page 65 1 When Ready appears in the message display window press the Calibration button on the operation panel The following messages appear in the message display window If optional Lispl 832 is installed Pressing the Reset Can...

Страница 44: ... goes back to the nor mal display Ready If the calibration pattern cannot be read properly with the built in densitometer the message Dens Error Tray No appears in the message display window In such a case calibrate that tray again If you fail to read with the densitometer again contact Koni ca Minolta technical representatives Please note that no tray num ber appears depending on the version of t...

Страница 45: ...test print in general see 5 2 Operation of Test Print page 65 and how to judge the results after printing QC patterns see 5 2 3 How to Judge QC Pattern page 67 To print QC patterns perform the following steps 1 Press the Test print button on the operation panel The following message appears in the message display window If an optional Lispl 832 is installed Pressing the Reset Cancel button switche...

Страница 46: ...s the limit of reference value NG is displayed Moreover if the reference value is not set and the QC patterns are not printed after starting this machine is displayed Main Unit Name View The name of the main unit that appears on Printlink5 IN is displayed Main Unit IP Address View The IP address set for the main unit is displayed Main Unit Subnet Mask View The subnet mask set for the main unit is ...

Страница 47: ... Main Unit IP Address View Main Unit Subnet Mask View Main Unit Gateway View Main Unit MAC Address View Return to the Current Status View Press the Reset Cancel button Press the Reset Cancel button Press the Reset Cancel button Press the Reset Cancel button Press the Reset Cancel button ...

Страница 48: ...hange the film size to 10x12 or 8x10 or from 10x12 or 8x10 to a different size the settings of some mechanical parts need to be changed Contact Konica Minolta technical repre sentatives If you change the film size with items remaining in the queue E9211 error will occur as many times as the number of items in queue When changing the settings make sure there is nothing left in the queue 1 Turn the ...

Страница 49: ...ressed 14 17 14 14 14 11 10 12 8 10 14 17 5 Press the Calibration button Film type flashes 6 Press the Test print button The film type changes Each time the Test print button is pressed B C HB B 7 Press the Open Enter button A change verification message appears 8 Press the Open Enter button The settings are saved 9 Press the Test print button This switches the tray that is being displayed ...

Страница 50: ...y Tray Film 1 Press the Open Enter button on the DRYPRO 832 operation panel The following messages appear in the message display window If the optional Lispl 832 is the target TRAY2 is displayed The supply tray pops out several centimeters In the following cases the supply tray will not open When films are being printed Please wait a while is displayed and the supply tray opens when printing has c...

Страница 51: ... regulation pin mounting hole Intermediate Plate B Film regulation pin mounting hole 11x14 in Size of film to be used Attachment position of film regulation pin 14x17 in None film regulation pin is not used 14x14 in A 11x14 in B Do not place objects on the supply tray or lean on the supply tray when it is pulled out Failure to do so could cause fault Do not leave allen keys film regulation pins sc...

Страница 52: ...le Intermediate Plate Cross section Protrusion Note The type of Allen key included might differ from that shown in the illustration When changing from 14 x 14 inch or 11 x 14 inch to 14 x 17 inch 5 Use the supplied allen key to remove the film regulation pins 2 pins for the 14 x 14 inch or 11 x 14 inch films Be careful not to leave the film regulation pins 2 pins or hexago nal socket screws 2 scre...

Страница 53: ...53 Chapter 4 Troubleshooting ...

Страница 54: ...sistent in a study 4 2 Error Display and Solutions page 55 Film jam occurred Identify the section where a film jam occurred 4 4 How to Clear a Film Jam page 57 Cannot shut down Did you press the operation switch until a beep sounds approximately one second Did you hold down the operation switch for 10 seconds 3 1 2 How to Shut Down page 36 Tray cannot open Is the message Film Empty shown in the me...

Страница 55: ...ss the Reset Cancel button 4 3 1 Reset from Operation Panel page 56 F error Fxxxx Error message Turn OFF the power Internal error Press the operation switch until a beep sounds approximately one second and shut down this machine Check that the machine has been shut down and then press and hold the operation switch until a beep sounds approximately one second to restart the machine 4 3 1 Reset from...

Страница 56: ...ssage Starting with E other than film jam When the error message starting with E is displayed perform the following steps 1 After handling the error press the Reset Cancel button The message Now in progress Please wait a while is displayed Once the error has been successfully reset Ready appears in the message display window and the machine is ready to print Error Message Starting with F Whenthe e...

Страница 57: ...n the following two places Between supply unit and position regulation unit The error code E4410 E4411 E4412 E4510 or E4512 is displayed Heat process unit The error code E4511 E4610 or E4611 is displayed 4 4 1 Film Jam between Supply Unit and Position Regulation Unit When a film jam has occurred between the supply unit and the position regulation unit remove the film following the steps below 1 Op...

Страница 58: ...ollowing messages appear in the message display window on the operation panel 2 Rotate lever B in the direction of an arrow and open the right cover Lever B Do not press the open right cover down or place an object on it Failure to observe this caution may cause damage to the right cover Do not scratch the inside of the right cover It can cause film to be damaged ...

Страница 59: ... Close the right cover 5 Close the front cover Once the film jam has been cleared the machine will automatically return to the Ready state When closing the front cover check that two magnets at the top edge of the front cover are placed in the correct position on the main unit ...

Страница 60: ... heat process unit remove the film following the steps below 1 Open the front cover Do not press the open front cover down or place an object on it Failure to observe this caution may cause damage to the front cov er The following message appears in the message display window on the operation panel ...

Страница 61: ...e supply tray Lever A 3 Remove the film from the film ejection port When the film is not ejected out of the ejection port after rotating lever A five to six times go to step 4 After completion of clearing the film jam if the error message is displayed handle the error If the same error persists contact Konica Minolta technical repre sentatives ...

Страница 62: ...ront cover Once the film jam has been cleared the machine will automatically return to the Ready state When closing the front cover check that two magnets at the top edge of the front cover are placed in the correct position on the main unit ...

Страница 63: ...63 Chapter 5 Maintenance ...

Страница 64: ...jection tray Cleaning supply tray Cleaning air intakes outlets Changing deodorant filter Every 10 000 prints or every two years Maintenance and Items to be Checked by Service Personnel Other major maintenance and items to be checked are as follows These are included in the mainte nance contract For performance of maintenance contact Konica Minolta technical representatives Maintenance Parts Descri...

Страница 65: ...hen QC patterns are printed three times with a reference value not set in cases where this machine is used for the first time installation or a reference value is reset a reference value is automatically set The default set for this machine is used for checking the density when a reference value is not set 5 2 2 How to Print QC Patterns page 66 Resetting Reference Value In the following cases a re...

Страница 66: ...ge display window If optional Lispl 832 is installed Pressing the Reset Cancel button switches to Tray 2 Pressing the Reset Cancel button once again returns you to the state Ready appears in the message display window before pressing the Test Print button 2 Press the Open Enter button The following messages appear in the message display window The QC patterns will be printed The message display wi...

Страница 67: ...etric pattern as shown is printed 2 Alphabetic numeric characters on the film image can be properly identified 3 No speckle noise was created on all or part of the film image 4 No horizontal stripe was created on all or part of the film image 5 No vertical stripe was created on all or part of the film image 6 No serious image distortion was created on all or part of the film image 7 No image wear ...

Страница 68: ...main unit from the operation panel of the main unit When Checking from the Message Display Window on the Operation Panel 1 Check that Dens Error Tray No is not displayed on the DRYPRO 832 operation panel Item to be checked When QC patterns are printed from the standard supply tray tray 1 2 Press the Reset Cancel button twice The QC Results View of the standard supply tray tray 1 is displayed When ...

Страница 69: ...m ejection tray tends to be dusty Dust could damage the printed film Wipe off the dust with dry cloth once every three months 5 3 2 Cleaning Supply Tray Keep the inside of the supply tray clean Wipe off the dust with dry cloth or vacuum the dust once every three months When wiping with cloth be careful not to get injured by a protru sion in the supply tray ...

Страница 70: ... 3 Cleaning Air Intakes Outlets Vacuum the dust from outer side once every six months to prevent the air intakes and outlets from getting clogged with dust Air outlet Air intake Air outlet Air intake Exhaust duct Air intake ...

Страница 71: ...owing message appears in the message display window on the operation panel Change the deodorant filter following the steps below 1 Open the front cover Do not press the open front cover down or place an object on it Failure to observe this caution may cause damage to the front cov er The following message appears in the message display window on the operation panel ...

Страница 72: ... case 4 Press the lever on the top of the filter case to release the lock and then remove the old filter 1 Push 3 Move up and down 2 Remove the tab Hold it by the handle press the tab by pushing the locking lever with your index finger and move it up and down In this way you can remove the filter without touching it ...

Страница 73: ...odorant filter ready and install it in the case Make sure that the tab hitches to the filter and the filter is locked into the case Lock the tab 6 Install the deodorant filter case in the main unit Push the deodorant filter case as far as it will go and then push it down ward ...

Страница 74: ...ront cover When closing the front cover check that two magnets at the top edge of the front cover are placed in the correct position on the main unit Once the front cover has been closed the machine will automatically go back to the Ready state ...

Страница 75: ...75 Appendix ...

Страница 76: ... 8 x 10 inch size sheets Approximately 90 sheets hour With High Grade License installed Approximately 180 sheets hour mixed sizes Outside Dimension 599 W x 570 H x 585mm L without Lispl 832 599 W x 722 H x 585mm L with Lispl 832 Weight 95 kg or less without Lispl 832 117 kg or less with Lispl 832 Power Supply CE AC 220 V 240 V 10 50 60 Hz 1 Hz 6A UL AC 120 V 10 60 Hz 1 Hz 10 A Heating Value CE 140...

Страница 77: ...ertified to meet the requirements of ISO9001 2000 ISO13485 2003 and EN ISO9001 2000 EN ISO13485 2003 quality control standards Accessories Power cable two cutters warranty operation manual accessories list deodorant filter attached documents for doctors inspection cards two clamps film size label operation sheet operation sheet box two ducts shutter intermediate plate for 10 x 12 in size papers in...

Страница 78: ...is printed 2 Alphabetic numeric charac ters can be properly identified None following thing was cre ated on all or part of the film image 3 Speckle noise 4 Horizontal stripe 5 Vertical stripe 6 Serious image distortion 7 Image wear 8 Other image anomalies Density Check Items to be Checked 11 and 12 When checking from the message display window on the operation panel Current Status View QC Results ...

Страница 79: ...part of the film image 7 No image wear was created on all or part of the film image 8 No image anomaly other than items in c to g occurred on all or part of the film image Resolu tion 9 The horizontal thin line of QC pattern appears to be resolved Use of a magnifying glass 10 The vertical thin line of QC pattern appears to be resolved Use of a magnifying glass Check from operation panel Density 11...

Страница 80: ...80 ...

Страница 81: ...81 ...

Страница 82: ...82 ...

Страница 83: ......

Страница 84: ...onica Minolta Healthcare India Private Ltd Office No 201 2nd Floor Atrium 2 Next to Courtyard Marriott Hotel Andheri Kurla Road Chakala Andheri East Mumbai 400093 India TEL 91 22 61916900 Konica Minolta Business Solutions Canada Ltd 5875 Explorer Drive Mississauga Ontario L4W 0E1 Canada TEL 905 890 6600 Konica Minolta Medical Graphic SHANGHAI Co Ltd Room1602 Tower B Hongwell International Plaza 16...

Отзывы: