background image

72

SETUP MENU

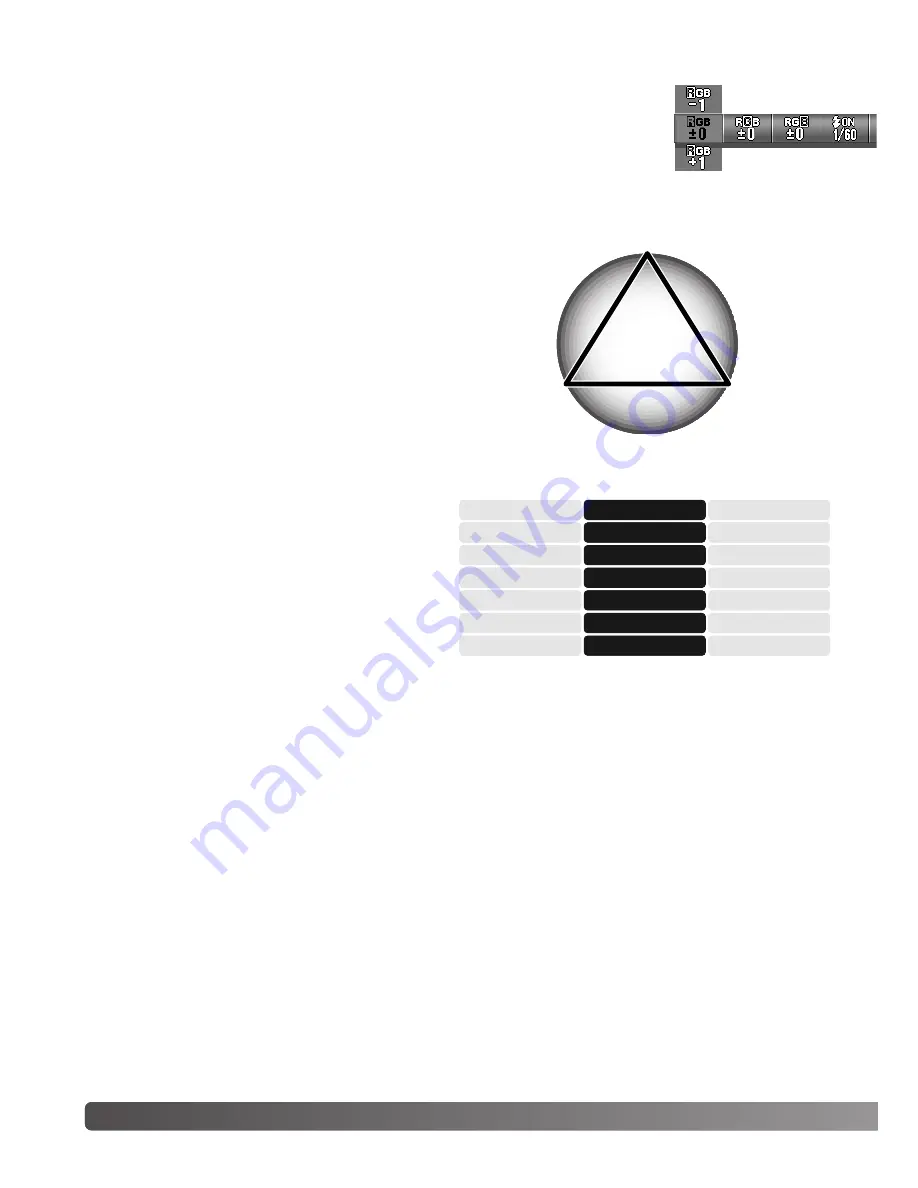
The red, green, and blue color channels can be adjusted in five levels. Any
changes made are applied to the live image. See pages 68 and 69 for more
on custom functions. Color is adjusted on the manual recording menu.

RGB color channels

An introduction to color

In photography, red, green, and blue are the pri-
mary colors. The secondary colors, cyan,
magenta, and yellow, are made from combining
the primary colors: cyan = blue + green,
magenta = blue + red, and yellow = red +
green. The primary and secondary colors are
grouped in complementary pairs: red and cyan,
green and magenta, and blue and yellow.

Knowing the complementary colors is very
important in color balancing. If the image has a
specific color cast, either subtracting the color
or adding its complementary color will create a
natural looking image. 

Adding or subtracting equal parts of red, green,
and blue have no affect on the color balance.
However, changing two colors equally has the
same affect as the opposite change with one
color; +2 green and +2 red is the same as -2
blue. The greatest change in a specific color
comes by setting the color channels to their
opposite extremes. To make an image as blue
as possible, set the color channels to +2 blue, -
2 red, and -2 green. 

RED

GREEN

BLUE

CYAN

MAGENTA

YELLOW

Image is too:

Increase

Decrease

Red

Green

Blue

Cyan

Yellow

Magenta

Red

Green

Blue

Red

Green

Blue + Green

Blue

Blue + Green

Blue + Red

Blue + Red

Red + Green

Red + Green

Содержание DiMAGE G530

Страница 1: ...9222 2736 11 IM A402 0406 109678 INSTRUCTION MANUAL E ...

Страница 2: ...on Power PC is a trademark of the International Business Machines Corporation QuickTime is a trademark used under license Memory Stick is a trademark of Sony Corporation All other brand and product names are trademarks or registered trademarks of their respective owners DiMAGE G530 digital camera Lithium ion battery NP 600 Lithium ion battery charger BC 600 Neck strap NS DG130 SD Memory Card USB c...

Страница 3: ...ot store the battery near or in metallic products Do not use the battery with any other products Only use the specified charger An inappropriate charger may cause damage or injury through fire or electric shock Do not use a leaking battery If fluid from the battery enters your eye immediately rinse the eye with plenty of fresh water and contact a doctor If fluid from the battery makes contact with...

Страница 4: ...h voltage circuit which may cause an electric shock resulting in injury The contin ued use of a damaged product or part may cause injuries or fire Keep the battery memory card or small parts that could be swallowed away from infants Contact a doctor immediately if an object is swallowed Store this product out of reach of children Be careful when around children not to harm them with the product or...

Страница 5: ...d Hold the plug when removing it from an outlet Do not damage twist modify heat or place heavy objects on the AC adapter or charger cord A damaged cord may cause damage or injury through fire or electric shock If these products emits a strange odor heat or smoke discontinue use Immediately remove the battery taking care not to burn yourself as the battery may become hot with use The continued use ...

Страница 6: ...mount of energy which may cause burns Do not apply pressure to the LCD monitor A damaged monitor may cause injury and the liquid from the monitor may cause inflammation If liquid from the monitor makes contact with skin wash the area with fresh water If liquid from the monitor comes in contact with the eyes immedi ately rinse the eyes with plenty of water and contact a doctor When using the AC ada...

Страница 7: ...with the limits for a Class B digital device pursuant to Part 15 of the FCC Rules These limits are designed to provide reasonable protection against harmful interference in a residential installation This equipment generates uses and can radiate radio frequency energy and if not installed and used in accordance with the instructions may cause harmful interference to radio communications However th...

Страница 8: ...9 Macro modes 30 Deleting images 31 The getting up and running section covers how to prepare the camera for use It contains important information about power supplies and memory cards The basic operation of this camera is covered in the recording basic operation section between pages 22 and 30 and the playback basic oper ation section between pages 32 and 34 Read the data transfer mode section in ...

Страница 9: ...ge size and quality 41 Self timer 42 Exposure compensation 43 Movie audio recording mode 44 Audio recording 44 Audio caption 45 White balance 46 Camera sensitivity ISO 47 Camera sensitivity and flash range 47 Exposure modes 48 Aperture priority 48 Manual exposure 49 Focus modes 50 Autofocus and autoexposure lock 51 Playback advanced operation 52 Playing back movies and audio 52 Deleting audio capt...

Страница 10: ... 67 Custom 68 Custom setup 69 Flash compensation 70 Saturation 70 Contrast 70 Sharpness 71 Shutter speed limit 71 RGB color channels 72 An introduction to color 72 AE metering modes 73 File number memory 74 Red eye reduction 74 Digital zoom 75 Sound 76 Auto power off 76 USB transfer mode 77 Initialize 78 Language 80 Date setup 81 A short guide to photography 82 What is an Ev 82 ...

Страница 11: ...0 Macintosh 91 PictBridge 92 Notes on printing errors 94 QuickTime system requirements 94 Changing the memory card data transfer mode 95 Appendix 96 Troubleshooting 96 About the lithium ion battery charger cord 97 Removing the driver software Windows 98 Care and storage 99 Camera care 99 Cleaning 99 Storage 99 Memory cards 100 Batteries 100 Before important events or journeys 100 Operating tempera...

Страница 12: ...es clean Please read the care and storage instructions in the back of this manual p 99 Flash p 28 Lens Lens cover Main switch Microphone Tripod socket Battery Card chamber door p 15 18 Shutter release button Start up Self timer lamp p 42 66 Viewfinder window NAMES OF PARTS Speaker Names of parts ...

Страница 13: ...13 USB port Viewfinder Indicator lamp Controller LCD monitor Set Display button p 27 33 Delete button p 31 Menu button Strap eyelet p 20 Playback button p 32 Zoom buttons p 23 Mode button ...

Страница 14: ...lide the battery into the charger 2 The indicator lamp 3 is red when the battery is charging The lamp turns green when the battery has been charged Charging time is approximately 120 minutes Plug the power cord into the charger unit 1 Plug the other end of the cord into a live house hold outlet The included AC cord is designed for the current of the sales region Only use the cord in the region it ...

Страница 15: ...ttery chamber door 3 and slide it toward the camera to engage the safety catch After initially installing the battery the menu lan guage clock and calendar need to be set The camera can also reset if the camera is stored without a battery See page 21 on how to set up the camera After initially inserting a charged battery do not remove it from the camera for twenty four hours the camera can be off ...

Страница 16: ...tes To restore power turn the camera off and on with the lens cover or press the playback button The length of the auto power off period can be changed or the function disabled in the setup menu p 76 This camera is equipped with an automatic battery condition indicator It is displayed in the bottom left corner of the LCD monitor when the camera is on If power is insufficient for camera operation t...

Страница 17: ...er areas Slide the battery chamber door toward the side of the camera to release the safety catch 1 Open the door Remove the battery and the cable slot cover 2 Insert the adapter making sure the cable passes through the slot at the side of the camera 3 Close the battery chamber door 4 and slide it toward the camera to engage the safety catch Connect the AC adapter cables as described in the adapte...

Страница 18: ...o release the safety catch 1 Open the door Insert the memory card all the way into the card slot and then release 2 The Memory Stick slot is next to the battery the SD Memory Card MultiMediaCard slot is next to the back of the camera The card should catch in the slot Always push the card in straight never at an angle Never force the card If the card does not fit check that it is oriented correctly...

Страница 19: ... when the card is protected images cannot be recorded If an attempt is made to record or delete an image with the camera the card protected message appears the viewfinder indicator lamp blinks For memory card care and store see page 100 If the unable to read message appears the inserted card in the camera may need to be formatted A card used in another cam era may also have to be formatted before ...

Страница 20: ...e cover toward the lens the lens retracts automatically The cover can be closed when the lens has completely retracted into the body Always keep the strap around your neck in the event that the camera is accidentally dropped Attaching the strap GETTING UP AND RUNNING Pass the other end of the strap through the small loop and tighten 2 Pass the small loop of the strap through the strap eye let on t...

Страница 21: ...ESE DEUTSCH FRANCAIS Press the set display button to continue A confirma tion screen will open Use the left right keys to select Yes No returns to the previous screen Press the set display button to continue Use the up down keys to select the option to be changed Use the left right keys to change the option The last option sets the date format among year month day day month year and month day year...

Страница 22: ...t Keep your elbows at your side and your feet shoulder width apart to hold the camera steadily Take care not to cover the lens or flash with your fingers or the strap LCD monitor display Time Image size and quality p 41 Battery condition indicator p 16 Frame counter p 41 Memory priority p 39 Date AF area The current date and time are displayed for a few seconds each time the camera is turned on Fl...

Страница 23: ...digital zoom function can increase the power of the lens The digital zoom is activated in the setup menu p 75 Because the optical viewfinder and the lens are slightly separated the image seen through one is not exactly the same as the other this is called parallax Parallax can cause errors in fram ing when using the viewfinder at close distances When the subject is closer than 1m 3ft at the lens w...

Страница 24: ...ck function p 25 can be used with off center sub jects If the subject is closer than 1m 3ft at the zoom lens wide angle position or 3m 10ft at the telephoto position only use the LCD monitor to frame the subject Press the shutter release button all the way down 2 to take the picture After the shutter releases the viewfinder indicator lamp glows while image data is being written to the memory card ...

Страница 25: ...hutter release button partway down and wait until the focus signal appears and viewfinder indicator lamp glows to indicate focus is locked If the signal and lamp blink repeat the procedure Without lifting your finger from the shutter release button recom pose the subject within the image area Press the shutter release button all the way down to take the picture Focus range The focus range depends ...

Страница 26: ...to focus on another object at the same distance as your main sub ject and then the image can be recomposed to take the picture The subject in the AF area is low in con trast The subject is too dark The subject is com posed of broad hori zontal lines The subject is near a very bright object or area Focus confirmed the monitor focus signal and viewfinder indicator lamp glow Focus is locked Cannot fo...

Страница 27: ...n be conserved by turning the monitor off and using the viewfinder to take pic tures However because of parallax the monitor should be used for subjects closer than 1m 3ft at the zoom lens wide angle position or 3m 10ft at the telephoto position When changing settings the monitor turns on automatically The warnings and other relevant infor mation can appear on the live image only display The digit...

Страница 28: ...less of the amount of ambient light Fill flash can be used to reduce harsh shadows caused by strong direct light or sunshine Flash cancel the flash will not fire Use flash cancel when flash photography is prohibited natural light is desired to illuminate the subject or the subject is beyond the flash range Flash cancel Fill flash RECORDING BASIC OPERATION Autoflash No display Red eye reduction can...

Страница 29: ...us of the flash When the signal appears the flash will be used in the exposure When using flash cancel the flash signal and viewfinder indicator lamp blink to warn of camera shake caused by long exposures Camera shake is slight blurring caused by subtle hand motion and is more pronounced at the lens telephoto position than at the wide angle position Although the warning appears the shutter can be ...

Страница 30: ...s only available at the telephoto position of the lens Wide angle position Telephoto position 5cm 2 0in 50cm 19 7in If the subject is outside the flash range p 47 overexposure may result To prevent the flash from firing set the flash mode to flash cancel p 28 Always use the monitor to frame the image The use of a tripod is recommended Camera shake is more noticeable with long exposures or close up...

Страница 31: ...he delete operation DELETE If the select option was selected the frame selection screen opens Select the image s to be deleted by placing the red frame on the index thumbnail and pressing the set button a yellow frame indicates selection Highlight the OK frame and press the set button to continue DELETE CANCEL SELECT ALL ONE Use the up down keys of the controller to select the delete option Press ...

Страница 32: ...he lens cover is closed To cancel the playback mode press the playback button If the lens cover is open pressing the shutter release button also cancels the playback mode when a still image is displayed Time of recording Date of recording Image size and quality p 41 Memory location Battery condition indicator p 16 Frame number total number of images on card Folder number file number p 88 Press the...

Страница 33: ...nly be displayed with the standard display Display button playback Enlarged playback An image can be enlarged maximum magnifi cation depends on image size To enlarge the displayed image press the telephoto zoom button 1 Use the zoom buttons 2 to enlarge and reduce the image size the degree of magnifi cation is displayed The controller 3 scrolls the image To cancel the enlarged playback reduce the ...

Страница 34: ...ton to display the framed image in the single frame playback mode Index playback Changing modes MOVIE AUDIO Four recording modes are available auto record ing for general photography scene selection for specific subjects movie and audio recording and manual recording for more control over the image The setup mode can also be accessed Press the mode button 1 The current mode is indicated Use the up...

Страница 35: ...t ter release button all the way down and release to begin recording Recording time The camera continues to record until the memory card is full or the shutter release button is pressed again The elapsed recording time and remaining memory are displayed on the monitor Take care not to cover the microphone while recording During recording focus is locked and the optical zoom is disabled The writing...

Страница 36: ... the menu press the menu button The menu varies depending on the mode selected p 34 Use the left right keys of the controller to scroll through the menu options The option name is displayed on the monitor The manual recording menu has several consecutive option displays Use the up down keys to change the setting the selected setting is shown by a black indicator Press the menu button set button or...

Страница 37: ...etup p 63 Exposure modes p 48 Drive modes p 40 Image size and quality p 41 Memory priority p 39 Self timer p 42 Color mode p 39 Exposure compensation p 43 White balance p 46 Camera sensitivity ISO p 47 Focus modes p 50 Refer to the following sections for descriptions of the menu options and their settings Indicators next to each section heading show on which menu the option appears When an option ...

Страница 38: ...ture action by maximizing shutter speeds When using flash the subject must be within the flash range p 47 Scenery focus is optimized for landscapes The use of a tripod is recommended in twilight or overcast conditions The flash is canceled Night for deep subtle night scenes The use of a tripod is recommended When used with fill flash the subject and background exposures are balanced The flash can ...

Страница 39: ...ngly See page 36 for informa tion on menu operation When warm or cool color is set a monitor indicator shows the active mode No indicator is used for other the modes Color mode indicator Black white for neutral tone monochrome images Memory priority When two memory cards are used in the camera memory priority specifies to which card recorded images and audio are saved When the card is full the sec...

Страница 40: ...t Only available in the manual recording mode Except when single shutter is selected a monitor indicator shows the active drive mode The maximum rate of capture with continuous shutter depends on the image size and quality as well as the use of other functions The maximum rate of capture is approximately 0 7fps with 5 megapixel normal images The bracketing drive modes are only available in manual ...

Страница 41: ... the image smaller images are more suitable for web sites whereas larger sizes produce higher quality prints Compression affects the file size and image detail Normal compression is sufficient for most uses Fine makes higher quality image but file sizes are larger If image resolution is changed the frame counter displays the approximate number of images that can be recorded at that setting on the ...

Страница 42: ... to start the timer The self timer lamp on the front of the camera blinks during the countdown it flashes quickly just before the picture is taken To stop the countdown before the exposure turn off the cam era the ten second self timer is canceled The ten second self timer is canceled after the exposure or when the camera is turned off The three second self timer remains active after the exposure ...

Страница 43: ...ration 2 0Ev 1 0Ev Camera exposure Exposure compensation is used when the camera s exposure meter is deceived by high key or low key subjects In the example below the dark water caused the camera to overexpose the image making it bright and washed out By compensating the exposure detail is brought out in the leaves and the stones and water appear richer In the manual recording mode exposure compen...

Страница 44: ... in the movie audio recording mode To select the recording mode see page 34 audio recording is selected with the menu see above and page 36 Audio recording Press the shutter release button all the way down and release to begin recording Recording time The camera continues to record until the memory card is full or the shutter release button is pressed again The elapsed recording time and remaining...

Страница 45: ...4 Audio caption Press the shutter release button all the way down and release to begin recording Recording time The camera continues to record until the memory card is full or the shutter release button is pressed again The elapsed recording time and remaining memory are displayed on the monitor When using a MultiMediaCard the maximum recording time is 30 seconds Take care not to cover the microph...

Страница 46: ... white balance setting are available in the movie audio and manual recording modes White balance is set on the menu On the movie audio or manual recording menu select the white bal ance option the live image reflects the changes See page 36 for menu operation Auto white balance compensates for the color temperature of a scene automatically Auto white balance is sufficient in most cases Tungsten fo...

Страница 47: ...2m 2 6ft 3 9ft 0 8m 1 7m 2 6ft 5 6ft Flash range wide angle 0 5m 3 0m 1 6ft 9 8ft 0 5m 1 5m 1 6ft 4 9ft 0 5m 2 1m 1 6ft 6 9ft 0 5m 3 0m 1 6ft 9 8ft 0 8m 2 4m 2 6ft 7 9ft 0 5m 4 3m 1 6ft 14 1ft Flash range telephoto Camera sensitivity ISO The sensitivity of the camera can be changed in the manual recording mode with the menu To change recording modes see page 34 On the manual recording menu select ...

Страница 48: ...hutter speed for the exposure Manual exposure the aperture and shutter speed is specified by the photographer Aperture priority The operation of the program exposure mode is the same as described in the basic recording operation section on page 24 However when the shutter release button is pressed partway down the shutter speed and aperture used for the exposure are displayed in the top right corn...

Страница 49: ...ange the flash mode p 28 macro mode p 30 and white balance p 46 To change the exposure press the up key of the con troller the exposure display turns white Press the down key to select between two apertures the apertures vary depending on the zoom position Use the left right keys of the controller to set the shutter speed When the shutter release button is pressed partway down the difference betwe...

Страница 50: ...cus fixed at 0 8m 2 6ft Focus fixed at 1 2m 3 9ft Focus fixed at 2 5m 8 2ft Focus fixed at infinity The fixed focus modes can be used when a special focusing situa tion is preventing the autofocus system from focusing p 26 How much area is in focus before and behind the subject plane depends on the position of the zoom lens and the aperture in use Depth of field increases as the focal length and a...

Страница 51: ...elease button partway down The focus signal and shutter speed and aperture display should appear on the monitor Press the up controller key to lock the exposure the AE lock indicator appears on the monitor The shutter button can be released The focus and exposure remains locked even after the the picture is taken Repeat the procedure to cancel the AF or AE lock The lock is also canceled when the c...

Страница 52: ...ess the shutter release button to start the playback of the displayed file Playback time is displayed in the top right corner of the image To cancel the playback press the shutter release button The basic functions in this mode are described in the basic playback section on pages 32 through 34 This section covers how to playback movie clips and audio tracks and delete audio captions as well as the...

Страница 53: ... set button to complete the operation Use the left right keys to highlight YES NO can cels the delete operation DELETE DELETE AUDIO CAPTION CANCEL AUDIO IMAGE AUDIO Use the up down keys of the controller to select the delete option The audio option erased the audio cap tion and the audio image option deletes the image and audio file Press the set button to continue ...

Страница 54: ...splayed on the monitor The up down keys select function options or the execute tab the selected setting is shown by a black indicator Press the menu button or shutter release button to close the menu Function options To change the option highlight it and press the set button Playback menu functions Execute tab Highlight the tab and press the set button to start the operation Press the set button t...

Страница 55: ...icators may be displayed Press the set button to select the file a yellow border indicates selected files If the frame is marked with a yel low border pressing the set button again clears the bor der deselecting the image Repeat until all required files are selected Use the controller to highlight the OK frame Press the set button to continue or the shutter release button to cancel the operation C...

Страница 56: ...ove selected files To copy or move all files on a card To select the files on a card to be copied or moved To specify the source and destination cards between the SD Memory Card MultiMediaCard and Memory Stick Highlight the OK tab Press the set button to continue the operation specified with the copy and move options If the select option was specified the frame selection screen opens Select the im...

Страница 57: ...resized to a VGA 640 X 480 or QVGA 320 X 240 JPEG copy so that it may be easily transmitted by e mail Display the image to be resized before opening the playback menu See navigating the playback menu section on how to use the menu p 54 Resize Highlight the resize option with the controller Press the set button to specify the size of the image between VGA and QVGA Highlight the OK tab Press the set...

Страница 58: ...time print All To select all or multiple files to print or cancel the existing DPOF file To specify the card containing the images to be printed when both an SD Memory Card MultiMediaCard and Memory Stick are in the camera Highlight the OK tab Press the set button to continue the operation specified with the DPOF options Select Reset SELECT SETUP CANCEL USE LAST DPOF FILE NEW COPIES 0 If the selec...

Страница 59: ...ressing the set button a yellow frame indi cates selection Use the zoom buttons to select the numbers of copies the number of copies is displayed in the top left corner of each index frame Reduce the number of copies to zero to deselect the image Highlight the OK frame and press the set button to continue See page 55 for more on the frame selection screen A confirmation screen opens Use the left r...

Страница 60: ...existing files To specify the card containing the images to be protected when both an SD Memory Card MultiMediaCard and Memory Stick are in the camera Highlight the OK tab Press the set button to continue the operation specified with the protect options Select Reset If the select option was specified the frame selection screen opens Select the image s to be protected by placing the red frame on th...

Страница 61: ...y cards are displayed automatically in order for approxi mately two seconds Slide show Press the set menu or shutter release button to cancel the slide show When showing a large number of images disable the auto power off function in the setup menu p 76 Highlight the OK tab Press the set button to continue the operation During the slide show pressing the left right keys of the controller advances ...

Страница 62: ...de button 1 to open the menu The left right keys of the controller scrolls through the playback menu sections The sec tion name is displayed on the monitor The up down keys select functions the selected setting is shown by a black indicator and the function name is displayed Press the menu button or shutter release button to close the menu Press the set button to change the function Setting or con...

Страница 63: ...back 67 Format Monitor Rec set Sound Basic setup To set up recording mode preferences Custom 68 AE metering mode 73 File number memory 74 Digital zoom 75 Red eye reduction 74 To turn the sounds used in the camera s audio signal on and off p 76 To set up basic camera operations Initialize 78 USB transfer mode 77 Auto power off 76 Language 80 Date and time setup 81 ...

Страница 64: ...en and use the menu p 62 When a memory card is formatted all data on the card is erased A status bar is displayed and the viewfinder lamp glows while the card is being formatted Never remove the card or battery during this period Use the left right controller keys to select the format option Use the up down keys to select the card to be formatted Select the SD option to format a MultiMediaCard Pre...

Страница 65: ...el The change is visible in the monitor image Press the set button to complete the operation Use the up down keys of the controller to select the brightness white box red green or blue channel For more on color see page 72 Brightness and color channels Level Use the left right controller keys to select the monitor menu section Use the up down keys to select the monitor adjustment option Press the ...

Страница 66: ...option Press the set button to turn the LED on or off the menu indicator changes Information display setup The information displayed on the live image in the recording mode and on the recorded image in the playback mode can be turned off and on See navigating the setup menu section on how to open and use the menu p 62 Use the left right controller keys to select the monitor menu section Use the up...

Страница 67: ...y on or off the menu indicator changes Instant playback Instant playback displays a still image for approximately three seconds after it has been recorded Instant playback can be canceled before the end of the playback period by pressing the shutter release button partway down When using the continuous shutter drive mode p 40 instant play back activates after each frame If the monitor is off it ac...

Страница 68: ...e up down keys to select the custom option Press the set button to continue Use the controller to select the option to be added or removed from the manual recording menu Press the set button to add or remove the check checked options are displayed on the menu Press the menu or shutter release button to complete the operation Custom menu option When the custom menu option is selected the custom fun...

Страница 69: ...mpensation Saturation Contrast Sharpness Red color channel Green color channel Blue color channel Shutter speed limit Manual recording menu Use the left right keys of the controller to select the custom option Use the up down keys to select the memory register off disables the cus tom settings and prevents changes to the options Press the menu button set button or the shutter release button to clo...

Страница 70: ... changes the ratio between the highlights and shadows By decreasing the flash output with a nega tive Ev setting the shadows receive less light and are deeper Using a positive Ev setting softens or eliminates shadows Saturation Saturation controls how vivid the colors of an image are Saturation can be set in five levels See pages 68 and 69 for more on custom functions Saturation is set on the manu...

Страница 71: ...imum shutter speed used for automatic exposures can be specified See pages 68 and 69 for more on custom functions The shutter speed limit is set on the manual recording menu When the custom settings are off the minimum shutter speed is 1 60 second with flash and 1 8 second without Shutter speed limit To specify the shutter speed limit when the flash is set to aut oflash or fill flash The camera se...

Страница 72: ...complementary colors is very important in color balancing If the image has a specific color cast either subtracting the color or adding its complementary color will create a natural looking image Adding or subtracting equal parts of red green and blue have no affect on the color balance However changing two colors equally has the same affect as the opposite change with one color 2 green and 2 red ...

Страница 73: ...ing allows precise exposure measurements of a particular object without being influenced by extremely bright or dark areas within the scene Center weighted metering measures luminance over the entire image area with emphasis to the central region This metering mode give accurate exposures in almost all situations The AE metering mode controls how light is measured See navigating the setup menu sec...

Страница 74: ... and use the menu p 62 File number memory Use the left right controller keys to select the rec set menu section Use the up down keys to select the file number memory option Press the set button to turn file number memory on and off Red eye reduction uses a pre flash to minimize red eye by contracting the pupils of the subject s eyes Use this in low light conditions when taking pictures of people o...

Страница 75: ...the power of the digital zoom the lower the image quality The effect of the digital zoom is visible on the LCD monitor only The digital zoom function is canceled if the LCD monitor is turned off p 27 See navigating the setup menu section on how to open and use the menu p 62 At the maximum telephoto position press the tele photo zoom button to engage the 2X and 3X digital zoom The zoom magnificatio...

Страница 76: ...se the up down keys to select the sound option Press the set button to turn the option on and off Auto power off The length of the auto power off period can be changed between 3 and 10 minutes or the function can be disabled Auto power off is disabled when the camera is connected to a computer or printer For more on auto power off see page 16 See navigating the setup menu section on how to open an...

Страница 77: ...Viewer software The PictBridge option allows images to be printed directly from the camera with a PictBridge compatible printer p 92 See navigating the setup menu section on how to open and use the menu p 62 Use the left right controller keys to select the basic setup menu sec tion Use the up down keys to select the USB transfer mode option Press the set button to change the USB transfer mode betw...

Страница 78: ... button to continue A confirmation screen opens Use the left right keys to highlight Yes No cancels the operation Press the set button to complete the operation The following are reset YES NO INITIALIZE Macro mode Canceled p 30 Flash mode Autoflash p 28 Color mode Standard color p 39 Display mode Standard display p 27 Drive mode Single shutter p 40 Image size and quality 5M normal p 41 Recording m...

Страница 79: ...p 74 p 73 p 76 p 74 File number memory On p 75 p 76 p 76 p 76 p 77 USB transfer mode Data storage Exposure compensation 0 0 AE metering mode Center weighted metering White balance Auto Exposure mode Program Focus mode Autofocus Movie audio recording mode Movie recording Custom Off p 71 Shutter speed limit Autoflash Fill flash 1 60 Flash cancel 1 8 Start up LED On Monitor on off On Instant playback...

Страница 80: ...ion Use the up down keys to select the language option Press the set button to continue A confirmation screen opens Use the left right keys to highlight Yes No cancels the operation Press the set button to complete the operation YES NO SET LANGUAGE Use the up down keys to select the language JAPANESE DEUTSCH FRANCAIS Press the set button to continue A confirmation screen will open ESPAÑOL ITALIANO...

Страница 81: ...ess the set button to continue Use the up down keys to select the option to be changed Use the left right keys to change the option The last option sets the date format among year month day day month year and month day year Press the set button to continue 01 01 00 00 2004 day month min hour year yy mm dd A confirmation screen opens Use the left right keys to highlight Yes No cancels the operation...

Страница 82: ... also changes with focal length The shorter the focal length the greater the depth of field the longer the focal length the shallower the depth of field Wide angle lenses also create a strong perspective which gives a sense of depth in the image Telephoto lenses compress the space between the subject and background and create a weak perspective The shutter controls not only exposure but also the a...

Страница 83: ...merica http www konicaminolta us Europe http www konicaminoltasupport com Users with Windows 98 or 98 second edition will need to install the driver software on the included DiMAGE Viewer CD ROM p 85 No special driver software is required for other Windows or Macintosh operating systems Customers who have bought a previous DiMAGE digital camera and have installed the Windows 98 driver software mus...

Страница 84: ...g menu is set to the card type To change the memory card while the camera is connected to a computer see page 95 USB TRANSFER MODE 2 Turn off the camera The camera turns on automatically when it is connected to a computer the viewfinder lamp lights to indicate the connection When using two cards in the camera if the card to be accessed is full the camera may automatically switch the memory priorit...

Страница 85: ...uired for other Windows or Macintosh operating systems Connecting to Windows 98 and 98 SE Before connecting the camera to the computer place the DiMAGE Viewer CD ROM in the CD ROM drive The DiMAGE installer menu should automatically activate To automatically install the Windows 98 USB driver click on the starting up the USB device driver installer button A window appears to confirm that the driver...

Страница 86: ... CD ROM drive at Win98 USB When the location is shown in the window click Next Manual Installation To install the Windows 98 driver manually follow the instruc tions in the connecting the camera to a computer section on page 84 When the camera is plugged into the computer the operat ing system will detect the new device and the add new hardware wizard window opens Place the DiMAGE Viewer CD ROM in...

Страница 87: ...he system One of three drivers may be located MNLVENUM inf USBPDR inf or USBSTRG inf The last window confirms the driver has been installed Click Finish to close the add new hardware wizard Restart the computer When the my computer window is opened a new remov able disk or G530 drive icon is displayed Double click on the icon to access the camera s memory card see page 88 ...

Страница 88: ...rmat the card Only files recorded by the camera should be stored on the memory card 88 USB TRANSFER MODE Memory card folder organization G530 SD DCIM PICT0001 JPG PICT0004 AVI Voice recording Still image Movie clip Misc PICT0001 WAV PICT0001 s audio caption PICT0005 WAV 100KM009 The misc folder contains DPOF print files p 58 Images and the attached audio file should be stored together in the same ...

Страница 89: ...sed with image files do not change when an image is deleted Image files contain exif tag data This data includes the time and date the image was recorded as well as the camera settings used This data can be viewed with the camera or the DiMAGE Viewer software If a camera image is opened in a photo retouching application like Adobe Photoshop and then the image is saved overwriting the original data...

Страница 90: ...pped Windows 98 98 Second Edition When more than one external device are connected to the computer repeat the procedure above except right click on the unplug or eject hardware icon This opens the unplug or eject hardware window after clicking on the small window indicating the unplug or eject hardware routine Click on the small window to stop the device The safe to remove hardware window opens Cl...

Страница 91: ...er and then drag the mass storage device icon and drop it into the trash Disconnect the USB cable A confirmation screen appears to indicate the devices to be stopped Clicking OK will stop the device A third and final screen appears to indi cate the camera can be safely discon nected from the computer Close the window and then disconnect the USB cable Macintosh Mac OS9 Mac OSX ...

Страница 92: ...nts Number of copies Confirm the USB transfer mode option in the setup menu is set to PictBridge Connect the camera to a PictBridge com patible printer using the camera s USB cable The larger plug of the cable is connected to the printer Insert the smaller plug of the cable into the camera the camera turns on automatical ly and starts the PictBridge connection Individual still images can be select...

Страница 93: ...ns for postcard L and 2L paper sizes in both millimeters and inches for your reference Printing Notes L Postcard 2L 89 X 127mm 100 X 148mm 127 X 178mm 3 5 X 5 0 in 3 9 X 5 9 in 5 0 X 7 0 in Press the set button to begin printing cancel Total 3 2 5M Printing To cancel the print run once it begins press the set button OK Total 3 2 5M Printing finished The printing finished message indicates the end ...

Страница 94: ...for the printer problem Check the printer settings before starting again and use the PictBridge screen to deselect the images that were printed Notes on printing errors QuickTime system requirements To install QuickTime follow the instructions in the installer Macintosh users can download the latest version of QuickTime free of charge from the Apple Computer web site http www apple com IBM PC AT C...

Страница 95: ... the unplug or eject hardware routine p 90 2 Disconnect the USB cable 3 Change the memory card 4 Reconnect the USB cable to remake the USB connection 1 Stop the USB connection by dragging the drive icon into the trash p 91 2 Disconnect the USB cable 3 Change the memory card 4 Reconnect the USB cable to remake the USB connection Never remove the card when data is being transferred between the camer...

Страница 96: ...y contact a Konica Minolta service facility Shutter will not release Memory full warning appears on the monitor Memory card is full and unable to store an image at the image size and quality setting on the camera Insert a new memory card p 18 delete some images p 31 or change the image size and quality setting p 41 No card warn ing appears on the monitor No memory card in the camera Insert a memor...

Страница 97: ... higher set ting p 47 or use the flash p 28 Green viewfinder indicator lamp blinks Subject is too close If the camera does not function normally turn it off remove and reinsert the battery or unplug and reconnect the AC adapter Always turn the camera off otherwise the memory card may be damaged and camera settings reset About the lithium ion battery charger cord The included AC cord is designed fo...

Страница 98: ...ill be located in the universal serial bus controller or other devices location of the device manager Click on the locations to display the files The driver should be indicated with the camera name Under certain conditions the driver name may not contain the camera name However the driver will be indicated by either a question mark or exclamation point 5 Click on the driver to select it 6 Windows ...

Страница 99: ... with a soft clean dry cloth If the camera or lens comes in contact with sand gently blow away loose particles Wiping may scratch the surface To clean the lens surface first blow away any dust or sand then gently wipe the lens with a cloth or tissue designed for optics Use lens cleaning fluid if necessary Never use organic solvents to clean the camera Never touch the lens surface with your fingers...

Страница 100: ...inside of a coat Batteries can recover their power when they warm up Do not store the battery when it is fully charged When storing the battery for extended periods recharge it for five minutes every six months The battery may not be able to be charged if completely exhausted Store batteries within 20 C to 35 C 4 F to 95 F A special built in battery supplies power to the clock and memory when the ...

Страница 101: ...is not monitor defect and does not affect the recorded image Do not apply pressure to the surface of the LCD monitor it may be permanently damaged If fingerprints are on the LCD monitor surface gently wipe with a soft clean dry cloth Copyright TV program films video tapes photographs and other materials may be copyrighted Unauthorized recording or duplication of such material may be contrary to co...

Страница 102: ...electronic shutter plus mechanical shutter Shutter speed range 1 1 2000s Auto Program Aperture priority 15 1 1000s Manual Built in flash recycling time Approximately 4 seconds Viewfinder Optical real image zoom viewfinder Monitor LCD 1 5in 3 8 cm low temperature polysilicon TFT color Monitor field of view Approximately 100 A D conversion 10 bits Recording media SD Memory Cards MultiMediaCards Memo...

Страница 103: ...pter AC 9 Dimensions 93 5 W X 55 5 H X 26 0 D mm 3 7 W X 2 2 H X 1 0 D in Weight Approximately 145g 5 1oz without battery or memory cards Operating temperature 0 C to 50 C 32 F to 122 F Operating humidity 20 80 noncondensing Lithium ion Battery NP 600 Voltage 3 7V Weight 25g 0 8oz Dimensions 31 8 W X 9 0 H X 49 8 D mm 1 3 W X 0 4 H X 2 0 D in Battery Charger BC 600 Input voltage AC100 240V 50 60Hz...

Страница 104: ...toworld com Become a member of the Konica Minolta Photo World today It is free for registered customers of Konica Minolta Werden Sie noch heute Mitglied der Konica Minolta Photo World Die Mitgliedschaft ist für registrierte Konica Minolta Kunden kostenlos Devenez dès aujourd hui membre du Konica Minolta Photo World L inscription est gratuite Konica Minolta Customer Support www konicaminoltasupport...

Отзывы: