background image

123

Installing USB Driver Software

- Installing from attached DiMAGE Viewer CD-ROM.
- Install the software only if you are using Windows 98 or Windows 98SE. If

you are using another OS, you do not need to install this.

- Turn OFF the power supply to the camera.
- To conserve the battery, using the AC adapter AC-9 (sold separately) is

recommended.

1) Turn on the PC power and start Windows.

2) After connecting your camera and PC with USB cable (p.122), turn ON

the power supply to the camera.

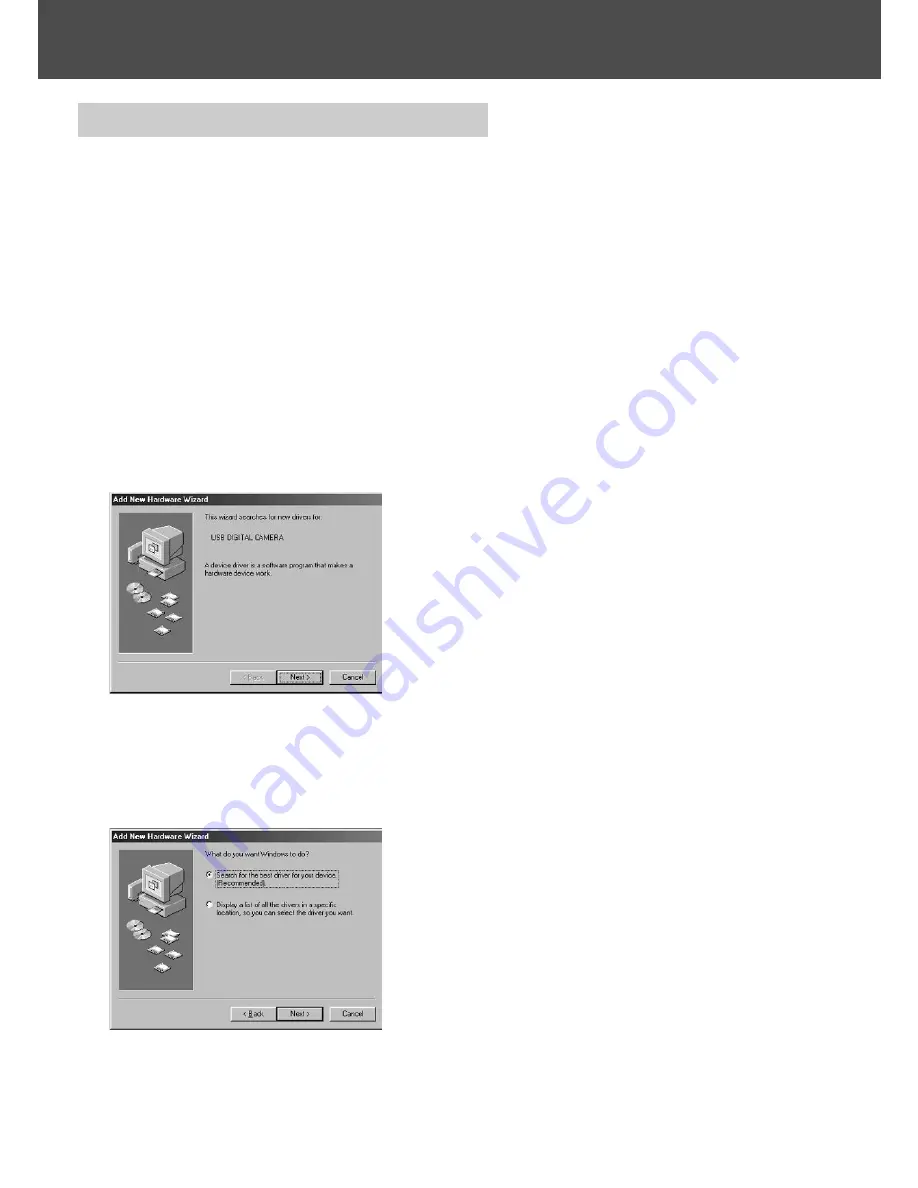
3) The “Add New Hardware Wizard” screen will appear.

4) Insert the DiMAGE Viewer CD-ROM supplied into the CD-ROM drive.

5) Click “Search for the best driver for your device (Recommended).” and

then click “Next”.

Installing software and downloading images

Содержание DiMAGE G400

Страница 1: ......

Страница 2: ...some occasions of the performing arts demonstrations and exhibitions may restrict photography even for the purpose of personal enjoyment Caution for Extended Camera Use The camera body may become hot...

Страница 3: ...re for the purpose of explanation and may differ from the actual design of your camera You can also order a digital print at a photo lab except for some labs such as a traditional photofinishing servi...

Страница 4: ...urning the Power ON OFF 28 Setting the Menu Language Date and Time 29 Basic Operation Taking Pictures 31 Holding Your Camera 31 Viewfinder LED 31 Selecting the Shooting Mode 32 Taking Pictures using t...

Страница 5: ...Using the Manual Mode Menu 74 Taking Pictures in Program Mode 76 Taking Pictures in Aperture Mode 78 Taking photographs in manual exposure mode 79 Using the Auto Bracket Function 81 Changing the Sensi...

Страница 6: ...n mode 111 Preventing the blue LED from switching on 111 Adjusting the Brightness and color of the LCD Monitor 112 Specifying the Shooting mode settings 113 Taking pictures using red eye reduction 114...

Страница 7: ...stalling USB Driver Software 123 Downloading transferring Images 125 How to Install and Use QuickTime Windows only 127 Using Windows 128 Using Macintosh 130 Others When Carrying the Camera Overseas 13...

Страница 8: ...gree of danger or damage that may occur if the displayed content is not followed or the product is misused Warning This symbol indicates that misuse may result in serious injury and even death Caution...

Страница 9: ...r repair the camera yourself Fire and or electrical shock may occur as a result For repair or internal inspection consult the dealer from whom you bought the product Do not allow the camera to get wet...

Страница 10: ...allow metals wires necklaces etc to come into contact with batteries Fluid leakage heat fire and damage may occur as a result Caution Do not point the lens directly at the sun or at a strong light so...

Страница 11: ...rying out non photographic operations on the camera disconnect the AC adapter for safety Do not leave the camera in locations such as A location exposed to direct sunlight or inside a car etc where th...

Страница 12: ...Due to the characteristics of liquid crystals the brightness of the LCD monitor may appear uneven with changes in temperature etc The LCD monitor has been developed using high precision engineering a...

Страница 13: ...s 1 Lithium ion battery the packaged item or purchased separately Read the user s guide on the battery and the charger thoroughly and use them accordingly You cannot charge the battery in the camera W...

Страница 14: ...or damage may occur as a result Do not touch the terminals with hands or metal objects Damage to the components may occur as a result of static electricity Before handling an SD Memory Card Multi Medi...

Страница 15: ...a Images that have been changed or added will not only play back on the camera but may cause the camera to malfunction as well Always format SD Memory Cards Multi Media Cards Memory Stick using this c...

Страница 16: ...Names of Parts Camera Body Auto focus Sensor Windows Shutter Button Blue LED Strap Holder Battery Sub cap Lens Speaker Flash Viewfinder USB Terminal Cover Microphone Self timer LED Lens Cover Main Swi...

Страница 17: ...Parts Cont d Delete Button P 18 Play Button P 18 Green LED LCD Monitor Viewfinder Eyepiece Tripod Socket SET DISP Button MENU Button P 19 MODE Button P 18 Zoom Buttons P 18 4 way Button P 18 Battery...

Страница 18: ...way Button Use the different buttons and to select menu items images etc This button is used for the following Selecting shooting mode Selecting menus Selecting pictures Scrolling a picture in an enl...

Страница 19: ...amera on a stable surface before installing the strap to avoid the possibility of it being dropped and damaged 1 Push the loop on the small end of the strap through the strap holder 2 Pass the other e...

Страница 20: ...between 0 C 32 F and 40 C 104 F Charging time will vary with the surrounding temperature and the condition of the battery pack Before using new battery packs or battery packs that have not been used f...

Страница 21: ...ith the terminals facing inside the camera After making sure the battery pack is properly installed close the battery card cover securely Make sure that the battery pack is facing the right way If the...

Страница 22: ...be recorded Repeated focus operations by pressing the shutter button halfway Repeated zoom operations Extensive use of the LCD monitor in the Playback mode Communication with a PC Caution When you co...

Страница 23: ...to operate the equipment This equipment has been tested and found to comply with the limits for a Class B digital device pursuant to Part 15 of the FCC Rules These limits are designed to provide reas...

Страница 24: ...ely specified for your camera as use of any other device may result in a breakdown fire or electrical shock Make sure the camera is OFF check that the LCD monitor is not lit and turn OFF all power Aft...

Страница 25: ...ry compartment and close the battery card cover When finished using the camera turn OFF the power supply to the camera and then disconnect the connecting plug of the battery type plug from the AC adap...

Страница 26: ...ards 1 Open the battery card cover 2 With the camera and the label of the card facing up insert the card with the knocked out part first into the slot and push in until a click is heard Take care that...

Страница 27: ...processed the LCD monitor will show Now COPY etc and the green LED will come on If you open the battery card cover while the green LED is lit image processing may be interrupted or hindered While the...

Страница 28: ...n With the power ON it is possible to shoot pictures Also the LCD display will be lit 3 When you wish to turn the power OFF slide the lens cover just a little in the direction indicated by the arrow T...

Страница 29: ...PLAY button The language selection screen will automatically appear on the LCD monitor By pressing or select the desired language and push the SET DISP button 2 You will be prompted to confirm your la...

Страница 30: ...age Date andTime Cont d 6 After finishing the settings If you turned the power ON with the main switch by opening the lens cover you can take pictures once the lens has reached its extended position I...

Страница 31: ...tors When the LED Indicators light they mean the following Green LED On Camera ready to shoot Flash charging Formatting the card USB cable is being connected Card being accessed Flashing Warning that...

Страница 32: ...de for most shots When you take pictures in this mode the camera adjusts automatically itself to the suitable setting for you p 34 SCENE SELECT You simply select a mode suited to the shot you are taki...

Страница 33: ...e Balance p 72 Memory Priority p 60 Self Timer p 61 4 MANUAL p 74 Program p 76 Aperture p 78 Manual p 79 Continuous Bracket p 81 Image Size p 58 Memory Priority p 60 Self Timer p 61 Color p 56 Exposur...

Страница 34: ...um ion battery NP 600 or use the AC adapter AC 9 sold separately 1 Opening the lens cover turns ON the power If the surface of the lens is dirty gently wipe it clean with a soft dry cloth 2 The LCD mo...

Страница 35: ...er use Shooting with Focus Lock p 41 5 Press the shutter button half way and a green LED lights in the viewfinder and on the LCD monitor indicating that the focus and exposure are locked The icon also...

Страница 36: ...erate the camera Do not open the battery card cover while the green LED is lit 8 When you are finished taking pictures close the lens cover and turn OFF the power supply Daytime normal shooting distan...

Страница 37: ...djust the auto focus and exposure After the focus lock is set aim at your original subject and shoot your picture p 41 About Auto Power Off Function If you do not operate for a certain period of time...

Страница 38: ...ormation on setting the flash mode t Macro mode 1 Displayed when Macro mode p 46 is set When Macro mode is not set the icon appears when the shutter button is pressed half way and the shot is focused...

Страница 39: ...es 71 and 77 4 Aperture setting 1 When Program mode p 76 is set the aperture setting is displayed when you press the shutter button half way When Aperture p 78 or Manual p 79 mode is set the aperture...

Страница 40: ...h the LCD monitor off 3 Looking through the viewfinder compose the shot so that the subject you want to photograph is in the center of the image Then take the picture No auto focus mark is displayed w...

Страница 41: ...2 With the shutter button pressed half way re compose your photo and press the shutter button all the way to take the picture When re composing the photo do not change the shooting distance If the di...

Страница 42: ...t turn off Please view the LCD monitor while shooting your movies 1 Open the lens cover and turn the power on so that the live image appears then press the MODE button 2 Press the or button to select...

Страница 43: ...right of the screen See p 50 for information on how to play back movies NOTE 1 While recording a movie the sound is also being recorded so take care not to cover the microphone on the front of the cam...

Страница 44: ...ash mode setting remains in effect even if you switch the power OFF and back ON 1 Turn the power on so that the LCD monitor is lit 2 By pressing or bring up the desired mode icon on the LCD monitor Pr...

Страница 45: ...best to use the red eye reduction when using a flash with people p 114 Flash Shooting Distances ISO AUTO Focus Distance Shooting Distance Wide Angle 0 5m 1 6ft to 2 3m 7 5ft Telephoto 0 8m 2 6ft to 1...

Страница 46: ...tween the camera and the subject is close there will be a difference between the image in the viewfinder and the picture that is actually taken It is recommended that the LCD monitor be used If you us...

Страница 47: ...ssage NO DISPLAY DATA will be displayed 1 2 Every time you press or the previous or next photo will be played back If you press the W side on the zoom button Index Playback will start For operation af...

Страница 48: ...d Display If an image is protected the Protected symbol is displayed e Remaining Battery Power Display When the battery is in use the remaining power is displayed in two levels p 21 r Image No Playbac...

Страница 49: ...e 1 Image size is displayed 2 is displayed in movie images 3 For images with voice memos the icon is displayed o Recording Media Display The type of media in use is displayed The SD Memory Card or Mul...

Страница 50: ...o select the movie you wish to see is displayed on the movie image 2 If you press the shutter button the movie images will be played back When playback is finished the display returns to screen 1 Symb...

Страница 51: ...are erasing all or some of the frames it does not matter which frame is displayed 2 When you press the Delete button the frame selection screen appears Press the or button to select ONE the selected i...

Страница 52: ...last frame will switch the screen to the next eight images 2 A yellow frame appears around the selected image To select additional images repeat the selection procedure return to step 1 When you have...

Страница 53: ...53 4 Once erasing starts Now DELETE is displayed Once erasing is completed the disply returns to the playback image Erasing the Playback Image Cont d 4...

Страница 54: ...turned off Available menu options Color Allows you to take pictures in color modes other than normal color photography such as black white and sepia p 56 Continuous Allows continuous shooting p 57 Im...

Страница 55: ...he menu 5 Press the SET DISP button to complete the setting and return the camera to shooting mode live image displayed The selected mode icon appears on the LCD monitor To set another menu option wit...

Страница 56: ...SET DISP button to complete the setting and return the camera to shooting mode 1 Available modes Standard color default Normal color mode Black white Allows you to shoot in black and white Sepia Allo...

Страница 57: ...mplete the setting and return the camera to shooting mode Available modes Single Shutter default Normal single frame shooting mode Continuous shutter Allows you to take multiple shots by holding down...

Страница 58: ...T DISP button to complete the setting and return the camera to shooting mode 1 Image size and pixel count width height 1 4M 2272 1704 pixels approximately 3 870 000 pixels This is the highest quality...

Страница 59: ...4 NORMAL About 72 Photos 2M 1600 1200 NORMAL About 143 Photos VGA 640 480 NORMAL About 574 Photos The number of photos you can take may vary depending on the subject When there are files other than im...

Страница 60: ...ilable in the mode menus for Scene Select p 62 Movie Voice p 66 and Manual p 74 1 Select the Memory Priority menu option The current setting is displayed PRIORITY SD is displayed as the default settin...

Страница 61: ...SET DISP button to complete the setting and return the camera to shooting mode 3 When you press the shutter button the self timer lamp flashes and the shutter releases after either 10 seconds or 3 se...

Страница 62: ...u options Scene mode Six modes are available from which you can choose the best mode for the scene you are photographing p 64 Continuous p 57 Image Size p 58 Memory Priority p 60 Self Timer p 61 Becau...

Страница 63: ...r buttons to select the desired mode from the menu 5 Press the SET DISP button to complete the setting and return the camera to shooting mode live image displayed The selected mode icon appears on the...

Страница 64: ...ting In dark locations you should use a tripod to prevent camera shake 1 Select the Scene Mode setting menu option The current setting is displayed PORTRAIT is displayed as the default setting 2 Use t...

Страница 65: ...revent camera shake Snap This mode is ideal for snapshots and you can take a photo between the ranges of 0 8m and 2 5m Use this mode when you want someone to take a picture for you without having to w...

Страница 66: ...add voice comments to still images you have shot p 68 Recorded Message You can record voice only p 70 Exposure Compensation Allows you to adjust the brightness of your images p 71 White Balance You c...

Страница 67: ...option you want to set 4 Use the or buttons to select the desired mode from the menu 5 Press the SET DISP button to complete the setting and return the camera to shooting mode live image displayed Th...

Страница 68: ...nt Sound cannot be recorded to a photo displayed in the movie mode If you press the MENU button the selection is invalidated and you will return to screen 1 3 Press the shutter button to start recordi...

Страница 69: ...press the SET DISP button If you decide not to erase select CANCEL or press the SET DISP button again 3 When the Now DELETE sign disappears erasing has finished and you will return to the through imag...

Страница 70: ...ns If you do not press the shutter button you can return to screen 1 without making a recording by pressing the MENU button When the available recording time runs out recording will end automatically...

Страница 71: ...n the mode menu for Manual p 74 1 Select the Exposure Compensation setting menu option The current setting is displayed EXPOSURE 0 0 is displayed as the default setting 2 Use the or buttons to select...

Страница 72: ...is displayed with icon on the LCD monitor However AUTO is not displayed This option is also available in the mode menu for Manual p 74 1 Select the White Balance setting menu option The current settin...

Страница 73: ...ent lighting TUNGSTEN Ideal for taking photos indoors with normal incandescent lighting About White Balance The human eye has the ability to compensate so that it sees white subjects as white whatever...

Страница 74: ...tter speed automatically p 78 3 Manual The shutter speed and aperture are both set manually p 79 Continuous Bracket Allows you to select the Auto Bracket function p 81 as well as the Continuous Shooti...

Страница 75: ...t to set 4 Use the or buttons to select the desired mode from the menu 5 Press the SET DISP button to complete the setting and return the camera to shooting mode live image displayed The selected mode...

Страница 76: ...to shooting mode The icon appears on the LCD monitor 2 1 Differences between the Auto and Program modes The shutter speed and aperture size combinations automatically set by the camera are the same i...

Страница 77: ...s power OFF press the Zoom button or change the white balance setting Changing the white balance setting You can select the white balance mode by pressing Each time you press the mode alters and the...

Страница 78: ...and you can then set the aperture to the desired setting Use the button to set the aperture and then take the picture You can also use the or buttons to set the exposure compensation Each time you pr...

Страница 79: ...can then set the shutter speed and aperture to the desired settings Set up focus value with button and shutter speed with or button Please use a tripod to prevent movement during slow shutter speed ex...

Страница 80: ...is set slower than 1 2 second it will take longer for processing due to the noise reduction function Some of the functions will be restricted on manual exposure mode You cannot set Exposure Compensat...

Страница 81: ...or AUTO BRACKET FOCUS Press the SET DISP button to complete the setting and return the camera to shooting mode Available modes Single shutter default This is the normal shooting mode in which the cam...

Страница 82: ...ndition of an object 50 100 200 400 High sensitivity is suitable for an object with quick motion or for dark places However the higher the sensitivity is the more noise image will have Low sensitivity...

Страница 83: ...tness and image contrast to your preferred settings 1 Select the Custom setting menu option The current setting is displayed CUSTOM OFF is displayed as the default setting 2 Use the or buttons to sele...

Страница 84: ...setting Press the SET DISP button to complete the setting and return the camera to shooting mode If you want to reduce the flash intensity so as to take photograph of a close object adjust the volume...

Страница 85: ...Adjust to the to increase color clearness and adjust to the to reduce color clearness Adjusting the Contrast Contrast of images gap between bright and dark can be adjusted 1 Select the Contrast settin...

Страница 86: ...harpness setting menu option The current setting is displayed SHARPNESS 0 is displayed as the default setting 2 Use the or buttons to select the desired setting Press the SET DISP button to complete t...

Страница 87: ...ed as the default setting for all 3 colors 2 Use the or buttons to set the color and then the or buttons to select the desired setting Press the SET DISP button to complete the setting and return the...

Страница 88: ...W SHUTTER The current setting is displayed 1 8 seconds is displayed as the default setting 2 Use the or buttons to select the shutter speed Press the SET DISP button to complete the setting and return...

Страница 89: ...you entered the menu will be surrounded by a red frame Use or to move the frame and select the image you wish to display or erase Pressing when the first frame is selected or on the last frame will sw...

Страница 90: ...play the image in the normal size 2 Use or to scroll around the photo to the part you want to see 2 1 Using the Quick view Function If you pre set the camera to the Quick view mode p 111 you can revie...

Страница 91: ...Recording image Playing back the sound of After Recording image p 68 1 Press the PLAY button and then select After Recording image with or button When playing back After Recording image a screen will...

Страница 92: ...ove images to other media p 94 DPOF Specifies the images to be printed and the number of copies of each image p 97 Protect Used to prevent images from being deleted p 101 Resize Allows you to reduce t...

Страница 93: ...highlighted 4 When you have completed all the settings use the button to select OK and press the SET DISP button When the settings are completed the menu screen reappears From the menu screen press t...

Страница 94: ...fore you can move them 1 Select COPY MOVE 2 Use the or buttons to select the mode After selecting the media mode use the SET DISP button to select the media to which the data will be copied or moved I...

Страница 95: ...on position just above OK discards the settings and returns to the screen in step 1 If you selected SELECT as the unit mode proceed to step 6 If you selected ALL ON proceed to p 96 8 6 An 8 frame imag...

Страница 96: ...d then press the SET DISP button 8 A confirmation screen appears To move the image s select YES with or then press the SET DISP button If you select NO and press the SET DISP button you will return to...

Страница 97: ...print services for printing out images you ve taken with your camera You can select the frames one frame multiple frames or all frames you want to print from all the still images you ve taken You can...

Страница 98: ...ect DATE ON or DATE OFF If you select DATE ON the date and time of shooting are also printed 5 When you have completed all your selections use the button to select OK and then press the SET DISP butto...

Страница 99: ...ing the red frame to select an image allows you to change or set or cancel the DPOF settings for the image Images for which prints have been specified are surrounded by a yellow frame and the number o...

Страница 100: ...f you selected ALL ON or SELECT Use the or button to select YES and then press the SET DISP button If you chose ALL OFF Select YES and press the SET DISP button If you select NO and press the SET DISP...

Страница 101: ...ect PROTECT 2 Use the or button to select the mode After selecting the media mode use the SET DISP button to select the media containing the images to be protected or unprotected If there are no image...

Страница 102: ...5 If you selected ALL ON or ALL OFF proceed to p 103 7 5 The 8 frame index appears Using or move the red frame to an image you wish to protect or cancel protect and press the SET DISP button Pressing...

Страница 103: ...and press the SET DISP button If you select NO with or and press the SET DISP button your settings will be invalidated and you return to screen 1 8 The Now PROTECT or Now PROTECT OFF screen is display...

Страница 104: ...ie images 1 Select the image to be resized in the playback screen and then select the RESIZE menu option 2 Use the button to select the size mode and then use the SET DISP button to select the image s...

Страница 105: ...MEMORY FULL is displayed Playing a Slide Show The slide show will proceed in order from the first image at a set interval 1 Select SLIDE SHOW 2 Use the button to select OK and then press the SET DISP...

Страница 106: ...u options Format Initializes a card p 108 Monitor Allows you to specify settings for the LCD monitor p 110 REC SET Allows you to specify settings for Shooting mode p 113 Sound You can turn the various...

Страница 107: ...MENU button When the settings are completed the SET UP menu screen screen in step 1 reappears If you accessed the SET UP menu from the playback screen the playback image reappears In the SET UP menu...

Страница 108: ...the camera If a card is formatted by a computer it may not perform normally Using the Set up Menu Cont d 1 Select FORMAT Use the or button to select the type of media to be formatted and then press t...

Страница 109: ...d 3 Once formatting starts the message Now FORMAT will appear When formatting is complete the camera returns to the Set up menu mode During formatting be sure not to open the battery card cover as da...

Страница 110: ...button When the settings are completed the SET UP menu screen reappears 2 1 Available modes QUICK VIEW Allows you to set up the camera so that you can check your images right after you shoot them INFO...

Страница 111: ...ing shooting or playback The default setting is INFORMATION ON show Changing the LCD monitor operation mode When you switch the camera on the LCD monitor always lights up However you can stop the LCD...

Страница 112: ...the settings to the desired brightness and color After making the adjustments press the SET DISP button complete the settings To make screen brighter to make color deeper move the cursor to the with b...

Страница 113: ...u have completed the settings press the MENU button When the settings are completed the SET UP menu screen reappears 2 1 Available modes RED EYE REDUCTION Allows you to take pictures using red eye red...

Страница 114: ...ffect may not be apparent Using the Digital Zoom If you select DIGITAL ZOOM ON it can become 2x zoom furthermore from the maximum magnification of optical zoom and pictures can be taken The default se...

Страница 115: ...ing as the default but it can be changed to spot metering Spot metering is used to ensure matching the exposure to a targeted part of your subject Center weighted metering AE CENTER In this mode the c...

Страница 116: ...ane AF using a CCD to set the focus This mode uses the optimum AF on the camera for the scene being shot exo AF sensor OFF This modes sets the focusing using only image plane AF with a CCD with no ext...

Страница 117: ...unds and the shutter sound on and off The default is ON emit sound for all the sounds 1 Select SOUND 2 Use the or button to select the mode Then use the SET DISP button to turn each mode ON or OFF 3 W...

Страница 118: ...N or OFF 3 When you have completed the settings press the MENU button When the settings are completed the SET UP menu screen reappears 2 1 Available modes DATE SET Allows you to adjust the date and ti...

Страница 119: ...on the LCD monitor Select LANGUAGE press the SET DISP button and the language settings screen appears See step 1 to 2 on page 29 for instructions on making the settings Setting the Auto Power OFF Time...

Страница 120: ...arked with a tick Use the or buttons to select a mode and the SET DISP button to set the mode to ON or OFF To enable the Custom settings p 83 select CUSTOM and press the SET DISP button You can also d...

Страница 121: ...f available RAM 32MB or more recommended Display 32 000 colors or more resolution of 640 480 pixels or more Others CD ROM drive USB port standard equipped 2 Macintosh OS Mac OS 9 0 9 1 9 2 Mac OS X Ve...

Страница 122: ...e camera to the computer with the USB cable Please use only the USB cable supplied with the camera While the camera is connected to your PC the camera is inoperable While connected to your PC do not d...

Страница 123: ...onserve the battery using the AC adapter AC 9 sold separately is recommended 1 Turn on the PC power and start Windows 2 After connecting your camera and PC with USB cable p 122 turn ON the power suppl...

Страница 124: ...e CD ROM drive is assumed to be drive D The INF file necessary for the install is located in D When searching a different location click Browse 7 Click Next 8 Click Finish The USB device driver is now...

Страница 125: ...indows or Mac OS and connect your camera and PC with USB cable p 122 2 If you are using Windows open My Computer and double click the newly created icon removable device If you are using Mac an Undefi...

Страница 126: ...ct setting set with this camera is equivalent to the read only attribute of a file Please note that if the attribute of a file is changed using a PC the protect setting set with the camera will be dis...

Страница 127: ...ched DiMAGE Viewer CD ROM For Macintosh users QuickTime is normally already installed so you can playback movies without doing anything else QuickTime System Requirements IBM PC AT Compatible Pentium...

Страница 128: ...Turn on the PC power and start Windows 2 Put the attached INSTRUCTION MANUAL CD ROM in your CD ROM drive 3 Check to see that Adobe Acrobat Reader and DiMAGE G400 DiMAGE Viewer INSTRUCTION MANUAL in th...

Страница 129: ...art the PC until all the installations have been completed 5 When all of the software checked in 3 have been installed the DiMAGE G400 Setup Menu screen will appear Click OK to finish the installation...

Страница 130: ...lick the Konica Minolta icon 3 Double click the Adobe icon 4 Double click the English icon 5 Double click the Acrobat Reader Installer icon 6 Follow the instructions shown on the screen Installing the...

Страница 131: ...re the voltage is outside the displayed power supply voltage AC 100V to AC240V Using the Attached Charger BC 600 Please do not use the charger where the voltage is outside the displayed power supply v...

Страница 132: ...fety precautions of the product After using the camera If the camera is not to be used for a long period remove the batteries and ensure that the power plug of the AC adapter is disconnected from the...

Страница 133: ...e pixels is more than 99 98 there may be missing or constantly lit pixels When using the LCD monitor in a cold location the screen may appear darker than normal immediately after starting use The scre...

Страница 134: ...to the Self Timer mode 61 Flash being charged 45 Subject not in the center 41 Subject hard to focus 41 Dirty lens 34 Incorrect distance from the subject 36 LCD brightness adjusted incorrectly 112 Fin...

Страница 135: ...tion is not adjusted properly 71 Flash used with subject too close 45 Exposure correction is not adjusted properly 71 Not connected to your PC correctly 122 No image data inserted in the camera 126 Le...

Страница 136: ...ISO 100 changeable sensitivity AUTO 50 100 200 400 Lens F 2 8 4 9 f 5 6 16 8mm 7 elements in 6 groups Equivalent to 35mm camera conversion of 34 to102mm Focus adjustment Photometric TTL center 5 poin...

Страница 137: ...ly silicon TFT with back light LCD color monitor Playback Single frame index playback slide show playback digital zoom playback Erase function Single frame designated frames all frames format LED disp...

Страница 138: ...m Co Ltd and Matsushita Electric Industrial Co Ltd is a standard for recording specified information such as the images or quantity to print from the images taken by a digital camera on a recording me...

Страница 139: ...9224 2732 11 KO A310...

Отзывы: