background image


4

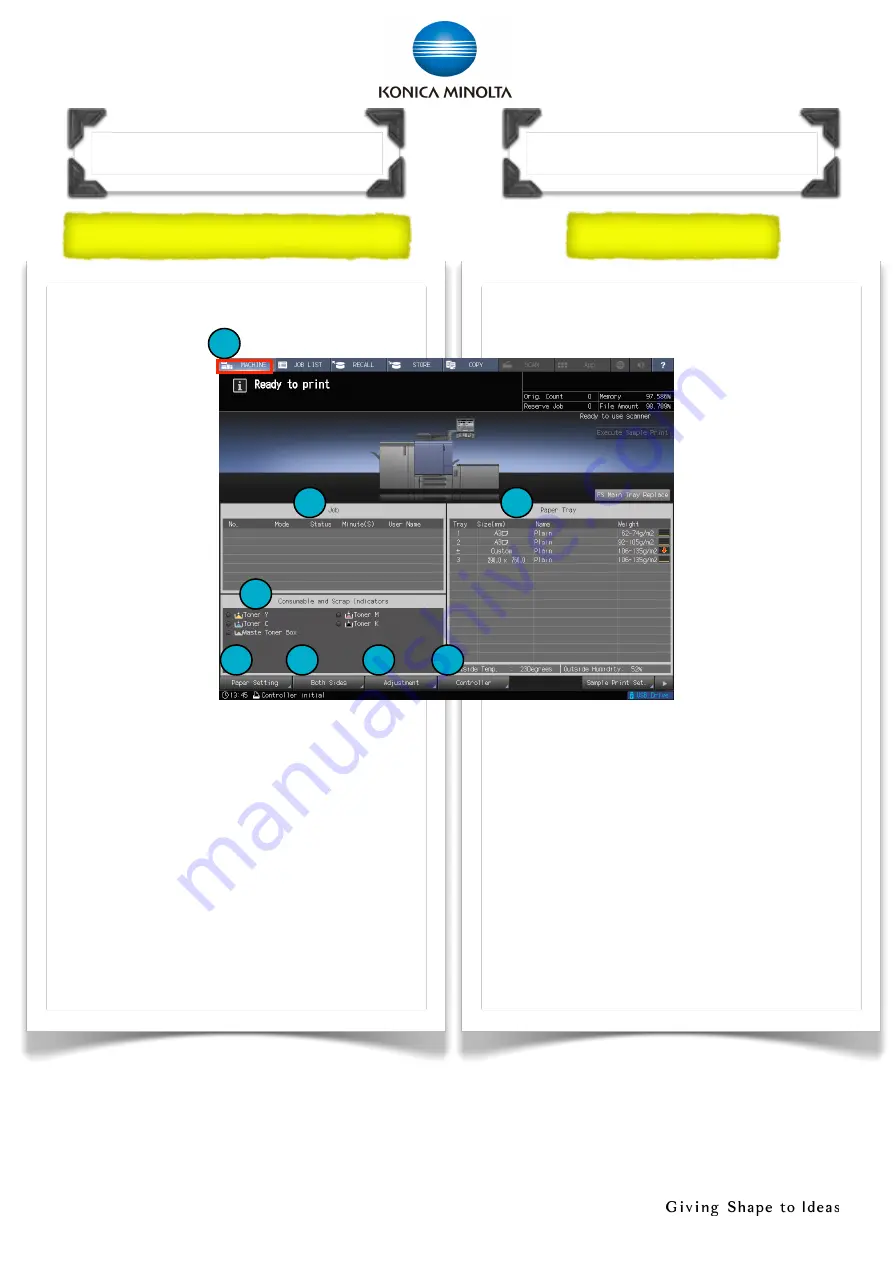
1. Machine  configure  display  -  Displays  

the  configuration  of  main  body  and  
options

2. Job  display  

area  -  
Displays  the  
current  status  
of  the  jobs

3. Consumable  

and  scrap  
indicator  area

4. Tray  

information  
indicator

5. [Paper  

Setting]  -  Specifies  the  paper  
conditions

6. [Both  Sides]  -  Adjustments  for  images  

printed  on  the  front  and  back  sides  

7. [Adjustment]  -  Adjust  the  main  body  

and  the  optional  equipment

8. [Controller]  -  Configures  the  controller

Overview of Machine Scree

n

機器面板概要

Screen  Overview

1. 機器配備顯示  

  顯示主機身的配備和附

加配件

2. 作業顯示區域  

  顯示現在的

工作情況

3. 耗材與紙屑盒

的指示

4.      紙盤資訊

5. [紙張設定]  


指定各紙盤的
設定

6. [兩面調整]  


調校前後兩面
的影像

7. [調整]  

  調整機身的設定

8. [列印控制器]  

設定列印控制器  

面板

1

2

3

4

6

7

8

5

Содержание AccurioPress C4070

Страница 1: ...Education Newsletter Shortcut Manual For details operations please refer to full set manual https manuals konicaminolta eu AccurioPress C4080 C4070 C4065 EN index html...

Страница 2: ...2...

Страница 3: ...5 Interrupt 6 Stop 7 Proof Copy 8 Start 9 Start LED 10 C Clear 11 Access 12 Mode Check 13 Utility Counter 14 Mode Memory 15 Accessibility 16 Help 17 Brightness adjustment dial 18 Power Save 19 Power S...

Страница 4: ...ble and scrap indicator area 4 Tray information indicator 5 Paper Setting Specifies the paper conditions 6 Both Sides Adjustments for images printed on the front and back sides 7 Adjustment Adjust the...

Страница 5: ...jobs 4 Reserved Job It provides a listing of the current status of printing suspended or reserved jobs 5 Spool Displays the status of the currently extracted job during print job receiving or spooling...

Страница 6: ...obs 4 Print Click to print the job 5 Job Setting Click to adjust the job setting 6 Delete Click to delete the job 7 Store Click to store the job 8 Edit Page Click to edit the job Image Controller IC 6...

Страница 7: ...job 3 Color Select color mode Single Color Black Full Color or Auto Color 4 Quality Adj Adjust copy quality 5 Zoom Specify the zoom ratio 6 Simplex Duplex Select the simplex duplex copy mode 7 Applic...

Страница 8: ...8 Select copy color mode 1 Touch Copy 2 Select i Single Color ii Black iii Full Color iv Auto Color 1 2 i ii iii iv Copy Function Color...

Страница 9: ...9 Adjust the copy density 1 Touch Quality Adj 2 Adjust the density is lightened or darkened 1 2 Copy Function Density...

Страница 10: ...h Zoom A Fixed Zoom Select fixed zoom size e g A5 A3 2 000 B Manual Zoom Touch Vert Horiz Zoom to input zoom value C Auto Zoom Touch Auto to zoom original image to specified paper in paper tray 1 A A5...

Страница 11: ...iii 2 1 or iv 2 2 1 2 i 1 1 ii 1 2 iii 2 1 iv 2 2 1 2 Single sided Original to Double sided Copy 2 1 Double sided Original to Single sided Copy 2 1 2 2 Double sided Original to Double sided Copy 2 2...

Страница 12: ...12 1 Touch Output Setting 2 Select Right Left or Top 1 2 Copy Function Bind Direction...

Страница 13: ...ect whether to sort or group when printing multiples sets of copies 1 Touch Output Setting 2 Select i Offset Sort ii Sort iii Offset Group iv Group 1 2 i ii iii iv Copy Function Sort Group Sort Group...

Страница 14: ...et character 4 Option Setting Display Email option setting screen 5 Main Displays only addresses which were registered as Main address 6 Input Address Input scan destination 7 All Display all addresse...

Страница 15: ...nsity tone and contrast 5 Resolution Change resolution 6 File Name Change file name 7 Zoom Set zoom level 8 Simple Duplex Select 1 sided or 2 sided scanning 9 Color Set color mode 10 Color Space Selec...

Страница 16: ...16 1 Touch Machine 2 Touch Paper Setting 3 Select tray 4 Touch Change Set 1 2 3 4 Tray Setting Change Tray Setting Part1...

Страница 17: ...ard or Custom Size 7 Weight set paper weight 8 Colored Paper Specify whether or not the colored paper 9 Punch Specify whether or not the punched paper 10 Both Sides Adjust Correct misalignment between...

Страница 18: ...Machine 2 Touch Paper Setting 3 Select tray 4 Touch Change Set 5 Touch Paper Size 6 Touch Custom 7 Touch 1 to input width and 2 to input length 8 Touch OK 1 2 3 4 5 6 7 1 2 8 OK Tray Setting Custom S...

Страница 19: ...k side with reference to the printing position of the front side 1 Touch Machine and Both Sides 2 Touch Scan Meas 3 Select Tray 4 Touch Output Background Sheet 5 Press Start to print out the backgroun...

Страница 20: ...20 7 Touch Output Adjustment Chart 8 Touch Black 9 Press Start to print out the adjustment chart 10 Touch Exit PrintMode 7 8 9 Start 10 Tray Setting Both Side Adjustment Part2...

Страница 21: ...ouch Scan Adjustment Chart 12 Set the background sheet and adjustment chart according to the instruction on the screen and then scan 13 Touch Yes to finish 11 12 13 Yes Tray Setting Both Side Adjustme...

Страница 22: ...position of front side ii Rotate Skew If the entire image rotates clockwise or counterclockwise or a diagonal skew is detected 15 Touch Chart Adjustment 16 Touch Print Mode and Start to print a test...

Страница 23: ...the back side Measure the X and Y directions to check the misalignment of print position You can enter a value in 0 1 mm increments 19 Touch X or Y of each point to enter the measurement value 20 Touc...

Страница 24: ...n of the whole output is not good 1 Touch Adjustment 2 Touch Execute Adjust Operation 3 Touch Gamma automatic Adj 4 Touch OK 5 Wait for the display Now adjusting to disappear 1 2 3 Gramma 4 OK 5 Machi...

Страница 25: ...25 Replenish Paper Main Tray 1 2 3 4 5 6 7 8...

Страница 26: ...26 Trimmer Unit Inner Trimmer Unit 1 2 Optional Device TU 510 TU 510 4 3...

Страница 27: ...27 Replenish Paper Multi bypass Tray 1 2 Optional Device MB 508 MB 508...

Страница 28: ...uch Exiting PrintMode to return normal screen 6 Touch Exit Utility bhkg_csmeter gcp konicaminolta com 2565 2128 If Digital Doctor not installed please send the meter report monthly through email bhkg_...

Страница 29: ...ing cleaning indicator of lights up yellow to notify that the Charging Corona If printing is interrupted because it is time to clean the Charging Corona the charging cleaning indicator lights up red a...

Страница 30: ...show please add toner Y M C or K If not join Digital Doctor Service to order new toner please email bhkg_csorder gcp konicaminolta com OR call 2565 8181 Y M C K bhkg_csorder gcp konicaminolta com 256...

Страница 31: ...isplay Replacing Waste Toner Box 1 Open the waste toner box door then draw out the waste toner box 2 Remove the label applied on the waste toner box then apply the label on the waste toner inlet to se...

Страница 32: ...replacing staple cartridge message will display please follow on screen instructions to replace Replacing Staple Cartridge 1 Touch 2 Touch Consumable Scrap 3 Touch Add Stapler 4 Touch and to switch p...

Страница 33: ...aper misfeed occurs in a copy job the machine displays the message Mishandled paper and misfeed area s on the screen Please touch Illustration and follow on screen instructions to remove paper Removin...

Страница 34: ...h 2 Turn ON the sub power switch The warm up takes approximately 6 5 minutes 1 Turn OFF the sub power switch 2 Turn OFF the main power switch Don t turn off the main power switch before turing off the...

Страница 35: ...35...

Страница 36: ......

Отзывы: