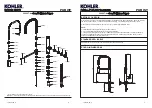


2. Partially thread the screws(1) into the ring(2).
3. Slide the washers(3,4) onto the shank(5) and thread
the ring onto the shank.
4. Tighten the screws to fix the faucet.
5. Connect the hoses(6) to water supplies. The hose
with “COLD” label(7) should be connected to cold water
supply.
1
4,
Metal
3,
Rubber
2
5
Faucet Maintenance:
With the water running, rub the nozzles to dislodge
debris.
To improve the flow, disconnect the spray(8) and clean
the screen washer(13). Reassemble.
Turn on the handle gently. Turn clockwise for cold water,
turn counter-clockwise for hot water.
Press the button(11), the water flow is as figure B shown;
Press the button(12), the water flow is as figure A shown;
Press and hold the button(10), it will increase water flow.
A
B
1431501-2A-A
3
1431501-2A-A
2
8
9
11
11
12
12
10
8
13
"LEAD FREE" is marked on the back of the faucet signifying its compliance with the United States AB1953
INSTALLATION CHECKOUT
Ensure that all coupling nuts are tight. Ensure that the handle is in the off
position. Check for leaks. Repair as needed.
Unscrew the spray(8). While rotating the handle, flush the hot and cold water
for about one minute. Reinstall the spray into the hose(9), adjust the hose and
make spray hook in the positon of bracket.
OPERATION INSTRUCTION
CLEANING INSTRUCTIONS
All Finishes: Clean the finish with mild soap and warm water. Wipe entire surface completely dry with clean soft
cloth. Many cleaners may contain chemicals, such as ammonia, chlorine, toilet cleaner etc, which could adversely
affect the finish and are not recommended for cleaning.
Do not use abrasive cleaners or solvents on Kohler faucets and fittings.
INSTALLATION
1. Slide the base over the shank until it is against the
faucet bottom. Insert the faucet assembly into the hole,
and make sure the handle is on the right side.
Base
6
7
Hot
Cold


