background image

7

1495657-T2

-A

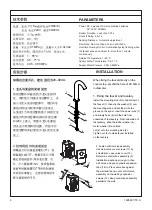
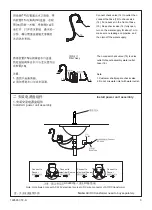
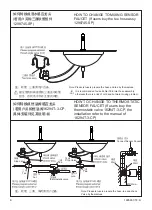
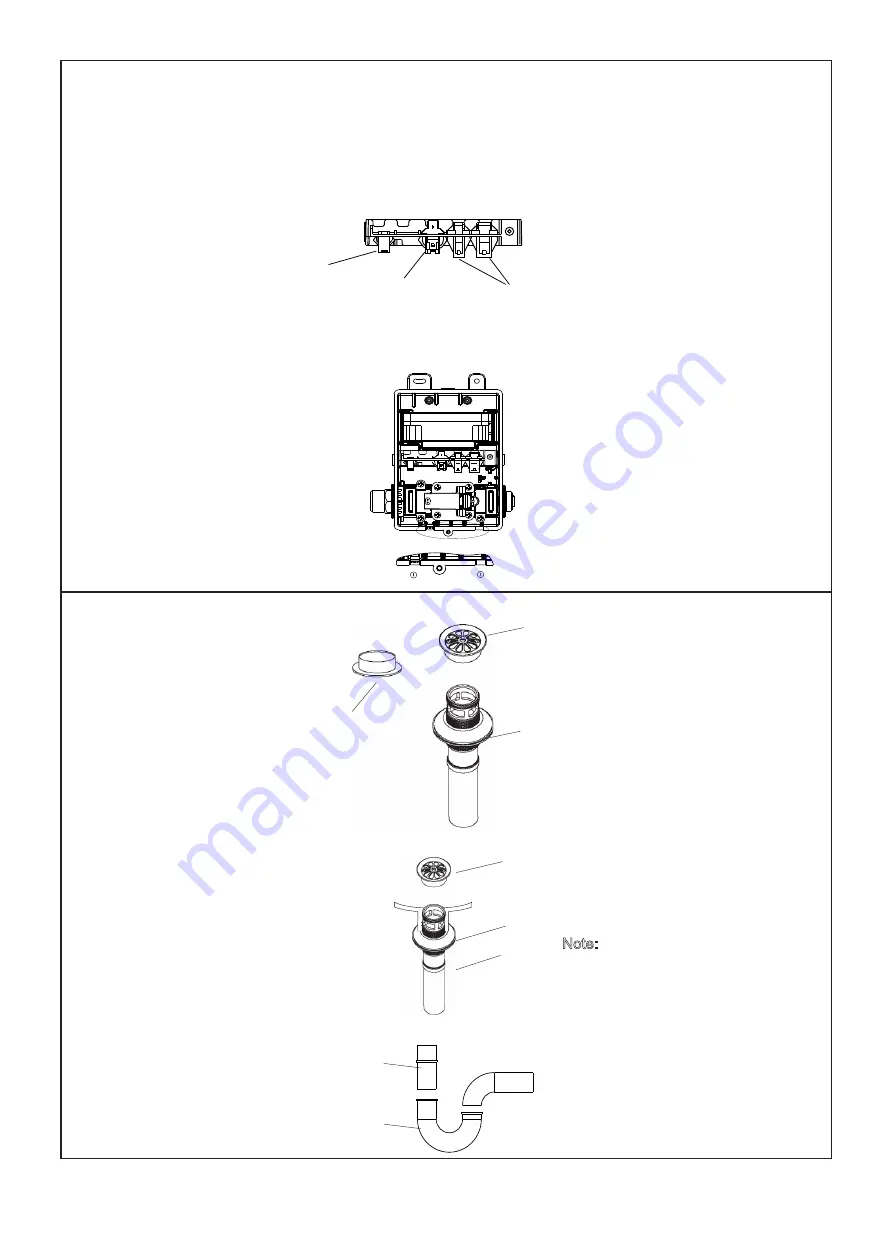
三 如何安装排水组件

How to Install the Drain

19

20

旋下排水器盘片

(19)

,在其底面沿

周围涂上一圈密封油灰。把排水本

(20)

由底下插入面盆。

Screw off the drain flange (19) from drain.
Apply a ring of plumbers putty around
underside of the drain flange (19). Insert
the drain body (20) into the lavatory from 
the underside.

19

20

21

22

Connect the tailpiece (22) to the trap (23).
The tailpiece should extend 25mm to 
55mm into the trap.

23

把尾管

(22)

接上存水弯

(23)

,尾管

需插入存水弯

25mm

55mm

之间。

会破坏油灰密封。

Thread the drain flange (19) onto the drain 
Body (20). Tighten the locknut (21) by hand
from the underside of the fixture. Remove
any excess putty.

Note:

Do not try to change the position of 

the drain after the locknut (21) is tightened, 
or you may break the putty seal.

Apply plumbers putty

涂油灰

把排水器盘片

(19)

旋入排水本体

(20)

。从下方用手拧紧锁紧螺母

(21)

,去除多余的油灰。

注意:

在锁紧螺母

(21)

拧紧后,不

可再调整排水本体的位置,否则将

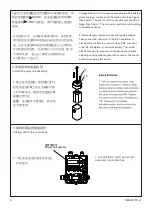
注:①为交流电源出线口,使用时,
将①的卡扣(薄片状)去除,保证
出线口光滑。

②为龙头感应器出线口。

Note: 

 is the outlet of AC power supply. 

Remove the clip (lamellar) during the 
process of use to ensure the smoothing 
of outlet. 

is the outlet of faucet sensor.

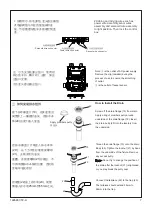
2.Cabing and tidying wires such as
power wire assembly,senor wires
assembly and solenoid wire assembly
to right position. Then lock the control
box.

2.如图所示

,

将电源线

,

龙头感应器线

及电磁阀线与

应的接线端

接。

后整理好线

并锁紧控制盒

盖。

Power wire connector

电磁阀接线端

Solenoid wire connector         

电源线接线端

龙头感应线接线端

Sensor wire connector

Содержание OBLO K-24270T-NW-CP

Страница 1: ...stics packaging or availability at any time without notice Please leave these instructions for the consumer They contain important information BEFORE YOU BEGIN 1 1495657 T2 A K 24270T NW CP K 24270T NWS3 CP K 24270T NWS5 CP 所有的资料是按最新出版的产品资料编写而成 科勒公司保留任何时候不经通知即可改变产品特 性 包装或产品可供类型的权利 说明书包括重要的安装 保养及清洁方面的内容 请把这些资料交给用户阅读 欧宝台盆感应龙头 单冷 1 9升 特供版 OBLO DM SENSOR FCT COLD 0 5GPM SP 欧宝台盆感应龙头 单冷 1 4升 特供版 OBLO DM...

Страница 2: ...ction Only provide electric supply to power box after the installation is completed 7 One AC DC transformer for max one faucets 7 一个交流电源盒最多可供一个感应龙头 2 1495657 T2 A 6 对于交流龙头 安装时务必按照说明书的要 求正确连接导线 龙头安装完毕后才可向电源盒 供电 注意事项 1 一定要先彻底冲洗供水管以清除管道中的杂 质 使用水源为自来水或可供饮用水 2 请勿将强力及冲击施于产品 以免造成故障 引起漏水 3 安装 清洁龙头时 切勿损伤感应窗口表面 以免造成故障 4 如果是安装新的洗面盆 可将水龙头和排水组 件先安装好到面盆上 5 对于直流龙头 安装时注意电池的正负极不能 装反 电池盒盖要拧紧 防止电池受潮 1 Flush the wate...

Страница 3: ...G1 2 Please prepare external thread angle valve G1 2 3 1495657 T2 A 排水组件 φ41 2 φ54 φ31 75 226 φ66 5 72 54 Output DC6V 输出 直流电压6V Input AC220V 输入 交流电压220V 36 5 105 5 26844T NA DC Power Unit 直流电源盒 Output DC6V 直流电压6V 26845T NA AC DC Transformer 交流电源盒 The Drain 注 交 直流电源盒需另购 NOTE AC DC transformer and DC power Unit need purchasing 205 136 205 136 ...

Страница 4: ...lve box against the wall and then mount control valve assembly on the wall by expansion screws 13 Keep control box assembly parallel to the wall 9 11 10 13 12 2 控制阀组件的安装固定 拧松 11 10 9 12 13 4 1495657 T2 A 如需在台面开孔 建议直径为20 30mm 1 龙头与面盆的安装固定 将固定螺杆 2 安装到水龙头底部 1 处 再把垫片 3 套在固定螺杆上 并 嵌入水龙头底部的盘槽中 然后将电 源线 7 和进水软管 8 穿过安装孔 从面盆下方将固定橡胶垫片 4 固定金 属垫片 5 和固定螺母 6 对齐固定螺 杆 2 向上套入 调整水龙头电源线 7 及进水软管 8 的位置 用扳手拧 紧固定螺母 6 以便把水...

Страница 5: ...er supply Then connect check valve 15 to valve outlet to faucet assembly water outlet hose Note 14 15 14 15 14 15 16 1 2 二 安装电源盒组件 16 5 1495657 T2 A Connect to electrical Source 接交流电源 Connect to electrical Source 接交流电源 AC220V接入直流DC接线端 Connect to Faucet Connect to Faucet Note Not allowed connect AC 220V electrical source to DC wire connector of AC DC transformer 注 交流电源盒需另购 Note AC DC transformer ne...

Страница 6: ... Turn on AC electrical power faucet will be in the period of automatic adjusting sensing distance about 30 seconds The faucet will not work during this period 1 建议交流电源线采用带绝缘和护套层的电线 导 体标称截面积 0 5mm2 直流连接线采用导体标 称截面积 0 3mm2 的电线 请严格按照上图进行 连接 2 排线完毕后 应检查并确保所有排 接线无误 再分别连接电源盒AC接线端与排线管内交流接线 端 以及电源盒DC接线端 黑橙线接头 与控制组 件的电源线接插件 从阀盒内引出的电线 最 后 打开AC电源 龙头进入30秒自动调距阶段 此过程龙头不会出水 2 安装直流电池盒组件 Install DC power unit assem...

Страница 7: ...fixture Remove any excess putty Note Do not try to change the position of the drain after the locknut 21 is tightened or you may break the putty seal Apply plumbers putty 涂油灰 把排水器盘片 19 旋入排水本体 20 从下方用手拧紧锁紧螺母 21 去除多余的油灰 注意 在锁紧螺母 21 拧紧后 不 可再调整排水本体的位置 否则将 注 为交流电源出线口 使用时 将 的卡扣 薄片状 去除 保证 出线口光滑 为龙头感应器出线口 Note is the outlet of AC power supply Remove the clip lamellar during the process of use to ensure th...

Страница 8: ...y 1298745 SP HOW TO CHANGE TO THERMOSTATIC SENSOR FAUCET If users buy the thermostatic valve 16294T 3 CP the installation refer to the manual of 16294T 3 CP Note Please let users prepare the hose and tee by themselves MIN 50mm Note Please let users prepare the hose tee and check Valve by themselves 建议使用科勒推荐的三通进水软管 组件 否则有冷热水互窜的风险 It is recommended to use Kohler TEE inlet hose assembly otherwise the...

Страница 9: ...ly with knowing the meaning of the sensor indicator s flashing 1 Fast flashing means the faucet is in the period of adjusting sensing distance after power on for 30s During these 30s please do not put objects in the sensing range 2 The indicator flashes every 6 seconds DC type indicates that the unit is out of battery and has stopped working Replease batteries 4 In normal condition the water will ...

Страница 10: ...move the valve assembly and take out the filter for cleaning then re install it Notice Make sure to install the filter washer after cleaning the filter 该感应龙头的阀体组件内已包含了优良的过滤装 置 如管内杂质过多或水质较差 长期使用会引 起出水情况不良 请按以下步骤清洗过滤装置 1 关闭角阀 2 将主阀体组件取下 拿出滤网 用水冲洗完 毕后 重新装入 注意 在清洗完滤网后 不要 遗失平垫 4 自动清洗存水功能 When the faucet is no used for a long period of time it will automatically flush to discharge the stagnant water ins...

Страница 11: ... 检查总电源 重新连接接插件 感应指示灯每2秒快速 闪烁1次而不出水 刚装机完毕 阀体组件关闭 起泡器脏堵 过滤装置堵塞 等待 30秒 打开阀体组件 清洗起泡器 清洗过滤装置 感应指示灯闪烁 不出水 阀体组件是否彻底打开 用内六角扳手逆时针旋转阀体组件 的调节螺栓 清洗过滤装置 清洗起泡器 检查供水系统 感应指示灯闪烁 出水量小 过滤装置堵塞 起泡器脏 水压太低 约一分钟以内不止水 感应指示灯不闪烁 感应范围内有物体 移开物体 平整切除连接处不光滑进水管 1cm左右 软管与阀体连接处漏水 进水软管连接处不光滑 如按以上操作仍未解除故障 请与销售商或科勒 中国 投资有限公司联系 除安装更换电池外 请勿随意拆卸龙头其它部件 检查电池 检查总电源和接线情况 移开物体 清洁窗口 检查接线端 11 1495657 T2 A ...

Страница 12: ...w out Batteries are out of power Just power cut DC or AC connector of AC DC transformer may not connect well Replace batteries Check the power supply Reconnect the connector No water flow while the indicator flashes Just finishing installation The connector assemblies are closed Aerator is blocked The filter is blocked Wait for 10 minutes Open the connector assemblies Clean the aerator Clean filte...

Страница 13: ...类 多溴联苯 PBB 多溴二苯醚 PBDE 镉 Cd Cr VI 六价铬 13 1495657 T2 A 本产品的 环保使用期限 为10年 科勒公司根据产品设计特性指定该期限 只有在本产品 使用说明书所述的正常情况下使用本产品时 环保使用期限 才有效 本表格依据SJ T 11364 2014的规定编制 表示该有害物质在该部件所有均质材料中的含量均在GB T 26572现行有效版本规定的限量要求以下 表示有害物质至少在该部件的某一均质材料中的含量超出GB T 26572现行有效版本规定的限量要求 表示部分机型含有该部件 注 本表格提供的信息是基于供应商提供的数据及科勒公司的检测结果 本产品应用环保设计理念 在当 前技术水平下 所有有害物质或元素的使用已经控制到了最低程度 科勒公司会继续努力通过改善现有技 术来减少这些物质的使用 10 ...

Страница 14: ...e only partial product series contains this substance Note the information provided is based on the supplier data and Kohler inspection results The product is designed not to hurt the environment Under current technology all hazardous materials have been used in the smallest amounts possible Kohler will strive to reduce the use of these hazardous materials used in this product The product service ...

Отзывы: