background image

ÉÉ

ÉÉÉ

Flush Valve

Gasket

Bottom of Tank

Nut

 Fig. #10  

3.

Refer to Fig. #11. 

 Insert threaded rod from under

neath tank, through flush valve.  

 Make sure the two

engagement pins are securely clipped in  the
valve slots as shown.


ÍÍ

ÍÍ

ÍÍ

ÍÍ

ÍÍ

ÍÍ

ÍÍ

ÍÍ

ÍÍ

ÍÍ

ÍÍ

ÍÍ

Threaded  Rod

Valve Body

Engagement

Pin

 Fig. #11  

4. Insert actuator rod into threaded rod.

5.

Refer to Fig. #12.  

Position tank lid in place.  Draw a

line on the rod 1/16" (2 mm) above the lid.  Cut rod at
this mark. 

Remove the tank lid before cutting the

rod.

ÍÍ

ÍÍ

ÍÍÍ

ÍÍÍ

Tank Lid

Threaded  Rod

2mm

Actuator Rod

6.

Refer to Fig. #13. 

 Put lid on tank. Reinsert rubber

washers, brass washers, and brass screws inside the

tank.  Assemble brass washers and nuts to screws un

derneath tank.  

CAUTION: DO NOT OVERTIGHTEN.

BREAKAGE/CHIPPING MAY RESULT.

ÍÍÍ

ÇÇ

ÇÇ

ÇÇ

ÇÇ

ÇÇ

ÍÍÍ

ÇÇÇ

ÇÇÇ

ÇÇÇ

ÇÇÇ

ÇÇÇ

Threaded  Rod

Tank Lid

Actuator

Actuator  Rod


Fig. #12  

 Fig. #13  

7. Screw actuator into place.
8. Turn water supply to toilet on.  Flush toilet.

SERVICING THE ACTUATOR ROD KIT

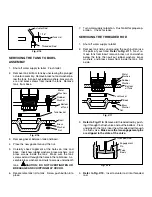
1. Shut off water supply to toilet.  Flush toilet.
2.

Refer to Fig. #14. 

 Unscrew actuator from top of tank

and remove tank lid.

 Fig. #14  

ÍÍÍ

ÍÍÍ

ÇÇ

ÇÇ

ÇÇ

ÇÇ

ÇÇ

ÍÍÍ

ÍÍÍ

ÇÇÇ

ÇÇÇ

ÇÇÇ

ÇÇÇ

ÇÇÇ

Threaded  Rod

Tank Lid

Actuator

Actuator  Rod

3. Inset new rod into threaded rod.
4. Position tank lid in place.
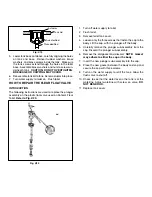
5.

Refer to Fig. #15. 

 Draw a line on the rod (1/16") above

the lid.  Cut rod at this mark. 

 Remove tank lid before

cutting rod.

6. Put lid back into position and screw actuator into place.
7. Turn water supply to toilet back on.  Flush toilet.

Содержание K-3417 Fleur

Страница 1: ...s standard height is considered the most com fortable for the average adult to use When the toilet is flushed the water in the tank is directed to the rim holes and the siphon jet The siphon jet is lo...

Страница 2: ...owl Imported from France it offers European styling without the problems involved with buying from a European manufacturer Warranty and service parts are available from Kohler Co Flush valve with push...

Страница 3: ...VICING THE FLEUR FLUSH VALVE REMOVING OLD FLUSH VALVE 1 Shut off water supply to toilet Flush toilet 2 Refer to Fig 10 Remove tank from bowl remove brass nut and washer below the tank then pull out ru...

Страница 4: ...brass screws inside the tank Assemble brass washers and nuts to screws un derneath tank CAUTION DO NOT OVERTIGHTEN BREAKAGE CHIPPING MAY RESULT Threaded Rod Tank Lid Actuator Actuator Rod Fig 12 Fig 1...

Страница 5: ...neath tank CAUTION DO NOT OVERTIGHTEN OR BREAKAGE AND CHIPPING MAY OCCUR 6 Reassemble tank lid to tank Screw push button into place 7 Turn water supply to toilet on Flush toilet for proper op eration...

Страница 6: ...float valve used on Kohler s Fleur Toilet Refer to Fig 20 Float Rod Cap Plunger Gasket Fig 20 1 Turn off water supply to toilet 2 Flush toilet 3 Remove toilet tank cover 4 Loosen only the three screw...

Страница 7: ...e place seat D Foreign matter on plunger D Clean or replace plunger E Plunger in cap is corroded E Replace cap F Water leaking past float assembly on F Replace float assembly on flush flush valve valv...

Отзывы: