background image

-4-

INSTALL THE BATH

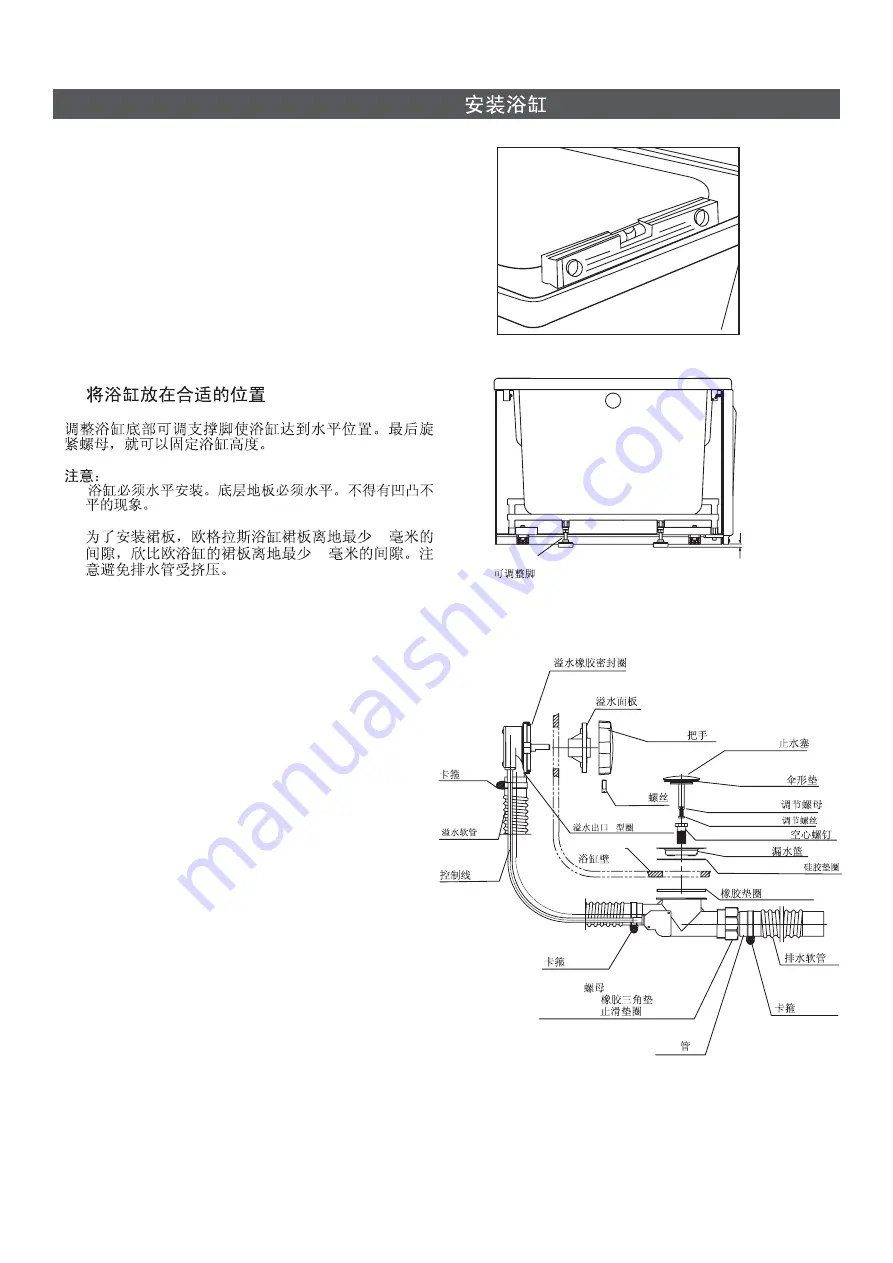
A. Locate the bath in the proposed position

Adjust the feet under the bath to make it level. Tighten
the nut to fix the height of the bath.

The bath must be installed level on all top edges.
Floor should be flat, level and free of any bumps or
protrusions.

Keep the clearance of minimum 10mm (for
HOURGLASS)/15mm (for SYMBIO) from floor to the
apron for installing the apron. Be careful with the
drain hose to prevent it to be squeezed.

10

15

IMPORTANT:

!

!

!

!

A.

Adjustable Feet

HOURGLASS>10mm
SYMBIO>15mm

Gasket, Overflow

Handle

Cover, Overflow

Fix Clip Assy

Flexible Pipe,
Overflow

Control Cable

O-ring for Overflow outlet

O

Screw

Bath Wall

Seal Plug

Adjustable Nut

Adjustable Screw

Fix screw, Strainer

Gasket, Thin, Drain

Gasket, Thick, Drain

Joint Nut
Joint Gasket
PVC Gasket

Fix Clip Assy

B. Plumbing Installation and Electric

Wiring

CAUTION: Risk of damage to bath bottom and
subfloor.

1 . When the bath is securely positioned, connect the

drain to the trap and apply silicone sealant.

2 .

Open the hot and cold

water valves, and check the supply connections for
leaks.

The installation of the faucet and drain has been
completed before the bath leaves factory. Connect
cold and hot water supplies.

3). Connect power supply (220V/50Hz, 10A) to motor.

This should be a separato line, direct from the
switchboard.

The electrical connections must comply with

local authority regulations and must be done by an
authorized electriclan.

4).

Note:

Fill bathtub with water to the height of the

overflow and trial run pump for 10-15 minutes.
Check all the fittings for leaks and test the
control functions. Check the pump and pipes
union connections for leaks. Hand tighten union
connections if required. Check bath drains and
overflow for leaks.

)

)

Plug Body

Strainer

Fix Clip Assy

PVC Pipe
PVC

Flexible Pipe

1073414-T01-B

Содержание K-1753T

Страница 1: ...ulking compound Bath drain supplies and electric wiring should be arranged preliminarily according to the selected bath please leave these instructions for the consumer IMPORTANT NOTE Bath can be inst...

Страница 2: ...ch transmitter No installation is needed The whirlpool pump and piping are factory assembled Do not relocate the whirlpool pump or make other modifications to the whirlpool system as this could advers...

Страница 3: ...vering for bathtub Nails B Materials Required A Tools Required B A INSTALLATION REQUIREMENTS 3 BEFORE INSTALLING UNIT A B A The protective film must be removed from around the waste and along the tili...

Страница 4: ...umbing Installation and Electric Wiring CAUTION Risk of damage to bath bottom and subfloor 1 When the bath is securely positioned connect the drain to the trap and apply silicone sealant 2 Open the ho...

Страница 5: ...r spa has been factory tested and approved It is the responsability of the installer to test run the spa check all the fittings for leaks and test the control functions NON OBSERVANCE WILL INVALIDATE...

Страница 6: ...ockwise and anticlockwise to adjust the air massage On Off Spa Control Air Switch Push once to start the motor Push again to stop the motor IMPORTANT Do not operate spa bath without water On Off Decre...

Страница 7: ...can check the trouble shooting guide before a service agent needs to be called If the unit is still not operating properly advise your local merchant distributor from whom you purchased your spa bath...

Страница 8: ...leeve 5 Clean out any hair or grime from inside the jet body 5 6 Clean off any hair or grime from the sleeve spring eyeball washer and facia with a clean cloth 6 B TO RE ASSEMBLE 1 Exploded diagram of...

Страница 9: ...ody until it clicks into place 5 6 To open or close the jet control rotate the central stalk There is no solid stop on the control and it can therefore be rotated clockwise or anticlockwise from the O...

Страница 10: ...or tar can be removed with mineral spirits Do not use cleaners containing solvent Plaster can be removed by scraping with wood edge Do not use metal scrapers wire brushes or other metal tools One of t...

Страница 11: ...surface Wipe out the bath after each use to prevent a build up of soap and scum If the acrylic surface becomes dull an automotive type rubbing compound may be used on the unit followed by an applicati...

Отзывы: