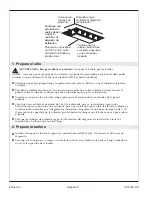
Kohler K-1013 Скачать руководство пользователя страница 3

1. Prepare the Site

WARNING: Risk of product damage.

Do not support the bath by the rim.

NOTICE:

Unless otherwise specified, floor support under the bath must provide for a minimum of 80

lbs./square foot (390 Kg./square meter) loading.

Make sure the flooring offers adequate support for your bath, and verify that the subfloor is flat and
level.

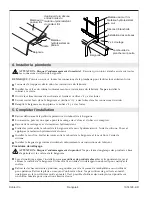
This bath should be installed in a drop-in or raised deck installation. If a deck-mounted faucet and
valving are planned, ensure that adequate space is available for their installation.

When constructing the framing, allow for the thickness of the finished wall materials.

Construct 2x4 or 2x6 stud framing designed for your particular installation. Frame the floor, or
construct a frame for a raised deck installation according to the roughing-in information. Ensure that
there is a 1/16

(2 mm) gap between the finished deck/floor surface so the bath does not rest on the

rim.

Position the plumbing according to the roughing-in information. Cap the supplies and check for
leaks.

2. Prepare the Bath

Install the drain to the bath according to the drain manufacturer’s instructions. Do not connect the
trap at this time.

Position a clean drop cloth or similar material in the bottom of the bath. Be careful not to scratch the
surface of the bath.
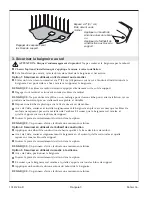
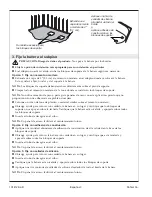
Frame the floor 
according to the 
roughing-in information.

Position 
the rough 
plumbing.

Verify that the subfloor 
offers adequate support, 
and is flat and level.

Provide a 1/16" (2 mm) 
gap between the bath rim 
and framing.

Construct 2x4 or 
2x6 stud framing 
according to the 
roughing-in 
information.

Kohler Co.

3

1014128-2-D

Содержание K-1013

Страница 1: ...rylic Drop In Baths M product numbers are for Mexico i e K 12345M Los n meros de productos seguidos de M corresponden a M xico Ej K 12345M Fran ais page Fran ais 1 Espa ol p gina Espa ol 1 K 1013 K 11...

Страница 2: ...gned for drop in or raised deck installation The installation of a rim mounted faucet is not recommended with this bath Observe all local plumbing and building codes Unpack and inspect the bath for da...

Страница 3: ...floor or construct a frame for a raised deck installation according to the roughing in information Ensure that there is a 1 16 2 mm gap between the finished deck floor surface so the bath does not re...

Страница 4: ...t in the bed material Verify that the bath is level and resting on all support blocks Insert the drain tailpiece into the trap NOTE An access panel will simplify future maintenance Option 2 Secure Usi...

Страница 5: ...terial Install the finished wall Seal the joints between the bath rim and the finished wall with silicone sealant Install the faucet trim according to the faucet manufacturer s instructions Clean Up P...

Страница 6: ...llation encastr e ou sur podium L installation d un robinet montage sur rebord n est pas recommand e pour cette baignoire Respecter tous les codes de plomberie et de b timent locaux D baller la baigno...

Страница 7: ...allation sur podium selon le plan de raccordement S assurer qu il y ait un espace de 1 16 2 mm entre la surface du comptoir sol fini de mani re ce que la baignoire ne repose pas sur le rebord Position...

Страница 8: ...iau de l embase S assurer que la baignoire soit nivel e et qu elle s appuie sur tous les blocs de support Ins rer la pi ce de raccordement du drain dans le siphon REMARQUE Un panneau d acc s faciliter...

Страница 9: ...mur Installer le mur fini Sceller les joints entre le rebord de la baignoire et le mur fini l aide de silicone Installer la bague de garniture du robinet conform ment aux instructions du fabricant Pro...

Страница 10: ...larse empotrada o sobre cubierta elevada No se recomienda instalar las grifer as sobre el borde de la ba era Cumpla con todos los c digos locales de plomer a y de construcci n Desembale la ba era y re...

Страница 11: ...sobre cubierta elevada conforme a la informaci n contenida en el diagrama de instalaci n Aseg rese de que haya un espacio de 1 16 2 mm entre la superficie de la cubierta piso acabados de manera que l...

Страница 12: ...que que la ba era est nivelada y apoyada sobre todos los bloques de soporte Inserte el tubo de desag e en el sif n NOTA Un panel de acceso facilitar el mantenimiento futuro Opci n 2 Fije con adhesivo...

Страница 13: ...acabada Selle las uniones entre el borde de la ba era y la pared acabada con sellador de silicona Instale la guarnici n de la grifer a seg n las instrucciones del fabricante Procedimientos de limpiez...

Страница 14: ...1014128 2 D...

Страница 15: ...1014128 2 D...

Страница 16: ...USA 1 800 4 KOHLER Canada 1 800 964 5590 M xico 001 877 680 1310 kohler com 2005 Kohler Co 1014128 2 D...

Отзывы: