background image

15

Teletext

General Description

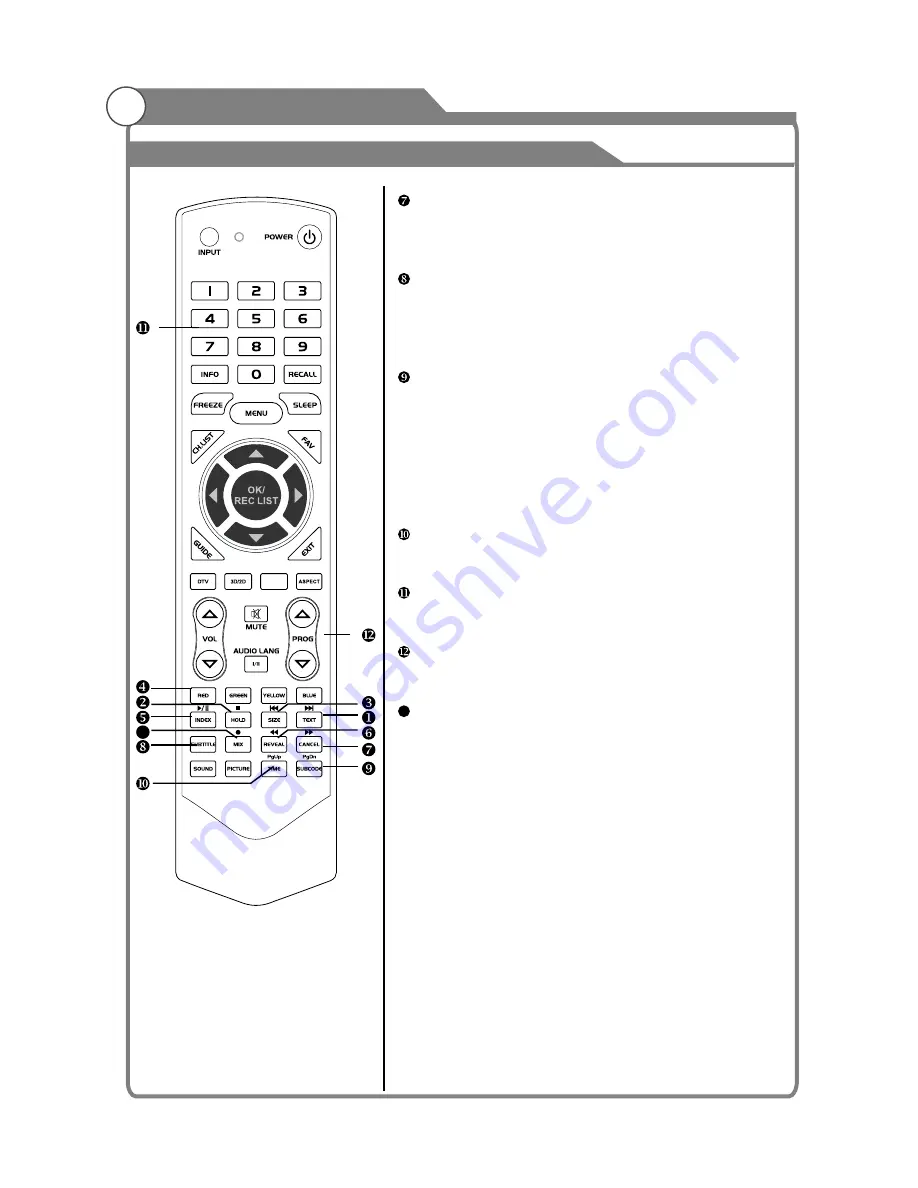
    Cancel


Subtitle

    Turning the Teletext subtitles on or off.
    Subtitles is a separate mode with only a few
    buttons available. There will be no OSD visible
    other than the Teletext Subtitles.
   

 Subcode 

    Subcode mode gives the possibility to select
    certain subcode pages of a Teletext page.
    Entry of digits within the range 0...9 for current
    subcode entry. If the digit completes the entry,
    a page request is started.
    Press PROG

r

/PROG

s

 buttons to change the

    subcode pages.
    

Time

    This button is used to show the time of the
    Teletext.
    

Digital buttons(0~9)


   You can press them to enter the number of the

    Page required.
   

 PROG

r

/PROG

s


You can press them to change page upward or

    downward.
    

Mix


Press MIX b

u

tton, the teletext page changes 

    transparent, TV content and teletext page 
    content will display at the same time.
    Press MIX button again to exit MIX mode.

The CANCEL button will exit from any Teletext on 

    the display. Press CANCEL button again to exit 
    Teletext and return to live TV broadcast. 

13

13

HOME

Содержание KALED423DSMTZA

Страница 1: ... 607 USER MANUAL ...

Страница 2: ...Quad Core GPU this Smart TV contains a robust system configuration designed to run the newest software applications You can enjoy your favourite applications downloads internet content and human computer interaction such as Surfing the Web SNS Social Network Online Video Playback Online Video Chat and creating a home entertainment centre between the TV and your portable devices This TV also has wi...

Страница 3: ... home screen Add apps to the home page 2 All Apps 3 Change Wallpaper 4 Search 5 Settings 6 Mass Storage USB SD TF 7 Network Wireless WLAN 8 Source Window TV DTV ATV AV HDMI YPbPr VGA 9 Application at home page 10 Search 11 HOME page 12 13 14 Other pages ...

Страница 4: ...2 NETWORK CONNECTION Wired Wireless PPPOE WLAN HP The instant network page gives you quick and easy access to information via the internet CABLE NETWORK WIRELESS NETWORK ...

Страница 5: ...PPPOE PPPOE is point to point protocol over ethernet For detailed operations please contact your Internet Service Provider WLAN HP Hotspot ...

Страница 6: ...your music photos and videos anywhere anytime Note 1 Make sure your devices PC Smartphone iPad etc have a DLNA compatible program installed 2 Ensure your devices and the TV is in the same local area network 3 Share the video music picture on your devices via DLNA OPERATION ...

Страница 7: ...n to connect to your network Operation 5 MHL MHL is Mobile High Definition Link It utilizes established connectors and features a single cable with a 5 pin interface It supports 1080p HD video and digital audio and simultaneously provides power to the mobile device It also enables the TV remote control to control the mobile phone and access its contents NOTE MHL cable and a portable device that su...

Страница 8: ...line store for Google by Android devices You can select your favourite from 450 000 apps millions of songs and books plus thousands of movies Note Some applications you can download from the Google Play Store may not be compatible with this TV Please check that the application is compatible with the TV We suggest that you are best to install applications from the local app store 8 USB 3 0 The newl...

Страница 9: ...filled with liquids such as vases shall be placed on the apparatus 1 If the following problems occur Turn off the TV set and unplug the AC power cord immediately if any of the following problems occur Ask your dealer or service centre to have it checked by qualified service personnel When AC power cord is damaged Poor fitting of AC power outlet TV set is damaged by being dropped hit or having some...

Страница 10: ...be fatal Ensuring the television is not overhanging the edge of the supporting furniture Installation The ventilation should not be impeded by covering the ventilation opening with items such as newspapers tablecloths curtains etc At least 10 cm space should be left around the apparatus for sufficient ventilation The product should be situated away from heat sources such as radiators heat register...

Страница 11: ...the surface of the LED panel cracks do not touch it until you have unplugged the AC power cord Otherwise electric shock may result Do not throw anything at the TV set The LED panel may break from the impact and cause serious injury Precautions When Displaying a Still Image A still image may cause permanent damage to the TV screen Do not display still images and partially still images on the LED pa...

Страница 12: ...mcorder 18 Connecting a DVD Player Set Top Box via DVI 19 Connecting DVD Player Set Top Box via HDMI 20 Connecting Digital Audio System 21 Connecting PC 22 Supporting signals 22 Basic operation 23 Turning the TV on and off 23 The main interface 24 Applications of the TV 25 Menu system instruction 26 TV menu 26 Sound 26 Image 28 Program 29 Input Source 31 3D 31 General Description Function 32 Time ...

Страница 13: ...lease make sure the following items are included with your LED TV If any items are missing contact your dealer Accessories 5 Remote Control HOME Note Detail operation please refer to HELP menu on the TV ...

Страница 14: ...one output l TV adopts 42 TFT display screen l Zero X radiation complies to green environment protection requirement l Connect to computer directly to realize TV monitor combo l MHL2 0 l Android4 2 l USB3 0 l 16 9 wide screen l Auto tuning and fine tuning l HDMI input l Component Compatible 480i 480P 576i 576P 720P 1080i 1080P l PC VGA l Programmable sleep timer l Wide range voltage input l No sig...

Страница 15: ... 25MHz 855 25MHz Digital 5 12 21 69 PAL NTSC SECAM 5 X2 W 90W o o 0 C 40 C 1W 110 240V 50 60Hz 75 ohms unbalanced 42 Diagonal max Display size LED panel resolution Power supply TV receive system Frequency range Video in Antenna Input Speaker output power Power consumption Standby consumption Work Temperature Model Controller power DC 3V Two AAA size batteries 1920X1080 958X52X566mm 16Kg 958X250X62...

Страница 16: ......

Страница 17: ...Fasten screws into the two screw holes on the rear cabinet 5 Tighten bolt on the bottom of the rear cabinet with screws then put rubber gaskets on the bolt 6 Left the TV and hang it on the wall 400mm 400mm Wall Nylon sleeve 4 piece Wall mounting bracket 1 piece Self tapping screw 4 piece Mounting Screw 2 piece Rear cabinet Bolt Rubber gaskets 2 piece Screw 2 piece optional Your LED TV is able to a...

Страница 18: ...yer VCR and video camera to enjoy the high quality picture SPDIF Headphone Microphone Video output SD card USB 3 USB 2 USB 1 USB 1 USB 2 USB 3 USB 3 0 SPDIF Pr Pb Y V L R MIC VIDEO COMPONENT AV IN VGA AUDIO ANT HDMI4 HDMI3 HDMI2 HDMI1 MHL PC Camcorder DVD player PC HDMI output Blu ray disc player DVD player ...

Страница 19: ... Press to increase or decrease the volume 6 7 Press button to toggle between normal and standby mode Standby button Remote Control Sensor Power Indicator Green In power on mode Red In standby mode Power Switch Press this button to turn TV on or off Aim the remote control towards this spot on the TV INPUT Toggles between all the available input sources MENU Press to display an on screen menu of you...

Страница 20: ...f 10 20 30 60 90 120 180 240 min Press MENU button to exit when you have set the sleep timer After you have set sleep timer press SLEEP button again you will see the Remaining time Notes The sleep timer you have set will be cancelled when the TV turns off or if a power failure occurs 9 CH LIST Press it to show channel list on screen 10 FAV Press it to display favorite list 11 12 GUIDE In DTV sourc...

Страница 21: ...on It is also used for recording function when TV is on DTV mode 18 ASPECT VOLr and VOLs Press these buttons to adjust TV volume 20 PROGrand PROGs Press these buttons to change channel upward or downward In the teletext these buttons are used to display the next page and previous page 21 MUTE Press this button to shut off sound of the TV press again to restore TV sound In ATV the button is used to...

Страница 22: ...s stopped When Hold is switched off the page acquisition is started Size Red Green Yellow Blue Command Index Press INDEX button then index page displays Reveal Press SIZE button one time to display the upper half of the screen in double height press the SIZE button two times to display the lower half of the screen in double height press three times to display the full screen in normal size These f...

Страница 23: ...entry a page request is started Press PROGr PROGs buttons to change the subcode pages Time This button is used to show the time of the Teletext Digital buttons 0 9 You can press them to enter the number of the Page required PROGr PROGs You can press them to change page upward or downward Mix Press MIX button the teletext page changes transparent TV content and teletext page content will display at...

Страница 24: ...eeder ANT IN 75ohm coaxial cable Antenna cable Antennas with 300 W flat twins Leads Antennas with 75 W Round Leads External Connection Installing Batteries Installing Batteries Point the remote towards the remote control sensor of the TV and use it within 8 meters Put the used batteries into the recyc ling bin since they can negatively affect the environment The batteries battery pack or batteries...

Страница 25: ...Cable between the ANT OUT terminal on the VCR and the ANT IN terminal on the TV 4 jack on the TV 5 Connect Audio Cables between the AUDIO OUT jacks on the VCR and the AUDIO L and AUDIO R jacks on the TV Note 1 Whenever you connect an external device to your TV make sure that power on the unit is turned off 2 When connecting an external device match the color of the connection terminal to the cable...

Страница 26: ... between the AUDIO L and AUDIO R jacks on the TV and the AUDIO OUT jacks on the camcorder 3 Connect a Video Cable between the component IN Y on the TV and the VIDEO OUT jack on the DVD 4 Connect Audio Cables between the component IN AUDIO L and R jacks on the TV and the AUDIO OUT jack on the DVD Note 1 Whenever you connect an external device to your TV make sure that power on the unit is turned of...

Страница 27: ...he HDMI 1 HDMI 2 HDMI 3 or HDMI 4 connector on the TV and the DVI connector on the DVD player Set Top Box 2 Connect Audio Cables between the PC AUDIO IN jack on the TV and the AUDIO OUT jacks on the DVD player Set Top Box Note 1 Whenever you connect an external device to your TV make sure that power on the unit is turned off 2 When connecting an external device match the color of the connection te...

Страница 28: ...ifference between HDMI and DVI is that the HDMI device is smaller in size has the HDCP High Bandwidth Digital Copy Protection coding feature installed and supports multi channel digital audio Each DVD player STB has a different back panel configuration 1 Connect an HDMI Cable between the HDMI1 HDMI2 HDMI3 or HDMI4 connector on the TV and the HDMI connector on the DVD player Set Top Box Note 1 When...

Страница 29: ... 1 Connect an Coaxial Cable between the SPDIF jacks on the TV and the Digital Audio Input jacks on the Digital Audio System When a Digital Audio System is connected to the SPDIF terminal Decrease the gain volume of the TV and adjust the volume level with the volume control Digital Audio System s TV Rear Panel Coaxial Cable Not supplied Digital Audio System Black USB 1 USB 2 USB 3 USB 3 0 SPDIF Pr ...

Страница 30: ...panel configuration The HDMI jacks do not support PC connection 1 Connect a D Sub Cable between VGA PC IN connector on the TV and the PC output connector on your computer 2 Connect a PC Audio Cable between PC AUDIO IN jack on the TV and the Audio Out jack of the soundcard on your computer You should set PC software before you connect a PC to your TV please refer to PC Note 1 Whenever you connect a...

Страница 31: ...the power for this unit unplug the power cord plug for this unit 6 After switching off the unit you should Status indication lamp Red In standby mode Green In power on mode Auto power off 1 If there is no signal the TV will 10 minutes 2 In VGA mode if no any operation 15 seconds later TV will enter standby mode Memory before turning TV off wait at least 5 seconds before switching on again automati...

Страница 32: ...as the following in turn 1 Add to home screen 2 All apps 3 Change wallpaper 4 Search 5 Setting 6 Mass storage 7 Wired Note 1 The first area as the photo shown will display the current video images and it will display snowflake when there is no signal 2 The second area shows some small desktop plug ins select one and press the OK button you will enter the relevant application program 3 The third ar...

Страница 33: ...oaded Menu Button Open or Close the app s menu Exit Button Return to the main menu Arrow Button Select the application which you want OK Button Enter the application you ve selected Note When the applications are of more than one page and the focus is on left or right side of each line the left right buttons can page up down Basic Operation 25 ...

Страница 34: ...e status bar Menu system instruction 26 3 D Sound Image Program Input Source 3D Function Time Sound Mode You can select the type of special sound to be used when watching a given broadcast Your TV has five sound settings Standard Music Movie Sports User that are preset at the factory 1 Press p q key to select Sound Mode option 2 Press t u key to select one sound mode l Standard Selects the normal ...

Страница 35: ...e volume every time the channel is changed Auto Volume automatically adjusts the volume of the desired channel by lowering the sound output when the modulation signal is high or by raising the sound output when the modulation signal is low 1 Press p q key to select Auto Volume option 2 Press t u key to select On or Off 1 Press p q key to select Surround sound option 2 Press t u key to select On or...

Страница 36: ... one color temp Adjusting the Backlight You can the brightness of the entire screen according to your preference 1 Press p q key to select Backlight option 2 Presst u key to select one backlight mode Window Adjust This option is only used when VGA mode has signal 1 Press p q key to select Window Adjust option 2 Press OK key to display the Window Adjust menu Auto Adjust Allows you to set the TV to ...

Страница 37: ... Search Program Edit Signal Information Auto Search TV DTV RADIO DATA 0 Programmes 0 Programmes 0 Programmes 0 Programmes 1 VHF CH 5A DTV Exit EXIT MENU Skip è è Color System è Sound System Sound ound DK I è è è è Current CH You can see the current channel number and you can press button to choose the channel you want to modify Select the Color System option press on the remote control or TV The c...

Страница 38: ... possible solution is to adjust your antenna to increase the signal strength Continue to adjust the antenna until you find the best position with the strongest signal Program DTV Manual Search Search OK MENU Return CH37 Signal Strength Signal Quality DTV 0 DATA 0 RADIO 0 è è è è Delete You can press RED button to enter DEL menu then choose the channel you want to delete and press RED button again ...

Страница 39: ...cursor to the input you desired and press OK key to confirm 2 Input Source menu 1 Press MENU key to display the main menu on the screen 2 Press key to select Input Source option 3 Press OK key to enter submenu t u t u Input Source 3D DTV ATV YPbPr VGA HDMI1 HDMI2 HDMI3 HDMI4 AV 3 D DTV ATV AV YPbPr VGA HDMI1 HDMI2 HDMI3 HDMI4 Figure2 Figure1 1 2D 3D Turn source film from 2D into 3D mode 2 3D 2D Tu...

Страница 40: ...3 It is suggested to watch 3D program under the operation temperature above 10 c to obtain the best 3D effect 4 When in 3D mode 2D 3D can t be selected When in 2D mode 3D 2D can t be selected OSD Setting You can modify the OSD set to suit your user preferences OSD Setting Lock Optional 1 Lock 1 Press p q key to select option 2 Press OK key to display the OSD setting menu OSD Language select the pr...

Страница 41: ...el of the Parental Guidance Off 3 4 5 18 PVR File System 1 Press MENU key to display the main menu on the screen 2 Press p q key to select PVR File System option 3 Press OK key to enter PVR File System submenu operation refer to PVR File System Lock the default password is 0000 and the ultimate overiding password is 1980 Lock System Lock System t u key to select On or Off Set Password Password Cho...

Страница 42: ...on or off Noise Reduction 1 Pressp qkey to select Noise Reduction option 2 Press key to select Off Low Middle High and DEFAULT to improve the picture sharpness Note Noise Reduction doesn t work in VGA Mode RGB Range Change the brightness and saturation for a better picture 1 Pressp qkey to select RGB Range option 2 Press key to select 16 235 or 0 255 Note only available in HDMI mode please select ...

Страница 43: ...back up your disk if you do not want to lose this data You are recommended to use a dedicated disk for PVR use only Do not disconnect disk or power during formatting 3 Do not modify PVR files on a PC Note Make sure your USB device is compatible with the TV and able to support PVR recording Sleep Timer 1 Press p q key to select Sleep Timer option 2 Press t u key repeatedly until the desired time ap...

Страница 44: ...creen 2 Recording stops when you press the EXIT button and the recorded file is stored in the external USB device automatically NOTE You can only watch channels on the same frequency as the program being recorded If you try to change to another channel or come to the main interface a message will appear prompting you to continue or not STOP RECORDING System will stop record if user want to channel...

Страница 45: ...01 18 15 53 INFO Reminder Settings Channel 90 Nine Digital HD Hour Month Date Mode Ok Back Minute 0 OK EXIT 16 1 18 Once Return Delete OK Schedule 2007 01 18 16 01 Channel ID Channel Name Event Name 90 CH90 Nine Digital HD Once 2007 01 18 16 30 NATIONAL NINE AFTERNOON 99 Ch99 Nine Guide Once 2007 01 18 17 00 THE SHAK Thursday Friday Saturday Sunday Monday Tuesday Wednesday DTV 9 Nine Digital 90 Ni...

Страница 46: ... Media Player 38 On the main interface page 24 click the Mass storage state icon to enter the USB chanel I Initialization Interface f no inserted U disk the system will be prompted to insert the USB device while the screen displays Storage DeviceRemove message the interface shown in Figure 1 When you insert a USB disk the interface shown in Figure 2 OK key to enter the selected letter Device and F...

Страница 47: ...se e Next f Stop g Sequence h Anticlockwise i Clockwise j Zoom in k Zoom out l DragMode 2 Music Those menu items from left to right function as the following in turn a Lyric b Prev c Play Pause d Next e Play Mode f Lyric Search USB support character Wallpaper List Prev Play Pause Next Stop DragMode Zoom out Zoom in Clockwise Anticlockwise Sequence Lyric Prev Play Pause Play Mode Next Lyric Search ...

Страница 48: ...Press menu button to play exit the movie menu Those menu items from left to right function as the following in turn a Prev b Play Pause c Next d Stop e Advanced setting USB support character Next Prev Play Pause Advanced setting Stop ...

Страница 49: ...Make sure a headphone jack is not connected Batteries of remote control may have exhausted if necessary please change the batteries Clean the remote control lens The distance between LED TV and remote control should be within 8m within recommended operating angle and path is free of obstructions V HEIGHT value may be set too big restart computer and enter safe mode then set monitor parameters to c...

Страница 50: ...lock small block dots pixelization etc Black bars on each side will be shown on HD channels when displaying SD 4 3 contents Black bars on Top Bottom will be shown on movies that have aspect ratios different from your TV Adjust picture size option on your external device or TV to full screen Noise from speaker Check cable connections make sure a video cable is not connected to an audio input Low si...

Страница 51: ...Troubleshooting 43 Picture defects and the reason Ghosting may also occur when still pictures are displayed continuously It may disappear after a few moments ...

Страница 52: ......

Отзывы: