


8
TRAVELSLEEPER
PT
NO
NL
IT
GB
FR
FI
ES
DK
DE
1 Unpacking and assembling the
product
1.1 Before using it for the first time
Danger, risk of serious injury or death!
• Keep plastic packaging materials away from
children as they can present a choking hazard
for children.
• Beware of small parts. Your child may swallow
a small part and choke.
• Remove all objects from the travel cot (such as
pillows and soft toys) which could cause
strangulation or choking hazards.
Warning!
• Before use, check your product for any damage,
loose or missing parts, sharp edges and/or
protruding parts.
• Never exceed the maximum allowed weight for
the travel cot (see p. 13 ‘technical specifications’).
Caution!
•
To prevent damage to the travel cot, do not
remove logos or stickers. Some logos and stickers
are required by law.
Tip
•
For environmental reasons we recommend that
you discard the packaging at your local civic
amenity site.
The travel cot is packed away
1. Remove the folded travel cot that is packed in
the travel bag, from the box.
2. Remove all packaging materials and discard
immediately.
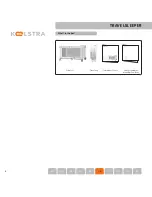
3. Use the product description to check if the travel
cot is complete (see p. 7).
1.2 Unfolding the travel cot
Warning!
•
Beware of any moving parts or hinges when
unfolding, folding or adjusting the travel cot. Beware
of getting your fingers or hands, or your child's
fingers or hands jammed.
Caution!
• To avoid danger of fingers becoming jammed or
the travel cot suddenly folding, check that all the
locks are securely engaged each time before use.
• Check each time before use whether all the corner
pieces and locks are covered by the cover flaps.
• Check that the zips and press-studs are properly
closed and/or attached.
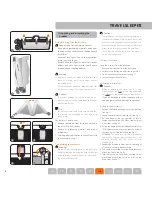
The travel cot is folded.
Untie the mattress from the package:
1. Remove the travel cot from the travel bag.
2. Lay down the package in a horizontal position.
3. Open the three Velcro mattress (see fig. 1).
4. Lay the mattress aside for now.
Assembling the travel cot:
Caution!
•
When assembling the travel cot it is very
important that you
first
set up all the edges and
only
then
push the central lock towards the floor.
If you do not adhere to the sequence below,
you may (permanently) damage the product.
A. Set up the edges of the cot
1. Position the folded package in a vertical position
(see fig. 2).
2. Gently separate the four legs slightly (see fig. 3).
3. Pull one edge of the cot upwards to form a
straight horizontal line (the side of the travel cot
is now taut, see fig. 4).
4. Rotate the frame lock on the edge of the travel cot
180 degrees around its axis towards the inside of
the travel cot so it can be locked (see fig. 5).
Attention:
The frame lock must be rotated at an
angle of 180 degrees, otherwise the lock is not
correctly secured and the travel cot may
suddenly fold.
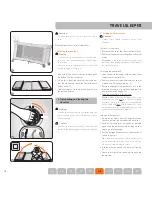
5. Repeat the two above steps until all four edges
of the travel cot have been secured.
6. Fold the four cover flaps over the frame locks and
attach the Velcro (see fig. 6).
7. Fold the four corner cover flaps over the corner
pieces and attach the Velcro and fasten the
press-studs (see fig. 7).
1
3
2
4
5
6
7


