


5
1. KSR816 Guide
1. System Overview
Syst
em
Ov
ervi
ew
4
1. KSR816 Guide
1. System Overview
Sy
st
em
Ov
ervi
ew
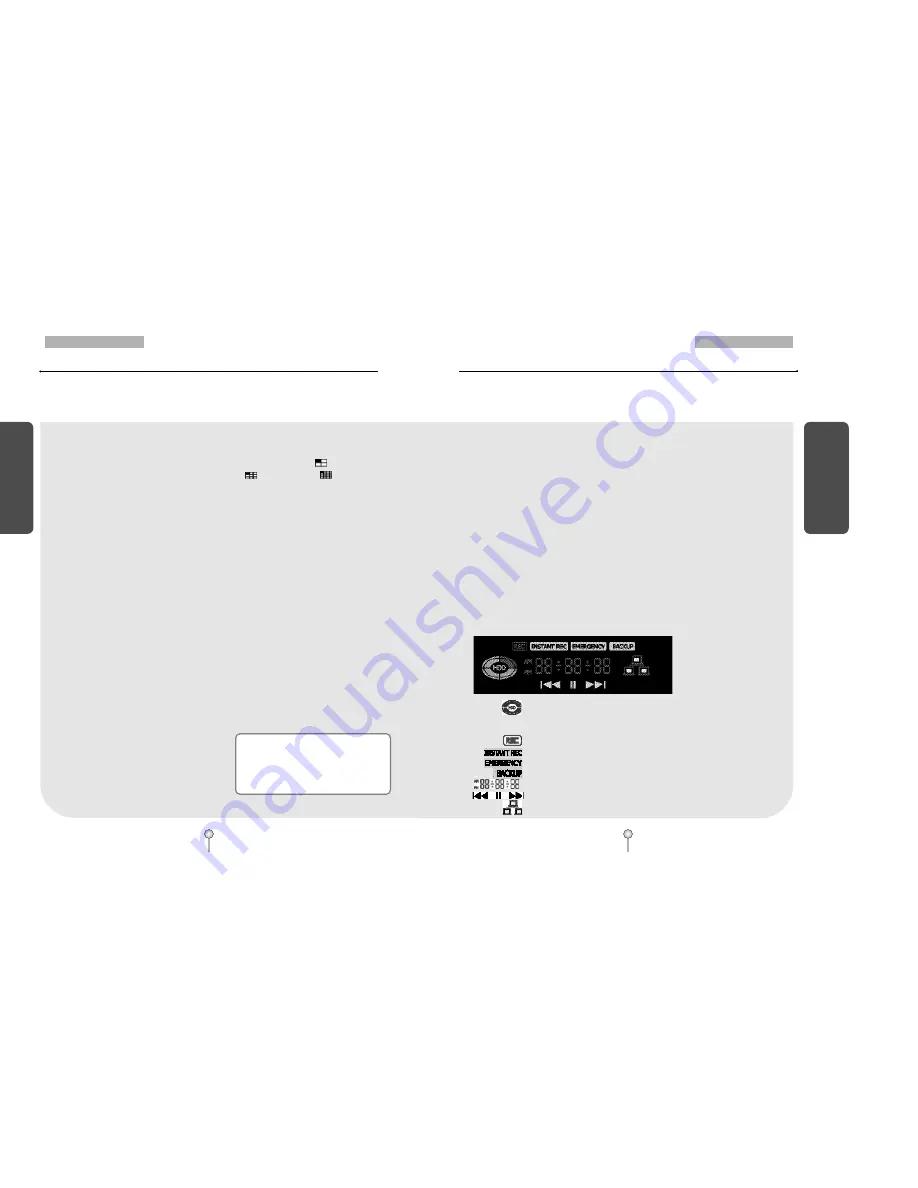
⑥
[Auto]
• Press to begin automatic channel
sequence either in full or multi screen
modes.
⑦
[Camera/Number keys]
• In Surveillance mode, press for full
screen display of that camera.
• In Search mode, press for full screen
display of that camera recording during
playback.
• Press the keys to enter correct numeric
password when accessing Setup or
Search modes.
•
영상 소스가 입력된 카메라는 버튼에서
황색불이 켜지며, 영상 소스 입력이 없는
카메라는 버튼에서는 불이 들어오지 않
습니다.
⑧
[Split screen buttons]
•
To output live audio data on the
monitoring screen, press the [AUD SEL.]
button and the applicable camera button
whose live audio data are to beoutputted.
[AUD SEL.] turns green, and the selected
camera button turns red.
•
Selecting the [AUD SEL.] button causes
it to function as a live audio selection
button.
•
To exit the audio mode and to select
video data, press the [AUD SEL.] button
again.
⑨
[Split screen buttons]
• On Surveillance or Search modes, press
to select 4-splitscreen , 9-splitscreen
or 16 -splitscreen .
⑩
[Auto]
•
To go to the system configuration window, press
the [Menu] button. You will then be asked to
enter the administrator’
s password. To exit the
current menu or to close the configuration
window, press the [Menu] button.
⑪
[Search]
•
To go to the search window, press the
[Search] button. You will then be asked
to enter the administrator
’
s password.
⑫
[Instant REC]
•
In case of an emergency, press the
[Instant REC] button.
Use the [Instant REC] button to record
video data from all cameras regardless of
the recording schedule. In the LED status
window,
“
Instant REC
”
turns yellow.
•
To cancel instant recording, press the
[Instant REC] button again.
☞
[Note]
�Selecting the instant recording feature causes
video data to be recorded according to the number
of recording frames and audio data recording set
for each camera
⑬
[CD-RW Open]
• Press button to open CD-RW.
⑭
[Emergency]
•
Use this button to send video data to a remote location or an e-mail address in case of
an emergency.
•
During emergency transmission,
“
Emergency
”
is displayed in yellow on the LED status
window.
•
To cancel emergency transmission, press the [Emergency] button again.
(For more information on the [Emergency] button, see
“
Emergency Warning
”
in
“
7.6 Network Setup.
”
)
⑮
[Search mode control Keys]
• In Search mode, use these keys to view the recording from either the first or last recorded
image, to play the recording either forwards or backwards, to pause viewing the recording.
�
[LED Status windows]
•
The LED status window displays the current operating state of the DVR.
: The access state and access count vis-a-vis the HDD installed in the system are displayed.
When the HDD is in normal state, this button turns orange; in case of bad sector or
overheating, however, this button turns red.
: Indicates that a recording is in progress
: D
Diissp
plla
ayyeed
d w
wh
heen
n tth
hee [[IIn
nsstta
an
ntt R
RE
EC
C]] b
buutttto
on
n iiss p
prreesssseed
d
: D
Diissp
plla
ayyeed
d w
wh
heen
n tth
hee [[E
Em
meerrg
geen
nccyy]] b
buutttto
on
n iiss p
prreesssseed
d
: Displayed when recorded video data are being backed up
: Displays the current time
: Displayed when images are replayed on the search window
: Displayed when the center accesses the system, or data are backed up remotely
1
1
P
PM
M
< 하드 디스크 타입 >
PM : Primary Master
PS
: Primary Slave
SM : Secondary Master
SS
: Secondary Slave
P
PS
S
S
SS
S
S
SM
M


