background image

English

53

Restoring the factory settings

You can restore the default settings on the unit using the web 
interface or Control panel.

»

Refer to “Restore Factory Default” on page 46.

 Power  cycling

»

Refer to “Troubleshooting” on page 55.

If a problem occurs that cannot be corrected with the instructions in 
“Troubleshooting”, follow the Steps given here.

Pull out the AC plug.

Wait at least 30 seconds, then connect the AC plug back into the 
AC outlet.

Follow the instructions on the display and in the error report. If the 
problem repeats, visit the following website at 

www.kodakverite.

com/support

Cleaning the printhead nozzles


Using the Control panel

From the Control panel, press 

 until [Setup], then press 

.

Press 

 to select [Maintenance], then press 

.

Press 

 to select [Clean Printhead], then press 

.

Load plain Letter or A4 -size paper.

Press 

 to start cleaning the printhead.

A page prints, forcing ink through the ink cartridge nozzles to clean 
them (this will use up some of your Ink from the Cartridges).

Print the document again to verify that the print quality has 
improved.

 Cleaning the ink cartridge nozzles and contacts

Remove the ink cartridge(s).

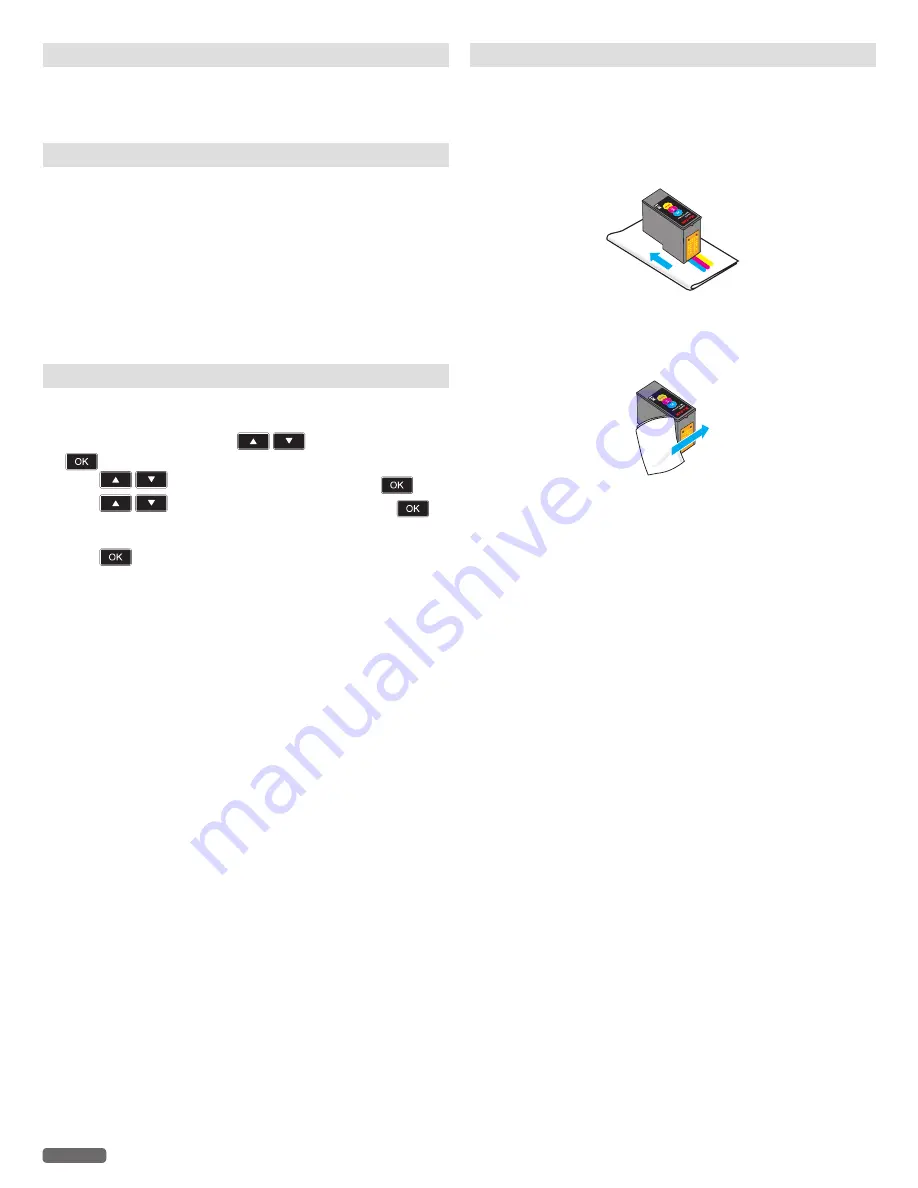
Dampen a clean, lint-free soft cloth with water, and then place the 
cloth on a flat surface.

Gently hold the nozzles against the cloth for about 3 seconds, and 
then wipe in the direction shown.

e.g.) 

Verité 5 Color CartridgeXL COLOR

Using another clean section of the cloth, gently hold the cloth 
against the contacts for about 3 seconds, and then wipe in the 
direction shown.

e.g.) 

Verité 5 Color CartridgeXL COLOR

With another clean section of the cloth, repeat Step 

3

 and Step 

4

and then let the nozzles and contacts dry completely.

Reinsert the ink cartridge(s), and then print the document again.

If the print quality does not improve, clean the print nozzles, and 
then try printing the document again.

Repeat Step 

7

 up to two more times.

If print quality is still not satisfactory, replace the ink cartridge(s).

Continued on next page.

Содержание verite 55 plus

Страница 1: ...ireless All In One Inkjet Printer more enjoyable If you have read your instructions and still need assistance you may access our online help at www kodakverite com support or call 1 844 995 6325 1 844 99KODAK Details explanations and expressions in the display panel of the actual product may differ from those shown in this Extended User Guide The displayed items and specifications are subject to c...

Страница 2: ... Printing Preferences for Windows 27 Confirming Print Settings for Mac 29 Using Menu display 31 Making copies 31 Copy Setting 32 Check ink levels 34 Scanner 35 Scan in Scanning application by Windows 35 Scan in Mac 36 Settings 38 Maintenance 38 Paper Setup 39 Network Status 39 Wi Fi Setup 40 Enable Wi Fi 43 Device Setup 43 Direct Connect Time 44 AirPrint 44 Google Cloud Print 44 Print Reports 45 R...

Страница 3: ...mal printer paper into the paper support Refer to Specifications for print media on page 25 ID Card Copy function Using the ID Card Copy function you can copy both sides of a small document e g business card onto one page Refer to ID Card Copy on page 33 Web interface The web interface is available to you on all operating systems You can access the web interface with an internet browser on your PC...

Страница 4: ...tion slits Otherwise the device could overheat or degrade The area in which you operate the device must be adequately ventilated especially if the device is used frequently Set up your device in such a way that the Heat or A C vent s air flow must be directed away from the work station Never use a gas duster on this device This gas trapped inside of this device may cause ignition and explosion In ...

Страница 5: ...a license exempt RSS standard s Operation is subject to the following two conditions 1 This device may not cause interference and 2 this device must accept any interference including interference that may cause undesired operation of the device CAN ICES 3 B NMB 3 B PC connection Use only a custom high speed certified USB cable to connect the device to your PC The recommendable cable length is no l...

Страница 6: ...hrow the paper away carefully Do not make any repairs to the device yourself Improper maintenance can result in injuries or damage to the device Only have your device repaired by an authorized service center Copying and Scanning precautions Be aware that scanning photocopying or editing any of the following may be punishable by law Copyrighted work Unauthorized reproduction of copyrighted work is ...

Страница 7: ...per exit tray 5 Exit tray extender 6 Menu display 7 Control panel and LEDs 1 3 4 5 7 6 2 When opening the lid door 8 Scanner glass 9 Ink door 10 Ink cartridge holder 10 9 8 Rear view 11 AC power cord and AC plug 12 USB port USB connection for your PC 12 11 Continued on next page ...

Страница 8: ... return to the previous screen cancel a current job delete the letters when inputting change the password cancel a WPS process Wireless Use to connect to the wireless network Wireless feature On Press and hold less than 3 seconds establishes Wireless Connection to the mobile device using Easy Simple Print Press and hold until the screen of the Menu display switches establishes Wireless Connection ...

Страница 9: ...ceive a print job from USB network equipment All LEDs Lights up and Blinking 9 Unit is Starting When you turn On KODAK Logo with Starting Up and the progress bar will be displayed on the Menu display Lights up Indicates that the unit is Ready The unit is able to receive a print job This LED behavior is also used when copying scanning or canceling copy or scan Blinking 5 Indicates that the unit is ...

Страница 10: ...etwork Blinking 1 Indicates that the unit is directly connected to your smartphone tablet using Easy Simple Print connection The unit is connected to the network using Easy Simple Print Blinking 7 Indicates that the network connection has become unavailable and the unit is not currently connected to the network Blinking 5 Indicates that the unit is in process of the Google Cloud Print registration...

Страница 11: ...nit and then remove the tape including the white paper 1 2 W ha t s In Th e Bo x W ha t s In Th e Bo x Wi rele ss Prin ter Ve rité 55 W Eco V eri té 55 Eco V eri té 55 Plu s 1 2 What s In The Box What s In The Box Wireless Printer Verité 55W Eco Verité 55 Eco Verité 55 Plus JF230 JF240 JF210UA 3 0 Turn power on ES Encender la energía FR Mettez l appareil en m h Unpack Unpack ES Desempaque Desempaq...

Страница 12: ...ridge slot 2XL 1XL Press Press 5 Set the color ink cartridge all the way into the cartridge slot on the right side 1 Color Right 2 Black Left Slid e Slid e Slid e Slid e Slid e Slid e 6 Set the black ink cartridge all the way into the cartridge slot on the left side 7 Push and click the cartridge tab to close the cartridge slot until the cover snaps securely into position Click Click 8 Close the i...

Страница 13: ...aper support You can load up to 60 plain paper sheets Slide the paper guide firmly against the edge of the paper 1 2 4 Open the paper exit tray and the exit tray extender 1 2 Note s Loading Paper You can load up to 15 index cards or postcards 10 glossy paper sheets or 5 envelopes on the paper support Refer to Print media on page 25 Turn On the unit 1 Connect the AC plug to the AC outlet 2 Press an...

Страница 14: ...of 5 For best results please proceed with cartridges setup Cartridge Setup OK Next Skip 2 The unit will start printing the alignment pattern Step 2 of 5 Test Print Cartridge Setup 3 Open the scanner lid and place the alignment pattern paper facing down on the scanner glass then press after closing the scanner lid R e verse R e verse place place Step 3 of 5 Place test print on WKH XSSHU OH FRUQHU o...

Страница 15: ...y Select the SSID that you would like to connect then press If the SSID that you would like to connect to is not displayed in the list select Other then press Enter the SSID name then select the SSID security type Router1 Router2 Router3 Router4 Network and Password Back OK Select 3 Enter Password will appear on the Menu display then enter Password Press to select a letter then press After enterin...

Страница 16: ...he WPS button must be pressed and other specifics vary depending on the router type Please refer to your router s manual If you would like to setup Wi Fi later 1 Press to select Skip then press twice Wi Fi Setup Network and Password Wi Fi Protected Setup Skip OK Wi Fi Skipped To install Wi Fi later go to the Wi Fi setup menu Back OK Continue 2 Press to go to Home Note s If you do not want to setup...

Страница 17: ... be different from those described in this user guide In this Extended User Guide the appearance of the screen images are based on Windows 10 however other operating systems e g Windows 8 etc provide basically the same operations There may be programs and functions named differently CAUTION C If there are any programs running close them first The screens may differ depending on your operating syst...

Страница 18: ... installer the printer driver starts to install to your PC through the Wi Fi connection Select this unit s serial number to complete the printer driver installation 1 The following guidance will appear while the PC is searching the network 2 If your PC cannot find the unit the pop up menu will appear for 5 seconds Click the instruction for the connection method you have chosen then read the help t...

Страница 19: ...ck Add printer or Scanner 6 Click the printer select the driver from pull down menu of Use then click Add Make sure to choose FUNAI KODAK VERITE 55 PLUS of Bonjour Multifunction in kind 7 Select FUNAI KODAK VERITE 55 PLUS added Changing connection type to USB from Wi Fi connection If you would like to change the connection type to USB from Wi Fi connection refer to the following instructions Micro...

Страница 20: ...ed 12 SAVE 30 in total The current setting mode and the description will appear on the Menu display For ECO mode 2 the print size is reduced 94 vertically and horizontally to the center of the image e g 1 Paper size Letter e g 2 Poster e g 3 Resizing Paper A4 Fit to paper size A5 e g 4 Layout 2 up Selecting ECO mode you can automatically save ink and reduce the size of your print You can also sele...

Страница 21: ...an Apple ID If you have NFC supporting device you can set the mobile App for Android by simply placing your smartphone tablet near the NFC tag on the unit Refer to Mobile connection by NFC for Android on page 22 Note s Connect your mobile to the same wireless network that your unit is using Use the mobile App Printing using the print application is available How to download the mobile App 1 From y...

Страница 22: ...ndroid smartphone tablet cover NFC recognition may not work properly e g Chromium plating Only Android 4 1 or higher will automatically enable the wireless direct feature on your Android smartphone tablet when you enable the NFC feature Mobile connection by Wireless Note s Check whether your smartphone tablet supports QR code reading first 1 Scan the QR code below or on the Setup Manual with your ...

Страница 23: ...d for printing Applications for Chrome OS Google Chrome browser Google Drive for mobile Gmail webmail service for mobile For more information about Google Cloud Print visit website at www kodakverite com support 2 3 4 1 1 Click RESOLUTION CENTER 2 Select Verité 55 Plus from pull down menu 3 Select Software How to 4 Select Google Cloud AirPrint With iOS OS X AirPrint you can print photos emails web...

Страница 24: ...ification If you click on the pop up an error recovery guide appears so that you can confirm a detailed explanation on how to fix the problem Settings for pop up message and detailed information display can be configured in Status Messenger Settings For how to configure the settings refer to the following instructions Status Messenger Settings To configure the Status Messenger right click on the i...

Страница 25: ...n edited with correction fluid are soiled or have a coated surface that are held together with office or notebook staples or with tape or glue that are pasted with note paper that are creased crumpled or torn that are curled 0 08 inches 2 mm or more Forms from a Laser Printer Forms that have been printed out by a laser printer are not suitable for further printing Note s Curled Paper If paper is c...

Страница 26: ...nted Material If you would like to print on an input sheet for example forms or stationery place the input sheet with the Pre printed side facing forward in the paper support CAUTION C Forms from a Laser Printer Forms that have been printed out by a laser printer are not suitable for further printing Child Safety Do not pull out the paper support swiftly otherwise the tray may fall resulting in in...

Страница 27: ... other in succession Activate Reverse page order if you would like to change the print order to print the last page of your document first Paper size Select the format of the document Letter 8 1 2 x 11 in Letter Borderless Legal 8 1 2 x 14 in Executive 7 1 4 x 10 1 2 in Statement 5 1 2 x 8 1 2 in A4 210 x 297 mm A4 Borderless JIS B5 182 x 257 mm A5 148 x 210 mm A5 Borderless A6 105 x 148 mm A6 Bor...

Страница 28: ...Postcard 15 sheets Page Layouts Normal Prints the normal printing Multiple pages per side N Up Prints multiple pages on one side of a paper for the page layout Poster Prints a document in a larger format The Poster option lets you enlarge a print job to several times the standard size Mirror Prints a horizontally flipped document Note s When Poster is selected Depending on the poster size that you...

Страница 29: ...he Printer Setting menu will be displayed 4 If details are not displayed select Show Details on the bottom of the Print Menu You can edit print settings when details are displayed Save changes 1 Click on Presets list box and select Save Current Settings as Preset The saved configuration information will be managed by names 2 Input name in Preset Name textbox then select Preset Available For radio ...

Страница 30: ... If you don t want to scale up select the checkbox Cover Page If necessary you can print the cover page Print Cover Page If you would like to print the cover page select Before document or After document Cover Page Type If you would like to print the cover page select the cover page type Quality Media Print Quality Select the Quality settings to match the document type to be printed You can select...

Страница 31: ... Copies 1 Color Color Quality Text Resize 100 Back Copy e g Copy Setting Making copies The copy function is available using on the unit 1 Lift the scanner lid on the unit 2 Load the original print side down on the scanner glass 3 Close the scanner lid 4 Specify the settings as necessary Refer to Copy setting on page 32 for its settings 5 Press 6 The unit will start copying To cancel copy press Dir...

Страница 32: ... Set the resize for enlarging or compressing the copy document 1 From the Control panel navigate to Home Copy Setting Resize then press Copy Setting Copies 1 Color Color Quality Text Resize 100 Back Copy 2 Press to select the resize setting 100 Default 130 Letter Legal 104 Executive Letter 97 Letter A4 93 A4 Letter 85 Letter Executive Custom Copy Resize 100 Default 130 Letter Legal 104 Executive L...

Страница 33: ...e the unit will start the copying process with only the scanned data up to that point Copy Pages per Side Would you like to include another page No OK Include 9 Remove the first page from the scanner glass and place the next page 10 Press to continue to scan the next page Repeat this until you have scanned all the pages Copy Pages per Side Place next page on Flatbed Scanner and press to continue S...

Страница 34: ...owing cases copy settings are not saved and the settings will be reset to default When you return to the Home setting by pressing If you have changed the Paper Settings in the Setup Menu the default value of Paper Settings in the Copy Menu will also be changed Check ink levels Ink levels From the Control panel navigate to Home Ink Levels and press Home Copy Copy Setting Ink Levels Scan Copy Ink Le...

Страница 35: ...elope C5 Entirely Resolution dpi Select the scan resolution from below 75 dpi 100 dpi 150 dpi 200 dpi 300 dpi 600 dpi 1200 dpi Note s Scanning at 2400 dpi or more is available on High Resolution Scanning application included with the software Color Depth Select the scan color depth from below Gray Black and white Color Content Type Specify the content type of the scan document from below Text Text...

Страница 36: ...dpi 200 dpi 300 dpi 600 dpi 1200 dpi Select the Use Custom Size checkbox to enable the Size fields to specify the width and height you want to scan Select pixels inches or cm centimeters Rotation Angle Set the number of degrees of clockwise rotation for your scanned image Auto Selection Choose one of the following from the Auto selection pop up menu Off to normally select the object Detect Separat...

Страница 37: ...ividness of colors When choosing Black White in Kind Brightness to adjust the balance between light and dark Contrast to adjust the balance of sharpness and softness When choosing Text in Kind Threshold to adjust the transition point between dark and light Note s Those images are created based on the screen of OS X 10 11 If the version of the OS is different or the OS is updated it is possible tha...

Страница 38: ...ck OK Select 3 Cartridge Setup screen will be displayed on the Menu display Make sure plain letter or A4 size paper is loaded in the paper support then press Cartridge Setup Step 1 of 5 For best results please proceed with cartridges setup Skip OK Next 4 The unit will start printing the alignment pattern The Power LED will light up then blink rapidly LED lighting pattern is Blinking 5 Refer to Mea...

Страница 39: ...Plain Labels Envelope Glossy Photo Matte Photo 3 Press to confirm Paper Type Plain Labels Envelope Glossy Photo Cancel OK Setting Network Status You can check the following settings for the network router connection status Connection 1 From the Control panel navigate to Home Setup Network Status Connection then press Network Status Connection Signal Quality Security IP Address Back OK Select 2 The...

Страница 40: ...t 2 Press Select the SSID that you would like to connect then press If it is not displayed the SSID that you would like to connect in the list select Other then press Enter the SSID name then select the security type of the SSID Refer to Manual SSID Setting on page 41 Network and Password Router1 Router2 Router3 Router4 Back OK Select 3 Enter Password Press to select letters numbers and symbols th...

Страница 41: ...outer Wi Fi Protected Setup Push WPS button on Wi Fi router 120 Cancel 3 Connected to XXXXXXXX appears on the Menu display WPS Wi Fi Protected Setup is completed The XXXXXXXX represents the SSID of your router 4 Press to Wi Fi Setup screen Wi Fi Protected Setup Connected to XXXXXXXX OK Next IP Address 1 From the Control panel navigate to Home Setup Wi Fi Setup IP Address then press Wi Fi Setup Net...

Страница 42: ... can enter numbers only When you enter a wrong number then you can erase it by pressing After entering the proxy port press to select Done then press Proxy Enter Proxy Port 1 2 3 4 5 6 7 8 9 0 Done Host Name 1 From the Control panel navigate to Home Setup Wi Fi Setup Host Name then press Wi Fi Setup Wi Fi Protected Setup IP Address Proxy Host Name Back OK Select 2 The Host Name is displayed on the...

Страница 43: ...osen English as the language for your printer Cancel OK Sleep 1 From the Control panel navigate to Home Menu Setup Device Setup Sleep then press Device Setup Language English Sleep 10min Usage Tracking Software Version Back OK Select 2 Select Sleep Time Time before the unit goes into sleep mode from 1 minute to 120 minutes Use to increase the Sleep Time or to decrease the Sleep Time 3 Press to con...

Страница 44: ...er Enable Disable Cancel OK Select 2 The Google Cloud Print connection or registration status unit name and unit description will be shown on the Menu display The Verite55Plus XXXX represents the system name of your unit 3 Press to return to the previous menu Google Cloud Print Status Not configured Verite55Plus XXXX Back The following table shows the Google Cloud Print service registration and co...

Страница 45: ...RL will be unavailable after 15 minutes To cancel the registration process from the unit press GCP Registration Cloud Printer Mail address xxxxxxxx gmail com Verite55Plus XXXX OK Enable Disable to Google Cloud Print 1 From the Control panel navigate to Home Setup Google Cloud Print Enable Disable then press Google Cloud Print Status Register Enable Disable Cancel OK Select 2 Press to set Enable or...

Страница 46: ...Print Print Reports Restore Factory Defau Back OK Select 2 Press Restore Factory Default Erase ALL content and settings and restore factory defaults Cancel OK Restore 3 Press If you choose Yes all settings will be restored to factory defaults and the unit will restart If you choose No the display will return to Setup screen Restore Factory Default Are you sure you want to restore to default Yes No...

Страница 47: ...n SleepTime out 10min EWSAccesspath http xxx xxx xxx xxx 㸸 㸸 Color Cartridge Black Cartridge Device Information Device Statistics Information Supply Information Device Configuration Network Information EWS Access path Unit s IP address http xxx xxx xxx xxx Calling the Web interface For the first time use you will need to set the Password to get the entire features on the Web interface After you ha...

Страница 48: ...gn the IP address manually If the IP address you entered is not correct you will not be able to connect to the unit When you cannot connect to the unit after a configuration change please reset the unit Refer to Restore Factory Default on page 46 When the connection of the unit is changed the Web interface will be disconnected If necessary reconnect the Web interface Enable Wi Fi You can turn On O...

Страница 49: ...information are displayed when you are using Google Cloud Print Action You can set the following for the Google Cloud Print setting After you select the Action click on Accept Select Action Action Register to Google Cloud Print Register to Google Cloud Print Disable Cloud Print Disable Google Cloud Print Suspend Cloud Print Suspend Google Cloud Print Enable Cloud Print Enable Google Cloud Print Re...

Страница 50: ...e s Record the Password in case you forget it If you have forgotten the Password you can perform Restore Factory Default to reset all settings including the Password to their factory default After resetting the unit you can login with the default Password admin Passwords may only contain alphanumeric characters and are from 1 to 32 characters in length The default Password admin provides you with ...

Страница 51: ...of the consumable materials 1 Open the unit by lifting the ink door Do Not Open During a Print Job Never open the ink door while printing 1 2 2 Press the cartridge tab to open the cartridge slot 2XL 1XL Press Press 3 Remove the cartridges Color Black Slid e Slid e Slid e Slid e Slid e Slid e 4 Remove the black and color ink cartridges from the packaging 5 L B L A C K 5 L C O L O R Color Black 5 Re...

Страница 52: ...ion visit www kodakverite com support The cartridges used for printing documents can also be used for printing photos For best results use only genuine KODAK VERITÉ Ink Cartridges Using genuine KODAK VERITÉ Ink Cartridges KODAK VERITÉ Ink Cartridges are designed to perform for superior print quality and our inks are formulated to work with the unit and help extend the life of your product We recom...

Страница 53: ...k through the ink cartridge nozzles to clean them this will use up some of your Ink from the Cartridges 7 Print the document again to verify that the print quality has improved Cleaning the ink cartridge nozzles and contacts 1 Remove the ink cartridge s 2 Dampen a clean lint free soft cloth with water and then place the cloth on a flat surface 3 Gently hold the nozzles against the cloth for about ...

Страница 54: ...d Off and unplugged from the AC outlet SHOCK HAZARD To avoid the risk of electric shock disconnect the AC power cord from the AC outlet and disconnect all cables to the unit before proceeding 2 Remove paper from the paper support and paper exit tray 3 Dampen a clean lint free soft cloth with water CAUTION C Warning Potential Damage Do not use household cleaners or detergents as they may damage the...

Страница 55: ...ers folder or as the unit option when sending a print job you can try uninstalling and reinstalling the software Make sure your operating system is supported The following operating systems are supported Microsoft Windows OS Version Processor Browser USB port Windows 10 Windows Server2012 32 bit x86 or 64 bit x64 Microsoft Edge Only Wndows 10 Internet Explorer USB 2 0 High Speed or Full Speed Wind...

Страница 56: ... Printers Windows 7 From the Windows start menu click Control Panel Hardware and Sound and Printers Windows Vista 2 Either double click the icon for your unit or right click the icon for your unit and select See what s printing to open the print queue 3 On the menu make sure there are no check marks next to Pause Printing or Use Printer Offline 4 If you made any changes try to print again If a che...

Страница 57: ...ps select the printer software folder KODAK VERITE from the list Windows 8 Click Start button Click All Programs and then select the printer software folder KODAK VERITE from the list Windows 7 Vista 2 Select Uninstall 3 Follow the instructions on your PC screen to remove the printer software 4 Restart the PC before reinstalling the printer software 5 Click Cancel on all New Hardware Found screens...

Страница 58: ...ls the latest FAQs and troubleshooting tips Visit our website at www kodakverite com support Alignment problems If the following message is displayed on the LCD after running alignment make sure whether the alignment pattern is a printing failure or not Cartridge Setup Test scan failed Place test print on upper left corner of scanner and close lid Back OK Scan Refer to Cartridge Setup on page 38 C...

Страница 59: ... If you want to cancel the print job then press Clearing paper jam in the unit on page 52 Check cartridge lock Cartridge Error Please check ink cartridge lock And retry by OK OK blinksaspattern1 An ink cartridge is not installed correctly If the packaging paper is stuck in the ink door remove it Reinstall the cartridge then close the lid completely Confirm the ink cartridge is correctly installed ...

Страница 60: ...r Clearing paper jam in the unit on page 52 Power cycling on page 53 Printer s ink door is open Ink Door Open Please close ink door blinksaspattern1 Ink Door Open Close Ink Door Remove and Re insert black ink cartridge Cartridge Error Remove and Re insert black ink blinksaspattern1 Soiled or unsupported ink cartridge has been inserted Clean the surface of the nozzles and contacts on the Ink cartri...

Страница 61: ...ontacts on the Ink cartridges with a dampened soft cloth then let them dry before reinserting cartridge Replace the current Ink cartridges with authorized Ink cartridges If this error occurs occasionally try to replace the current Ink cartridges with new Ink cartridges Cleaning the ink cartridge nozzles and contacts on page 53 Changing the ink cartridge on page 51 Defective Cartridge Ink Error Def...

Страница 62: ...ink is not inserted You get good printed results with Mono mode in this condition If you want to use both Ink cartridges please cancel the print job then press and replace with a new Color Ink cartridge Black ink level is Low Print Printing Black Ink Low Cancel Black ink level is low You should prepare the new Ink cartridge Order a new Ink cartridge from our website at www kodakverite com Color In...

Страница 63: ...fer the latest troubleshooting to visit our website at www kodakverite com support If you cannot solve the problem disconnect the AC plug and contact an authorized service center Power cycling on page 53 Alignment in progress Alignmentinprogress blinksaspattern6 Please confirm the Menu display of the device Print jobs cannot start while running alignment Run the alignment or run cancel operation o...

Страница 64: ...tup on page 38 5 Cleaning the ink cartridge nozzles and contacts Refer to Cleaning the ink cartridge nozzles and contacts on page 53 6 Cleaning the scanner glass Copy function Refer to Cleaning the scanner glass on page 54 7 Cleaning the exterior of the unit Refer to Cleaning the exterior of the unit on page 54 8 Please change to the higher quality mode Faint or white lines Refer to Confirming Pri...

Страница 65: ... notice Note about recycling This unit s packaging materials are recyclable and can be reused Please dispose of any materials in accordance with your local recycling regulations For product recycling information please visit www kodakverite com support click on Safety Data Sheet SDS To obtain Material Safety Data Sheets MSDS for supplies containing chemical substances e g ink visit our website at ...

Страница 66: ...aintenance commercial use such as hotel rental or office use of this product or damage which results from fire flood lightning or other acts of God THIS WARRANTY DOES NOT COVER PACKING MATERIALS ANY ACCESSORIES ANY COSMETIC PARTS COMPLETE ASSEMBLY PARTS DEMO OR FLOOR MODELS FUNAI AND ITS REPRESENTATIVES OR AGENTS SHALL IN NO EVENT BE LIABLE FOR ANY GENERAL INDIRECT OR CONSEQUENTIAL DAMAGES ARISING...

Страница 67: ...The Kodak trademark and trade dress are used under license from Eastman Kodak Company www kodakverite com 2016 Funai Electric Co Ltd All rights reserved ...

Отзывы: