background image

Configuring Your Printer

9

www.kodak.com/go/aiosupport

Setting up an IP 
address

IMPORTANT: 

You should only need to set up an IP address for your printer if you are 

having a problem with connecting. Typically, it is not necessary to set up an 
IP address. This procedure is for advanced users who know how to obtain 
the IP address for the printer.

All IP address entries have the following format: 000.000.000.000. Within each 
three-digit grouping, the number must be right-justified. If an address or subnet 
mask has only one or two characters between the periods, include one or two 
leading zeros in front of that number. For example: 

For information about obtaining the printer IP address, go to 

www.kodak.com/go/inkjetnetworking

.

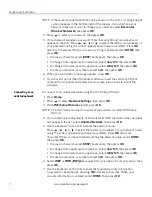
To set up your IP address on the printer:

1. Press 

Home

.

2. Press  

to 

select 

Network Settings

, then press 

OK

.

3. Press  

to 

select 

Advanced IP Address Setup

, then press 

OK

.

4. Press 

OK

 again to continue.

5. Select one of the following, then press 

OK

:

Dynamic (DHCP)


Automatic (Private)

Manual (Static)

6. If you selected 

Manual (Static)

, you are prompted to enter an IP address, a 

Subnet Mask, a Gateway Address, and a DNS Server address. Press 

OK

 after 

each entry. Use the navigation buttons to enter each digit of the numbers.

Consult your network administrator or Internet service provider for more 
information.

Verifying the 
network 
configuration

To verify that you are connected to your wireless network:

1. Press 

Home

.

2. Press  

to 

select 

Network Settings

, then press 

OK

.

3. Press  

to 

select 

View Network Configuration

, then press 

OK

.

The wireless network settings appear on the LCD. 

If the printer is connected to your network, you will see the network name and 
the word CONNECTED. 

4. To scroll through the information, press 

5. When you are done, press 

OK

.

The address as it may appear 
in your documentation

How to enter the address 
in the printer menu


149.89.138.149 149.089.138.149

149.2.40.149

149.002.040.149

Содержание ESP 5250 - All-in-one Printer

Страница 1: ...cessaire pour relier I imprimante avotre ordinateur Windows ou Macintosh e e CI ar e e Comme cez oda ESP 5200 Series oda ESP serie 5200 All in One Printer Imprimante tout en un Print Copy Scan Imprimer Copier Numeriser Includes Information on the ESP 5250 AII in One Printer ESP 5260 AII in One Printer Fournit des informations sur ces modeles Imprimante tout en un ESP 5250 Imprimante tout en un ESP...

Страница 2: ...PORTANT To view a setup video for your printer go to WWW KUUUK c Or I gu In J lLVIU a Remove all shipping tape from the outside of the printer 2 Printer Access Door Scanner Lid b Lift the printer access door c Remove all shipping tape and foam pieces from the inside of the printer d Close the printer access door www kodak comjgojaio5upport ...

Страница 3: ...adapter adapter to the printer power cord to the power source b Remove the plastic film from the LCD display and raise the control panel c Press ON d Select your language and press OK e Select your country region and press OK www kodak com go aio5upport 3 ...

Страница 4: ... from its bag Do not touch the copper colored contacts c Remove the two plastic protective shields Carriage d Place the printhead into the carriage Insert at the angle shown e Push firmly against the target label of the printhead until you hear a loud snap 4 www kodak com go aio5upport ...

Страница 5: ...ange cap Handle ink cartridges carefully to avoid ink transfer c Insert the black ink cartridge into the printhead d Press down on the ink cartridge until you hear it click into position e Repeat steps 4a 4d with the color ink cartridge f Close the printer access door and press OK www kodak comjgojaio5upport 5 ...

Страница 6: ...access door Paper Edge Guide 6 b Move the paper edge guide to the left c Load plain paper into the paper tray d Move the paper edge guide to the edge of the paper e Press Start Calibration will take two to three minutes www kodak com go aiosupport ...

Страница 7: ... connect later to a computer or network NOTE You can change your connection type at a later date See the last section in this step or the chapter Setting Up Your Printer in the User Guide for detailed instructions USB Cable Connection U CABL co CTION WAIT TO CON ECT a Select USB cable from the LCD display and press OK b Continue with step 7 if you have a WINDOWS OS computer continue with step 8 if...

Страница 8: ... on your router this may either be a physical button on the router or a virtual button in the router s software Generate WPS PIN 1 Select Generate WPS Pin on the LCD display 2 Go to your router s software and locate the PI N button Refer to your router s Web page for more information about WPS PIN 3 Enter the PIN you received on the LCD display into the PIN screen for your router c If successfully...

Страница 9: ...n select Connect to Unlisted Network and press OK b Use the arrow keys and the OK button to enter your security string now NOTE To use the virtual keyboard select the letter you want and press OK Select BKSP and press OK to clear any mistakes you may make When you are finished select Done and press OK c If successfully connected your Wi Fi indicator should be solid blue Continue with step 7 if you...

Страница 10: ...teps in the Wireless Wi Fi Connection section 3 After your printer is connected to your wireless network go to Start Programs Kodak Kodak Printer Network Setup Utility Follow the on screen instructions 4 To print to your Wi Fi connected printer choose Kodak 5250 XXXX Printer or 5260 XXXX Printer where XXXX is a number unique to your printer From a Wi Fi connection type to a USB connection type To ...

Страница 11: ...screen instructions until installation is complete NOTE If you are prompted by your firewall during software installation be sure to allow access For additional information go to www kodak com go inkjetnetworking If you have additional computers on your network install the KODAK Inkjet Printer Software on each computer KODAK Home Center Software for WINDOWS OS KODAK Home Center is installed with y...

Страница 12: ...structions If the installer window does not open double click the KODAK Inkjet Printer Software CD icon on the desktop KODAK Home Center Software for MACINTOSH OS 12 KODAK Home Center is installed with your KODAK Inkjet Printer Software The Home Center icon will appear on your desktop You can use it to order supplies and configure your All in One Printer from your computer www kodak com go aio5upp...

Страница 13: ...ks failure to follow Kodak s operation maintenance or repacking instructions failure to use items supplied by Kodak such as adapters and cables or claims made after the duration of this warranty KODAK MAKES NO OTHER EXPRESS OR IMPLIED WARRANTY FOR THIS PRODUCT AND DISCLAIMS THE IMPLIED WARRANTIES AND CONDITIONS OF MERCHANTABILITY AND FITNESS FOR A PARTICULAR PURPOSE In the event that the exclusion...

Страница 14: ...r power supply is equipped with 3 wire grounding type plugs If you cannot insert the plug into the power outlet contact an electrician to check or replace the power outlet Do not plug the AC adapter into a household extension cord If the power cord or plug is frayed or damaged the equipment gets wet or the equipment does not operate normally when the operating instructions are followed unplug your...

Страница 15: ...e software downloads plus a phenomenal deal on inkjet supplies to get you started Simply register right away when prompted during software installation or on the web at www kodak col D goJreglster Registration takes a minute but the rewards are lasting Inkjet supplies offer valid for U S residents only www kodak com go aiosupport 15 ...

Страница 16: ...ack into the printer 2 Confirm that you are using a USB 2 0 cable You can purchase a USB 2 0 cable online at wvv v aK COmj VI SDca or at your local retailer 3 Make sure that you have the most up to date software and firmware files from the Web Go to N Qua LU IjgOjdu llUdU to download the latest files For additional assistance 16 Go to I w koda r f Y1 1 0 urn select your printer and view Frequently...

Страница 17: ...isitez Ie site wwW koct k com go downloadspour telecharger les plus recents fichiers Si vous avez encore besoin d aide Visitez I adresse www _kodak comlgo aiosUj Qort selectionnezvotre imprimante puis consultez la Foire aux questions des solutions detaillees des informations sur les reparations des guides d utilisation et plus encore Kodak Eastman Kodak Company Rochester NY 14650 U S A Eastman Kod...

Страница 18: ...tout en un Print Copy Scan Impression Copie Numerisation Includes Information on the ESP 5250 AII in One Printer ESP 5260 AII in One Printer Information applicable aux produits Imprimante tout en un ESP 5250 Imprimante tout en un ESP 5260 User Guide Guide d utilisation ...

Страница 19: ...ents Resources Support is available Go to www kodak com go aiosupport and select your printer model for Frequently Asked Questions FAQs software or firmware upgrades Extended User Guide and more If you prefer you can chat online send us an e mail or call for technical support Go to www kodak com go contact 2 www kadak cam ga aia5uppart ...

Страница 20: ...g plain paper 6 Loading photo paper 8 2 Basic Functions Printing 9 Printing documents 9 Printing pictures 9 Copying 10 Scanning 11 Ordering supplies 11 3 Troubleshooting Basic troubleshooting 12 4 Safety and Warranty Information Safety Information 14 Warranty Information 15 Declaration of Conformity 16 www kodak com go aiosupport 3 ...

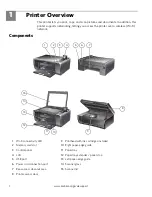
Страница 21: ...KODAK Home Center Software on your computer Components Wi Fi connectivity LED 2 Memory card slot 3 Control panel 4 LCD 5 USB port 6 Power cord connection port 7 Rear access cleanout area 8 Printer access door 4 9 Printhead carriage printhead and ink cartridges not shown 10 Right paper edge guide 11 Paper tray 12 Paper tray extender paper stop 13 Left paper edge guide 14 Scanner glass 15 Scanner li...

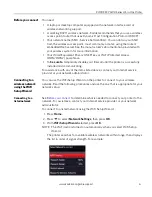
Страница 22: ...rinter on or off Displays the main menu and toggles between screens Used to navigate menus scroll through pictures Enlarge or reduce the size of the displayed picture Begins copying scanning printing maintenance task and file transfer Stops the current operation and returns to the menu Changes the orientation of the displayed picture Selects a menu item accepts a zoom setting and allows you to con...

Страница 23: ...ers which are optimized to work with KODAK All in One Printers For the best document printing results use KODAK Document Papers or a paper with the COLORLOK Technology logo on the package Use only paper that is designed for inkjet printers You can use Plain paper 20 to 24 Ib 75 to 90 gsm Photo paper 10 mils Card stock 110 Ib 200 gsm max Envelopes most standard types Transparencies inkjet variety w...

Страница 24: ... Lift the paper stop paper stop _ paper tray extender 4 Make sure the left paper edge guide is to the far left 5 Carefully fan and stack the paper then insert it into the tray 6 Move the paper forward until it stops 7 Move the left paper edge guide until it touches the paper www kodak com go aiosupport 7 ...

Страница 25: ...d photo paper 1 Remove any paper from the tray 2 Carefully fan and stack the photo paper then insert the paper short side first into the tray with the logo side facing up 3 Move the paper forward until it stops 4 Move the left paper edge guide until it touches the paper www kodak com go aio5upport ...

Страница 26: ...r Software lets you edit and enhance your pictures quickly Before you begin printing load photo paper with the logo side facing up Your printer accepts the following memory cards SD Card SDHC Card MMC Card Memory Stick Variations of the memory cards above that require an adapter for example Memory Stick Duo miniSD and microSD To print a picture from a memory card 1 Insert the memory card into the ...

Страница 27: ...xtended User Guide at www kodak com go espS2S0support To copy a document or a picture 1 Lift the scanner lid and place the document or picture face down on the glass 2 Close the lid 3 Press Home 4 Press or to select Copy Document or Copy Photo then press OK 5 Press Start to begin copying For more information about copying see the Extended User Guide at www kodak com go espS2S0support www kodak com...

Страница 28: ...Center Software 4 Select Scan Pictures and Documents then follow the on screen instructions For more information about scanning see the Extended User Guide at www kodak com go esp5250support Ordering supplies You can order ink cartridges paper and accessories online To order supplies make sure that your computer is connected to the Internet then 1 Open Home Center Software 2 Select Order Supplies ...

Страница 29: ...t came with your printer Make sure the power cord is connected to the AC adapter and is plugged into an outlet or power strip If the USB 2 0 cable was disconnected from the printer then reconnected or if power to the printer was interrupted restart the computer Make sure your printer is plugged in and turned on If you are using a USB cable make sure you have a USB 2 0 cable that the USB cable is c...

Страница 30: ...DAK Ink CartridgeCs are installed Do not use non Kodak brand or refilled ink cartridges 0 Remove then install the cartridges again Make sure the cartridges click into place Paper jam Check for paper in the rear access cleanout area 0 Open the printer access door and gently remove any paper from inside the printer 0 Make sure the paper in the tray is free of tears or creases 0 Make sure you do not ...

Страница 31: ...not place near radiators heating vents or in direct sunlight Leave enough room around this product for sufficient ventilation Do not block this product s covers or openings or insert any objects through slots Do not use aerosol products inside or around this product Do not spill any liquid on this product Do not attempt to repair or service this product If the power cord or plug is damaged if any ...

Страница 32: ... party ink or ink tanks failure to follow Kodak s operation maintenance or repacking instructions failure to use items supplied by Kodak such as adapters and cables or claims made after the duration of this warranty KODAK MAKES NO OTHER EXPRESS OR IMPLIED WARRANTY FOR THIS PRODUCT AND DISCLAIMS THE IMPLIED WARRANTIES AND CONDITIONS OF MERCHANTABILITY AND FITNESS FOR A PARTICULAR PURPOSE In the eve...

Страница 33: ...s B EN 61000 3 2 2006 Class A EN 61000 3 3 1995 A1 2001 A2 2005 AS NZS C1SPR 22 2006 Class B EN 61000 4 2 1995 A1 1998 A2 2001 EN 61000 4 3 2006 A1 2008 EN 61000 4 4 2004 EN 61000 4 11 2004 EN 61000 4 8 2001 ED 1 1 CFR 47 FCC Part 15 Subpart B Class B EN 61000 4 5 2006 EN 61000 4 6 2007 ICES 003 2004 Class B ANSI C63 4 2003 Radio EN 301 489 1 V1 8 1 2008 04 EN 301 489 17 V1 3 2 2008 04 AS NZS 4268...

Страница 34: ...Kodak 1111111 II 1K581 0 Printed in U S A WindowsCRl is a registered trademark of Microsoft Corporation MacintoshiR is a registered trademark of Apple Inc Imprime aux Etats Unis Windows est une marque deposee de Microsoft Corporation Macintosh est une marque deposee de Apple Inc ...

Страница 35: ...KODAK ESP 5200 Series All in One Printer Includes Information for the ESP 5250 All in One Printer ESP 5260 All in One Printer Extended User Guide MS SD HC MM C Rotate Back Home ...

Страница 36: ... Kodak Company Rochester NY 14650 Eastman Kodak Company 2009 Kodak EasyShare and Perfect Touch are trademarks of Eastman Kodak Company Specifications subject to change without notice P N 1K5831 September 2009 ...

Страница 37: ...e network 10 Connecting to another KODAK All in One Printer 10 Adding a network connection to a USB connected computer 11 For WINDOWS OS based computers 11 For MACINTOSH Computers 11 3 Handling Paper Paper types 12 Paper sizes 12 Envelope sizes 13 Loading paper 13 Loading plain paper 13 Loading photo paper 14 Loading envelopes 15 4 Printing Pictures Changing Print Photos Options Defaults 16 Printi...

Страница 38: ...neral care and cleaning 29 Cleaning the scanner glass 30 Cleaning inside the scanner lid 31 Replacing ink cartridges 32 Replacing the printhead 35 Upgrading the printer software and firmware 39 Upgrading software and firmware on a WINDOWS OS based computer 39 Upgrading software and firmware on a MACINTOSH Computer 39 Monitoring and adjusting printer performance 40 Checking ink levels 40 Resetting ...

Страница 39: ...ns 47 Warranty 47 System requirements 47 Safety information 49 Regulatory compliance 51 FCC statement 51 Canadian statements 51 German compliance statement 52 REACH Article 33 declarations 52 Waste electrical and electronic equipment labeling 52 ENERGY STAR Qualified 52 Warranty Information 53 Index Declaration of Conformity 54 ...

Страница 40: ...nts 1 Wi Fi connectivity LED 9 Printhead with ink cartridges installed 2 Memory card slot 10 Right paper edge guide 3 Control panel 11 Paper tray 4 LCD 12 Paper tray extender paper stop 5 USB port 13 Left paper edge guide 6 Power cord connection port 14 Scanner glass 7 Rear access cleanout area 15 Scanner lid 8 Printer access door MS SD HC MMC Rotate Back Home MS SD HC MMC Rotate Back Home 5 6 7 8...

Страница 41: ...Begins copying scanning printing maintenance task and file transfer 7 Cancel button Stops the current operation and returns to the menu returns to previous item when navigating menus 8 Rotate button Changes the orientation of the displayed picture with the zoom function changes the orientation of the red box that shows the area of the picture to be printed 9 OK button Selects a menu item accepts a...

Страница 42: ...ing Home Center Software for MACINTOSH Computers On a MACINTOSH Computer Home Center Software has three panes Select Tools and Maintenance These panes let you do the following Select pane select your printer from a list of connected printers and check the printer ink levels Tools pane start a scan select scanning settings change Home Center Software settings and restore all factory default setting...

Страница 43: ... Power Press to change the time to energy saving low power select from 1 to 4 hours in 0 5 hour increments After the Time to Low Power the printer goes into a low power mode Tagged Images Printing see Printing tagged pictures page 19 Press to select On or Off If you select On when you are printing pictures the printer LCD prompts you to verify that you want to print pictures that were tagged or ma...

Страница 44: ...Hardware and Sound Printers 2 Right click your printer and select Set as Default Printer For WINDOWS 7 OS based computers 1 Select Start Control Panel Hardware and Sound Devices and Printers 2 Right click your printer and select Set as Default Printer For MACINTOSH Computers When a new printer is installed it becomes the default printer If your all in one printer is not the default printer 1 From ...

Страница 45: ...lly installed and communicating For assistance with any of the items listed above contact your Internet service provider or your network administrator Connecting to a wireless network using the WiFi Setup Wizard You can use the WiFi Setup Wizard on the printer to connect to your wireless network Read the following procedures and use the one that is appropriate for your network setup Connecting to ...

Страница 46: ... instructions to install the software Connecting to an unlisted network To connect to an unlisted network using the Wi Fi Setup Wizard 1 Press Home 2 Press to select Network Settings then press OK 3 With WiFi Setup Wizard selected press OK NOTE The Wi Fi radio is turned on automatically when you select WiFi Setup Wizard 4 If your network is configured to not broadcast its SSID network name and doe...

Страница 47: ...re you press OK on the printer make sure you know where the router s push button is or where to enter the generated PIN If necessary consult your Internet service provider or router device manufacturer s documentation for more information To use push buttons a With Push Button Configuration selected press OK b You will have two minutes to push the WPS button on your router this may either be a phy...

Страница 48: ...anced IP Address Setup then press OK 4 Press OK again to continue 5 Select one of the following then press OK Dynamic DHCP Automatic Private Manual Static 6 If you selected Manual Static you are prompted to enter an IP address a Subnet Mask a Gateway Address and a DNS Server address Press OK after each entry Use the navigation buttons to enter each digit of the numbers Consult your network adminis...

Страница 49: ...ng an ESP 5250 printer you must install the software for the newer model If you are connecting to another ESP 5250 printer or to an older model On a WINDOWS OS based computer a Select Start All Programs Kodak Kodak Printer Network Setup Utility b If your wireless all in one printer example KodakESP5200 1133 is not listed Select No my printer is not listed then click Next From the drop down list se...

Страница 50: ...es 5250 5260 c Select Network Wireless WiFi then click Next When your printer is detected driver installation begins 8 If your wireless all in one printer example KodakESP5200 1133 is listed a Highlight the all in one printer that is connected to your network b Select Yes my printer is listed then click Next When your printer is detected driver installation begins 9 When driver installation is com...

Страница 51: ...er types You can use Plain paper 20 to 24 lb 75 to 90 gsm Photo paper up to 12 mil 290 gsm Card stock 110 lb 200 gsm max Envelopes most standard types Transparencies inkjet variety with white stripe Labels all inkjet varieties on 8 5 x 11 in or A4 sheets Iron on transfers all inkjet varieties on 8 5 x 11 in or A4 sheets Paper sizes The printer accepts the following paper sizes 4 x 6 in 101 x 152 m...

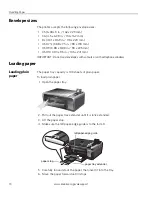
Страница 52: ...with cutouts or with cellophane windows Loading paper Loading plain paper The paper tray capacity is 100 sheets of plain paper To load plain paper 1 Open the paper tray 2 Pull out the paper tray extender until it is fully extended 3 Lift the paper stop 4 Make sure the left paper edge guide is to the far left 5 Carefully fan and stack the paper then insert it into the tray 6 Move the paper forward ...

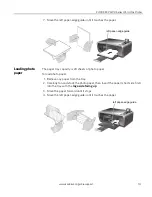
Страница 53: ... photo paper To load photo paper 1 Remove any paper from the tray 2 Carefully fan and stack the photo paper then insert the paper short side first into the tray with the logo side facing up 3 Move the paper forward until it stops 4 Move the left paper edge guide until it touches the paper MS SD HC MMC Rotate Back Home left paper edge guide MS SD HC MMC Rotate Back Home left paper edge guide ...

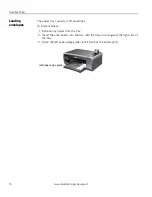
Страница 54: ... paper tray capacity is 20 envelopes To load envelopes 1 Remove any paper from the tray 2 Insert the envelope s into the tray with the flap up and against the right side of the tray 3 Move the left paper edge guide until it touches the envelope s left paper edge guide ...

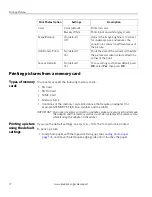
Страница 55: ... print photos options 1 Press Home 2 If necessary press to select View and Print Photos then press OK 3 Press or as needed to change the settings below Print Photos Option Settings Description View Photos Scroll through the pictures on the memory card Transfer All to PC To transfer all the pictures on the memory card to your computer press OK then Start Your printer and computer must be connected ...

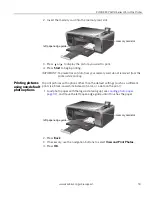
Страница 56: ...you use the default settings one 4 x 6 in 101 x 152 mm picture is printed To print a picture 1 Load photo paper with the logo side facing up see Loading photo paper page 14 and move the left paper edge guide until it touches the paper Color Color default Prints full color Black White Prints black and white gray scale Scene Balance On default Off Adjusts the image brightness to correct for underexp...

Страница 57: ...lt photo options To print pictures with options other than the default settings such as a different print size black and white instead of color or a date on the print 1 Load photo paper with the logo side facing up see Loading photo paper page 14 and move the left paper edge guide until it touches the paper 2 Press Back 3 If necessary use the navigation buttons to select View and Print Photos 4 Pr...

Страница 58: ...ure is displayed then press OK 12 When you are done selecting pictures press Start to begin printing IMPORTANT To prevent loss of data from your memory card do not remove it from the printer while printing Printing tagged pictures Some digital cameras let you tag or mark pictures on the memory card for printing This creates a tag that is recognized by the printer If you choose to print tagged pict...

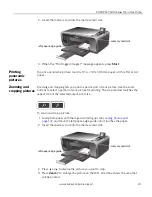
Страница 59: ...elect a portion of your picture for printing The crop window matches the aspect ratio of the selected output print size To zoom and crop a picture 1 Load photo paper with the logo side facing up see Loading photo paper page 14 and move the left paper edge guide until it touches the paper 2 Insert the memory card into the memory card slot 3 Press or to display the picture you want to crop 4 Press Z...

Страница 60: ...ected to your computer with a USB cable NOTE If you have large video files or a large number of pictures 400 or more we recommend that you use a memory card reader attached directly to your computer to transfer them Transferring pictures to a WINDOWS OS based computer 1 Insert the memory card into the memory card slot on the printer 2 Press Back 3 If necessary use the navigation buttons to select ...

Страница 61: ...on the scanner and immediately press Start without following the remaining steps below You can use this feature when the printer has been idle or when it is turned on the printer automatically goes to Copy Document mode 3 Press Home 4 If needed press or to select Copy Document or Copy Photo 5 Press Start to begin copying Changing copy options You can change the copy options for an individual copy ...

Страница 62: ...arges up to 500 of the original size Plain Paper Quality Normal default Good quality output prints faster than Best Best The highest quality but the slowest print speed eliminates the banding effect that sometimes occurs when printing Draft or Normal Draft The fastest print speed but the lowest quality Photo Paper Quality Automatic default The printer detects when you load photo paper and sets Bes...

Страница 63: ... smaller than the paper in the paper tray the printer automatically arranges the pictures to best fit the paper size Plain Paper Quality Normal default Good quality output prints faster than Best Best The highest quality Draft The fastest print speed Photo Paper Quality Automatic default The printer detects when you load photo paper and sets Best quality automatically Color Color default Prints fu...

Страница 64: ...ress to select Copy Size 7 Press or to select the enlargement or reduction you want NOTE If you select Fit to Page the printer detects the size of the original on the scanner glass and the size of the paper in the paper tray and automatically reduces or enlarges the original so that the copy fits on the paper 8 Press Start to begin copying Enlarging or reducing a photo To enlarge or reduce the siz...

Страница 65: ...r To darken or lighten the copy 1 Lift the scanner lid and place the document face down on the glass 2 Close the lid 3 Press Home 4 If needed press or to select Copy Document or Copy Photo 5 Press OK 6 Press to select Brightness 7 Press to select a number below zero for a darker copy or press to select a number above zero for a lighter copy 8 Press Start to begin copying MS SD HC MMC Rotate Back H...

Страница 66: ...s and documents Color black and white gray scale Resolution dpi File format pdf rtf tif jpg for documents jpg bmp tif for pictures Base name by default scanned files are named scan1 scan2 etc Location folder where the scanned files will be saved Before saving a scanned file you can preview it in Home Center Software and crop the output as desired See the Home Center Software Help icon for instruct...

Страница 67: ...en Home Center Software then select Scan Pictures and Documents 4 Open the Tools panel if it is not open by clicking the Tools icon 5 Click Printer Scan Settings 6 Select the Picture tab 7 Select Automatically Detect Pictures if it is not selected then click OK 8 Make sure Picture is selected then follow the on screen instructions NOTE Click the Help icon for additional instructions Scanningmultip...

Страница 68: ... the Electronics Industry Alliance at www eia org or go to www kodak com go recycle General care and cleaning CAUTION Always disconnect the power to the printer before cleaning it Do not use harsh or abrasive cleaners or organic solvents on the printer or any of its parts To clean the printer wipe the outside with a clean dry cloth Keep the surrounding area vacuumed and litter free Protect the pri...

Страница 69: ... acetone benzene or carbon tetrachloride on the glass as these chemicals may damage it Do not pour or spray liquid directly on the glass the liquid might seep under the glass and damage the printer To clean the scanner glass 1 Unplug the printer and raise the scanner lid 2 Wipe the glass with a soft cloth or sponge slightly moistened with a nonabrasive glass cleaner 3 Dry the glass with a lint fre...

Страница 70: ...e printer or any of its parts To clean the white document backing under the scanner lid 1 Unplug the printer and raise the scanner lid 2 Gently clean the underside of the lid with a soft cloth or sponge slightly moistened with a mild soap and warm water 3 Dry the underside with a chamois or soft cloth 4 If the white document backing needs further cleaning use isopropyl rubbing alcohol on a soft cl...

Страница 71: ...re When an ink cartridge is out of ink the printer LCD displays a message stating that the black or color ink cartridge needs replacing IMPORTANT Do not use non Kodak brand or refilled ink cartridges To replace an ink cartridge 1 Make sure your printer is on 2 Lift the printer access door and wait for the carriage to move to the access position The black and color ink cartridges are located in the...

Страница 72: ...ch the latch on the ink cartridge and lift it out of the printhead 4 Remove the ink cartridge from its bag IMPORTANT Insert the ink cartridge into the printhead immediately to prevent the printhead from drying out 5 Remove the protective cap from the cartridge 10 ...

Страница 73: ...www kodak com go aiosupport 34 KODAK ESP 5200 Series All in One Printer 6 Insert the ink cartridge into the printhead 7 Press down on the tab until you hear a click 8 Close the printer access door ...

Страница 74: ...aintenance procedure Replace the printhead only if you receive a new printhead from Kodak To replace the printhead 1 Make sure your printer is on 2 Lift the printer access door and wait for the carriage to move to the access position 3 Remove any paper that may be loaded in the printer 4 Remove both ink cartridges and set them aside ...

Страница 75: ...n One Printer 5 Unlatch the used printhead by lifting the button in the center of the carriage 6 Lift the used printhead out of the carriage 7 Remove the new printhead from its bag CAUTION Do not touch the copper contacts on the printhead as this may damage it ...

Страница 76: ...Maintaining Your Printer 37 www kodak com go aiosupport 8 Remove the two plastic protective shields 9 Place the new printhead into the carriage Insert it at the angle shown ...

Страница 77: ...oud snap 11 Insert the black ink cartridge into the printhead 12 Press down on the ink cartridge until you hear it click into position 13 Repeat steps 11 12 for the color ink cartridge 14 Close the printer access door The printer detects the new printhead Follow the instructions on the LCD to calibrate your printer 1 0 Cartouche d encre noire 1 0 ...

Страница 78: ...our computer is connected to the Internet 2 Connect the printer to the computer with a USB cable if not currently connected 3 Open Home Center Software 4 Click the Tools icon to open the side navigation pane 5 Under Web Links click Software Updates to check whether software updates are available 6 If there are updates click Next and follow the on screen instructions 7 Under Web Links click Firmwar...

Страница 79: ...s Home 2 Press to select Maintenance 3 With Check Ink Levels selected press OK The LCD shows approximate levels of ink in the cartridges so you know when it s time to order replacement cartridges Resetting factory defaults To reset all defaults to the factory default settings 1 Press Home 2 Press to select Printer Settings 3 Press to select Reset All Settings then press OK 4 When you see the messa...

Страница 80: ...rd is connected to the AC adapter and is plugged into an outlet or power strip If the USB 2 0 cable was disconnected from the printer then reconnected or if power to the printer was interrupted restart the computer Printer not detected Make sure your printer is plugged in and turned on If you are using a USB cable make sure you have a USB 2 0 cable that the USB cable is connected to both your prin...

Страница 81: ...cartridges again Make sure the cartridges click into place Paper jam Check for paper in the rear access cleanout area Open the printer access door and gently remove any paper from inside the printer Make sure the paper in the tray is free of tears or creases Make sure you do not overload the paper tray For more information see www kodak com go itg Select All in one printer then Paper jam Error mes...

Страница 82: ...sk On The printer is ready Power light What it means Off The Wi Fi radio is either turned off or is turned on but not connected to a wireless network Blinks continuously The Wi Fi radio is turned on and the printer is searching for available wireless networks within range Blinks intermittently The Wi Fi radio is turned on and the printer cannot find any available wireless networks within range or ...

Страница 83: ...plain paper Photo quality mode on photo paper Photo Printing Features Quantity Up to 99 may vary for different models of the 5200 series printers Print Sizes 2 x 3 in 5 x 7 6 cm 3 5 x 5 in 9 x 12 7 cm 4 x 6 in 10 x 15 cm 4 x 7 in 10 x 18 cm Panoramic 4 x 12 in 10 x 30 cm 5 x 7 in 13 x 18 cm 8 x 10 in 20 x 25 cm US Letter 8 5 x 11 in 22 x 28 cm A4 21 x 30 cm Quality Best Normal Draft Auto detect Me...

Страница 84: ...ality Best Normal Draft Brightness 3 to 3 Copy Photo Features Color Black and white or color Quantity 1 to 99 copies may vary for different models of the 5200 series printers Copy Sizes 2 x 3 in 5 x 7 6 cm 3 5 x 5 in 9 x 12 7 cm 4 x 6 in 10 x 15 cm 4 x 7 in 10 x 18 cm Panoramic 4 x 12 in 10 x 30 cm 5 x 7 in 13 x 18 cm 8 x 10 in 20 x 25 cm US Letter 8 5 x 11 in 22 x 28 cm A4 21 x 30 cm Quality Auto...

Страница 85: ...emory cards SD MS Duo MMC SDHC Image Formats Supported Image printing supports JPEG EXIF v2 2 does not support progressive JPEG format Number of USB Ports One rear device port high speed Protocols Supported USB 2 0 DPOF Tagged image printing MIPC Wi Fi Technology Supported 802 11b g WPS Software Support Application Support KODAK EASYSHARE Software for photos or third party image management applica...

Страница 86: ...ondensing and atmospheric pressure to approximately 10 000 ft ASL Full image Quality Environmental Range 15 C 59 F to 30 C 86 F and 20 to 80 RH ENERGY STAR Qualified Warranty Product One year from purchase with proof of purchase Printhead One year from purchase with proof of purchase WINDOWS OS Based Computer Minimum Recommended Operating System MICROSOFT WINDOWS XP SP2 OS MICROSOFT WINDOWS VISTA ...

Страница 87: ...available Interface USB 2 0 Full Speed USB 2 0 High Speed Removable Drive CD ROM CD ROM Other Internet access capability Internet access capability Paper Types Supported Plain Paper 20 to 24 lb 60 to 90 gsm Photo Paper Up to 12 mil 290 gsm Card Stock 110 lb index max 200 gsm Envelopes 20 to 24 lb 75 to 90 gsm Transparencies All commercially available inkjet varieties with a white stripe Labels All...

Страница 88: ... Executive 7 25 x 10 5 in 184 x 266 mm US Letter 8 5 x 11 in 216 x 280 mm US Legal 8 5 x 14 in 216 x 356 mm Custom sizes from 4 8 5 in wide and 6 14 in long Index Card Stock 4 x 6 in index cards 101 x 152 mm 5 x 7 in index cards 127 x 178 mm Transparency Iron on Transfer A4 210 x 297 mm US Letter 8 5 x 11 in 216 x 280 mm Label Sizes C5 6 38 x 9 in 162 x 299 mm C6 4 49 x 6 38 in 114 x 162 mm A2 4 3...

Страница 89: ...n Do not block this product s covers or openings or insert any objects through slots Do not use aerosol products inside or around this product Do not spill any liquid on this product Do not attempt to repair or service this product If the power cord or plug is damaged if any liquid has been spilled onto the product if the product has been dropped or the case damaged if the product does not operate...

Страница 90: ... the equipment and receiver Connect the product into an outlet on a circuit different from that to which the receiver is connected Consult the dealer or an experienced radio TV technician for help CAUTION Pursuant to Part 15 21 of the FCC Rules any changes or modifications to this product not expressly approved by Eastman Kodak Company might cause harmful interference and void the FCC authorizatio...

Страница 91: ...am Bildschirmarbeitsplatz gemäß BildscharbV vorgesehen REACH Article 33 declarations Go to www kodak com go REACH for information about the presence of substances included on the candidate list according to article 59 1 of Regulation EC No 1907 2006 REACH Waste electrical and electronic equipment labeling In the European Union do not discard this product as unsorted municipal waste Contact your lo...

Страница 92: ...or attachments such as third party ink or ink tanks failure to follow Kodak s operation maintenance or repacking instructions failure to use items supplied by Kodak such as adapters and cables or claims made after the duration of this warranty KODAK MAKES NO OTHER EXPRESS OR IMPLIED WARRANTY FOR THIS PRODUCT AND DISCLAIMS THE IMPLIED WARRANTIES AND CONDITIONS OF MERCHANTABILITY AND FITNESS FOR A P...

Страница 93: ... Address 16275 Technology Drive San Diego CA 92127 USA Product Name KODAK ESP 5250 All in One Printer Power adapters HP A0601R3 VP 09500084 000 Radio Module Number US101 Safety IEC 60950 1 2001 EN 60950 1 2001 A11 2004 UL 60950 1 2003 R7 06 CAN CSA C22 2 No 60950 1 03 EMC EN 55022 2006 A1 2007 Class B CISPR 22 1997 Class B EN 61000 3 2 2006 Class A EN 61000 3 3 1995 A1 2001 A2 2005 AS NZS CISPR 22...

Страница 94: ...te and time setting 4 synchronizing to your computer 4 Default printer settings resetting 4 Document paper sizes 49 Dowloading latest software and firmware 41 DPOF See Tagged images printing E Energy Star qualification 52 Enlarging or reducing a copy document 25 photo 25 Envelopes capacity 15 loading 15 sizes 13 Extender paper tray 1 F FAQs Web support 41 Firewall disabling 6 Firmware downloading ...

Страница 95: ...ray 1 Paper tray capacity envelopes 15 photo paper 14 plain paper 13 Paper tray extender 1 Photo paper capacity 14 loading 14 Photo paper sizes 49 Photo printing features 44 Plain paper capacity 13 loading 13 Ports power cord connection 1 USB 1 Power status light 43 Print photos options 16 Print sizes 44 Printer access door 1 Printer performance monitoring and adjusting 40 Printer supplies maintai...

Страница 96: ...sted network connecting to 7 USB port 1 USB to wireless connection adding 11 W Warranty 46 Water exposure troubleshooting 29 Web support www kodak com go esp5250downloads 41 www kodak com go esp5250specs 41 www kodak com go esp5250support 41 www kodak com go inkjetnetworking 41 www kodak com go itg 41 www kodak com go recycle 29 WEP key 6 Wi Fi connectivity LED 1 WiFi Setup Wizard on printer 6 Wi ...

Страница 97: ... I 1111 1111 lK5804 Operating Systems Kodak All in One Printer Software f Bonjour English Fran ais Deutsch Espanol Nederlands Italiano Portugues Version 4 2 ...

Страница 98: ... istantanea 5neldroog Premium Photo Paper Professional quality photosfor a lifetime of memories Desphotos de qualite proJessionnellepour toute une vie de souvenirs Hochwertige Qualitdtsjotos an denen Sie lange Freude haben werden Calidadfotogrdfica profesionalpara conservar recuerdos de toda la vida Poto di qualita f rofessionale per ricordi che durano tutta la vita Professionele kwaliteitsfoto s ...

Страница 99: ...eschiktvooraile inkjetprinters NOT FOR RESALE CE PRODUIT N EST PAS DESTINE A LA REVENTE NICHT FOR DEN WIEDERVERKAUF NO APTO PARA REVENTA NON DESTINATO ALLA VENDITA NIET VOOR WEDERVERKOOP TM Kodak EasyShare Ultra EASTMAN KODAK COMPANY 2007 KP126419 Made in Germany for Kodak EASTMAN KODAK COMPANY Rochester NY 14650 www kodak com Not for use with KODAK EASYSHARE Printer Docks Ne pas utiliser avec les...

Отзывы: