8
OPERATION
• Move the tool over the desired width of the cove.
• With the flute facing the opposite direction, repeat step
for other side of cove. Stop at bottom of cut.
V-grooves
• Use the point of the skew.
• Lightly mark the center of the “V” with the top of
the skew.
• Move the point of the skew to the right half of
the desired width of your cut.
• With the bevel parallel to the right side of the cut, raise
the handle and push the tool in to the desired depth.
• Repeat from the left side. The two cuts should meet at
the bottom and leave a clean v-groove.
• Additional cuts may be taken to add to either the depth
or width of the cut.
Parting off
• Use parting tool.
• Adjust lathe speed to lower speed for parting through
a workpiece.
• Place tool on tool rest and raise the handle until it starts
to cut and continue to cut toward the center of
the workpiece.
• Loosely hold on to the piece in one hand as it separates
from the waste wood.
Sanding and finishing
Leaving clean cuts will reduce the amount of sanding
required. Move the tool rest out of the way, adjust
the lathe to a low speed, and begin with fine sandpaper
(120 grit or finer). Coarser sandpaper will leave deep
scratches that are difficult to remove, and dull crisp details
on the spindle. Progress through each grit without
skipping grits (for example, do not jump from 120 grit to
220 grit). Fold the sandpaper into a pad; do not wrap
sandpaper around your fingers or the workpiece. To apply
a finish, the workpiece can be left on the lathe.
Turn off the lathe and use a brush or paper towel to apply
the finish. Remove excess finish before restarting lathe.
Allow to dry and sand again with 320 or 400 grit
sandpaper. Apply second coat of finish and buff.
4. Face plate and bowl turning
4.1 Mounting stock
Use of a face plate is the most common method for
holding a block of wood for turning bowls and plate.
• Select stock at least 5mm larger than each dimension
of the finished workpiece.
• Always select the largest diameter face plate that can
be used for the workpiece to be turned.
• True one surface of the workpiece for mounting against
the face plate.
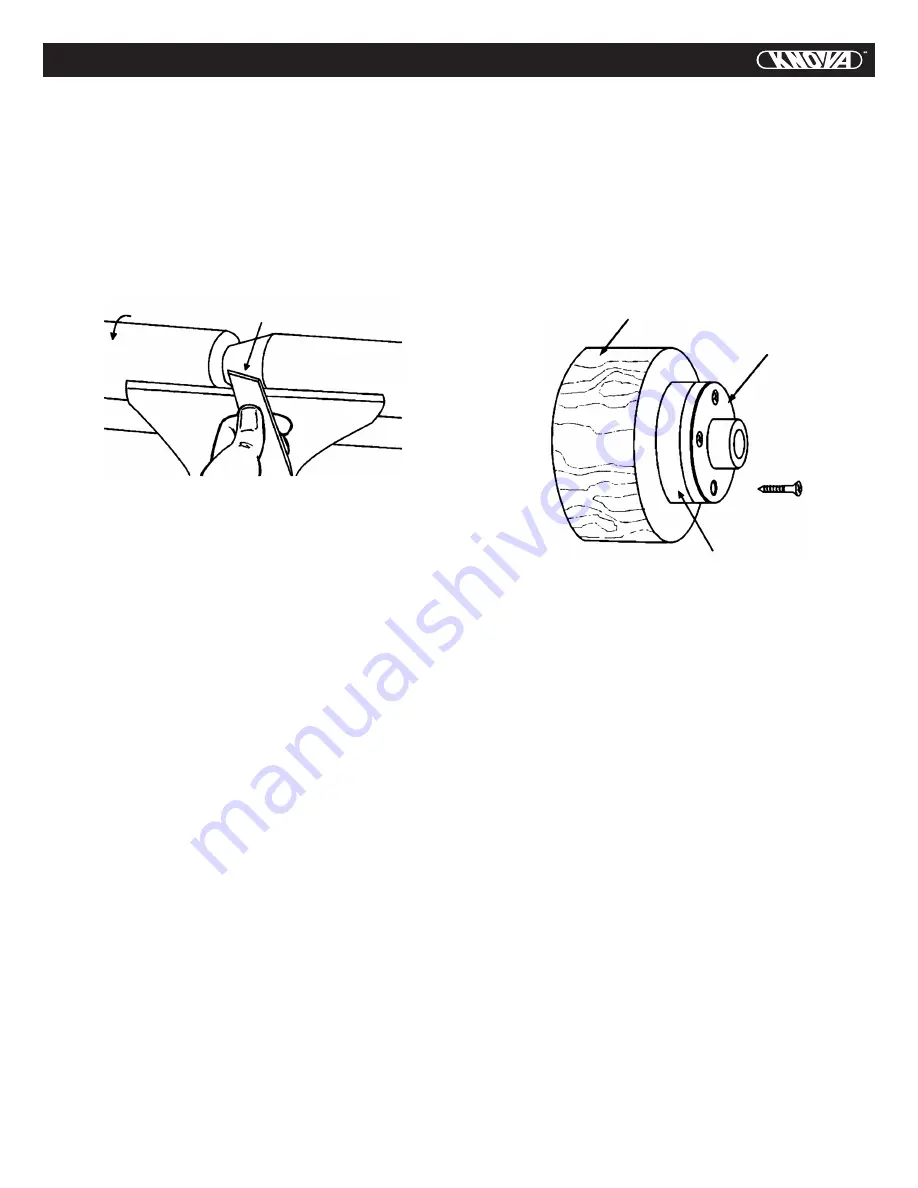
Bevel of skew parallel to cut
• Using the face plate as a template, mark the location
of the mounting holes on the workpiece, and drill pilot
holes of the appropriate size.
If the mounting screws on the face plate interfere with
the workpiece. A glue or waste block can be used:
• Make a block the same diameter as the face plate.
Both waste block and workpiece should have fat
surfaces for gluing.
• Glue the block to the workpiece. Avoid using brown
paper or newspaper between the waste block and
workpiece. It may work fine if you are using scrapers,
but a slight catch with a bowl gouge can separate
the two.
Using a chuck
While face plates are the simplest, most reliable method
of holding a block of wood for turning, chucks can also
be used.
A chuck is not a requirement, but is handy when
working on more than one piece at a time. Rather than
removing screws, you simply open the chuck and change
workpieces.
The most popular ones are four jaw scroll chucks with
a variety of jaws to accommodate different size tenons.
Most also come with a screw chuck as well.
4.2 To shape outside of bowl
• Odd shaped burls, crotches and other irregular shaped
blanks require special preparation before mounting in a
chuck or onto a face plate. Remove the bark, if there
is any, from what appears to be the center of the top
of the workpiece.
• Driver spur center into the top of the workpiece with
a mallet or dead blow hammer.
• Slip the spur center into the headstock taper and bring
the tailstock with a live center into position. Lock
the tailstock to the bed and advance the quill in order
to seat the cut center into the workpiece. Tighten
the quill locking handle.
• Turn workpiece by hand to ensure proper clearance.
• Start lathe at lowest speed and bring it up to the proper
speed for the size of work to be turned. If the machine
starts to vibrate, lower the speed until vibration stops.
• Rough out the outside of the bowl with the bowl gouge,
holding the handle of the tool firmly against your hip.
• As the bowl takes shape, work on the bottom
(tailstock end) to accommodate attaching a face plate.
Workpiece
Face plate
Screw
Waste block
Содержание KN WL-12M
Страница 13: ...ASSEMBLY DIAGRAM 12 Mini wood lathe 12 Mini torno para madera 305 mm KN WL 12M...
Страница 26: ...ESQUEMA DE MONTAJE 25 Mini wood lathe 12 Mini torno para madera 305 mm KN WL 12M...
Страница 27: ...NOTES NOTAS 26...
Страница 28: ...www knova com mx...