23
d) Remove the power switch from the old panel by squeezing the ends and pushing it out of
the panel. Put this in the new panel with the red printing on the switch to the top (away from
the base). Do this by feeding the wires through the hole and pressing the switch into the hole.
e) Put the serial number plate onto the new panel using the two new screws provided.
f) The new power plate can now be fitted by screwing it on using the four screws that were
removed in step c.
g) Solder back on the two black wires from the switch to the same two points they were
removed from. These are marked SW on the board and show a graphic of a switch. It does not
matter which way around these go.
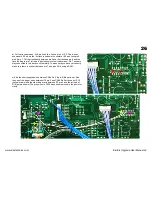
h) Solder the three wires from the new IEC power socket to the board. The green earth wire
goes to the earth pin marked on the board (this is nearest to the transformer - see photo). For
synths that had a two wire power cord solder to the unused earth terminal (usually the one
closest to the transformer) The blue wire goes to the terminal marked 'C' (Cold or Neutral) and
the brown wire goes to the terminal marked 'H' (Hot or Live). Make sure all these wires are well
soldered so that they cannot come loose.
i) Run the midi wire along the existing wires to the KLM-367
board and clip it under the existing cable clamp along with the
other wires.
Note - in the photo the midi connections are the early type.
Newer models use a board & ribbon cable.
Note for early version models.
The ground cable on the early
version polysix is mounted onto the power plate and not
the chassie as on the later model. It will be necessary to
drill a 4mm hole in the same position as in the later version
polysix (see photos) and remove any burrs. Burr removing
can be done be using a larger drill. Next mount the ground
cable to this using the bolt, lock washer, ground tag and
nut removed from the old power plate (in this order). This
needs to be tight to ensure a good ground connection.
Carefully remove all metal fragments from the drilling from
the synth.
www.kiwitechnics.com
KiwiSix Upgrade User Manual v3


