


22
UNPLUG THE PolySix!
UNPLUG THE PolySix!
There are dangerous voltages inside the unit and it must not be opened until the power plug is removed from
the power supply.
The KiwiTechnics KiwiSix Upgrade must be installed by a competent technician with the correct tools or damage to your PolySix
can occur.
KiwiTechnics will not be responsible for damage done to your precious PolySix if this upgrade is not fitted correctly.
1) Rear Panel Install
a) Open the PolySix case by removing the four screws located on the top of the front panel ends (two are at
each end) and the four screws on the underside along the rear of the unit. The top will then hinge up. This
will be limited by a think black wire running from the KLM-367 board to the top panel (yellow arrow in photo).
This can be cut as it will be removed during the install.
b) Remove the Keyboard. This is done by removing the plug with the black and white wires (yellow on early
models) to the keyboard from the KLM-366 board (CN04) and the five large screws on the underside front.
The five screws are in two rows with three located nearest the front edge of the Polysix and two nearer the
center. The Photo shows the keyboard already removed and the empty socket can be seen just to the
right of the KLM-367 Board. Some of the holes that the keyboard screws use are visible in the photo.
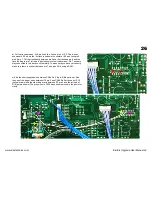
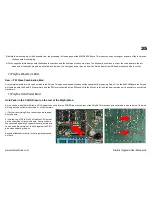
c) Remove the Power Panel. The left photo shows the panel as it is
in the later production PolySix. The other photo shows the cable
ties that will need to be cut with yellow arrows and the wires that
need to be unsoldered with red arrows before the panel can be
removed.
For units that have a two wire power cable the ground
wire will be missing.
Once this is done the rear panel can be
unscrewed with the four black screws and removed. Retain these
four screws for screwing on the replacement panel. Also remove
the serial number plate by undoing the two screws. The serial
number plate screws will not be used again and can be discarded.
For early production models the Ground cable is connected to the
plate being removed. See the note on the next page for instructions for these models.
www.kiwitechnics.com
KiwiSix Upgrade User Manual v3