background image

DS560/DS570 User's Guide - Rev. A04

StorCase Technology, Inc.

Configuration

39

Starting the Monitor Utility

NOTES:

Microsoft

®

 Windows

®

 3.x and Windows

®

 NT™ 3.5x include a program

called Terminal which does not support ANSI color.  If using either O/S,

select VT-100 for terminal emulation or use a third-party software program

such  as  Procomm  for  Windows.
Microsoft

®

 Windows

® 

95/98/NT/2000 includes a program called Hyper-

Terminal that supports ANSI color.

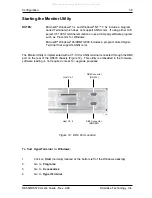
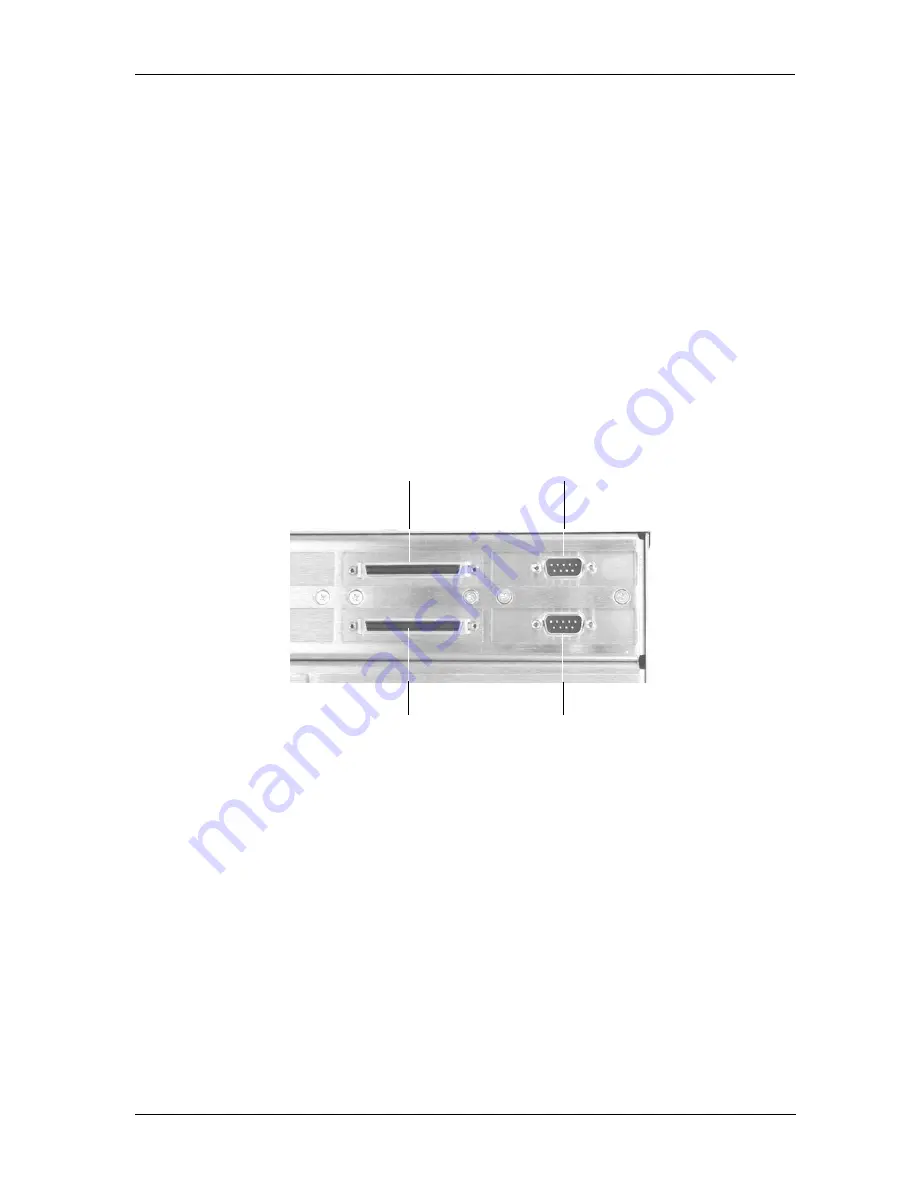
The Monitor Utility is implemented with a VT-100 or ANSI terminal connected through the DB9

port on the rear of the DS570 chassis (Figure 14).  This utility is embedded in the firmware;

software  loading  is  not  required  unless  for  upgrade  purposes.

To  find  HyperTerminal  in  Windows:

1.

Click on 

Start

 (normally located at the bottom left of the Windows desktop)

2.

Go  to 

Programs

3.

Go  to 

Accessories

4.

Go  to 

HyperTerminal

Figure 14:  DB9 Port Location

Host Ch. 1

Host Ch. 2

DB9 Connector

(RS-232)

DB9 Connector

(MODEM)

S_IDE09

All manuals and user guides at all-guides.com

Содержание StorCase Technology Data Silo DS560

Страница 1: ...StorCase Technology Data Silo DS560 DS570 SCSI IDE RAID Enclosures User s Guide All manuals and user guides at all guides com a l l g u i d e s c o m...

Страница 2: ...Technology Data Silo DS560 DS570 SCSI IDE RAID Enclosures User s Guide Part No D89 0000 0203 A04 January 2003 StorCase Technology Inc 17600 Newhope Street Fountain Valley CA 92708 9885 Phone 714 438...

Страница 3: ...the RAID controller power supply fan and blower components which are covered by the three year warranty described below Three Year Warranty The following StorCase products are covered by this warrant...

Страница 4: ...oregoing is the complete warranty for the products identified above and supersedes all other warranties and representations whether oral or written StorCase expressly disclaims all warranties for the...

Страница 5: ...2 IEC 61000 4 5 IEC 61000 4 3 IEC 61000 4 6 IEC 61000 4 4 IEC 61000 4 8 IEC 61000 4 11 EN 60950 CAN CSA C22 2 No 60950 UL 60950 Third Edition EN 60950 2000 FCC Part 15 Class A AS NZS 3548 Information...

Страница 6: ...er t nicht in der N he von Wasser verwenden 5 Das Ger t nur mit dem Aufkleber bezeichneten Netzspannung betreiben Bei Fragen ber die Art der Netzspannung sollte der H ndler oder das Energieversorgungs...

Страница 7: ...ons 17 CONFIGURATION 19 Configuration Overview 19 Operation Mode 21 Mode Operation 22 Self Diagnostic Mode 22 Configuration Mode 22 Configuring the RAID Controller 24 Initial RAID Configuration 24 Qui...

Страница 8: ...Support 51 Troubleshooting 51 Error Messages 54 Reader s Comments 57 NOTICE This User s Guide is subject to periodic updates without notice While reasonable efforts have been made to ensure the accur...

Страница 9: ...D Configuration 16 Figure 11 Typical Dual Ch RAID Configuration with One Optional Repeater Kit 17 Figure 12 Typical Dual Ch RAID Configuration with Two Optional Repeater Kits 18 Figure 13 LCD Display...

Страница 10: ...at 800 435 0642 to arrange for a Return Material Authorization RMA StorCase cannot accept returns which do not display an RMA number on the outside of the package Return the unit with all the original...

Страница 11: ...ata Silo DS560 and DS570 SCSI to IDE RAID enclosures Figure 1 are a cost effective high performance RAID solution incorporating the Data Silo expansion chassis and Data Express removable drive enclosu...

Страница 12: ...Enclosure DS570 Shown This User s Guide describes the basic steps required to use the StorCase Data Silo SCSI to IDE RAID enclosure This guide supplements documentation provided with the Data Silo DS5...

Страница 13: ...2B Data Silo DS570 Front Figure 2A Data Silo DS560 Front S_IDE01 RAID Control Panel DE90 Drive Enclosure Key Lock LEDs Display Control Panel RAID Control Panel DE110 Drive Enclosure Key Lock Unit ID N...

Страница 14: ...43 C 109 F Audible alarm buzzer will also sound NOTE Warning message will also display on the RAID Controller LCD Screen or remote terminal if Monitor Utility is used Refer to Appendix C for further i...

Страница 15: ...Reset Yellow Mute Yellow Indicator and Control Panel S_IDE04 Figure 3 Indicator and Control Panel Figure 4A DE90 Receiving Frame Front Panel Applies to DS560 model only Front Panel Indicator LEDs Figu...

Страница 16: ...computer is accessing the data on the DE110 carrier This dot will flash during communication with the host computer Figure 4B Table 1 DE90 Receiving Frame Front Panel Indicator Conditions CONDITION L...

Страница 17: ...ED Indicates that data is being accessed Scroll UP DOWN Buttons Used to navigate through the RAID Controller menu Enter Button Used to select a menu option open a sub menu or select a value Escape But...

Страница 18: ...ion Refer to section System Params Menu for further information Power Supply Module s Dual 400W auto ranging power supply modules run in Shared Mode which allows both to operate at reduced wattage and...

Страница 19: ...y default is recom mended for high performance 10K RPM and higher drives NOTE In the event a blower fails always set the speed of the remaining blower toHIGH Status LED s Green Steady glow indicates n...

Страница 20: ...11 DS560 DS570 User s Guide Rev A04 StorCase Technology Inc Figure 7 Enlarged View of I O Panel Host Ch 1 Host Ch 2 DB9 Connector RS 232 DB9 Connector MODEM S_IDE09 All manuals and user guides at all...

Страница 21: ...o the drive carrier 3 Master Slave Drive Selection DS560 only In most cases your drive will be factory configured as a Master Ultra ATA 100 drive using a jumper plug on the drive itself No configurati...

Страница 22: ...into the drive carrier at an angle cable end first Make sure none of the cables are pinched Lower the front of the drive carefully into place Fasten the drive into the carrier with the four 4 screws p...

Страница 23: ...e Carrier Board so that the I O connector on the drive mates with the connector on the Drive Carrier Board Figure 9 Make sure that the DC power cable is not pinched 3 Fasten the drive into place with...

Страница 24: ...to the carrier and installed drive 5 Reboot the computer The new disks is now ready for use although it may have to be formatted or initialized prior to use with your operating system and application...

Страница 25: ...a certain level of expertise and experience on the part of the user integrator Since there are many configuration options and variables ie host platforms applications etc only general guidelines will...

Страница 26: ...chassis together Figures 11 12 Contact StorCase for further ordering information Figure 11 Typical Dual Channel RAID Configuration with One Optional Repeater Installed to SCSI Host 1 VT 100 ANSI Term...

Страница 27: ...l Channel RAID Configuration with Two Optional Repeaters Installed to SCSI Host 1 Daisy Chain to Another Chassis or Terminate VT 100 ANSI Terminal External Modem S_IDE13 to SCSI Host 2 Daisy Chain to...

Страница 28: ...s documentation for specific information regarding the disks Configuration Overview The SCSI to IDE RAID control panel Figure 13 allows for exploration of all configuration options However the LCD scr...

Страница 29: ...lternating cursor indicating operational status When the Enter button is pressed in Operation Mode the RAID Controller will go into Configuration Mode NOTE Configuration Mode will automatically cancel...

Страница 30: ...rent status of the RAID Controller A typical display will look like the following DS5X0 OOOOOOOS Installed Memory MB RAID Capacity MBytes Press Press Press CPU Type i960 Serial Number Firmware Revisio...

Страница 31: ...functionality Configuration Mode NOTE The RAID Controller should be OFFLINE disconnected from the host system when Configuration Mode is running Configuration Mode may be selected whenever the Enter b...

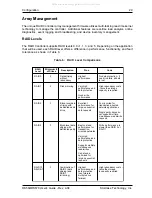
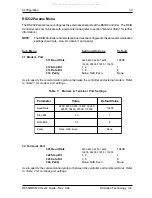
Страница 32: ...Configuration 23 The Main Menu consists of six 6 categories as shown in Table 3 Table 3 Main Menu Options Main Menu 1 RAID Params 2 SCSI Params 3 RS232 Params 4 System Params 5 NVRAM 6 RAID Func 0 Qu...

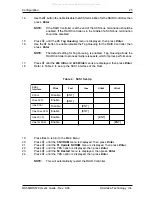
Страница 33: ...ntil the 011 Reconfirm menu is displayed then press Enter 6 Select YES to change the existing RAID configuration Single Host Configuration 1 Make sure the RAID Controller is ON 2 Press Enter to displa...

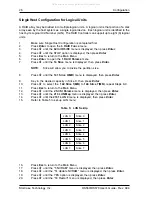
Страница 34: ...hich improve performance 17 Press until the 224 Ultra and 225 Wide menus are displayed then press Enter 18 Refer to Table 4 to set up the SCSI interface of the Host SCSI Interface Wide Fast Ultra Ultr...

Страница 35: ...ill allow you to divide the partition size 8 Press until the 141 Slice 0 MB menu is displayed then press Enter 9 Key in the desired capacity in Slice 0 then press Enter 10 Press to select the 142 Slic...

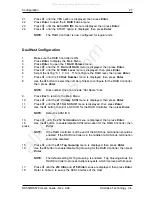
Страница 36: ...disk 9 Press Esc to return to the Main Menu 10 Press until the 21 Primary SCSI menu is displayed then press Enter 11 Press until the 211 Set SCSI ID menu is displayed then press Enter 12 Use the butto...

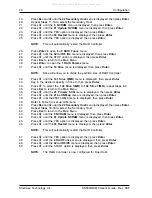
Страница 37: ...in the desired capacity in Slice 0 then press Enter 34 Press to select the 142 Slice 1 MB to 148 Slice 7 MB repeat Steps 8 9 35 Press Esc to return to the Main Menu 36 Press until the 21 Primary SCSI...

Страница 38: ...y high performance and data protection Supports multiple simultaneous read writes Can also be optimized for large sequential requests Write performance is slower than RAID 0 or RAID 1 RAID 10 RAID 0 1...

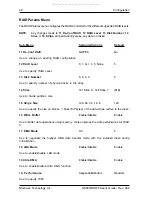
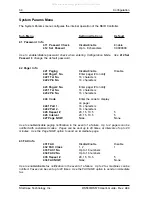
Страница 39: ...number of physical disks in the array 14 Slice 141 Slice 0 148 Slice 7 MB Use to divide partition size 15 Stripe Size 128 64 32 16 8 128 Use to specify the size in blocks 1 block 512bytes of the data...

Страница 40: ...I ID for controller 22 Termination Enable Disable Enable Use to enable disable SCSI termination for controller 23 TAG Queuing Enable Disable Enable Allows the controller to handle multiple I O request...

Страница 41: ...ecify speed of Host SCSI interface 225 Wide Enable Disable Enable Use to enable disable Wide SCSI feature 226 LUN Map 2261 LUN 0 Disable Slice 0 7 Slice 0 2262 LUN 1 Disable Slice 0 7 Slice 1 2263 LUN...

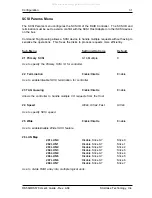
Страница 42: ...0 115200 312 Stop Bit 1 2 1 313 Data Bit 7 8 8 314 Parity None Odd Even None Use to specify the communication protocol between the controller and external modem Refer to Table 7 for modem port setting...

Страница 43: ...32 Pin No 16 characters 424 Code Enter the code to display on pager 4241 Part 1 16 characters 4242 Part 2 16 characters 425 Repeat 20 15 10 5 5 426 Interval 20 15 10 5 5 427 Page NOW None None Use to...

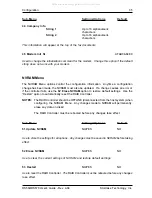
Страница 44: ...controller fails use the 52 Erase NVRAM option to restore default settings Use the Restart option to automatically reset the RAID Controller NOTES The RAID Controller should be OFFLINE disconnected f...

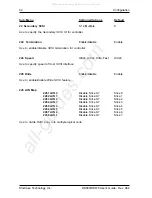
Страница 45: ...618 Format Disk8 Stop Start Stop Use to low level format the disks This option is only available when the RAID Controller is unconfigured Low level formatting is not mandatory since most new disks do...

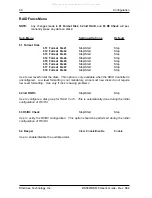
Страница 46: ...tomatically be added Once the drive has been removed use 66 Add Disk to add the new disk to the configuration 68 Statistic None None Use to view the current settings saved in NVRAM such as statistical...

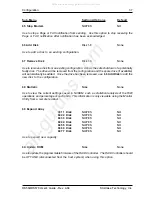
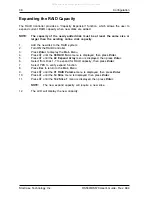
Страница 47: ...to display the Main Menu 4 Press until the 06 RAID Func menu is displayed then press Enter 5 Press until the 69 Expand Array menu is displayed then press Enter 6 Select from Disk 1 7 to expand for RAI...

Страница 48: ...led Hyper Terminal that supports ANSI color The Monitor Utility is implemented with a VT 100 or ANSI terminal connected through the DB9 port on the rear of the DS570 chassis Figure 14 This utility is...

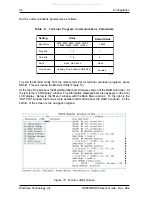
Страница 49: ...Utility Screen To start the Monitor Utility from the remote terminal or terminal emulation program press Ctrl D This will invoke the Monitor Utility Figure 15 At the top of the screen is the Model Num...

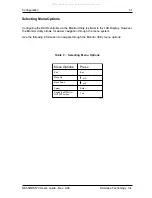
Страница 50: ...the MENU or OUTPUT screen Esc Enter Tab or A or Z Selecting Menu Options Configuring the RAID controller via the Monitor Utility is similar to the LCD Display However the Monitor Utility allows for ea...

Страница 51: ...42 Configuration StorCase Technology Inc DS560 DS570 User s Guide Rev A04 This Page Left Blank Intentionally All manuals and user guides at all guides com a l l g u i d e s c o m...

Страница 52: ...DS560 DS570 User s Guide Rev A04 StorCase Technology Inc Appendix A Specifications Dimensions 43 APPENDICES All manuals and user guides at all guides com...

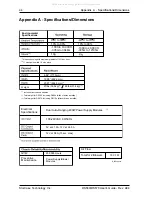
Страница 53: ...305m to 3048m 10g 10 to 90 1000 to 40 000 ft 305m to 12195m Includes front chassis handles Dual Auto Ranging 400W Power Supply Modules 5V at 21 5 A 12V at 24 5 A Electrical Specifications 100 240VAC 6...

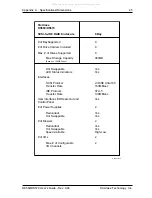
Страница 54: ...B Based on 120GB Drives Hot Swappable Yes LED Status Indicators Yes Interfaces SCSI Protocol LVD SE Ultra160 Transfer Rate 160MB sec IDE Protocol ATA 5 Transfer Rate 100MB sec User Interface LED Read...

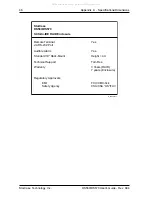
Страница 55: ...S570 SCSI to IDE RAID Enclosure Remote Terminal Yes via RS 232 Port Audible Alarm Yes Standard 19 Rack Mount Height 4U Technical Support Toll Free Warranty 3 Years RAID 7 years Enclosure Regulatory Ap...

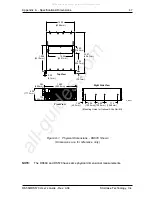
Страница 56: ...ew Right Side View Mounting Holes for Optional Slide Rail Kit 6 98 177 3mm 6 00 152 4mm 4 25 108 0mm 7 75 196 9mm 0 20 5 1mm 1 17 29 7mm 8 06 204 7mm 23 87 606 3mm 4 58 116 3mm 15 36 390 1mm 13 04 331...

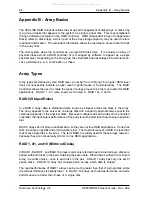
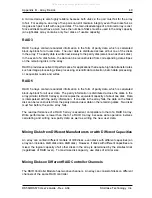
Страница 57: ...or RAID 10 3 and 5 RAID 0 Striped Disks In a RAID 0 array data is distributed also known as striped across the disks in the array The array appears to the server as one large disk with a capacity app...

Страница 58: ...n redundant information in the form of parity data which is calculated block by block for all user data The parity information is distributed across the disks in the array similar to RAID 0 arrays and...

Страница 59: ...tributed parity Best cost and performance for transaction oriented networks Very high performance and data protection Supports multiple simultaneous read writes Can also be optimized for large sequent...

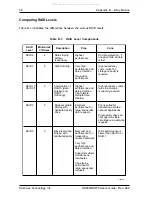
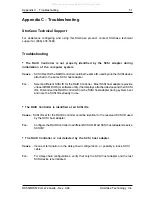
Страница 60: ...rs provide onboard ROM BIOS or software utility that displays attached devices and their SCSI IDs Disconnect the RAID Controller from the SCSI host adapter during system boot and note the SCSI IDs alr...

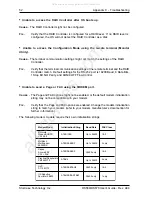
Страница 61: ...nd XON XOFF Flow Control Unable to send a Page or FAX using the MODEM port Cause The Page and FAX options might not be enabled or the default modem initialization string may not be compatible with you...

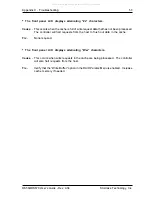
Страница 62: ...d The controller will halt requests from the host to flush out data in the cache Fix None required The front panel LCD displays alternating Ww characters Cause This occurs when write requests in the c...

Страница 63: ...s removed due to a failed disk or by user Too many RAID members failed The minimum number of disks required for the RAID configuration failed to initialize RAID not configured RAID cannot be configure...

Страница 64: ...rrently in use and unable to send FAX notification Paging Modem is busy Invalid NVRAM Information stored in NVRAM area is invalid and unable to be used No Configuration RAID Controller is currently un...

Страница 65: ...56 Appendix C Troubleshooting StorCase Technology Inc DS560 DS570 User s Guide Rev A04 This Page Left Blank Intentionally All manuals and user guides at all guides com...

Страница 66: ...at StorCase Technology is working toward the goal of providing you with the highest quality most cost effective products available on the market and we need your comments to guide our efforts We look...

Страница 67: ...T ALONG THIS LINE FROM BOTTOM TO TOP OF PAGE BUSINESS REPLY MAIL POSTAGE WILL BE PAID BY ADDRESSEE NO POSTAGE NECESSARY IF MAILED IN THE UNITED STATES FIRST CLASS MAIL PERMIT NO 10686 SANTA ANA CA TEC...

Отзывы: