background image

13

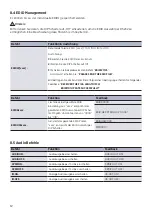
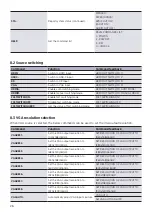
8.6 Displaysteuerung per CEC

Befehl

Funktion

Feedback 

TVON.

CEC Befehl “DISPLAY ON” senden, um 
das Display einzuschalten 

CEC TV POWER ON!

TVOFF.

CEC Befehl “DISPLAY OFF” senden, um 
das Display auszuschalten

CEC TV POWER OFF!

TVVOL+.

CEC Befehl “VOLUME UP” senden, um 
die Lautstärke am Display zu erhöhen

CEC TV VOLUME INCREASE!

TVVOL-.

CEC Befehl “VOLUME DOWN” senden, 
um die Lautstärke am Display zu 
reduzieren

CEC TV VOLUME DECREASE!

TVMUTE.

CEC Befehl “VOLUME MUTE” senden, 
um den Ton am Display stumm zu 
schalten

CEC TV VOLUME MUTE/UNMUTE!

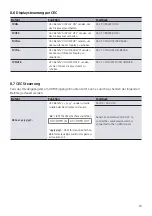
8.7 CEC Steuerung

Falls das Wiedergabegerät am HDMI Eingang CEC unterstützt, kann es durch das Senden der folgenden 
Befehle gesteuert werden. 

Befehl

Funktion

Feedback 

CECxx <yy:yy:yy>.

CEC Befehl “yy yy yy” senden, um die 
Quelle oder das Display zu steuern. 

xx

” steht für die Anschlussnummer:


00 = HDMI IN 03 = HDMI OUT

<yy:yy:yy>

” steht für den spezifischen 

Befehl des jeweilige Geräts, das gesteu-
ert werden soll. 

CEC00 <40:44:41>.

Send CEC command “40:44:41” to  
control the source device which is  
connected to the 1-HDMI IN port.

Содержание 5778 000 150

Страница 1: ...ultiSwitch 41 4K60 MultiSwitch 41 4K60 Montage und Bedienungsanleitung Mounting and operating instructions Multiformat Video und Audio Umschalter Multiformat presentation switcher Art Nr 5778000153 Ref No 5778000153 ...

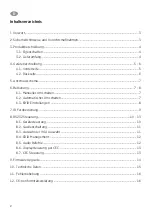
Страница 2: ...ma 7 6 Bedienung 7 8 6 1 Manuelles Umschalten 7 6 2 Automatisches Umschalten 7 6 3 EDID Einstellungen 8 7 IR Fernbedienung 9 8 RS232 Steuerung 10 13 8 1 Gerätesteuerung 10 8 2 Quellenschaltung 11 8 3 Auswahl der VGA Auswahl 11 8 4 EDID Management 12 8 5 Audio Befehle 12 8 6 Displaysteuerung per CEC 13 8 7 CEC Steuerung 13 9 Firmware Upgrade 14 10 Technische Daten 15 11 Fehlerbehebung 16 12 CE Konf...

Страница 3: ... niemals das Gerät Dies kann zu Stromschlägen oder Verbrennungen führen Das Produkt darf nur mit Sicherheitskleinspannung mit dem mitgelieferten Netzteil betrieben werden Die Verwendung von Verbrauchsmaterialien oder Teilen die nicht den Produktspezifikationen entsprechen kann zu Beschädigung oder Fehlfunktion führen Wenden Sie sich bei allen Wartungsarbeiten an qualifiziertes Servicepersonal Das ...

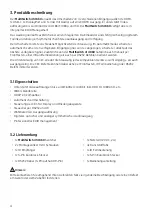
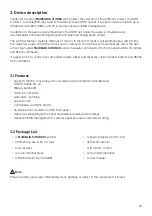
Страница 4: ...er RS232 Befehlen bedient werden Die Unterstützung von CEC erlaubt die Steuerung jedes kompatiblen Geräts sowohl eingangs als auch ausgangsseitig Die CEC Befehle können dabei aktiv per Fronttasten IR Fernbedienung oder RS232 Befehl initiiert werden 3 1 Eigenschaften Unterstützt Videoauflösungen bis zu 4K 60Hz 4 4 4 8bit inkl HDR 10 1080p 3D etc 18Gb s Bandbreite HDCP 2 3 kompatibel Automatische Um...

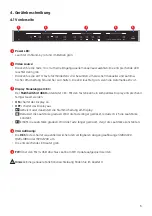
Страница 5: ...tput resolution is selected FW Micro USB port for firmware upgrade FW VIDEO SOURCE DISPLAY CONTROL ON OFF 1 2 3 4 AUTO RES 1920x1080 1280x720 1920x1200 VGA RESOLUTION 1 2 3 4 5 Reduziert die Lautstärke graduell Wird die Taste länger gedrückt reduziert sich die Lautstärke konstant HDMI V2 0 4x1 Presentation Switcher with Audio Extraction 3 Panel Description 3 1 Front Panel Power LED Illuminates red...

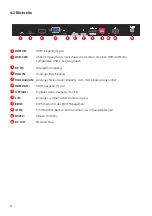
Страница 6: ...SB C IN Connects to the video source with SlimPort output e g Macbook 3 DP IN Connects to DisplayPort video source 4 VGA IN Connects to VGA video source VGA Audio IN Connects to audio source to be embedded in VGA video HDMI OUT Connects to HDMI display device OPTICAL Connects to audio playback device L R 5 pin balanced audio Connects to audio playback device EDID 4 pin DIP switch for EDID setting ...

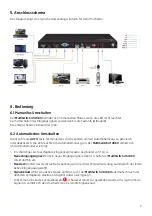
Страница 7: ...um den Automatikmodus zu aktivieren oder deaktiveren Die LED leuchtet im Automatikmodus grün Der MultiSwitch 41 4K60 verhält sich im Automatikmodus wie folgt Er schaltet das erste verfügbare Eingangssignal aktiv beginnend von 1 bis 4 Neues Eingangssignal Wird ein neues Eingangssignal erkannt schaltet der MultiSwitch 41 4K60 direkt dorthin um Neustart Verliert das Gerät die Netzspannung wird nach d...

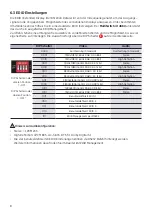
Страница 8: ...x2160 60Hz RGB 4 2 0 12bit High Definition 0111 3840x2160p 60Hz 4 4 4 HDR 12bit Stereo 1000 3840x2160p 60Hz 4 4 4 HDR 12bit High Definition 1001 1280x800 60Hz RGB 4 4 4 8bit Stereo 1010 1920x1200 60Hz RGB 4 4 4 8bit Stereo 1011 Benutzerdefiniert EDID 1 1100 Benutzerdefiniert EDID 2 1101 Benutzerdefiniert EDID 3 1110 Benutzerdefiniert EDID 4 1111 EDID Management per RS232 7 panel is designed for VG...

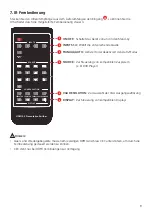
Страница 9: ...ion buttons 1 4 and AUTO mode button Source device control buttons Page Up Page Down Rewind Fast Forward Pause Play Stop Exit Enter Up Down Left Right Power On Off VGA resolution selection buttons Display device control buttons Power On Off Mute Unmute Volume Down Volume Up OK HDMI 2 0 Presentation Swither DISPLAY SOURCE VGA RESOLUTION 1280x720 1360x768 1920x1080 1920x1200 INPUTS Manual Auto 1 2 3...

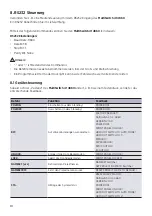
Страница 10: ...ndruck sendet er das entsprechende Feedback Befehl Funktion Feedback POWON Einschalten aus dem Stand by POWER ON POWOFF Ausschalten in dem Stand by POWER OFF RST Auf Werkseinstellungen zurücksetzen FACTORY DEFAULT Multiswitch 41 C 4K60 VERSION V1 0 0 POWER ON FRONT PANEL UNLOCK HDMI OUT SWITCH TO AUTO MODE HDMI OUT SWITCH TO 1 DIP0000 DIP EDID0000 SPDIF OUT ON IIS OUT ON UNLOCK Entsperrt die Front...

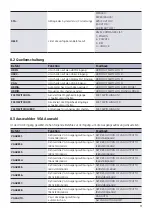
Страница 11: ...68 60Hz SET RESOLUTION OF VGA OUTPUT TO 1024x768 60Hz VGARES2 Definiert die VGA Ausgangsauflösung auf 1280x720 50Hz SET RESOLUTION OF VGA OUTPUT TO 1280x720 50Hz VGARES3 Definiert die VGA Ausgangsauflösung auf 1280x720 60Hz SET RESOLUTION OF VGA OUTPUT TO 1280x720 60Hz VGARES4 Definiert die VGA Ausgangsauflösung auf 1360x768 60Hz SET RESOLUTION OF VGA OUTPUT TO 1360x768 60Hz VGARES5 Definiert die ...

Страница 12: ...agung erhalten Sie folgendes Feedback RECEIVED THE FILE LENGTH 134 EDID1101 UPDATE SUCCESSFULLY Befehl Funktion Feedback EDIDRxxxx Liest die aktuell gewählte EDID Einstellung aus xxxx entspricht der gewählten EDID Auswahl per DIP Schal ter Möglich sind Antworten von 0000 bis 1110 EDIDR0000 EDID HEX STRING OF 0000 EDIDUSExxxx Aktiviert das gewählte EDID Preset xxxx entspricht der EDID Auswahl per D...

Страница 13: ...EASE TVMUTE CEC Befehl VOLUME MUTE senden um den Ton am Display stumm zu schalten CEC TV VOLUME MUTE UNMUTE 8 7 CEC Steuerung Falls das Wiedergabegerät am HDMI Eingang CEC unterstützt kann es durch das Senden der folgenden Befehle gesteuert werden Befehl Funktion Feedback CECxx yy yy yy CEC Befehl yy yy yy senden um die Quelle oder das Display zu steuern xx steht für die Anschlussnummer 00 HDMI IN...

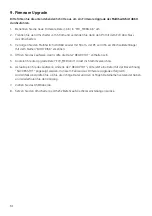
Страница 14: ...mit dem Namen BOOTDISK erkennen 4 Öffnen Sie das Laufwerk darin sollte die Datei READY TXT enthalten sein 5 Kopieren Sie die Upgrade Datei FW_MERG bin direkt ins Stammverzeichnis 6 Aktualisieren Sie das Laufwerk Anstelle der READY TXT sollte jetzt eine Datei mit der Bezeichnung SUCCESS TXT angezeigt werden In diesem Fall war das Firmware Upgrade erfolgreich Andernfalls überprüfen Sie ob Sie die ri...

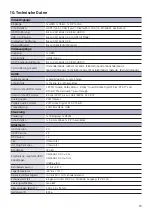
Страница 15: ...n Euroblock Unterstützte HDMI Formate LPCM 7 1 Audio Dolby Atmos Dolby TrueHD Dolby Digital Plus DTS X and DTS HD Master Audio pass through Unterstützte DP Formate 8 Kanal LPCM bis zu 24bit 192Khz AC3 DTS Analog Audio PCM Stereo Digitale Audio Formate PCM Dolby Digital DTS DTS HD Frequenzgang 20Hz bis 20kHz 1dB Steuerung Steuerung 1x IR Eingang 1x RS232 Schnittstellen 1x 3 5 mm Klinke 1x 3 Pin Eur...

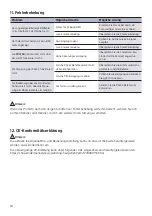
Страница 16: ...Befehle oder Schnitt stellenkonfiguration Überprüfen Sie die Kommunikations parameter und die Befehle Falsche PIN Belegung im Kabel Prüfen Sie die Belegung und arbeiten Sie ggf mit Adaptern Die Bedienung über die Fronttasten frunktioniert nicht aber die Steue rung per RS232 Befehlen ist möglich Die Tasten wurden gesperrt Senden Sie die RS232 Befehl zum Entsperren Hinweis Wenn das Problem nach den ...

Страница 17: ...ystem Connection 22 6 Button Control 22 23 6 1 Manual Switching 22 6 2 Automatic Switching 22 6 3 EDID Setting 23 7 IR Remote Control 24 8 RS232 Control 25 28 8 1 Device Control 25 8 2 Source Switching 26 8 3 VGA Resolution Selection 26 8 4 EDID Management 27 8 5 Audio Control 27 8 6 Display Control 28 8 7 CEC Control 28 9 Firmware Upgrade 29 10 Specification 30 11 Troubleshooting 31 12 CE declara...

Страница 18: ... unit This may result in electric shock or burns The product may only be operated with safety extra low voltage using the supplied power supply The use of consumables or parts that do not meet the product specifications may result in damage or malfunction Refer all servicing to qualified service personnel The system should only be stored and used in a dry environment Place the unit in a well venti...

Страница 19: ...y controlled by the front panel buttons IR remote and RS232 commands It supports CEC to control any compatible display either automatically via front panel buttons and RS232 CEC commands 3 1 Features Supports HDMI 2 0 including video resolution up to 4K 60Hz 4 4 4 8bit and HDR 10 1080p 3D etc 18Gbps bandwidth HDCP 2 3 compliant Automatic switching Supports CEC Controllable via RS232 and IR Selecta...

Страница 20: ...which output resolution is selected FW Micro USB port for firmware upgrade FW VIDEO SOURCE DISPLAY CONTROL ON OFF 1 2 3 4 AUTO RES 1920x1080 1280x720 1920x1200 VGA RESOLUTION 1 2 3 4 5 to decrease the audio volume gradually or press and hold it to decrease the audio volume constantly Press HDMI V2 0 4x1 Presentation Switcher with Audio Extraction 3 Panel Description 3 1 Front Panel Power LED Illum...

Страница 21: ... IN Connects to HDMI video source 2 USB C IN Connects to the video source with SlimPort output e g Macbook 3 DP IN Connects to DisplayPort video source 4 VGA IN Connects to VGA video source VGA Audio IN Connects to audio source to be embedded in VGA video HDMI OUT Connects to HDMI display device OPTICAL Connects to audio playback device L R 5 pin balanced audio Connects to audio playback device ED...

Страница 22: ...old the AUTO button for at least three seconds to activate or deactivate automatic switching mode The LED will illuminate green MultiSwitch 41 4K60 will react according to the following rules It will switch to the first available active input starting at input 1 to 4 New input The switcher will automatically select the new input once detected Reboot If power is lost it will automatically choose th...

Страница 23: ...z 4 4 4 HDR 12bit Stereo 1000 3840x2160p 60Hz 4 4 4 HDR 12bit High Definition 1001 1280x800 60Hz RGB 4 4 4 8bit Stereo 1010 1920x1200 60Hz RGB 4 4 4 8bit Stereo 1011 User defined EDID 1 1100 User defined EDID 2 1101 User defined EDID 3 1110 User defined EDID 4 1111 Enable RS232 EDID management 7 panel is designed for VGA resolution selection ress RES button repeatedly to set the output resolution ...

Страница 24: ... mode button Source device control buttons Page Up Page Down Rewind Fast Forward Pause Play Stop Exit Enter Up Down Left Right Power On Off VGA resolution selection buttons Display device control buttons Power On Off Mute Unmute Volume Down Volume Up OK HDMI 2 0 Presentation Swither DISPLAY SOURCE VGA RESOLUTION 1280x720 1360x768 1920x1080 1920x1200 INPUTS Manual Auto 1 2 3 4 5 1 ON OFF To active ...

Страница 25: ...anges e g by pressing a button it will send the related feedback via RS232 Command Function Command feedback POWON Power on system POWER ON POWOFF System standby POWER OFF RST Restore to factory default FACTORY DEFAULT Multiswitch 41 C 4K60 VERSION V1 0 0 POWER ON FRONT PANEL UNLOCK HDMI OUT SWITCH TO AUTO MODE HDMI OUT SWITCH TO 1 DIP0000 DIP EDID0000 SPDIF OUT ON IIS OUT ON UNLOCK Unlock front p...

Страница 26: ...GA OUTPUT TO 1024x768 60Hz VGARES2 Set the VGA output resolution to 1280x720 50Hz SET RESOLUTION OF VGA OUTPUT TO 1280x720 50Hz VGARES3 Set the VGA output resolution to 1280x720 60Hz SET RESOLUTION OF VGA OUTPUT TO 1280x720 60Hz VGARES4 Set the VGA output resolution to 1360x768 60Hz SET RESOLUTION OF VGA OUTPUT TO 1360x768 60Hz VGARES5 Set the VGA output resolution to 1600x1200 60Hz SET RESOLUTION...

Страница 27: ... file bin If successfully upload the feedback is RECEIVED THE FILE LENGTH 134 EDID1101 UPDATE SUCCESSFULLY Command Function Command feedback EDIDRxxxx Read the preset EDID The xxxx represents the 4 pin DIP switch status It maybe from 0000 to 1110 EDIDR0000 EDID HEX STRING OF 0000 EDIDUSExxxx Activate preset EDID function The xxxx represents the 4 pin DIP switch status EDIDUSE0000 DIP0000 8 5 Audio...

Страница 28: ...VMUTE Send CEC VOLUME MUTE command to mute unmute the display CEC TV VOLUME MUTE UNMUTE 8 7 CEC control If the input sources and display support CEC they can be controlled by sending the below command Command Function Command Example and Feedback CECxx yy yy yy Send CEC command yy yy yy to control the source device or the display device The xx represents the port number 00 HDMI IN 03 HDMI OUT The ...

Страница 29: ...er the PC will automatically detect a U disk named of BOOTDISK 4 Open the U disk READY TXT should be available 5 Directly copy the upgrade file FW_MERG bin to the root folder 6 Refresh U disk to check whether the filename READY TXT has been replaced by SUCCESS TXT If yes the upgrade was successfully otherwise it failed Please check the file and file name of bin file and repeat the procedure 7 Remo...

Страница 30: ...nal block Supported HDMI audio formats LPCM 7 1 audio Dolby Atmos Dolby TrueHD Dolby Digital Plus DTS X and DTS HD Master Audio pass through Supported DP audio formats 8 channels LPCM up to 24bit 192Khz AC3 DTS Analog audio format PCM Digital audio formats PCM Dolby Digital DTS DTS HD Frequency response 20Hz to 20kHz 1dB Control Control 1x IR in 1x RS232 Connector 1x 3 5 mm jack 1x 3 pin terminal ...

Страница 31: ...RS232 communication parameters Type in correct RS232 communica tion parameters Wrong pin assignment Please modify the cable or use gender changers Cannot control the device by front panel buttons while can control it through RS232 port The front panel buttons are locked Unlock the front panel buttons using the corresponding RS232 command Note If the problem still remaining after following the abov...

Страница 32: ...5778000153 D GB 2021 02 Änderungen vorbehalten Subject to alterations Printed in Germany Kindermann GmbH Mainparkring 3 D 97246 Eibelstadt E Mail info kindermann de www kindermann com ...

Отзывы: