KGuard Security Mars PRO Series Скачать руководство пользователя страница 22

22

Mars PRO Series NVR

•  User/Password

You need to use the login credentials only when the network type is set to PPPoE.

•  HTTP Port

 This is the port that you will use to log in remotely to the NVR (e.g. using the Web Client). If the default port 80 is already taken by other applications, please change it. 

•  Client Port

This is the port that the NVR will use to send information through. If the default port 9000 is already taken by other applications, please change it.

•  IP Address

The IP address identifies the NVR in the network. It consists of four groups of numbers between 0 to 255, separated by periods. For example, “192.168.001.100”. You 

need to enter the IP address manually only if your network type is 

Static

.

•  Subnet Mask

Subnet mask is a network parameter which defines a range of IP addresses that can be used in a network. If IP address is like a street where you live then subnet 

mask is like a neighborhood. The subnet address also consists of four groups of numbers, separated by periods. For example, “255.255.000.000”. Alike IP address, you need to 
enter the subnet mask manually only if your network type is 

Static

.  

•  Gateway

This address allows the NVR to access the Internet. The format of the 

Gateway

 address is the same as the 

IP Address

. For example, “192.168.001.001”. Alike IP address, 

you need to enter the gateway address manually only if your network type is 

Static

•  DNS1/DNS2

DNS1 is the primary DNS server and DNS2 is a backup DNS server. Usually should be enough just to enter the DNS1 server address.  

•  UPNP

If you want to log in remotely to the NVR using Web Client, you need to complete the port forwarding. Enable this option if your router supports the UPnP. You need to 

enable UPnP both, on NVR and router. In this case, you do not need to configure manually port forwarding on your router.


NOTE:


If your router does not support UPnP, make sure the port forwarding is completed manually. Please see the customized free guide on 

http://portforward.com/kguard.

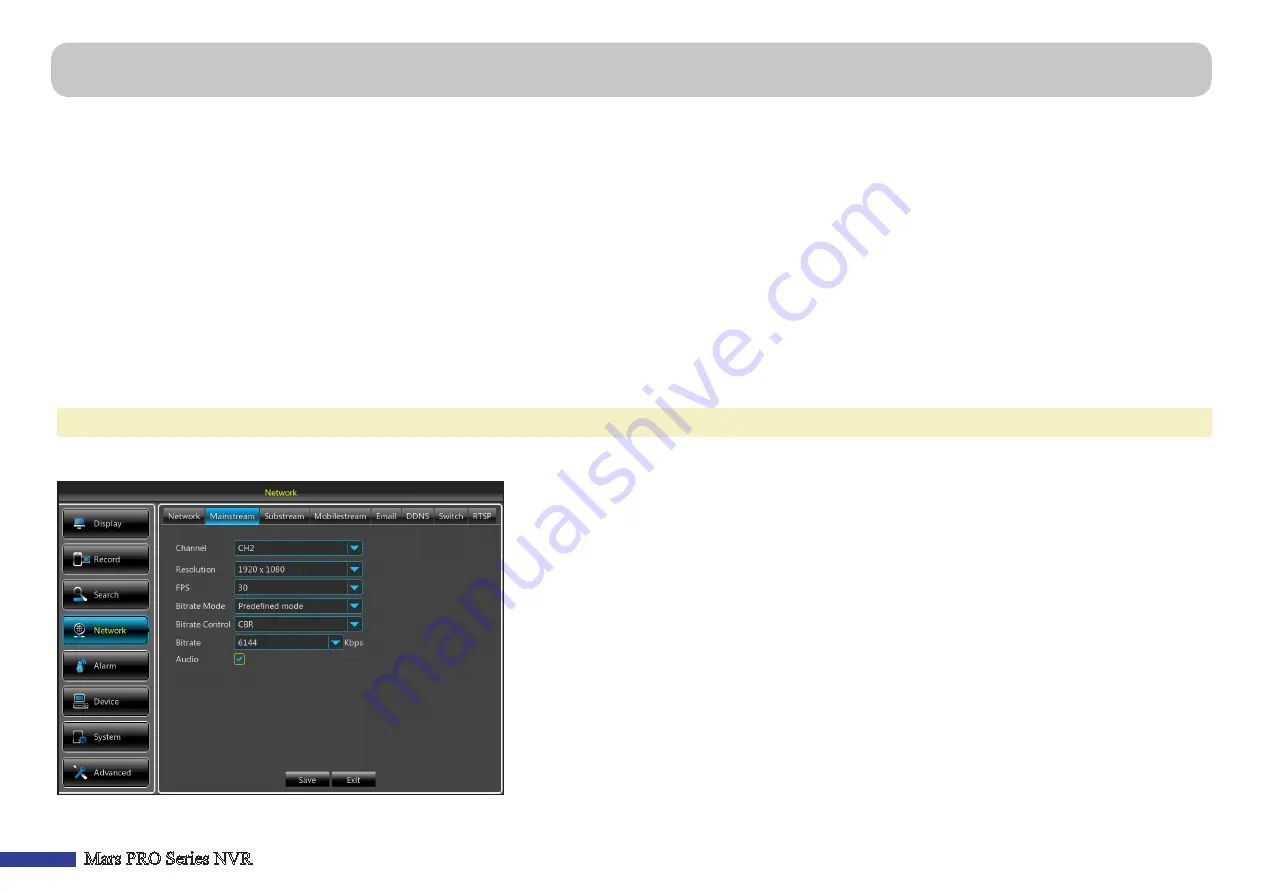
This menu allows you to configure the recorded video parameters. All the modifications you apply to these settings will affect the recorded video saved into the HDD.

• 

Channel

Select the channel to configure recording related information.

•  Resolution

: This parameter defines, how large the recorded images will be.

•  FPS

: This parameter defines the number of frames per second the NVR will record.

•  Bitrate Mode

If you want to set the bitrate by yourself, then choose 

User-defined mode

. If you 

want to select the predefined bitrate, choose 

Predefined mode

.

• 

Bitrate Control

Select the bitrate level based on the complexity of the scene. For a simple scene, 

such as gray wall is suitable constant bitrate (

CBR

). For more complex scene, such as busy street is 

suitable variable bitrate (

VBR

).

• 

Bitrate

This parameter corresponds to the speed of data transfer that the NVR will use to record 

video. Recordings that are encoded at higher bitrates, will be of better quality.

•  Audio

: Check the box to enable audio for a channel. Make sure the camera with audio capability is 

properly connected to the selected channel.

Network: Network & Mainstream

Содержание Mars PRO Series

Страница 1: ...USER MANUAL Mars PRO Series Default user name admin Default password 123456 EN...

Страница 2: ...se undesired operation Copyright Limitation of Liability This publication is provided AS IS without warranty of any kind either expressed or implied including but not limited to the implied warranties...

Страница 3: ...n be avoided Follow the recommended practices listed below Faulty installation improper grounding and incorrect operation and maintenance of electrical equipment are always sources of danger Do not tr...

Страница 4: ...the Hard Disk Drive s 5 Making the Connections 6 Common NVR Operations 8 Live Viewing Screen 9 Main Menu 10 Display IP Camera 11 Display IP Camera Camera Setup 12 Display Output Image Control 13 Disp...

Страница 5: ...allation procedure of 3 5 and 2 5 are slightly different Please see the installation details as follows a Connect the data and power cables to the two hard disk drives and place the hard disk drives o...

Страница 6: ...nnecting speakers I e SATA Connect this to an external hard drive to backup files stored on the NVR J VGA Connect this to your TV or a monitor with VGA input K HDMI Connect this to your digital TV or...

Страница 7: ...external hard disk drive to backup files stored on the NVR 5 Connect the included power cable 48V 2A 4 Pin DIN connector 6 Use the USB flash disk for backup camera or system upgrade 7 Connect a RS 485...

Страница 8: ...d via the Main Menu Using the Supplied Mouse A B A Left Button B Right Button Click once to choose an item in the menus and confirm your selection Click once to open the pop up menu on the Live Viewin...

Страница 9: ...the recording quality G Click this to start viewing channels in a sequence set in Display Output on page 13 H Click this to adjust the volume I Click this to start stop cruise for a PTZ camera J Click...

Страница 10: ...ettings and DDNS parameters E Alarm Select this menu option to set the motion area and sensitivity and configure the alarm settings F Device Select this menu option to format the HDD view available sp...

Страница 11: ...tion port Manufacturer Display the camera manufacturer s name Device Type Display the device type MAC Address Display the camera s MAC address Firmware Version Display the camera s firmware version Re...

Страница 12: ...nnels are displayed on the Live Viewing screen Color setting Click Setup to configure video color settings Channel Select the channel you want to modify Show Name Show Time Uncheck if you do not want...

Страница 13: ...me of the camera Channel Select the channel you want to modify IR CUT Mode Select the desired built in filter switch over mode to ensure the camera works properly both in the daylight and night IR CUT...

Страница 14: ...n to the Privacy Zone menu Channel Select the channel s where you want to set privacy zone s Privacy Zone You need to enable this function to set privacy areas Area Setup Decide how many privacy areas...

Страница 15: ...ing schedule for other channels use Copy To function The image on the left side shows a recording schedule defined for Channel 1 According to this example schedule Channel 1 would On Saturday and Sund...

Страница 16: ...corded videos Click Search The result is displayed in the calendar Start Time End Time Click on the date that is marked with a small orange triangle in the calendar and specify the beginning time and...

Страница 17: ...ck to zoom in f Time Bar The color indicates the video recording type Normal recording green Motion recording yellow Alarm recording red and IO recording blue g Recording Type Indicator Motion IO Alar...

Страница 18: ...up purposes 3 Set the date and time to search for the recordings Click on the specific day and then click The recordings of that day will be displayed as a list 4 Select the recording s and click 5 Ch...

Страница 19: ...o mark the beginning of the video footage you wish to backup 4 Click 5 Click on the Time Bar to mark the end of the video footage you wish to backup 6 Click The marked up area is now displayed within...

Страница 20: ...e 18 To playback event s double click on the event Please see more details in Playback Recordings on page 17 This menu displays a list of events presented in chronological order the most recent events...

Страница 21: ...t the network type you are using NOTE If you are not sure in your network type or settings please contact your ISP Internet Service Provider DHCP This is the network type when a device on your network...

Страница 22: ...erver Usually should be enough just to enter the DNS1 server address UPNP If you want to log in remotely to the NVR using Web Client you need to complete the port forwarding Enable this option if your...

Страница 23: ...will not affect the recorded video saved into the HDD Channel Select the channel to configure stream related information Enable Enable to allow the remote access function Resolution Set the screen re...

Страница 24: ...email Sender Enter your email address Sender Password Enter the password of your email Receiver Enter the email address where you want to receive the event notifications from the NVR Interval Configur...

Страница 25: ...s is the Subnet Mask for the internal switch Gateway This is the Gateway for the internal switch Switch Mode Select the switch mode For adding KGUARD ONVIF cameras such as IPB 300 or IPB 400 to PoE po...

Страница 26: ...ter an event occurs that the NVR will continue to record The recommended recording length is 30 seconds but it can be set higher up to 5 minutes Channel Select the channel you want to set the motion d...

Страница 27: ...reen If this function is enabled and the alarm sensor is triggered the corresponding channel will be displayed in full screen Record Channel Select which channels start to record when the alarm sensor...

Страница 28: ...munication protocol between the PTZ capable camera and NVR Baudrate The speed of the information sent from the NVR to the PTZ capable camera Make sure it matches the compatibility level of your PTZ ca...

Страница 29: ...Flicker Choose the video format between 50 Hz or 60 Hz depending on your geographical location For example in USA the flicker should be set to 60 Hz if set to 50 Hz then the live video from the camer...

Страница 30: ...t the start time and end time for daylight saving NTP stands for Network Time Protocol This feature allows you to synchronize the date and time automatically on the NVR over Internet Therefore the NVR...

Страница 31: ...r IDs when multiple NVRs are connected in the same network Device Name Enter the desired name for your NVR The name can include both letters and numbers This menu allows you to view the basic informat...

Страница 32: ...ogin Auto Reboot Set enable to reboot the NVR based on a schedule Reboot Choose to reboot the NVR on daily basis on weekly basis or on monthly basis Update Click to start updating the firmware Select...

Страница 33: ...the box to display a message on the screen when Disk Full Disk Error or Video Loss event happens Send Email Check the box to let the NVR to send you an auto email when an event occurs To set up the e...

Страница 34: ...e NVR and router or the manual port forwarding is completed in the router NOTE For Safari on Mac OS verify the following a Make sure you have installed or updated the Web plug in to the latest version...

Страница 35: ...d below Record Path Set the path to save manual recordings on your PC s local drive Download Path Set the path on your PC s local drive where you want to download recordings from the NVR Snapshot Path...

Страница 36: ...ports Answer Make sure the camera is ONVIF compliant If the camera does not support PoE check if the camera is using an external power supply Check if the camera is set to the same network segment as...

Страница 37: ...LTD Address 4F No 113 Jian 2nd Road Jhonghe District New Taipei City 23585 Taiwan TEL 886 2 8228 6080 FAX 886 2 8221 6857 Email support kguardsecurity com USA Technical Support Contact TEL 1 866 978...

Отзывы: