background image

Keyscan Inc. A Member of the Kaba Group 

Set Mode to “Not Used” When Default Input # & Output # Row Don’t Apply  


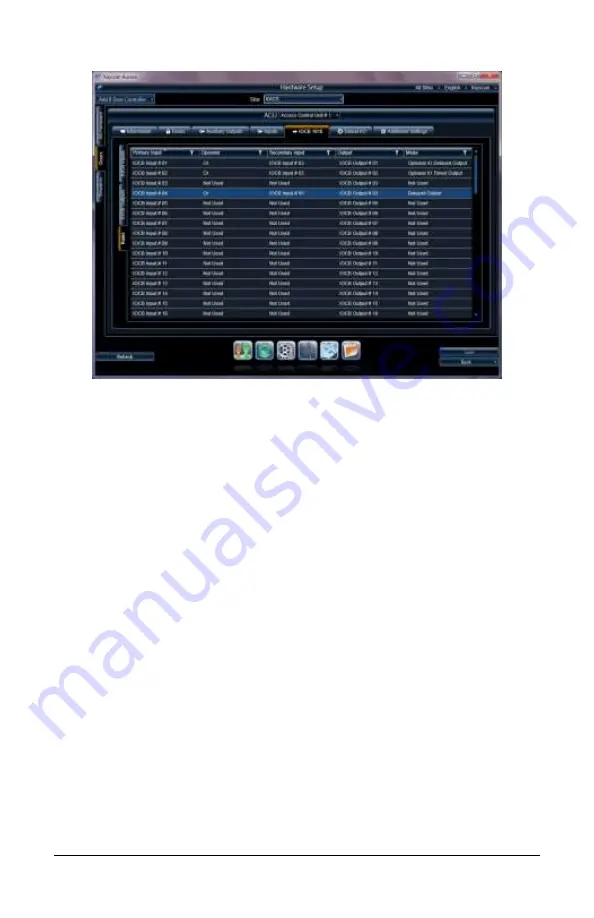
Steps to Assign Inputs to Outputs and Set Modes 

1.


Select the Rules tab.  


If you are at the Client main screen, select the Site Management button > 
Hardware Setup > select the site if you have multiple sites > double click on the 
control unit that is connected to the IOCB1616 in the All Hardware screen > 

select the IOCB1616 tab > select the Rules tab. 

2.


Click on the row with the first applicable primary input to be assigned to an output. 
The row is highlighted in blue. 

3.


On the input row highlighted in blue, double click under the Operator column, and 
choose the desired operator – AND, OR, or RTE – from the drop down list. 


If assigning just a single input to a single output, leave the setting on Not Used. 
If you make an error or need to clear the assignment, select Clear Operator and 
Secondary Input. 

4.


Under the Secondary Input column, double click on the highlighted row, and choose 
the desired secondary input from the drop down list. 

5.


If you are not assigning a secondary input, leave the field blank. 

6.


Under the Output column, double click on the highlighted row, and choose the desired 
output from the drop down list. 

7.


Under the Mode column, double click on the highlighted row, and choose the desired 
mode from the drop down list. 

8.


Repeat setting inputs, operators, outputs, and modes. When you have completed 
assigning inputs to outputs, click on the Save button. 

9.


If you have additional IOCB1616 boards connected to other access control units, 
repeat all the above procedures to define and assign the inputs and the outputs; 

otherwise click on the Back button until you are returned to the main screen or the 
Navigation History button for a previously viewed screen. 

Содержание Aurora IOCB1616

Страница 1: ...may be employed Monitor door inputs and use request to exit devices without a reader assignment and trigger a sounder such as a siren or a sound alert Trigger an auxiliary third party product such as...

Страница 2: ...he door contact is left open after the associated input time has expired 05 Delayed Input Delayed Output If the input is triggered the alarm is delayed The input is delayed by the specified input time...

Страница 3: ...puter room lights As soon as motion is detected in the room Output 2 is triggered and remains active for the duration of Output 2 s specified time If motion is still detected the output remains active...

Страница 4: ...tion when multiple inputs are assigned to a common output any one input fires the output And Condition With the AND condition when two multiple points are assigned to any common output both points nee...

Страница 5: ...n the site in the Hardware Setup directory screen 2 From the Hardware Setup screen double click on the control unit that is connected to the IOCB1616 in the All Hardware screen 3 Select the IOCB1616 t...

Страница 6: ...OCB Output 1 or the first output to be named 3 In the text box enter a name or description appropriate for the output 4 If you are applying a delay for this output double click on the output under the...

Страница 7: ...and the row with the default Input Output is not applicable set the Mode column for that row to Not Used The following table illustrates an example where the default Input 3 is not assigned to Output...

Страница 8: ...tting on Not Used If you make an error or need to clear the assignment select Clear Operator and Secondary Input 4 Under the Secondary Input column double click on the highlighted row and choose the d...

Страница 9: ...ect the IOCB Devices tab 3 Below the IOCB Inputs heading click in the box to the left of the access control unit IOCB Input The box has an x when selected If you are assigning multiple IOCB inputs to...

Страница 10: ...same schedule click in the box of each applicable output The box has an x when selected 4 Click on the symbol to the right of Schedule and select the schedule from the drop down list 5 Click on the As...

Страница 11: ...e 1 reviews the Input Output assignments and table reviews the input supervision selections Jumper Off Off 0 Jumper On On 1 5 4 3 2 1 J17 Jumper Settings Jumper Pins KI 00387E 10 11 J17 Jumper Setting...

Страница 12: ...able IOCB1616 function for PC1097 or later control boards is set in the Aurora software from the Hardware Setup Additional Settings screen under the Hardware Settings heading To enable the control boa...

Страница 13: ...in Standoffs Cover Locking Screw Cover Locking Screw Cover Locking Screw Cover Locking Screw Alternate Locations for Optional OCB 8s KI 00388E 10 11 Dual IOCB1616 Circuit Boards Front View Cover not s...

Страница 14: ...J11 J12 J13 J14 J15 J16 H1 H2 Max Current 400 mA Normal Reversed 1 to 8 9 to 16 Input Output Control Board Short J18 on last IOCB only PROM Ver RX TX Gnd 12V AUX POWER Supervised Inputs 1 2 3 4 5 6 16...

Страница 15: ...Lock power and ACU power must be separate supplies Current consumption without low current open collector connected to any device draws 100mA RX TX GND 12V AUX Power IOCB1616 Circuit Board Red Power C...

Страница 16: ...n without low current open collector connected to any device draws 100mA OCB 8 GND 12V J9 Ext Pwr ACU Pwr OCB 8 GND 12V J9 Ext Pwr ACU Pwr Set J9 jumper to Ext Pwr Set J9 jumper to Ext Pwr Second side...

Страница 17: ...n with ACU RX TX GND 12V AUX Power IOCB1616 Circuit Board 1 RX TX GND 12V AUX Power IOCB1616 Circuit Board 2 RX TX RX RX TX TX Refer to the Keyscan Technical Guide for ACU to PC communication ACU Circ...

Страница 18: ...4 5 6 16 15 14 13 12 High Current Open Collector Control Points 2 Amp Max 16 1 Normally Closed Contact Jumper 4 Off 1 Input 1 Door Contact 1 Input 1 Door Contact to Common Return Normally Closed Cont...

Страница 19: ...IOCB1616 PROM Ver RX TX Gnd 12V AUX POWER 2 3 4 5 6 16 15 14 13 12 High Current Open Collector Control Points 2 Amp Max 16 Supervised Inputs 12 VDC Strike 12 VDC Lock Power Auxiliary output device sw...

Страница 20: ...tput 05 Relay 06 Output 06 Relay 07 Output 07 Relay 08 Output 08 Relay 09 Output 09 Relay 10 Output 10 Relay 11 Output 11 Relay 12 Output 12 Relay 13 Output 13 Relay 14 Output 14 Relay 15 Output 15 Re...

Страница 21: ...This page is intentionally blank...

Страница 22: ...Keyscan Inc A Member of the Kaba Group 22 This page is intentionally blank...

Страница 23: ...IOCB1616 Installation Guide Aurora 06 15 23 This page is intentionally blank...

Страница 24: ...4 Keyscan Inc 901 Burns St E Whitby Ontario Canada L1N 0E6 1 888 539 7226 toll free Canada USA 905 430 7226 elsewhere www keyscan ca Technical support hours 9 00 A M to 6 30 P M Eastern Time IOCB1616...

Отзывы: