3
Ersatzteilbestellung Seite 22-23
Geben Sie bei Ersatzteilbestellungen bitte die vollständige Arti-
kelnummer, die Ersatzteilnummer, die benötigte Stückzahl sowie
die auf dieser Seite aufgestempelte Kontrollnummer an.
Bestellbeispiel:
Art.-Nr. 07978-900 /Ersatzteil-Nr. 94601775 /1
Stück /Kontroll-Nr: .................... Bewahren Sie die Originalver-
packung des Gerätes gut auf, damit sie später u. U. als Trans-
portverpackung verwendet werden kann.
Wichtig:
Zu verschraubende Ersatzteile werden grundsätzlich
ohne Verschraubungsmaterial berechnet und geliefert. Falls Be-
darf an entsprechendem Verschraubungsmaterial besteht, ist die-
ses durch den Zusatz
„mit Verschraubungsmaterial“
bei der Er-
satzteilbestellung anzugeben.
Heinz KETTLER GmbH & Co. KG
Postfach 1020 · D- 59463 Ense-Parsit
KETTLER Austria GmbH
Gewerbestraße 2 · A - 5322 Hof / Sbg.
Trisport AG
Im Bösch 67 · CH-6331 Hünenberg
http://www.kettler.net
CH
A
D
Wichtige Hinweise
D
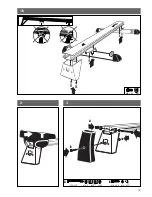
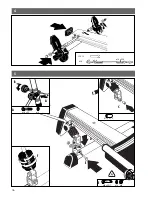
das Gerät entsprechend der Bilderfolge. Innerhalb der einzel-
nen Abbildungen ist der Montageablauf durch Großbuchsta-
ben vorgegeben.
■
Beachten Sie, dass bei jeder Benutzung von Werkzeug und bei
handwerklichen Tätigkeiten immer eine mögliche Verletzungs-
gefahr besteht. Gehen Sie daher sorgfältig und umsichtig bei
der Montage des Gerätes vor!
■
Sorgen Sie für eine gefahrenfreie Arbeitsumgebung, lassen Sie
z.B. kein Werkzeug umherliegen. Deponieren Sie z.B. Ver-
packungsmaterial so, dass keine Gefahren davon ausgehen
können. Bei Folien/Kunststofftüten für Kinder Erstickungsgefahr!
■
Die Montage des Gerätes muss sorgfältig und von einer er-
wachsenen Person vorgenommen werden. Nehmen Sie im
Zweifelsfall die Hilfe einer weiteren, technisch begabten Person
in Anspruch.
■
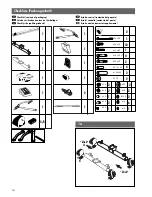
Das für einen Montageschritt notwendige Verschraubungsma-
terial ist in der dazugehörigen Bildleiste dargestellt. Setzen Sie
das Verschraubungsmaterial exakt entsprechend der Abbildun-
gen ein. Alles erforderliche Werkzeug finden Sie im Kleinteile-
beutel.
■
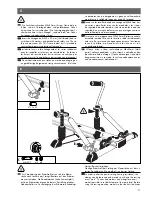
Bitte verschrauben Sie zunächst alle Teile lose und kontrollieren
Sie deren richtigen Sitz. Drehen Sie die selbstsichernden Mut-
tern bis zum spürbaren Widerstand zuerst mit der Hand auf,
anschließend ziehen Sie sie gegen den Widerstand (Klemmsi-
cherung) mit einem Schraubenschlüssel richtig fest. Kontrollie-
ren Sie alle Schraubverbindungen nach dem Montageschritt
auf festen Sitz. Achtung: wieder gelöste Sicherheitsmuttern wer-
den unbrauchbar (Zerstörung der Klemmsicherung) und sind
durch Neue zu ersetzen.
■
Aus fertigungstechnischen Gründen behalten wir uns die Vor-
montage von Bauteilen (z.B. Rohrstopfen) vor.
For Your Safety
■
The rowing machine should be used only for its intended pur-
pose, i.e. for physical exercise by adult persons.
■
Any other use of the equipment is prohibited and may be dan-
gerous. The manufacturer cannot be held liable for damage or
injury caused by improper use of the equipment.
■
The rowing machine has been designed in accordance with the
latest standards of safety. Any features which may have been a
possible cause of injury have been avoided or made as safe as
possible.
■
The unit complies with the DIN EN 957 - 1/7, H. It is therefore
unsuitable for therapeutic use.
■
Incorrect repairs and structural modifications (e.g. removal or
replacement of original parts) may endanger the safety of the
user.
■
Damaged components may endanger your safety or reduce the
lifetime of the equipment. For this reason, worn or damaged
parts should be replaced immediately and the equipment taken
out of use until this has been done. Use only original KETTLER
spare parts.
■
In case of enquiry, please contact your KETTLER dealer.
■
If the equipment is in regular use, check all its components thor-
oughly every 1 – 2 months. Pay particular attention to the tight-
ness of bolts and nuts.
■
Instruct persons using the equipment (in particular children) on
possible sources of danger during exercising.
■
Before beginning your program of exercise, consult your doctor
to ensure that you are fit enough to use the equipment.
Base
your program of exercise on the advice given by your doctor.
Incorrect or excessive exercise may damage your health.
■
Any interference with parts of the product that are not described
within the manual may cause damage, or endanger the person
using this machine. Extensive repairs must only be carried out by
KETTLER service staff or qualified personnel trained by KETTLER.
■
To ensure that the safety level is kept to the highest possible
standard, determined by its construction, this product should be
serviced regularly (once a year) by specialist retailers.
■
In choosing the location of the apparatus, ensure a sufficient sa-
fety distance from any obstacles. The apparatus must not be
Study these instructions carefully before assembling and ucing the equipment. The lnstructions contain important infor-
mation for your safety and for the use and maintenance of the rowing machine. Keep the instructions in a safe place
for your own information, for maintenance work and ordering spare parts.
Assembly Instructions
GB


