Kessler CINESHOOTER Скачать руководство пользователя страница 4

support.kesslercrane.com

Page 3 of 33

USER GUIDE

FEATURES & FUNCTIONS

CINESHOOTER SYSTEM 

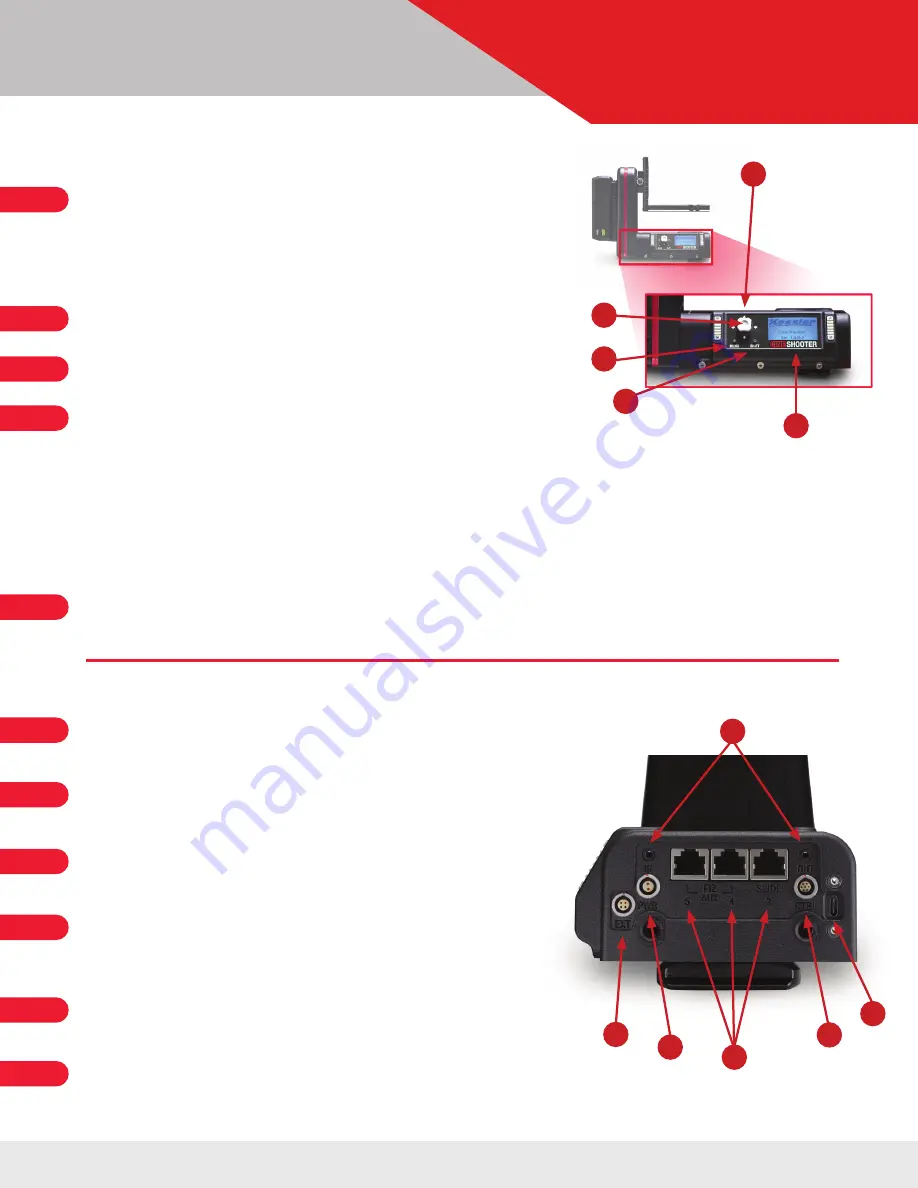
Directional Joystick


For on-board programming and control, the directional joystick can be used to navigate through 
the menu system, and also control the Left/Right movement of the Slider motor, Left/Right 
movement of the pan motor, the Up/Down movement of the tilt motor, spin Left/Right if using a 
turntable, or rotate Left/Right if using a FIZ motor.  

Enter/Select Button


Click the joystick to hit “enter” and make selections within the menu.

Menu Button


Navigate backwards to the previous menu page, or to return to the main menu

Shift Button


When used in conjunction with other buttons, this button allows for secondary controls, and secondary axes 
when utilizing motors driven through a bridged Second Shooter/Plus/Pro controller or wireless 2-axis 
expansion module.

Shift+ Directional arrows increases speed during set to allow moves to be programed faster. (NOTE: The head 
defaults to Quiet Mode. This option is only available when Quiet Mode is disabled.)

Double click Shift to cycle through axes.

Shift toggles backlight on/off during time lapse move.

Backlit Display Screen


Easy-to-navigate display screen that permits onboard programming and operaiton 


EXT Port


This is the CANbus port, and is for wired bridging with accessories such as a Second Shooter Pro/Plus 
controller, and other control devices.

PWR Port


This is an industry-standard 2-pin Lemo power port, and is compatible with AC wall power, as well as a wide 
variety of third-party power solutions that use Pin-1 GND.

I/O Ports


Used to support our Smart Handle and FreeMotion feature, or for triggering cameras (with corresponding 
trigger cable), and connecting external intervalometers and bulb-ramping devices, such as Ramper Pro.

CAT5 Axis Ports


Allows for the CineShooter head to control up to 3 additional external motor axes (typically Slide, FIZ, or 
Turntable), or any other combination of motors available. Each axis connects to corresponding port via 
provided CAT5 cable.

CTRL Port


This is for I2C and UART support, and allows CineShooter to communicate with Dragonframe software, as well 
as hardwired ethernet for remote control via our dedicated web server.

USB-C Port


The USB-C Port is for hardwiring the system for use through Kessler kOS software, as well as hardwire option 
for firmware updates (firmware can also be wirelessly updated via the mobile app as well).

A

B

C

D

E

F

G

H

I

J

K

B

A

C

D

E

F

G

K

ON-BOARD CONTROLS

PORTS & POWER

H

J

I

Содержание CINESHOOTER

Страница 1: ...http kesslercrane com support support kesslercrane com 574 400 2251 COMPLETE USER MANUAL...

Страница 2: ...22 Program Move 21 Manual Move 21 Turntable 22 Settings 22 Setting Up a Move 23 25 Loop Scrub 23 Time Lapse 24 Stop Motion 25 Updating Firmware 26 27 Wireless Update via CineShooter Remote App 26 Man...

Страница 3: ...recommended that users verify they are running the most current version of firmware before operating the CineShooter system for the first time Firmware can be downloaded and installed wirelessly via t...

Страница 4: ...t Display Screen Easy to navigate display screen that permits onboard programming and operaiton EXT Port This is the CANbus port and is for wired bridging with accessories such as a Second Shooter Pro...

Страница 5: ...ESHOOTER PAN TILT HEAD There are many ways to power your CineShooter Depending on what options and accessories you re using you have the option of powering your system via The provided 12v barrel conn...

Страница 6: ...ensor align directly on the tilt nodal plane Also note the height and width of your camera build to ensure clearance when completing a full roll rotation Using an unpowered CineShooter Pan Tilt Head m...

Страница 7: ...that reference point center your camera on the L Bracket or H Frame of the CineShooter NOTE Balancing the camera by shifting your mounting plate may cause you to move the camera off the nodal center...

Страница 8: ...h is located by a notch marking on the L Bracket Arca Mount The horizontal alignment Which is located by the perpendicular line in the crosshair marking on the top of the CineShooter Base as seen in t...

Страница 9: ...amera to avoid any difficulties such as camera crashing on the tilt axis if the camera payload is too high or unbalanced For standard operation you may Mount directly to the horizontal slide slot avai...

Страница 10: ...andard L Bracket using the supplied 20 or 3 8 16 camera screws Just orient your camera 90 degrees so the lens is pointing toward the ports side Keep your Kwik Release Receiver oriented normally but in...

Страница 11: ...Release Receiver located on both the CineShooter head and the end plate TaketheH FrameandslideintobothMiniKwikRelease Receivers Adjust the height and tighten down Mount camera Note The center point fo...

Страница 12: ...d interract with the FreeMotion feature 2 1 2 3 INSTALLATION OPERATION NOTE The Smart Button only activates FreeMotion when programming a move otherwise the function is disengaged and the Smart Button...

Страница 13: ...different gear ratios allowing for the adjustment of overall motor speed operating volume and torque Note The metal pin on the Slider Motor stores the extra pulley when not in uses ADDING AN ADDITIONA...

Страница 14: ...stalling ACCESSORY INSTALLATION CINESHOOTER SYSTEM 1 2 Install the Small Pulley onto the Slider Motor The pre installed belt labled 110XL on the Slider Motor is to be used in most applications However...

Страница 15: ...TER SYSTEM Choose between the following pulley combinations Fast Normal and Slow FAST LOW TORQUE This combination is only compatible with CineSlider and Stealth sliders 6 NORMAL SLOW HIGH TORQUE This...

Страница 16: ...GUIDE ACCESSORY INSTALLATION CINESHOOTER SYSTEM Place screw cap back on slider pulley point Push down pulley if needed and tighten Avoid over tightening Connect CAT5 cable from Slider motor to the SLI...

Страница 17: ...intended for mounting to the Pan motor but can be used on any third party cheeseplate or home made rigging with correct spacing and accepts 20 threading To mount to a slider We recommend using a Kess...

Страница 18: ...built on 15mm rods for the motor to attach to Slide motor onto 15mm rod orienting the motor so the gearing aligns with the desired gear ring Fo cus Iris or Zoom on your lens If the motor has trouble...

Страница 19: ...l reboot and will now say WiFi Enabled 2 3 4 5 1 USING KOS CINESHOOTER SYSTEM USING KOS SOFTWARE To use the CineShooter system with kOS software you will need kOS for CineShooter installed on your Mac...

Страница 20: ...l PAIRING PS4 XBOX CONTROLLER TO CINESHOOTER REMOTE PS4 Controller Hold down the PS button and the Share button simultaneously for 5 seconds or until the lights flash Open your phone settings go to Bl...

Страница 21: ...P BRIDGE MODE Plug in the Bridge Cable from the EXT port on your CineShooter to one of the expansion ports on the bottom of your connecting controller Once the CineShooter Controller are powered on us...

Страница 22: ...this effectively sets the timing from 1ST KEY FRAME to 2ND KEY FRAME and 2ND KEY FRAME to 3RD KEY FRAME The lower the percentage entered the faster the movement will be from 1ST KEY FRAME to 2ND KEY...

Страница 23: ...to continue desired motion SETTINGS This section allows you to select and adjust the following options Operation Mode Standalone Master Slave WiFi settings Quiet Mode settings Control Options Inverts...

Страница 24: ...e it will take to complete an entire camera move Ramp Percentage value indicates the change in speed of the movement over the entire move Often described as an ease in and ease out the indicated time...

Страница 25: ...navigating Up and Down on the joystick Press Down on the joystick and select NEXT 2 3 1 Set the RAMP value by selecting with Enter and adjusting Up and Down with the joystick RAMP Percentage value in...

Страница 26: ...era comes to a stop Select AUTO ADVANCE or Manual ADVANCE by pressing Enter to toggle selections Auto Advance In this mode after the camera fires the system will automatically advance to the next posi...

Страница 27: ...matically check for firmware updates and you will be prompted with an update notification If you haven t previously connected to your CineShooter WIFI network you will need to go to your phone s WIFI...

Страница 28: ...lay FIRM WARE UPDATE READY The Controller will show up as a USB device on your computer titled CineShooter Go to the location where you extracted CINESHOOTER IMG Select CINESHOOTER IMG and drag to the...

Страница 29: ...nge of operation with the widest amount of camera configurations and balances However the CineShooter head may also be used in Standard Mode to mount other utility items to the head such as small ligh...

Страница 30: ...tless ways to configure and use your system We invite you to play and explore to see what other configurations you re able to come up with Discover a great new configuration Share it with us at ideas...

Страница 31: ...rves will also be influencing the motor speed Adjust curves accordingly to achieve desired speed I CAN T PROGRAM CONTROL ANY MOTORS BESIDES PAN AND TILT By default the on board Pan and Tilt axes are s...

Страница 32: ...package until a better balance is achieved See the balancing section of this manual if uncertain I CAN T DO DIAGONAL MOVEMENTS ON THE JOYSTICK The joystick is a single direction interface meaning it...

Страница 33: ...oad from 15 lbs to 25 lbs Exposure The length of time the camera s shutter is open when taking a photograph Delay Amount of time between photos Ramp Rate of change of acceleration deceleration Damping...

Страница 34: ...ther call our sup port team directly at 574 400 2251 or email us at ideas kesslercrane com SHARE YOUR WORK We always love to see both behind the scenes photos and video as well as your final proj ects...

Отзывы: