background image

40 


MBB-M-BA-f-1617


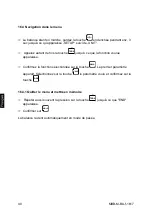
16.4  Navigation dans le menu 


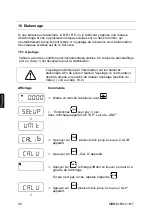
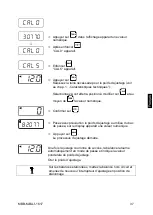
  La balance étant en marche, gardez la touche 

 enclenchée pendant env. 3 

sec jusqu’à ce qu’apparaisse „SETUP“ suivi de „UNIT“.  

   Appelez autant de fois la touche 

TARE

 jusqu’à ce que la fonction voulue 

apparaisse. 

  Confirmez la fonction sélectionnée sur la touche 

HOLD

. Le premier paramètre 

apparaît. Sélectionnez sur la touche 

HOLD

 le paramètre voulu et confirmez sur la 

touche 

TARE


16.4.1 Quitter le menu et mettre en mémoire 

   Répéter aussi souvent la pression sur la touche 

TARE

, jusqu’à ce que "END"  

apparaisse. 

  Confirmer sur 

HOLD


La balance revient automatiquement en mode de pesée. 


Содержание KERN MBB-M series

Страница 1: ...l 49 0 7433 9933 0 Fax 49 0 7433 9933 149 Internet www kern sohn com Betriebsanleitung Babywaage Kleinkindwaage Operating Instructions Baby scale Toddler weighing scale Mode d emploi Balance pèse bébé Balance pour nourrisson KERN MBB M Version 1 7 04 2016 MBB M BA def 1617 ...

Страница 2: ... de idiomas se encuentran online bajo www kern sohn com manuals Trovate altre versioni di lingue online in www kern sohn com manuals Bijkomende taalversies vindt u online op www kern sohn com manuals PL Inne wersje językowe dostępne są online na stronie www kern sohn com manuals FIN Muut kieliversiot ovat saatavilla kotisivuiltamme www kern sohn com manuals SWE Andra språkversioner finns tillgängl...

Страница 3: ...8 3 5 Prüfmittelüberwachung 9 4 Grundlegende Sicherheitshinweise 9 4 1 Hinweise in der Betriebsanleitung beachten 9 4 2 Ausbildung des Personals 9 4 3 Vermeidung von Kontamination 9 5 EMC Richtlinie und Herstellererklärung 10 6 Geräteübersicht 14 7 Anzeigenübersicht 15 8 Tastaturübersicht 16 9 Transport und Lagerung 17 9 1 Kontrolle bei Übernahme 17 9 2 Verpackung Rücktransport 17 10 Auspacken Auf...

Страница 4: ...Montage zur Kleinkindwaage 31 13 Fehlermeldungen 32 14 Wartung Instandhaltung Entsorgung 33 14 1 Reinigen Desinfizieren 33 14 2 Wartung Instandhaltung 33 14 3 Entsorgung 33 15 Kleine Pannenhilfe 34 16 Eichung 35 16 1 Justierung 35 16 2 Justierschalter und Siegelmarken 37 16 3 Überprüfung der Waageneinstellungen bezüglich der Eichung einer Waage 38 16 3 1 Menü Übersicht im Servicemode Justierschalt...

Страница 5: ... Betriebstemperatur 5 C 35 C Lagerungstemperatur 20 C 60 C Luftfeuchtigkeit max 80 nicht kondensierend Stromversorgung Netzadapter 15V 300 mA EN60601 1 Batteriebetrieb 6 x 1 5V Größe AA Betriebsdauer 50 h Auto Off nach 3 min ohne Lastwechsel einstellbar Gehäuse Anzeigegerät B x T x H mm 210 x 110 x 45 Waagschale BxT mm 550 x 240 Gewicht kg netto 4 Eichung nach 2009 23 EC medizinisch Klasse III Med...

Страница 6: ...Zeichen tragen sind in der europäischen Gemeinschaft in der Heilkunde zugelassen Die Zahl im Rahmen M16 Jahreszahl 16 hier als Beispiel dokumentiert das Jahr der Konformitätsbewertung Dieses Zeichen zeigt an dass sich diese Waage auf die Kon formität mit der EU Richtlinie 93 42 EEC für Medizinprodukte bezieht Geräte die dieses Zeichen tragen sind in der europäi schen Gemeinschaft Medizinprodukte S...

Страница 7: ...inisches Gerät mit Anwendungsteil des Typs B Gerät der Schutzklasse II Altgeräte gehören nicht in den Hausmüll Diese können bei den kommunalen Sammelstellen abgegeben werden Temperaturbegrenzung mit Angabe der unteren und oberen Grenze Lagerungstemperatur auf Verpackung Temperatur als Beispiel 15 V DC 300 mA Angabe der Versorgungsspannung der Waage mit Polaritätsan zeige Polarität und Werte als Be...

Страница 8: ... sichtig und mittig in die Waagschale legen bzw das Kleinkind vorsichtig auf die Wägeplatte stellen Nach Erreichen eines stabilen Anzeigewertes kann der Gewichtswert abgelesen werden Kontraindikaton Es ist keine Kontraindikation bekannt 3 2 Bestimmungsgemäße Verwendung Diese Waagen dienen dem Bestimmen des Gewichts von Babys und Kleinkindern in medizinischen Behandlungsräumen Die Waagen sind geeig...

Страница 9: ...auerstoff oder Lachgas entstehen kann Die Waage darf nicht konstruktiv verändert werden Dies kann zu falschen Wägeergebnissen sicherheitstechnischen Mängeln sowie der Zerstörung der Waa ge führen Die Waage darf nur gemäß den beschriebenen Vorgaben eingesetzt werden Abwei chende Einsatzbereiche Anwendungsgebiete sind von KERN schriftlich freizugeben 3 4 Gewährleistung Gewährleistung erlischt bei Ni...

Страница 10: ...nmessstabes zu empfehlen aber nicht zwingend not wendig da die Ermittlung der menschlichen Körpergröße immer mit einer sehr gro ßen Ungenauigkeit behaftet ist 4 Grundlegende Sicherheitshinweise 4 1 Hinweise in der Betriebsanleitung beachten Lesen Sie diese Betriebsanleitung vor der Auf stellung und Inbetriebnahme sorgfältig durch selbst dann wenn Sie bereits über Erfahrungen mit KERN Waagen verfüg...

Страница 11: ...missionen CISPR 11 Gruppe 1 Die MBB15K2DM verwendet die RF Energie nur für ihre interne Funktion Daher sind ihre RF Emissionen sehr gering und können wahrscheinlich keine Störung an nahe stehenden Elektronikgeräten verursachen RF Emissionen CISPR 11 Klasse B Die MBB15K2DM ist für die Verwendung in allen Einrichtungen geeignet einschliesslich Haushaltseinrichtungen und solchen die direkt an das öff...

Страница 12: ... 4 5 1kV Leitung en zu Leitung en 2kV Leitung en an Erde 1kV Differentialmodus Nicht zutreffend Die Qualität des Versorgungsnetzes sollte der üblichen Gewerbe oder Krankenhausumgebung entsprechen Spannungsabfall kurze Unterbrechungen und Spannungsschwankunge n an den Stromversorgungsleit ungen IEC 61000 4 11 5 UT 95 Abfall im UT für 0 5 Zykl 40 UT 60 Abfall im UT für 5 Zykl 70 UT 30 Abfall im UT f...

Страница 13: ...übersichta bestimmt sollten weniger sein als der Ausgleichswert in jedem Frequenzbereichb Möglichkeit von Störungen in der Nähe von Geräten mit dem folgenden Symbol BEACHTE1 Bei 80 MHz und 800 MHz gilt der höhere Frequenzbereich BEACHTE2 Diese Richtlinien gelten eventuell nicht in allen Situationen Elektromagnetische Übertragung wird durch die Absorption und Reflektion von Bauten Gegenständen und ...

Страница 14: ...ers W Trennungsabstand entsprechend der Transmitterfrequenz m 150 kHz bis 80 MHz d 1 2 P 80 MHz bis 800 MHz d 1 2 P 800 MHz bis 2 5 GHz d 2 3 P 0 01 0 12 0 12 0 23 0 1 0 38 0 38 0 73 1 1 2 1 2 2 3 10 3 8 3 8 7 3 100 12 12 23 Für Transmitter mit einer maximalen Ausgangsleistung die oben nicht aufgeführt ist kann der empfohlene Trennabstand d in Metern m geschätzt werden indem man die Gleichung die ...

Страница 15: ...MBB M BA d 1617 14 6 Geräteübersicht 1 Waagschale 2 Libelle 3 Anzeigegerät 4 Stativ optional 5 Wandhalterung 6 Kleinkindwaage ...

Страница 16: ...n Taste drücken Nach kurzer Wartezeit ist Ihre Waage auf Null zurückgesetzt 2 Stabilitätsanzeige Waage ist in einem stabilen Zustand 3 Netzspannung ange schlossen Leuchtet bei Stromversorgung über Netz adapter 4 HOLD Funktion aktiv Hold Speicherfunktion aktiv 5 Nettogewichtsanzeige Nettogewicht wird angezeigt 6 Gewichtswert Anzeige Aktueller Gewichtswert wird angezeigt ...

Страница 17: ... Ein Ausschalten Nullstelltaste Waage wird auf 0 0 kg zurückgesetzt Möglich bis max 2 der Maximallast bei geeichten Waagen bzw 2 oder 100 der Maximallast bei den übrigen Waagen im Menü wählbar HOLD Taste Holdfunktion Ermittlung eines stabilen Wägewertes TARE Taste Waage tarieren ...

Страница 18: ...n 9 2 Verpackung Rücktransport Alle Teile der Originalverpackung für einen eventuell notwendigen Rücktransport aufbewahren Für den Rücktransport ist nur die Originalverpackung zu verwenden Vor dem Versand alle angeschlossenen Kabel und lo sen beweglichen Teile trennen Evt vorgesehene Transportsicherungen wieder anbringen Alle Teile z B Waagschale Netzteil etc gegen Verrutschen und Be schädigung si...

Страница 19: ...t über längere Zeit starker Feuchtigkeit aus Eine nicht erlaubte Betauung Kondensation von Luftfeuchtigkeit am Gerät kann auftreten wenn ein kaltes Gerät in eine wesentlich wärmere Umgebung gebracht wird Ak klimatisieren Sie in diesem Fall das vom Netz getrennte Gerät ca 2 Stunden bei Raumtemperatur statische Aufladung der Waage und der zu wiegenden Person vermeiden Kontakt mit Wasser vermeiden Be...

Страница 20: ...schale Wägeplatte genau waagerecht steht Bei der Waage sind die 4 verstellbaren Gummifüße so einzustellen dass sich die Luftblase der Libelle rechts neben dem Kabelabgang zum Bediengerät in der Mitte befindet 1 Vorderseite der Waagschale Pfeil bis zum Anschlag über die Wägeplatte schieben 2 Feststellschraube an der Un terseite der Waagschale in das Untergehäuse einschrau ben ...

Страница 21: ...M BA d 1617 20 3 Die gegenüberliegende Fest stellschraube zur Fixierung ebenfalls ganz einschrauben 4 Wandhalterung mit den bei liegenden Rändelschrauben am Terminal festschrauben 10 5 Montage Wandhalterung ...

Страница 22: ...tativ mit den 4 Schrauben an der Waagenunterseite befestigen Am Anzeigegerät die beiden seitlichen Gummipfropfen entfernen Anzeigegerät mit den bei den schwarzen Drehknöp fen an der Halterung befes tigen Anzeigegerät mit den Dreh knöpfen positionieren ...

Страница 23: ...n und das Anzeigegerät aus der Halterung zu entnehmen Batteriedeckel unter dem Anzeigegerät abnehmen 6 x 1 5V AA Batterien in die Halterung einlegen Batteriedeckel wieder einsetzen und gegebenen falls das Anzeigegerät mit den schwarzen Drehknöpfen wieder in die Halterung ein schrauben Zur Batterieschonung schaltet die Waage 3 Minuten nach abgeschlossener Wägung automatisch ab Weitere Abschaltzeite...

Страница 24: ...0 7 1 Batteriebetrieb Batteriefachdeckel an Anzeigegeräte rückseite abnehmen Batteriehalterung 1 vorsichtig her ausnehmen 6 Batterien AA einlegen Darauf achten dass die Batterien in der richtigen Richtung eingelegt wurden ...

Страница 25: ...nicht eingeklemmt werden Batteriefachdeckel schließen Sind die Batterien verbraucht erscheint im Display LO Zum Ausschalten OFF ON Taste drücken und sofort Batterien wechseln Wird die Waage längere Zeit nicht benützt Batterien herausneh men und getrennt aufbewahren Auslaufen von Batterieflüssigkeit könnte die Waage beschädigen ...

Страница 26: ...nicht direkt zugänglich ist sind für das Öffnen des Batteriefaches die beiden schwarzen Drehknöpfe an den beiden Seiten des Anzeigegerätes zu entfernen und das Anzeigegerät aus der Halterung zu entnehmen Batteriefachdeckel an Anzeigegeräte rückseite abnehmen Batteriehalterung 1 vorsichtig her ausnehmen Stecker 2 vorsichtig vom Anschluß CN 4 3 abziehen 1 ...

Страница 27: ...ingeklemmt werden Batteriefachdeckel schließen Ist der Akku erschöpft erscheint im Display LO Der Akku wird über das mitgelieferte Steckernetzteil geladen Ladezeit 14 h für Komplettladung Wird die Waage längere Zeit nicht benützt Akku herausnehmen und getrennt aufbewahren Auslaufen von Flüssigkeit könnte die Waage beschädigen ...

Страница 28: ...chend der Vorschrift EN 60601 1 verwendet werden 10 9 Erstinbetriebnahme Um bei elektronischen Waagen genaue Wägeergebnisse zu erhalten müssen die Waagen ihre Betriebstemperatur siehe Anwärmzeit Kap 1 erreicht haben Die Waage muss für diese Anwärmzeit an die Stromversorgung Netzanschluss Akku oder Batterie angeschlossen und eingeschaltet sein Die Genauigkeit der Waage ist abhängig von der örtliche...

Страница 29: ... SETUP wird angezeigt Mit TARE und HOLD die Parameter wie folgt be schrieben auswählen Mit TARE ausgewählten Parameter bestätigen AOFF Auto off 120 sec 180 sec 240 sec 300 sec OFF bUrr Akustisches Signal ON OFF End Menü verlassen Wenn End ausgewählt ist mit der HOLD Taste das Setup beenden 0 0 kg ...

Страница 30: ...f die Wägeplatte stellen Stillstandsanzeige abwarten dann das Wägeresultat able sen Ist das Baby Kleinkind schwerer als der max Wägebereich erscheint in der Anzeige Err Überlast 12 2 Tarieren Das Eigengewicht beliebiger Vorlasten lässt sich auf Knopfdruck wegtarieren damit bei nachfolgenden Wägungen das tatsächliche Gewicht des Babys Kleinkinds ange zeigt wird 0 5 Gegenstand z B Handtuch oder Unte...

Страница 31: ...ich nicht ruhig auf der Waage befindet 0 0 0 Waage mit OFF ON einschalten Stillstandsanzeige abwarten HOLD 2 3 Baby mittig in die Waagschale legen bzw Kleinkind mittig auf die Wägeplatte stellen HOLD drücken In der Anzeige beginnt ein Dreieck zu blinken während dieser Zeit nimmt die Waage mehrere Messwerte auf und zeigt anschließend den errechneten Mittelwert an 2 3 Durch wiederholtes Drücken der ...

Страница 32: ...e Liegefläche auch als Kleinkindwaage ver wendbar Die Oberfläche besteht aus robustem ABS Kunststoff der hygienisch und leicht zu desinfizieren ist 12 4 1 Montage zur Kleinkindwaage Die gegenüberliegenden Feststellschrauben entfer nen Waagschale von der Wägeplatte schieben ...

Страница 33: ... ERRL Unterlast Das Gewicht auf der Waagschale ist zu niedrig Bitte Gewicht erhöhen Bleibt die Fehlermeldung erhalten Händler benachrichtigen Die Waagschale war während des Einschaltens belastet Waagschale entlasten ERR Überlast Zu hohe Last auf der Waagschale ...

Страница 34: ...regelmäßig gereinigt werden Empfehlung Nach jeder Wiegung welche eine potenti elle Kontamination nach sich ziehen könnte z B bei Wiegungen mit direktem Haut kontakt Gerät nicht mit Desinfektionsmittel besprühen Darauf achten dass kein Desinfektionsmittel in das Innere der Waage dringt Wir empfehlen Wischdesinfektion Verunreinigungen sofort entfernen 14 2 Wartung Instandhaltung Das Gerät darf nur v...

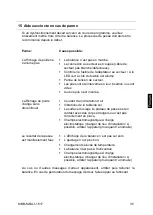
Страница 35: ... Die Gewichtsanzeige än dert sich fortwährend Luftzug Luftbewegungen Vibrationen des Tisches Bodens Die Sitzfläche Wägeplatte hat Berührung mit Fremdkörpern oder ist nicht richtig aufgesetzt Elektromagnetische Felder Statische Aufladung anderen Aufstellort wählen falls möglich störendes Gerät ausschalten Das Wägeergebnis ist offensichtlich falsch Die Waagenanzeige steht nicht auf Null Die Justieru...

Страница 36: ...rmzeit siehe Kap 1 zur Sta bilisierung ist erforderlich Bei geeichten Waagen ist die Justierung per Schalter gesperrt Um die Justierung durchführen zu können muss der Schalter in Justierposition Mittelstellung gebracht werden s Kap 16 2 Anzeige Bedienung a z000 Waage mit OFF ON einschalten SETUP UNKT für ca 3 sec drücken in der Anzeige erscheint SETUP gefolgt von UNIT CAL K B TARE so oft drücken b...

Страница 37: ...azu mit HOLD die zu verändernde Stelle und mit TARE den Zahlenwert auswählen Mit bestätigen 82077 Justiergewicht vorsichtig in die Mitte der Waagschale stel len im Display erscheint ein Zahlenwert HOLD drücken Der Justiervorgang wird gestartet 12 0 Nach erfolgreicher Justierung kehrt die Waage automatisch in den Wägemodus zurück und zeigt den Gewichtswert des Jus tiergewichtes an Justiergewicht ab...

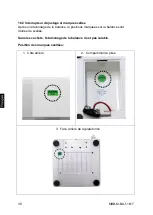
Страница 38: ...Siegelmarken Wenn eine Eichung der Waage vorgenommen wurde sind die markierten Positionen an der Waage versiegelt Die Eichung der Waage ist ohne die Siegelmarken ungültig Position der Siegelmarken 1 Rückseite 2 Batteriefach 3 Rückseite Plattform ...

Страница 39: ...en Dazu muss der Justierschalter in die Justierposition gebracht werden Im Servicemode können alle Parameter der Waage verändert werden Servicepara meter dürfen nicht verändert werden da hierdurch die Waageneinstellungen beein flusst werden können 16 3 1 Menü Übersicht im Servicemode Justierschalter in Justierposition Die Übersicht dient lediglich der Überprüfung der eingestellten Parameter durch ...

Страница 40: ...betätigen bis die gewünschte Funktion erscheint Ausgewählte Funktion mit der HOLD Taste bestätigen Der erste Parameter er scheint Mit der HOLD Taste gewünschten Parameter auswählen und mit der TARE Taste bestätigen 16 4 1 Menü verlassen und speichern TARE so oft drücken bis END erscheint Mit HOLD bestätigen Die Waage kehrt automatisch in den Wägemodus zurück ...

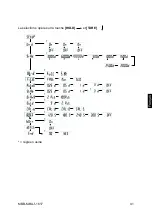
Страница 41: ...MBB M BA d 1617 40 Die Auswahl erfolgt mit der HOLD und TARE Taste Werkseinstellung ...

Страница 42: ...waage Einbereichswaage Mehrbereichswaage Filter schnell normal langsam Auto Zero Tracking 0 25d 0 5d 1d 3d OFF Stabilisierungsbereich 0 25d 0 5d 1d 3d OFF Nullbereich 2 100 Überlastbereich 9d 2 Justierung Auto off 120 sec 180 sec 240 sec 300 sec OFF Akustisches Signal ON OFF Rücksetzung auf Werkseinstellung Default Setup Menü verlassen ...

Страница 43: ...efristet Säuglingswaagen und mechanische Geburtsgewichtswaagen 4 Jahre Bettenwaagen 2 Jahre Rollstuhlwaagen 2 Jahre Als Krankenhäuser werden auch Rehakliniken und Gesundheitsämter behandelt 4 Jahre Eichgültigkeit Keine Krankenhäuser Eichgültigkeit nicht befristet sind Dialysestationen Pflege heime und Arztpraxen Angaben aus Die Eichverwaltung informiert Waagen in der Heilkunde ...

Страница 44: ... Test Resources 8 4 Basic Safety Precautions 9 4 1 Pay attention to the instructions in the Operation Manual 9 4 2 Personnel training 9 4 3 Preventing contamination 9 5 EMC guidance and manufacturer s declaration 10 6 Appliance overview 14 7 Overview of displays 15 8 Keyboard overview 16 9 Transportation Storage 17 9 1 Testing upon acceptance 17 9 2 Packaging return transport 17 10 Unpacking Setup...

Страница 45: ...nction 30 12 4 Toddler weighing scales 31 12 4 1 Assembly of toddler weighing scales 31 13 Error messages 32 14 Service maintenance disposal 33 14 1 Cleaning Disinfection 33 14 2 Service maintenance 33 14 3 Disposal 33 15 Instant help 34 16 Verification 35 16 1 Adjustment 35 16 2 Adjustment controls and seals 37 16 3 Checking the balance verification settings 38 16 3 1 Menu overview in service mod...

Страница 46: ...re 5 C 35 C Storage temperature 20 C 60 C Humidity of air max 80 not condensing Electric Supply Line adapter 15V 300 mA EN60601 1 Battery operation 6 x 1 5V size AA Operating life 50 h Auto Off After 3 min without load change adjustable Housing display unit B x D x H mm 210 x 110 x 45 Weighing pan WxD mm 550 x 240 Weight kg net 4 Calibrated in accordance with 2009 23 EC Medical grade III Medical p...

Страница 47: ... with EU Directive 2014 31 EU for non automatic weighing balances Weighing balances bearing this marking are licensed for medical purposes in the European Union The number inside the frame M16 example shown year 16 documents the year of conformity assessment This marking shows that this weighing balance is in conformity with EU Directive 93 42 EEC and inside the European Community is classified as...

Страница 48: ...duct including address Electro medical appliance with attachment for type B Device protection category II Dispose of old appliances separately from your household waste Instead take them to communal collection points Temperature limit indicating the upper and the lower limit storage temperature on packaging Temperature serving as an example 15 V DC 300 mA Display of supply voltage for scales with ...

Страница 49: ...ctice area Operated as non automatic weighing instrument which means that you have to carefully put the baby or the toddler in the centre of the weighing pan Once a steady display value is shown you can read the weight value Contra indication No contraindication known 3 2 Proper use These scales serve as a means of determining the weight of babies or toddlers in medical treatment rooms The scales ...

Страница 50: ...appliance is used outside the described uses The appliance is modified or opened mechanical damage and damage caused by media liquids Natural wear and tear The appliance is improperly set up or incorrectly electrically connected The measuring system is overloaded Dropping the balance 3 5 Monitoring of Test Resources In the framework of quality assurance the measuring related weighing properties of...

Страница 51: ... binding translation The original German is binding 4 2 Personnel training The medical staff must apply and follow the operating instructions for proper use and care of the product 4 3 Preventing contamination To prevent cross contamination fungal skin infections clean the seating surface or weighing platform every time Recommendation after a weighing procedure that could potentially result in con...

Страница 52: ...guidance RF emissions CISPR 11 Group 1 The MBB15K2DM uses RF energy only for its internal function Therefore its RF emissions are very low and are not likely to cause any interference in nearby electronic equipment RF emissions CISPR 11 Class B The MBB15K2DM is suitable for use in all establishments including domestic establishments and those directly connected to the public low voltage power supp...

Страница 53: ...kV line s to earth 1kV differential mode Not applicable Mains power quality should be that of a typical commercial or hospital environment Voltage Dips short interruptions and voltage variations on power supply input lines IEC 61000 4 11 5 UT 95 dip in UT for 0 5 cycle 40 UT 60 dip in UT for 5 cycles 70 UT 30 dip in UT for 25 cycles 5 UT 95 dip in UT for 5 s 5 UT 95 dip in UT for 0 5 cycle 40 UT 6...

Страница 54: ...xed RF transmitters as determined by an electromagnetic site surveya should be less than the compliance level in each frequency rangeb Interference may occur in the vicinity of equipment marked with the following symbol NOTE1 At 80 MHz and 800 MHz the higher frequency range applies NOTE2 These guidelines may not apply in all situations Electromagnetic propagation is affected by absorption and refl...

Страница 55: ...W Separation distance according to frequency of transmitter m 150 kHz to 80 MHz d 1 2 P 80 MHz to 800 MHz d 1 2 P 800 MHz to 2 5 GHz d 2 3 P 0 01 0 12 0 12 0 23 0 1 0 38 0 38 0 73 1 1 2 1 2 2 3 10 3 8 3 8 7 3 100 12 12 23 For transmitters rated at a maximum output power not listed above the recommended separation distance d in metres m can be estimated using the equation applicable to the frequenc...

Страница 56: ...14 MBB M BA e 1617 6 Appliance overview 1 Weighing pan 2 Bubble level 3 Display unit 4 Stand optional 5 Wall bracket 6 Toddler weighing scales ...

Страница 57: ...ss the button Your balance will be set to zero after a short standby time 2 Stability display Scales are in a steady state 3 Power supply connected Illuminates in the event of power supply via mains adaptor 4 HOLD function active Hold Save function active 5 Net weight display Net weight will be displayed 6 Weight value display Current weight value will be displayed ...

Страница 58: ...tch Turn on off Zero setting key Balance will be reset to 0 0 kg Possible up to max 2 of maximum load for verified scales or 2 or 100 of maximum load for all other scales selectable via menu HOLD button Hold function Calculation of a stable weight value TARE button Tare balance ...

Страница 59: ...r possible visible damage 9 2 Packaging return transport Keep all parts of the original packaging for a possibly required return Only use original packaging for returning Prior to dispatch disconnect all cables and remove loose mobile parts Reattach possibly supplied transport securing devices Secure all parts such as the weighing pan power unit etc against shifting and damage ...

Страница 60: ...vice to extreme dampness for longer periods of time Non permitted condensation condensation of air humidity on the appliance may occur if a cold appliance is taken to a considerably warmer environment In this case acclimatize the disconnected appliance for ca 2 hours at room temperature Avoid static charge of the balance and of the person to be weighed Avoid contact with water Major display deviat...

Страница 61: ... weighing plate is exactly horizontal Set the adjustable rubber feet of the baby scale in such a way that the air bubble inside the spirit level on the right next to the cable outlet to the control unit is in the centre 1 Push the front of the weighing pan arrow up to the stop across the weighing platform 2 Screw in the locking screw at the bottom of the weighing pan into the mount ...

Страница 62: ...20 MBB M BA e 1617 3 Then screw in the corresponding locking screw to achieve a tight fit 4 Use the supplied knurled screws to attach the wall bracket to the terminal 10 5 Assemble the wall bracket ...

Страница 63: ...nal Use the 4 screws to attach the stand to the bottom of the scale Remove the two lateral rubber plugs from the display unit Secure the display unit with the two black rotary knobs to the fixing device Position display unit with the rotary knobs ...

Страница 64: ...he battery compartment and remove the display unit from the holder Remove battery cover from under the display unit Insert 6 x 1 5V AA batteries into the holder Replace battery cover and screw the display unit back into the holder using the black rotary knobs In order to save the battery the balance switches automatically off after 3 minutes without weighing Further shutdown times can be set in th...

Страница 65: ...17 23 10 7 1 Battery operation Lift off the battery cover on the back of the display unit Carefully take out the battery holder 1 Insert 6 batteries AA Ensure that the batteries are inserted in the correct direction ...

Страница 66: ...re not squeezed Close the battery cover If the batteries are run down LO appears in the display To turn off scales press the OFF ON button and immediately change the batteries If the balance is not used for a longer time take out the batteries and store them separately Leaking battery liquid could damage the balance ...

Страница 67: ... of the display unit is not directly accessible remove the two black rotary knobs from both sides of the display unit in order to open the battery compartment and remove the display unit from the holder Lift off the battery cover on the back of the display unit Carefully take out the battery holder 1 Carefully pull out plug 2 from the connection CN 4 3 1 ...

Страница 68: ...d Close the battery cover If the rechargeable battery is exhausted LO is displayed The rechargeable battery is loaded via the provided plug in power supply unit loading time 14 h for a complete loading If the balance is not used for a longer time take out the rechargeable battery and store it separately Leaking liquid could damage the balance ...

Страница 69: ...sed in compliance with Directive EN 60601 1 10 9 Initial Commissioning In order to obtain exact results with the electronic balances your balance must have reached the operating temperature see warming up time chap 1 During this warming up time the balance must be connected to the power supply mains accumulator or battery and be switched on The accuracy of the balance depends on the local accelera...

Страница 70: ...or 3 sec SETUP will be displayed Select parameter by using TARE and HOLD as described Confirm the selected parameter by pressing TARE AOFF Auto off 120 sec 180 sec 240 sec 300 sec OFF bUrr Audio signal ON OFF End Exit menu If End is selected finish set up by pressing the HOLD button 0 0 kg ...

Страница 71: ...ng plate Wait for the rest position display then read the weighing result If the baby toddler is heavier than the maximum weighing range Err overload will appear on the display screen 12 2 Taring The tare weight of any preloads can be deducted by pressing a button so that the actual weight of the baby toddler is displayed in subsequent weighings 0 5 Put object such as towel or padding on the weigh...

Страница 72: ... the latter is not keeping still on the scales 0 0 0 Start balance by pressing OFF ON Wait for the rest position display HOLD 2 3 Put baby toddler in the centre of the weighing pan plate Press HOLD A triangle starts to flash in the display during this time the balance will record several measuring values and will then display the calculated average value 2 3 By pressing the HOLD button several tim...

Страница 73: ...e used as toddler weighing scales by removing the resting surface The surface consists of robust ABS plastic material hygienically to be defected 12 4 1 Assembly of toddler weighing scales Remove the opposite fastening screws Shift the weighing pan from the weighing plate ...

Страница 74: ...scription ERRL Underload Weight on weighing pan is too low Please increase weight If the error message remains inform manufacturer The weighing pan was bearing a load during start up unload weighing pan ERR Overload Weight on weighing pan too heavy ...

Страница 75: ... weighing platform Recommendation after a weighing procedure that could potentially result in contamination e g after weighing that involves direct skin contact Do not spray disinfectants onto appliance Make sure that disinfectant does not penetrate the interior of the appliance We recommend wiping for disinfection Remove dirt immediately 14 2 Service maintenance The appliance may only be opened b...

Страница 76: ...e displayed weight is permanently changing Draught air movement Table floor vibrations The seat surface weighing plate is in contact with foreign bodies or is not correctly positioned Electromagnetic fields static charging choose different location switch off interfering device if possible The weighing result is obviously incorrect The display of the balance is not at zero Adjustment is no longer ...

Страница 77: ...e chapter 1 is required for stabilization In calibrated balances the adjustment function is switch locked In order to carry out adjustments the switch must be turned to adjustment position centre position see chapter 16 2 Display Operation a z000 Start balance by pressing OFF ON SETUP UNKT Press for approx 3 sec in the display appears SETUP followed by UNIT CAL K B Press TARE repeatedly until CAL ...

Страница 78: ...nged with HOLD and the numeric value using TARE Acknowledge by 82077 Place the adjustment weight carefully in the centre of the weighing pan and a numerical value will appear in the display Press HOLD the adjustment process is started 12 0 The balance will automatically return to Weighing mode upon successful completion of the adjustment and will display the weight of the adjustment weight Take aw...

Страница 79: ...stment controls and seals After a verification the balance is sealed at the indicated positions Verification of the balance is invalid without the seal Position of the official seals 1 Rear 2 Battery compartment 3 Rear of platform ...

Страница 80: ...er to service mode To achieve the effect turn the adjustment switch to adjustment position In the service mode all parameters of the balance can be modified The service parameters may not be modified as this could damage the balance settings 16 3 1 Menu overview in service mode adjustment switch in adjustment position This overview is merely for checking the parameters set by the appropriate Burea...

Страница 81: ... as necessary until the required function is displayed Press the HOLD button to confirm the selected function The first parameter will be displayed Press the HOLD button to select the required parameter and confirm by pressing the TARE button 16 4 1 Exit menu and save Press the TARE button repeatedly until END appears Acknowledge by HOLD The balance returns automatically into weighing mode ...

Страница 82: ...40 MBB M BA e 1617 Press the HOLD and TARE buttons to make the selection default setting ...

Страница 83: ... balance selection Single range balance Multi range balance Filter fast normal slow Auto Zero Tracking 0 25d 0 5d 1d 3d OFF Stabilisation range 0 25d 0 5d 1d 3d OFF Zero range 2 100 Overload range 9d 2 Adjustment Auto off 120 sec 180 sec 240 sec 300 sec OFF Audio signal ON OFF Resetting to factory setting Default setup Exit menu ...

Страница 84: ...cales and mechanical birth weight scales 4 year Bed scales 2 year Wheelchair scales 2 year Rehab clinics and local health authorities are treated as hospitals 4 years verification validity Not treated as hospitals verification validity not limited are dialysis stations nursing homes and doctor s surgeries Data source Bureau of Standards News Weighing Instruments in Medicine ...

Страница 85: ......

Страница 86: ... de contrôle 9 4 Indications de sécurité générales 10 4 1 Observez les indications du mode d emploi 10 4 2 Formation du personnel 10 4 3 Prévention de la contamination 10 5 Directive EMC et déclaration du fabricant 11 6 Aperçu de l appareil 15 7 Vue d ensemble des affichages 16 8 Vue d ensemble du clavier 17 9 Transport et stockage 18 9 1 Contrôle à la réception de l appareil 18 9 2 Emballage réex...

Страница 87: ...e da la balance pour nourrisson 32 13 Messages d erreur 33 14 Maintenance entretien élimination 34 14 1 Nettoyage Désinfection 34 14 2 Maintenance entretien 34 14 3 Elimination 34 15 Aide succincte en cas de panne 35 16 Etalonnage 36 16 1 Ajustage 36 16 2 Interrupteur d ajustage et marque scellée 38 16 3 Contrôle des réglages de la balance concernant l étalonnage d une balance 39 16 3 1 Vue d ense...

Страница 88: ...ment 5 C 35 C Temp d entreposage 20 C 60 C Degré hygrométrique max 80 non condensant Alimentation en courant Adaptateur secteur 15V 300 mA EN60601 1 Fonctionnement sur piles 6 x 1 5V format AA durée de fonctionnement 50 h Auto Off après 3 min sans changement de charge réglable Boîtier afficheur larg x prof x haut mm 210 x 110 x 45 Bac de pesée larg x prof mm 550 x 240 Poids kg net 4 Etalonnage sel...

Страница 89: ...ruments de pesage à fonctionnement non automatique Les balances qui portent cette marque sont homologuées dans la Communauté Européenne pour leur usage en médecine Le chiffre dans le cadre M16 année 16 ici à titre d exemple documente l année de l évaluation de la conformité Ce signe indique que la balance se rapporte à la conformité de la directive UE 93 42 EEC pour les produits médicaux Les appar...

Страница 90: ...sse Appareil électromédical avec applicateur du type B Outil de la classe de protection II N évacuez pas les appareils usagés par les ordures ménagères Ils peuvent être remis aux stations de collecte communales Limitation de température avec indication de la limite inférieure et supérieure température de stockage sur l emballage la température à titre d exemple 15 V DC 300 mA Indication de la tens...

Страница 91: ...e non automatique ce qui revient à dire posez le bébé ou le nourrisson avec précaution au centre du bac de pesée La valeur pondérale peut être lue une fois la valeur affichée stabilisée Contre indication Il n y a pas de contre indication connue 3 2 Utilisation conforme aux prescriptions Ces balances servent à la détermination du poids des bébés ou nourrissons en salles de traitement médicales Les ...

Страница 92: ...ndroits où des explosions sont susceptibles de se produire Le modèle série n est pas équipé d une protection contre les explosions Il faut observer que un mélange inflammable se peut produire aussi des agents d anesthésie avec de l oxygène ou du gaz hilarant Toute modification constructive de la balance est interdite Ceci pourrait provoquer des résultats de pesée erronés des défauts sur le plan de...

Страница 93: ... contrôlées à intervalles réguliers dans le cadre des contrôles d assurance qualité A cette fin l utilisateur responsable doit définir un intervalle de temps approprié ainsi que le type et l étendue de ce contrôle Des informations concernant la vérification des moyens de contrôle des balances ainsi que les poids de contrôle nécessaires à cette opération sont disponibles sur le site KERN www kern s...

Страница 94: ...oi le document allemand original 4 2 Formation du personnel Pour l utilisation et l entretien réglementaire du produit le personnel médical professionnel doit appliquer et observer les consignes données dans la notice d utilisation 4 3 Prévention de la contamination Pour prévenir la contamination croisée mycose la surface du siège voire le plateau de pesée doivent être soumis à un nettoyage à inte...

Страница 95: ... 1 Le MBB15K2DM utilise l énergie des ondes radio uniquement pour son fonctionnement interne Par conséquent ses émissions d ondes radio sont très faibles et ne sont pas susceptibles de causer des interférences dans les équipements électroniques à proximité Emissions RF CISPR 11 Catégorie B Le MBB15K2DM peut être utilisé dans tous les établissements y compris les établissements domestiques et ceux ...

Страница 96: ...l Ne s applique pas La qualité de l alimentation secteur doit être celle d un environnement commercial ou hospitalier typique Creux de tension brèves interruptions et variations de la tension aux lignes d entrée de l alimentation en puissance IEC 61000 4 11 5 UT 95 dip in UT pour 0 5 cycle 40 UT 60 dip in UT pour 5 cycles 70 UT 30 dip in UT pour 25 cycles 5 UT 95 dip in UT pour 5 s 5 UT 95 dip in ...

Страница 97: ...a électromagnétique doivent être inférieures au niveau de conformité pour chaque gamme de fréquence b Une interférence peut se produire à proximité d équipements portant le sigle suivant NOTA1 A 80 MHz et 800 MHz s applique la bande de fréquence supérieure NOTA2 Les présentes lignes directrices ne s appliquent pas dans toutes les situations La propagation électromagnétique est affectée par l absor...

Страница 98: ...tteur W Distance de séparation selon la fréquence de l émetteur en m 150 kHz à 80 MHz d 1 2 P 80 MHz à 800 MHz d 1 2 P 800 MHz à 2 5 GHz d 2 3 P 0 01 0 12 0 12 0 23 0 1 0 38 0 38 0 73 1 1 2 1 2 2 3 10 3 8 3 8 7 3 100 12 12 23 Pour les émetteurs avec une puissance de sortie maximale nominale non répertoriés ci dessus la distance de séparation recommandée d en mètres m peut être estimée à l aide de ...

Страница 99: ...MBB M BA f 1617 15 6 Aperçu de l appareil 1 Bac de pesée 2 Bulle d air 3 Appareil d affichage 4 Statif optional 5 Fixation murale 6 Balance pour nourrisson ...

Страница 100: ...Après un court temps d attente votre balance est remise à zéro 2 Affichage de la stabilité La balance est dans un état stable 3 Tension du secteur branchée S allume avec une alimentation en courant par l adaptateur du réseau 4 Fonction HOLD active Fonction hold fonction mémoire activée 5 Afficheur du poids net Le poids net est affiché 6 Afficheur de la valeur pondérale La valeur pondérale actuelle...

Страница 101: ...uche de mise à zéro La balance est remise à 0 0 kg Possible jusqu au max de 2 de la charge maximale sur les balances étalonnées voire 2 ou 100 de la charge maximale sur les autres balances sélection dans le menu Touche HOLD Fonction hold détermination d une valeur de pesée stable Touche TARE Tarage de la balance ...

Страница 102: ...es 9 2 Emballage réexpédition Conservez tous les éléments de l emballage d origine en vue d un éventuel transport en retour L appareil ne peut être renvoyé que dans l emballage d origine Avant expédition démontez tous les câbles branchés ainsi que toutes les pièces détachées et mobiles Evtl remontez les cales de transport prévues Calez toutes les pièces p ex bac de pesée bloc d alimentation etc co...

Страница 103: ...e N exposez pas trop longtemps l appareil à une humidité élevée L installation d un appareil froid dans un endroit nettement plus chaud peut provoquer l apparition d une couche d humidité condensation de l humidité atmosphérique sur l appareil non autorisée Dans ce cas laissez l appareil coupé du secteur s acclimater à la température ambiante pendant env 2 heures Evitez la formation de charges sta...

Страница 104: ...e le plateau de pesée se trouve exactement à l horizontale Sur le balance réglez les 4 pieds en caoutchouc réglables de façon à ce que la bulle d air du niveau à bulle d air à droite à côté de la sortie du câble vers l organe de commande se trouve au centre 1 Glissez le devant du bac de pesée flèche jusqu en butée au dessus du plateau de pesée 2 Engagez la vis de blocage du bas du bac de pesée dan...

Страница 105: ... f 1617 21 3 Engagez également complètement la vis de blocage qui lui fait face pour la fixation 4 Vissez à fond le support mural par les deux vis à tête moletée jointes au terminal 10 5 Montage fixation murale ...

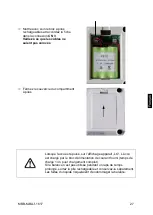
Страница 106: ...st pas directement accessible les deux boutons tournants noirs des deux côtés de l afficheur sont à retirer pour ouvrir le compartiment des piles et l afficheur est à retirer de son support Retirez le couvercle du compartiment des piles du dessous de l afficheur Insérez 6 piles x 1 5V AA dans le support Remettez le couvercle du compartiment des piles en place et vissez de nouveau l appareil d affi...

Страница 107: ...MBB M BA f 1617 23 Branchement CN 3 de pile rechargeable Branchement CN 4 de piles AA x 6 ...

Страница 108: ...1 Fonctionnement à pile Retirez le couvercle du compartiment à piles où l arrière des appareils Retirez le support de pile 1 avec soin Insérer 6 batteries AA Veiller à ce que les batteries soient insérées dans le sens correct ...

Страница 109: ...le couvercle du compartiment à piles Lorsque les piles sont usées apparaît sur l affichage LO Pour la mise hors circuit appuyez sur la touche OFF ON et remplacez sur le champ les piles Si la balance n est pas utilisée pendant un laps de temps prolongé sortez les piles et conservez les séparément Les fuites du liquide des piles risqueraient d endommager la balance ...

Страница 110: ...ichage n est pas directement accessible les deux boutons tournants noirs des deux côtés de l appareil d affichage sont à retirer pour ouvrir le compartiment des piles et l appareil d affichage est à retirer de son support Retirez le couvercle du compartiment à piles de l arrière des appareils Enlevez le support de pile 1 avec soin Retirez avec précaution la fiche 2 de la connexion CN 4 3 1 ...

Страница 111: ...uvercle du compartiment à piles Lorsque l accu est épuisé sur l affichage apparaît LO L accu est chargé par le bloc d alimentation de courant fourni temps de charge 14 h pour chargement complet Si la balance n est pas utilisée pendant un laps de temps prolongé sortez la pile rechargeable et conservez la séparément Les fuites du liquide risqueraient d endommager la balance ...

Страница 112: ...formément à la réglementation EN 60601 1 susceptibles d être utilisés 10 9 Première mise en service Pour obtenir des résultats exacts de pesée avec les balances électroniques les balances doivent avoir atteint sa température de service voir temps d échauffement au chap 1 Pour ce temps de chauffe la balance doit être branché à l alimentation de courant secteur accumulateur ou pile La précision de l...

Страница 113: ...our 3 sec SETUP est affiché Sélectionnez sur TARE et HOLD les paramètres comme décrit ci après Validez sur TARE les paramètres sélectionnés AOFF Auto off 120 sec 180 sec 240 sec 300 sec OFF bUrr Signal sonore ON OFF End Quitter le menu Lorsque End est sélectionné terminez sur la touche HOLD le setup 0 0 kg ...

Страница 114: ... la stabilité puis relevez le résultat de la pesée Si le bébé le nourrisson pèse davantage que la plage de pesée max apparaît sur l affichage Err surcharge 12 2 Tarage Le poids propre d une quelconque charge antérieure peut être saisi par la tare sur simple pression d un bouton afin que le pesage consécutif affiche le poids effectif du bébé 0 5 Posez l objet p ex une serviette ou une alèze sur le ...

Страница 115: ... le nourisson même s il ne se tient pas tranquille sur la balance 0 0 0 Mettre en marche la balance avec OFF ON Attendez l affichage de la stabilité HOLD 2 3 Installez le bébé le nourisson au centre du bac de pesée plateau de pesée Appuyer sur HOLD Sur l affichage commence à clignoter un triangle tandis que la balance enregistre en même temps plusieurs valeurs de mesure et indique ensuite la valeu...

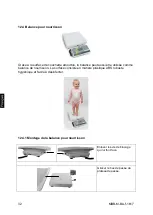
Страница 116: ...le la balance peut aussi être utilisée comme balance de nourrisson La surface consiste en matière plastique ABS robuste hygiénique et facile à désinfecter 12 4 1 Montage da la balance pour nourrisson Enlever les vis de blocage qui lui font face Glisser le bac de pesée du plateau de pesée ...

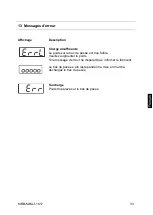
Страница 117: ...nsuffisante Le poids sur le bac de pesée est trop faible Veuillez augmenter le poids Si le message d erreur ne disparaît pas informer le fabricant Le bac de pesée a été lesté pendant la mise en marche déchargez le bac de pesée ERR Surcharge Poids trop élevé sur le bac de pesée ...

Страница 118: ...Recommandation Après chaque pesée qui pourrait entraîner une contamination potentielle p ex dans le cas de pesées avec contact direct de la peau Ne pulvérisez pas de produits de désinfection sur l appareil Veillez à ce que le produit de désinfection ne pénètre pas à l intérieur de la balance Nous conseillons d essuyer avec un désinfectant Enlevez les salissures sur le champ 14 2 Maintenance entret...

Страница 119: ...du poids change sans discontinuer Courant d air circulation d air Vibrations de la table du sol La surface du siège le plateau de pesée est en contact avec des corps étrangers ou n est pas correctement en place Champs électromagnétiques charge électrostatique changer de lieu d installation si possible arrêter l appareil provoquant l anomalie Le résultat de la pesée est manifestement faux L afficha...

Страница 120: ...n L ajustage est bloqué par l interrupteur sur les balances étalonnées Afin de pouvoir réaliser l ajustage le commutateur doit être amené en position de réaliser l ajustage position du milieu voir au chap 16 2 Affichage Commande a z000 Mettre en marche la balance avec OFF ON SETUP UNKT Enclenchez pour env 3 sec dans l affichage apparaît SETUP suivi de UNIT CAL K B Appuyer sur TARE plusieurs fois j...

Страница 121: ... sur HOLD et au moyen de TARE la valeur numérique Confirmer sur 82077 Posez avec précaution le poids d ajustage au milieu du bac de pesée sur le display apparaît une valeur numérique Appuyer sur HOLD Le processus d ajustage démarre 12 0 Une fois l ajustage couronné de succès la balance retourne automatiquement en mode de pesée et indique la valeur pondérale du poids d ajustage Oter le poids d ajus...

Страница 122: ...ellée Après un étalonnage de la balance le positions marquées sur la balance sont dotées de scellés Sans les cachets l étalonnage de la balance n est pas valable Position des marques scellées 1 Côté arrière 2 Compartiment à piles 3 Face arrière de la plateforme ...

Страница 123: ...de service L interrupteur d ajustage doit être amené en position d ajustage Dans le mode de service tous les paramètres de la balance se peuvent modifier Les paramètres de service ne doivent pas être modifiés parce que cela modifie les réglages de la balance 16 3 1 Vue d ensemble du menu en mode de maintenance interrupteur d ajustage en position d ajustage La vue d ensemble sert seulement au contr...

Страница 124: ...squ à ce que la fonction voulue apparaisse Confirmez la fonction sélectionnée sur la touche HOLD Le premier paramètre apparaît Sélectionnez sur la touche HOLD le paramètre voulu et confirmez sur la touche TARE 16 4 1 Quitter le menu et mettre en mémoire Répéter aussi souvent la pression sur la touche TARE jusqu à ce que END apparaisse Confirmer sur HOLD La balance revient automatiquement en mode d...

Страница 125: ...MBB M BA f 1617 41 La sélection s opère sur la touche HOLD et TARE réglé en usine ...

Страница 126: ... mesure Balance à une gamme de mesure Balance à plusieurs gammes de mesure Filtre Vite normal lent Tracking du zéro automatique 0 25d 0 5d 1d 3d OFF Plage de stabilisation 0 25d 0 5d 1d 3d OFF Gamme du zéro 2 100 Plage de surcharge 9d 2 Ajustage Auto off 120 sec 180 sec 240 sec 300 sec OFF Signal sonore ON OFF RAZ au réglage à l usine Default Setup Quitter le menu ...

Страница 127: ... et pèse nouveaux nés mécaniques 4 ans Pèse lits 2 ans Balances pour chaise roulante 2 ans Sont assimilés aux hôpitaux les cliniques de cure et les services sanitaires validité d étalonnage 4 ans Ne sont pas assimilés aux hôpitaux validité d étalonnage non limitée dans le temps les stations de dialyse les maisons de soins et les cabinets de médecin Ces indications sont issues de Le service d étalo...

Отзывы: