background image

 OIV-6-BA-e-2211 


30 

7  Optional equipment  


Accessories


Attachment lens 0.5x 

OZB-A6101 

Attachment lens 2.0x 

OZB-A6102 


8  Troubleshooting  


NO. 

Problems 

Cause

Solutions 

Poor visibility 

- Some dirt on the 
lens or dirty surface 
- Focus is not correct 

- Clean the lens and 
surfaces 
- Adjust the focus 

In the process of 
observation, the 
microscope head 
slides down 
automatically, 
the image is not 
clear

Focusing knob is too 
loose 

Appropriately adjust 
tension of the focusing 
knob 

Illumination does 
not work 

Power supply 
connection is bad

Check the power 
connections 

No image on the 
monitor 

HDMI cable 

Check the HDMI cable 
connection 

Incorrect image 
zoom 

Monitor resolution 
settings 

Set the appropriate 
resolution in the monitor 
menu 

Focus adjustment is 
too coarse 

Focusing knob is too 
tight 

Appropriately adjust 
tension of the focusing 
knob 


Содержание OIV 656

Страница 1: ...1 KERN Sohn GmbH Ziegelei 1 D 72336 Balingen E mail info kern sohn com Tel 49 0 7433 9933 0 Fax 49 0 7433 9933 149 Internet www kern sohn com User instructions Video microscope KERN OIV 6 OIV 656 Version 1 1 06 2022 ...

Страница 2: ...us Region of Interest focusing frame 13 5 1 4 Exposure 13 5 1 5 White Balance 14 5 1 6 Function 14 5 1 7 Crosshair Tool 15 5 1 8 Photograph 17 5 1 9 Recording 18 5 1 10 Open Picture 19 5 1 11 Compare Pictures 20 5 1 12 Time Setting 21 5 1 13 Freeze 21 5 1 14 Save Graphics 22 5 1 15 Flip Mirror 22 5 1 1 WDR 22 5 1 2 Gamma 22 5 1 3 FBL 22 5 1 4 Anti screen Flicker 22 5 1 5 Black and White mode 22 5 ...

Страница 3: ...optical components should therefore be left as they are found at the beginning of operation 1 2 Notes on the electrical system Before connecting to a power supply network it is important to ensure that the correct input voltage is used The information to select the correct mains cable is located on the device on the side of the product directly next to the connection socket You must comply with th...

Страница 4: ...eeded The unit should always be on a firm smooth and horizontal surface When the microscope is not being used you should cover it with the enclosed dust protective cover Dust or dirt inside the optics of a microscope can in many cases cause irreversible malfunctions or damage The best way to store accessories which consist of optical elements such as for example additional objectives is in a dry b...

Страница 5: ...re highly flammable substances It is therefore essential to keep them away from naked flames and electrical appliances that are switched on and off and to use them only in well ventilated rooms However organic solutions of this type should not be used to clean other components of the unit This could result in changes to the paintwork It is sufficient to use a neutral cleaning agent for this purpos...

Страница 6: ...OIV 6 BA e 2211 6 2 Nomenclature Housing Frame Microscope holder Dimmer Focusing knob AC inlet Ständerbasis Stand inlay Light source Zoom wheel Microscope head ...

Страница 7: ...7 OIV 6 BA e 2211 Rear Bottom DC 12V DC 5V USB port USB port HDMI port HDMI port USB port ...

Страница 8: ...5 mm Camera resolution 2 MP Data storage External via USB Max 128 GB Net weight 7 kg Dimension product WxDxH 372x285x482 mm Gross weight 15 kg Dimension packing WxDxH 420x350x630 mm Standard configuration Model KERN Standard configuration Resolution camera Interface Sensor Field of view mm Objective Zoom Software functions OIV 656 2 MP HDMI 30 FPS CMOS 1 2 8 Ø 12 64 2 65 0 7x 4 5x Images and video...

Страница 9: ...wer supply Connect the HDMI port to a monitor Connect the USB port to the mouse Place the specimen to the platform and check the ring light Dimming Turn the focus handwheel to adjust the image sharpness properly Adjust the brightness of the light source properly Adjust the magnification Observing the specimen photo video ...

Страница 10: ...screen by a left click on the mouse Focusing done The tension of the focusing knob can be adjusted by turning both knobs in opposite directions at the same time Magnification Choose the right magnification by turning the zoom wheel When changing the magnification level it might be necessary to adjust the light intensity turn dimmer and or the working distance turn focusing knob afterwards The zoom...

Страница 11: ...11 OIV 6 BA e 2211 5 Software functions 5 1 Control interface ...

Страница 12: ...ick F Semi Auto Focus Choose the focusing area colored frame on the screen by a left click on the mouse Confirm and set focus by clicking Click F again Click MF Manual Focus Turn the focusing knob on the microscope and pull the focus progress bar with the mouse in the menu to adjust the focal length and set the right focus When blocked the menu is continuously shown When open move the mouse to the...

Страница 13: ...djust the horizontal or vertical position of the focus frame After changing the area size or focus position click Set to save the settings 5 1 4 Exposure Auto Manual Click AE Set the automatic brightness target by dragging the Bright progress bar Click ME Set the optimum exposure by dragging the Gain progress bar and Shutter Exposure time progress bar You can go back to default auto exposure setti...

Страница 14: ...e achieved under different color temperatures Click MWB You can pull the Red Green Blue progress bar to adjust the red green and blue color value 5 1 6 Function Contrast Sharpness Saturation Zoom There are four more image adjustment tools Drag the progress bars to achieve the right settings ...

Страница 15: ...ne After the setting is complete select display to the set the lines on the screen and select delete to hide previously set lines Set crosshair lines Set the number of horizontal and vertical lines Double click of the horizontal and vertical lines to get to the settings of each line Note ROI has to be deactivated ...

Страница 16: ...select Hide All cross lines or cross tick marks will be hidden in the image area 4 Click on the set crosshair color tool Pull down to set the crosshair color After the color is set draw the crosshair again to take effect The color of the crosshair drawn before does not change Set crosshair color and position center and delete lines ...

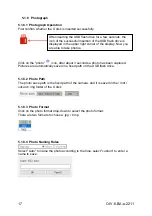
Страница 17: ... path of the camera and it is saved in the mnt sdcard img folder of the U disk 5 1 8 3 Photo Format Click on the photo format drop down to select the photo format There are two formats to choose jpg bmp 5 1 8 4 Photo Naming Rules Select Auto to name the photo according to the time select custom to enter a name to save After inserting the USB flash drive for a few seconds the icon of the successful...

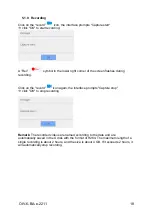
Страница 18: ...hes during recording Click on the record icon again the interface prompts Capture stop click OK to stop recording Remark The recorded videos are named according to the date and are automatically saved in the U disk with the format of H264 The maximum length of a single recording is about 2 hours and the size is about 4 GB If it exceeds 2 hours it will automatically stop recording ...

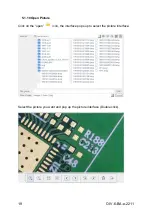
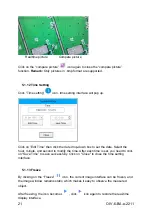
Страница 19: ...19 OIV 6 BA e 2211 5 1 10 Open Picture Click on the open icon the interface pops up to select the picture interface Select the picture you want and pop up the picture interface Double click ...

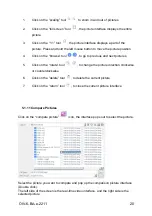
Страница 20: ...previous and next pictures 5 Click on the rotate tool to change the picture direction clockwise or counterclockwise 6 Click on the delete tool to delete the current picture 7 Click on the return tool to close the current picture interface 5 1 11 Compare Pictures Click on the compare picture icon the interface pops out to select the picture Select the picture you want to compare and pop up the comp...

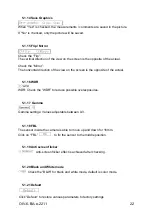
Страница 21: ...ck the date drop down box to set the date Select the hour minute and second to modify the time After each time is set you need to click on Save Time to save successfully Click on Close to close the time setting interface 5 1 13 Freeze By clicking on the Freeze icon the current image interface can be frozen and the image window remains static which makes it easy to observe the measured object After...

Страница 22: ...creen is the opposite of the actual 5 1 16 WDR WDR Check the WDR to reduce possible overexposures 5 1 17 Gamma Gamma settings Values adjustable between 0 3 5 1 18 FBL The sensor inside the camera is able to move up and down for 16mm Click on FBL to fix the sensor to the middle position 5 1 19 Anti screen flicker Anti screen flicker effect is achieved after checking 5 1 20 Black and White mode Chec...

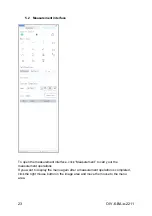
Страница 23: ...pen the measurement interface click Measurement to carry out the measurement operations If you want to display the menu again after a measurement operation is completed click the right mouse button in the image area and move the mouse to the menu area ...

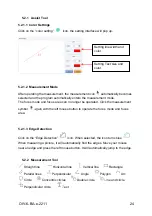
Страница 24: ...n with the left mouse button to operate the focus mode and focus area 5 2 1 3 Edge Detection Click on the Edge Detection icon When selected the icon turns blue When measuring a picture it will automatically find the edges Move your mouse near an edge and press the left mouse button It will automatically jump to the edge 5 2 2 Measurement Tool Straight line Horizontal line Vertical line Rectangle P...

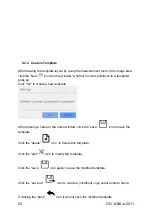
Страница 25: ...by using the measurement tools in the image area click the New icon and the window whether Convert primitives to a template pops up Click Ok to create a new template After entering a name in the name window click the save icon to save the template Click the delete icon to delete this template Click the edit icon to modify the template Click the save icon again to save the modified template Click t...

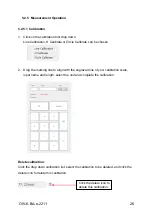
Страница 26: ... can be chosen 2 Drag the marking line to align with the engraved line of your calibration scale input name and length select the unit and complete the calibration Delete calibration Click the drop down calibration list select the calibration to be deleted and click the delete icon to delete this calibration Click the delete icon to delete this calibration ...

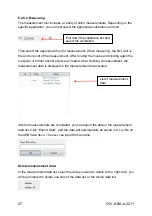
Страница 27: ...are created After finishing a measurement the measurement data is displayed in the measurement data list area After all measurements are completed you can export the data in the measurement data list Click Export Data and the data will automatically be saved in a csv file on the USB flash drive The user can input the file name Delete measurement data In the measurement data list select the data yo...

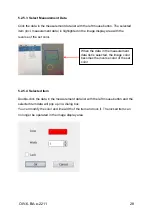
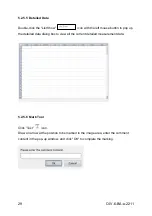
Страница 28: ...e of the set color 5 2 5 4 Selected item Double click the data in the measurement data list with the left mouse button and the selected item data will pop up in a dialog box You can modify the color and line width of the item and lock it The locked item can no longer be operated in the image display area When the data in the measurement data list is selected the image color becomes the inverse col...

Страница 29: ...eft mouse button to pop up the detailed data dialog box to view all the current detailed measurement data 5 2 5 6 Mark Tool Click Text icon Draw an arrow at the position to be marked in the image area enter the comment content in the pop up window and click OK to complete the marking ...

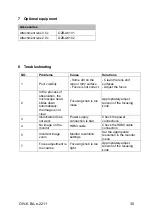
Страница 30: ... the microscope head slides down automatically the image is not clear Focusing knob is too loose Appropriately adjust tension of the focusing knob 3 Illumination does not work Power supply connection is bad Check the power connections 4 No image on the monitor HDMI cable Check the HDMI cable connection 5 Incorrect image zoom Monitor resolution settings Set the appropriate resolution in the monitor...

Страница 31: ...lly friendly materials that you can dispose of at local recycling points Disposal of the storage box and unit must be carried out by the operator in accordance with the valid national or regional law of the user s location 11 Further information The illustrations may differ slightly from the product The descriptions and illustrations in these operating instructions are subject to change without no...

Страница 32: ...OIV 6 BA e 2211 32 NOTES ...

Отзывы: