background image

6

Installation 

The radiator may only be installed by a specialist partner.

Conditions of use


Ŷ

Observe the operating conditions for hot water heating 
systems as defined in DIN 18380 “VOB German Cont-
ract Procedures for Building Services”. 


Ŷ

Maintain water quality as defined in VDI 2035 “Preven-
tion of damage in hot water heating systems”. 


Ŷ

Observe the limitations for use in wet rooms as defined 
in DIN 55900 “Coatings for radiators”. 


Ŷ

Use radiator only in closed heating systems. 


Ŷ

Only store and transport radiator in the protective 
packaging.


Ŷ

Observe minimum clearances between radiator and 
surrounding objects for air circulation.


Ŷ

When installing in rooms with bath or shower facilities: 
Take protective areas as per DIN VDE 0100-701 into 
account. Also follow all local regulations.


Ŷ

Note: The manufacturer prohibits installation of the 
products in safety area 1 and 2.

Technical features


Ŷ

Operating pressure: max. 10 bar


Ŷ

Test pressure: 1.3 x operating pressure


Ŷ

Flow temperature: hot water up to 55 °C (131 °F) 

Directions for installation

Protect radiator from damage


Ŷ

When installing, only remove protective packaging at 
the fixing and connection points.


Ŷ

Only remove protective packaging completely during 
final cleaning or prior to initial operation.

Fixing points


Ŷ

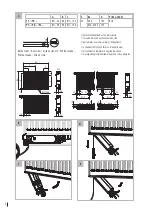
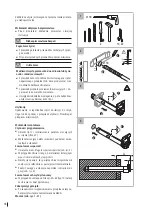
For radiators with lugs: Note the number and positions 
of fixing points (see Fig. A). 


Ŷ

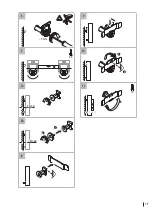
Install built-into-wall brackets according to separate 
installation instructions (see page 15). 

Compact radiator connection


Ŷ

Unscrew lacquered blanking plugs at the designated 
connection points. 


Ŷ

For multilayer radiators and twinwire or alternating 
connection: Install accompanying Therm X2

®

 separa-

ting plugs (see page 20). 


Ŷ

Connect radiator with commercially available fittings 
upstream.


Ŷ

Tightly cap open connections with air vent plugs (top) 
and blanking plugs. 

Only existing blanking plugs may be used on Kermi steel 
panel radiators.

Valve radiator connection

Valve, air vent plugs (top), and blanking plugs are factory 
pre-installed.


Ŷ

Connect radiator with commercially available fittings 
upstream on the valve fitting.

Radiators with two paint caps (FTV/PTV/PLV):


Ŷ

Remove paint caps from bottom on the valve fitting and 
dispose of them, as they must not be used as seals on 
the radiator.

Radiators with four paint caps (FTP/PTP/PLP):


Ŷ

Remove paint caps from bottom on valve fitting that 
connections are being made to. Paint caps are screwed 
on are tight and authorized for permanent operation.

Note: After removing the paint caps, check the connec-
tions for any residue. If necessary, clean the connections.

Fan connection


Ŷ

When installing the radiator (fixed installation), an 
all-pole disconnection device needs to be provided for 
the fan unit according to DIN EN 60335-1.


Ŷ

Ensure that a correctly mounted unit connection box 
or wall socket (230  V, 16  A fuse) is available within 
the cable range.


Ŷ

The wall emanating electrical connection must be freely 
accessible and must not project out to the surface of 
the radiator or the control unit. The radiator must not 
be attached directly beneath a wall socket.

Warning

Risk of injury!

There are sharp edges inside the radiator.


Ŷ

Be careful when reaching in.


Ŷ

Prepare the mains cable for connection by folding away 
the control unit (Fig. C).


Ŷ

Remove the adhesive tape and carefully pull the mains 
cable out of the radiator, remove adhesive tape residue 
(Fig. D)


Ŷ

Fold the control unit back in until it clicks into place in 
the radiator (Fig. E).


Ŷ

Connect the power supply cable.

Содержание x-flair

Страница 1: ... Built Into Wall Bracket Sealing Plug IT Istruzioni di montaggio x flair tassello a bussola con testa eccentrica Tappo di separazione CZ Návod k montáži x flair trubkové hmoždinky s výstřednou hlavou Oddělovací zátka SK Návod na montáż x flair vrtnej konzoly Deliaci uzáver PL Instrukcja montażu x flair wspornik Zaślepka rozdzielająca BL 1600 2x BL 1800 3x ...

Страница 2: ... 1 pri ventilových radiátoroch na prípojnej strane 1 w przypadku grzejników zaworowych od strony przyłącza T BL X Y BL 1800 22 400 100 BL 2 600 2000 140 Rückansicht Rear view Vista posteriore Pohled zezadu Pohľad zozadu Widok z tyłu A B C FT FK BH 54 89 BH 153 PT PK PL BH 59 94 BH 158 A BL Y X X C B WA 6 T 22 30 50 50 50 27 A BH BL 1800 32 50 50 BL 2 50 30 30 50 50 BL 2 32 50 50 32 B D C E ...

Страница 3: ... Berühren des Heizkörpers Warnung Überhitzungsgefahr Ŷ Um eine Überhitzung zu vermeiden decken Sie das Gerät nicht ab Warnung Verbrühungsgefahr beim Entlüften durch heraus spritzendes Heißwasser Ŷ Schützen sie Ihr Gesicht und Ihre Hände Warnung Verletzungsgefahr Ŷ Gewicht des Heizkörpers beachten siehe Unterlagen des Herstellers Ŷ Ab 25 kg mit Hebeeinrichtung oder mehreren Perso nen arbeiten Lüfte...

Страница 4: ...süblichen Verschraubungen was serseitig anschließen Ŷ Offene Anschlüsse mit Entlüftungsstopfen oben und Blindstopfen dicht verschließen Vorhandene Blindstopfen dürfen nur bei Kermi Flachheiz körpern eingesetzt werden Anschluss Ventilheizkörper Ventil Entlüftungsstopfen oben und Blindstopfen sind werksseitig vormontiert Ŷ Heizkörper mit handelsüblichen Verschraubungen was serseitig an der Ventilgar...

Страница 5: ...ise to 55 C 131 F Ŷ Be careful when touching the radiator Warning Risk of overheating Ŷ To avoid overheating do not cover the unit Warning Risk of scalding due to hot water squirting out when bleeding the radiator Ŷ Protect your face and hands Warning Risk of injury Ŷ Note the weight of the radiator see manufacturer s data Ŷ At 25 kg and above the work should be carried out with a lifting device o...

Страница 6: ...panying Therm X2 separa ting plugs see page 20 Ŷ Connect radiator with commercially available fittings upstream Ŷ Tightly cap open connections with air vent plugs top and blanking plugs Only existing blanking plugs may be used on Kermi steel panel radiators Valve radiator connection Valve air vent plugs top and blanking plugs are factory pre installed Ŷ Connect radiator with commercially available...

Страница 7: ...ne Pericolo di surriscaldamento Ŷ Per evitare un surriscaldamento non coprire l apparecchio Attenzione Pericolo di ustioni durante lo sfiato per la fuoriusci ta di acqua calda Ŷ Proteggere il viso e le mani Attenzione Pericolo di lesioni Ŷ Osservare il peso del radiatore vedere documentazi one del produttore Ŷ Se il peso supera i 25 kg effettuare le operazioni con un attrezzo di sollevamento o con ...

Страница 8: ...legare il radiatore sul lato acqua con collegamenti a vite disponibili in commercio Ŷ chiudere ermeticamente con tappi di sfiato in alto e tappi ciechi i collegamenti aperti I tappi ciechi presenti possono essere utilizzati solo con radiatori piatti di Kermi Attacco radiatore con valvola La valvola i tappi di sfiato in alto e tappi ciechi sono premontati di fabbrica Ŷ Collegare il radiatore con col...

Страница 9: ...e rozpálit až na 55 C 131 F Ŷ Při kontaktu s radiátorem buďte opatrní Výstraha Nebezpečí přehřátí Ŷ Aby nedošlo k přehřívání přístroj nezakrývejte Výstraha Nebezpečí opaření vystřikující horkou vodou při odvzdušňování Ŷ Chraňte si obličej a ruce Výstraha Nebezpečí úrazu Ŷ Respektujte hmotnost radiátoru viz podklady výrobce Ŷ Od hmotnosti 25 kg pracujte se zvedacím zařízením nebo ve více osobách Je...

Страница 10: ... X2 viz strana 20 Ŷ Připojte radiátor běžným šroubením k přívodu vody Ŷ Těsně uzavřete otevřené přípojky odvzdušňovací zátkou nahoře a záslepkami Přiložené záslepky se smí používat pouze u deskových otopných těles Kermi Připojení ventilového radiátoru Ventil odvzdušňovací zátky nahoře a záslepky jsou na montovány z výroby Ŷ U ventilové sady připojte radiátor běžným šroubením k přívodu vody Radiáto...

Страница 11: ...môže zohriať až na 55 C 131 F Ŷ Pri dotýkaní sa radiátora buďte opatrní Varovanie Nebezpečenstvo prehriatia Ŷ Aby ste predišli prehriatiu zariadenie nezakrývajte Varovanie Pri odvzdušňovaní nebezpečenstvo obarenia vys trekujúcou horúcou vodou Ŷ Chráňte si tvár a ruky Varovanie Nebezpečenstvo poranenia Ŷ Všímajte si hmotnosť radiátora pozri podklady výrobcu Ŷ Nad 25 kg pracujte so zdvíhacím zariade...

Страница 12: ...nu 20 Ŷ Na strane vodovodného potrubia pripojte radiátor bežnými skrutkovými spojmi Ŷ Otvorené prípojky s odvzdušňovacou zátkou hore a záslepkami tesne uzatvorte Priložené záslepky sa smú použiť len pri doskových vykuro vacích telesách Kermi Pripojenie ventilového radiátora Ventil odvzdušňovacie zátky hore a záslepky boli pred montované výrobcom Ŷ Na strane vodovodného potrubia na ventilovej súpra...

Страница 13: ...bezpieczeństwo przegrzania Ŷ Aby nie dopuścić do przegrzania nie przykrywać urządzenia Ostrzeżenie Niebezpieczeństwo poparzenia wodą grzewczą po dczas odpowietrzania Ŷ Chronić twarz i dłonie Ostrzeżenie Niebezpieczeństwo odniesienia obrażeń Ŷ Zwrócić uwagę na ciężar grzejnika patrz dokumen tacja producenta Ŷ W przypadku masy przekraczającej 25 kg użyć urząd zenia podnośnikowego lub skorzystać z po...

Страница 14: ...z strona 20 Ŷ Za pomocą dostępnych w sprzedaży połączeń śru bowych podłączyć grzejnik do instalacji wodnej Ŷ Szczelnie zamknąć otwarte przyłącza korkiem odpowie trzającym góra i korkiem zaślepiającym Dostępne korki zaślepiające mogą być stosowane wyłącz nie do grzejników płytowych Kermi Podłączenie grzejnika zaworowego Zawór korek odpowietrzający na górze i korek zaślepia jący są zamontowane fabry...

Страница 15: ... des verwendeten Baumaterials befindet Ŷ Einbaulage der Bohrkonsole beachten Schlitz nach oben siehe Abb 4 Abstandshalter montieren Ŷ Bei Wandabstand 50 60 Typ 10 Verlängerung für Abstandhalter verwenden Heizkörper sichern Ŷ Nach dem Einhängen und Ausrichten des Heizkörpers die vormontierten Aushebesicherungen über die La schen des Heizkörpers klemmen Montage siehe Abb 1 11 EN Built Into Wall Brac...

Страница 16: ...lari ad es per edifici pu bblici scuole o altro Smaltimento Procedere al riciclaggio o al corretto smaltimento dell im ballaggio e delle parti non necessarie Osservare le dispo sizioni locali Istruzioni di montaggio Operazioni di preparazione Ŷ Osservare il numero e posizioni dei punti di fissaggio vedere pagina 2 Verificare che il materiale di fissaggio non presenti danni Montare le mensole Ŷ Osser...

Страница 17: ...žitie nie je správne a preto ani dovolené Bezpečnostné pokyny Ŷ Pred montážou si dôkladne prečítajte tento návod Nebezpečí Ohrozenie života Ŷ Skontrolujte umiestnenie zásobovacích potrubí prúd plyn voda Ŷ Nevŕtajte do potrubí Varovanie Zranenie osôb a poškodenie vecí Ŷ Skontrolujte nosnosť podkladu Dodržiavajte hmot nosť naplneného radiátora pozri podklady výrobcu a možné dodatočné zaťaženie Ŷ Sko...

Страница 18: ...rzebne części dostarczyć do recyk lingu lub do zgodnej z przepisami utylizacji Przestrzegać przepisów miejscowych Wskazówki montażowe Czynności przygotowawcze Ŷ Określić ilość i rozmieszczenie punktów mocujących w ścianie strona 2 Ŷ Materiał mocujący należy sprawdzić pod kątem ewen tualnych uszkodzeń Zamontować wsporniki Ŷ Uważać na maks długość wpustu wspornika zob rys 4 Ŷ W przypadku obicia ścia...

Страница 19: ...19 3 Nm 22 34 50 5 7a 7b 8 6 50 60 1 2 2 1 13 9 10 11 ...

Страница 20: ...hraubungen wasser seitig anschließen Dabei die max Einschraubtiefe in das Anschlussgewinde beachten 14 mm EN Sealing plug Proper use The Therm X2 sealing plug may only be used at multi ple layer compact radiators and connection on same or alternating sides refer to the technical documentation for permissible types of connections and coupled systems The sealing plug is installed in the connection t...

Страница 21: ... orizzontale Ŷ Estrarre la chiave di montaggio fig 14 Ŷ Allacciare il radiatore al lato acqua con collegamenti a vite adatti osservando la profondità di inserimento max di 14 mm nella filettatura di raccordo CZ Oddělovací zátka Povolené použití Oddělovací zátka Therm X2 smí být použita jen u vícevrstvových kompaktních topných těles a přímém nebo vzájemném připojení povolené typy připojení a připoj...

Страница 22: ... 14 mm PL Zaślepka rozdzielająca Użytkowanie zgodne z przeznaczeniem Zaślepka rozdzielająca Therm X2 może być stosowana wyłącznie do wielopozycyjnych grzejników kompaktowych i przyłączy jedno lub wielostronnych dopuszczalne rod zaje przyłączy i systemy łączeniowe patrz dokumentacja techniczna Zaślepka rozdzielająca montowana jest w gwincie przyłączeniowym do którego zostaje podłączony przewód prze...

Страница 23: ...23 2 1 12 13 14 2 3 1 ...

Страница 24: ...ts und des Rates vom 08 Juni 2011 zur Beschränkung der Verwendung bestimmter gefährlicher Stoffe in Elektro und Elektro nikgeräten DECLARATION OF CONFORMITY We hereby declare that the products described in this in struction manual are CE certified and meet all the requirements of the fol lowing directives and harmonised standards 2014 35 EU low voltage directive Directive of the European Parliament...

Отзывы: