background image

Audio-Video Receiver KRF-X9992D

5

Mo

ving Around

How is PowerTouch Powered?

The Device Control/Menu Section: 

The device control section

provides the same kinds of access as the Quick Access menu, but
with more structure. Use the Main menu to navigate through the
feature menus to exactly the feature or device you want to use.

Using these features, your Kenwood PowerTouch can store and
display a large number of tasks, making it easier for you to
access features. You get all the advantage of on-screen graphical
display, without having to use a TV screen!

For more information on using these icons, see “How Do I Use
PowerTouch?” on page 6.

How is PowerTouch Powered?

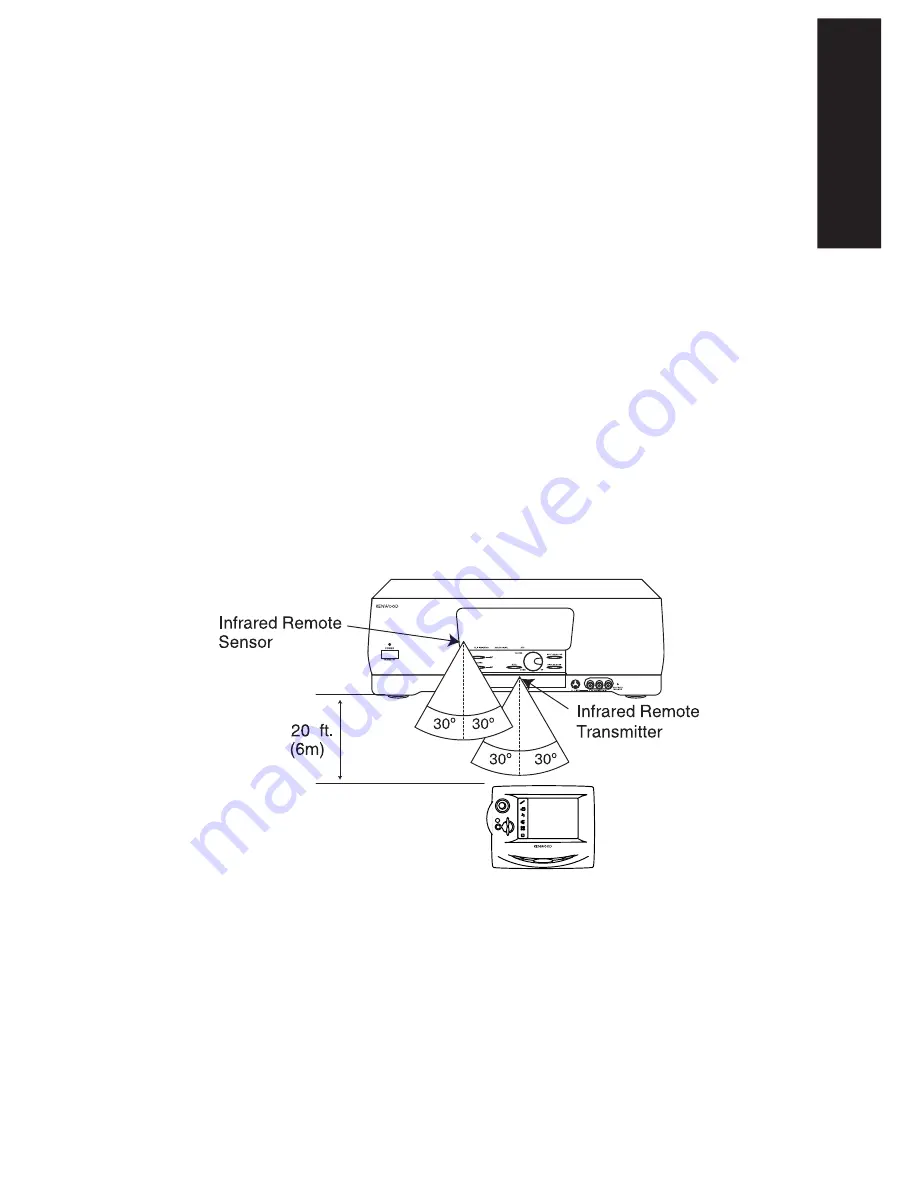
Your new PowerTouch uses 6 AA alkaline batteries and operates
in the following range:

ENTER

V

O

LU

M

E

UP

DOWN

CONFIRM

ON/STANDBY

CONTRAST

REMOTE OFF

e

d i

t

m

o

v i e

m

u

s i c

s

o

u n

d

li

st

e

n

mode

m

a

c r o

If you use PowerTouch outside of this range, PowerTouch’s
display may show incorrect information, or may not operate.

As you use PowerTouch, be aware of the following:

• When PowerTouch’s operating range gets shorter or Power-

Touch displays a low battery alarm, replace all 6 batteries:

Содержание KRF-X9992D

Страница 1: ...i B60 4326 00 01 CH T MC ...

Страница 2: ...output for digital dubbing to MiniDisc Manufactured under license from Dolby Laborato ries Dolby Pro Logic and the double D symbol are trademarks of Dolby Laboratories Confidential Unpublished Works 1992 1997 Dolby Laborato ries All rights reserved DTS and DTS Digital Surround are trademarks of Digital Theater Systems Inc Unpacking If any accessories are missing or if the receiver is damaged or fa...

Страница 3: ...d Europe AC 230 V only WARNING TO PREVENT FIRE OR ELECTRIC SHOCK DO NOT EXPOSE THIS AP PLIANCE TO RAIN OR MOISTURE Safety Precautions Read this section carefully to ensure safe operation Factory fitted moulded mains plug 1 The mains plug contains a fuse For replacement use only a 13 Amp ASTA approved BS1362 fuse 2 The fuse cover must be refitted when replacing the fuse in the moulded plug 3 Do not...

Страница 4: ...VD Player 16 To Connect a DVD Player Connecting Your DVD Player Through a Surround Processor 18 To Connect a DVD Player Through a Surround Processor Connecting Your MD Recorder or Primary Tape Deck 20 To Connect an MD Recorder To Connect a Primary Tape Deck To Connect a Secondary Tape Deck Connecting Your Secondary CD Player or Tape Deck 22 To Connect a Secondary CD Player To Connect a Secondary T...

Страница 5: ...P Level Bass Peak Level Identifying Devices For PowerTouch Control 37 How Do I Identify Devices How Do I Replace a Setup Code with a New One How Do I Delete Setup Codes What if my device does not work with any of the codes on the list What if I Want PowerTouch to Control Additional Functions Storing Radio Stations in Memory optional 40 Storing RDS Stations Automatically Storing Stations Manually C...

Страница 6: ...Audio Video Receiver KRF X9992D vi ...

Страница 7: ...e receiver with another device These areas should be at least top 50cm back 10cm and left and right side 10cm Do not install your receiver where direct sunlight or high frequency flourescent lighting can shine directly into the remote sensor This can cause your new receiver to malfunction Before You Begin This manual covers the most common and standard connections to the receiver Because of its ve...

Страница 8: ...ter One Connecting Your Devices Audio Video Receiver KRF X9992D Connections 2 The following diagram shows the entire back of the KRF X9992D VIDEO4 6CH INPUT CENTER SUBWOOFER SURROUND VIDEO 4 INPUT 6 CH 2 CH ...

Страница 9: ...ing chart before choosing a video jack set You will need this information later when you set up your PowerTouch see Identifying Devices For PowerTouch Control on page 37 Recording this information now will save you additional trips behind your home entertainment cabinet You will fill in the Setup Code column when you are setting up PowerTouch Jack Set Device Manufacturer Model Setup Code Phono CD1...

Страница 10: ...ng Your Devices Audio Video Receiver KRF X9992D Connections 4 Connecting Your Speakers A B C POWERED SUBWOOFER R FRONT L FRONT CENTER R SURROUND L SURROUND VIDEO4 6CH INPUT CENTER SUBWOOFER SURROUND VIDEO 4 INPUT 6 CH 2 CH ...

Страница 11: ...that this receiver can put out connect front speakers center left surround and right surround speakers To do so 1 Loosen the speaker wire binding posts 2 Follow the steps under To Connect Front Speakers Only on this page to connect the RIGHT and LEFT FRONT speakers 3 Insert the wire from the positive jack on the CENTER speaker into the U shaped slot in the base of the positive CENTER post as shown...

Страница 12: ...s Audio Video Receiver KRF X9992D Connections 6 What if I Have an Amplifier Power Amp Power Amp CENTER R SURROUND L SURROUND R FRONT L FRONT POWERED SUBWOOFER Power Amp VIDEO4 6CH INPUT CENTER SUBWOOFER SURROUND VIDEO 4 INPUT 6 CH 2 CH ...

Страница 13: ... of the receiver s built in amplifiers Do not plug in the amplifiers or the receiver to AC power until all connections have been made To connect supplemental power amplifiers 1 Using RCA audio cables not supplied connect the receiver s PRE OUT jacks to the amplifiers input jacks as shown to the left 2 Connect the speakers to the power amplifiers according to the amplifiers instruction manuals ...

Страница 14: ...Chapter One Connecting Your Devices Audio Video Receiver KRF X9992D Connections 8 Connecting Your TV COMPOSITE VIDEO S VIDEO VIDEO4 6CH INPUT CENTER SUBWOOFER SURROUND ...

Страница 15: ...e information under Before You Begin on page 1 It contains important notes about the types of video connections you can make 2 Connect a video cable from your TV s Video IN jack to the receiver s MONITOR OUT jack as shown to the left 3 If your TV does not have any video input connec tions you must purchase an RF modulator The modulator will convert the video signal from the receiver to an RF signa...

Страница 16: ...ur Cable TV or Satellite Tuner Note that video device jacks are linked to specific digital jacks For example if you connect a satellite tuner with a digital coaxial cable you should connect the analog cables to the VIDEO 2 video device jacks and the digital cable to the VIDEO2 digital COAXIAL jack ...

Страница 17: ...f video connections you can make 2 Connect the audio cables from the cable tuner s Audio Out jacks to the receiver s VIDEO 2 VIDEO 3 or VIDEO 4 PLAY IN jacks as shown to the left 3 Leave the cable tuner s video out RF jack connected directly to your VCR or TV wherever you already have it connected See How Do I Operate Devices on page 26 of the Users Guide for details about using this setup 4 Go to...

Страница 18: ...pter One Connecting Your Devices Audio Video Receiver KRF X9992D Connections 12 Connecting Your VCR s VIDEO4 6CH INPUT CENTER SUBWOOFER SURROUND AUDIO IN VIDEO IN S VIDEO OUT S VIDEO IN AUDIO OUT VIDEO OUT ...

Страница 19: ...video cables from the VCR s Audio and Video jacks to the receiver s VIDEO 1 REC OUT and PLAY IN jacks as shown to the left 3 Be sure to connect the VCR Video IN cable to the jack labeled REC OUT and the VIDEO OUT cable to the jack labeled PLAY IN 4 Go to Noting Your Devices on page 3 and note which jack you used to connect your VCR In addition note the brand name and model number of the VCR To Con...

Страница 20: ...deo Receiver KRF X9992D Connections 14 Connecting Your Primary CD Player SURROUND VIDEO4 6CH INPUT CENTER SUBWOOFER OUTPUT A CD1 OUTPUT B CD2 DIGITAL OUTPUT COMMUNICATION CABLE KENWOOD ONLY SYSTEM CONTROL CABLE KENWOOD ONLY KENWOOD DPF J9010 ONLY ...

Страница 21: ...le from the changer to the SYSTEM CONTROL jack as shown to the left Be sure that the SL16 XS8 switch on both the changer and the receiver is set to SL16 If you are connecting more than one Kenwood device with a system control cable see What if I Have Several Kenwood Devices System Control Chaining on page 30 for more information 4 Connect the SL16 text cable communication cable from the changer to...

Страница 22: ...gital jacks For example if you connect a DVD player with a digital optical cable you should connect the analog cables to the VIDEO 4 video device jacks and the digital cable to the VIDEO4 digital OPTICAL jack VIDEO4 6CH INPUT CENTER SUBWOOFER SURROUND AUDIO OUT ANALOG ONLY VIDEO OUT S VIDEO OUT DIGITAL OUT COAXIAL OR OPTICAL Remove protective cap before connecting ...

Страница 23: ... as shown to the left 4 Connect the digital cable either coaxial or optical from the DVD s digital jack to the appropriate digital jack on the receiver as shown to the left The illustration shows two digital connections one for coaxial connection and one for optical connection Your DVD player supports one or the other of these connection methods do not connect both If you use the optical digital c...

Страница 24: ...deo Receiver KRF X9992D Connections 18 Connecting Your DVD Player Through a Surround Processor VIDEO4 6CH INPUT CENTER SUBWOOFER SURROUND VIDEO 4 INPUT 6 CH 2 CH FRONT SURROUND CENTER SUBWOOFER Surround Processor VIDEO OUT S VIDEO OUT DVD player ...

Страница 25: ...tions on connecting your DVD player For further assistance on optional configurations contact the store where you purchased your receiver To Connect a DVD Player through a surround processor 1 Review the information under Before You Begin on page 1 It contains important notes about the types of video connections you can make 2 Connect the digital cable from the DVD player s Digital OUT jack to the...

Страница 26: ...ver KRF X9992D Connections 20 Connecting Your MD Recorder or Primary Tape Deck VIDEO4 6CH INPUT CENTER SUBWOOFER SURROUND RECORD IN ANALOG PLAY OUT ANALOG DIGITAL RECORD IN OPTICAL SYSTEM CONTROL CABLE KENWOOD ONLY Remove protective cap before connecting ...

Страница 27: ...player 4 If you are connecting a Kenwood MD recorder connect the system control cable from the MD recorder to the receiver Be sure that the SL16 XS8 switch on the receiver is set to SL16 MD recorder only supports SL16 system control mode If you are connecting more than one Kenwood device with a system control cable see What if I Have Several Kenwood Devices System Control Chaining on page 30 5 Go ...

Страница 28: ... One Connecting Your Devices Audio Video Receiver KRF X9992D Connections 22 Connecting Your Secondary CD Player or Tape Deck SURROUND VIDEO4 6CH INPUT CENTER SUBWOOFER CD OUTPUT OR TAPE PLAY OUT TAPE RECORD IN ...

Страница 29: ...rom the CD player s audio jacks to the receiver s CD2 TAPE 2 MONI TOR PLAY IN jack set as shown to the left Do not connect the system control cable from the second CD player even if it supports system control 2 Go to Noting Your Devices on page 3 and note which jacks you used to connect your CD player In addition note the brand name and model number of the CD player If you connect a second tape de...

Страница 30: ...ing Your Laser Disc Player with AC 3 RF Output VIDEO4 6CH INPUT CENTER SUBWOOFER SURROUND RF DEMODULATOR COAX OPT DIGITALOUTPUT COAX RF INPUT AC 3 RF DIGITALINPUT DC IN AUDIO OUT VIDEO OUT S VIDEO OUT DIGITAL OUT AC 3 RF OUT COAX OR OPTICAL DIGITAL OUT Remove protective cap before inserting ...

Страница 31: ...the audio cables from the laser disc player s Audio OUT jacks to the receiver s AUDIO jacks VIDEO2 or VIDEO3 PLAY IN as shown to the left 3 For the video cable connection you must use the VIDEO2 or VIDEO3 jack set as that is the set with a coaxial digital connection Do not connect the digital cable coaxial or optical yet it must be connected via the de modulator as described in the following steps...

Страница 32: ...ked to specific digital jacks For example if you connect a laser disc player with a digital optical cable you should connect the analog cables to the VIDEO 4 video device jacks and the digital cable to the VIDEO4 digital optical jack VIDEO4 6CH INPUT CENTER SUBWOOFER SURROUND AUDIO OUT VIDEO OUT DIGITAL OUT COAXIAL OR OPTICAL S VIDEO OUT Remove protective cap before inserting ...

Страница 33: ... connection on your laser disc player Use the table below to choose a jack set Note that the jack sets are linked even though they are not adjacent You must connect all of the cables from your laser disc player to a linked jack set If you connect the analog cables to VIDEO2 and the digital optical cable to VIDEO4 your laser disc player will not work correctly 3 Connect the audio cables from the la...

Страница 34: ...turntable record player s instructions for more detail about its connection jacks and capabilities To Connect a Turntable Record Player 1 Connect the audio cables from the turntable audio output jacks to the receiver s PHONO R and L jacks 2 If your turntable includes a ground cable connect the ground cable to the receiver s PHONO ground jack 3 Go to Noting Your Devices on page 3 and note which jac...

Страница 35: ...ow to connect a camcorder or VCR quickly and probably temporarily to the front of the receiver If you want a less cluttered and more permanent connection see Can I Connect an Additional VCR Permanently below To Connect a Camcorder or Additional VCR Connect the audio and video cables from the camcorder or VCR s Audio and Video jacks to the receiver s front panel jacks as shown to the left Can I Con...

Страница 36: ...ed device when you start playback from that device synchronize recording a CD automatically when you start playback from the connected CD player Make sure the units are connected to the correct jacks on the receiver for example no device connected to the CD2 TAPE 2 MONITOR jacks can use a system control cable Some CD players and cassette decks do not support the SL16 system control mode Do not inc...

Страница 37: ...a Your new receiver also comes with an FM indoor antenna for FM radio reception To connect the FM antenna 1 Attach the antenna sheath to the pole in the center of the receiver s FM antenna jack as shown above When you attach the sheath for the first time you may need to exert quite a bit of pressure 2 Adjust the antenna as necessary to improve reception 3 Tack the looped end of the antenna in the ...

Страница 38: ...as long as ordinary batteries We recommend replacing them with alkaline batteries for normal use To install the batteries 1 Press down and back on the battery cover to remove it 2 Insert six AA batteries as shown below 3 Close the cover If you use PowerTouch outside of it s range see How is PowerTouch Powered on page 5 of the Users Guide PowerTouch s display may show incorrect information This cha...

Страница 39: ... screen use the stylus to touch the center of each of the calibration points displayed When you touch each calibration point you should hear a beep and see the next point indicating that area of the screen is now calibrated If you do not hear a beep touch the calibration point until you do The touch screen is sensitive to pressure not to movement Press firmly but gently on any touch screen element...

Страница 40: ...his chapter you will be using the various settings on the Setup menu The Setup menu includes the following settings and their subsettings Preference which contains the following IR Identifying Devices For PowerTouch Control on page 37 This menu setting allows you to identify your connected devices to PowerTouch Input KRF X9992D Users Guide Surround Setting Up Speakers on this page These menu setti...

Страница 41: ...nd RS right surround a Touch on the Speaker Selection menu b Aim PowerTouch at the receiver and touch the speaker button until the correct setting appears see below The left and right front buttons and the left and right surround buttons are linked if you touch one you change the settings for both Off means you are not using the speaker Not available for front speakers If no subwoofer is connected...

Страница 42: ...l you can only set your center and surround speakers to Nml or OFF If you turn off the subwoofer your front speakers are automatically set to Lrg You may not set them to Nml SP Distance 1 Measure the distance from each speaker to the seat you most often use and note it below 2 If you are not already there touch on the Setup Surround menu to open the Speaker Distance menu 3 Touch or to set the dist...

Страница 43: ... to the next speaker setting or touch to return to the Surround menu Bass Peak Level Because of the way humans hear the test noise the Speaker Level menu sends through the subwoofer will not sound as loud as it really is This Speaker Level menu subwoofer test noise is designed to be used with a sound pressure level meter for balancig Because of this you cannot use that test noise to properly calib...

Страница 44: ...n the list If the devices are connected with a system control cable be sure to select the code preceded by Sys or System This instructs PowerTouch to send all commands for the device to the receiver which will control the device via the system control cable If you have a Kenwood Dual Play 200 Disc CD Changer you will need to set both CD1 and CD2 TAPE2 to the correct code for this device Sys Mega 1...

Страница 45: ...also say that your VCR has an OSD On Screen Display menu that is not part of the default code set you chose You can use your VCR s remote to teach PowerTouch to access that menu To teach PowerTouch new commands 1 Follow the steps under How Do I Identify Devices on page 37 Pick any code for the device brand PowerTouch must have a code to learn device commands 2 Touch to open the Function Change men...

Страница 46: ...You can overwrite RDS stations with manually stored stations Storing RDS Stations Automatically 1 Touch on the Main menu to access the Music menu 2 Touch on the Music menu to access the Tuner controls 3 Touch to choose FM 4 Touch at the top of the screen 5 Touch The receiver locates and stores any FM stations broadcasting an RDS signal This process can take a few minutes to complete please be pati...

Страница 47: ...ouch at the top of the screen 7 Touch a storage button Use or to access more storage buttons If you choose a storage button that already has a station assigned the new station will replace the previously stored station 8 Optional Touch to enter a name for the station in the Preset Memory menu Use the stylus to select characters from the keyboard Touch to access to lowercase characters Touch it aga...

Страница 48: ...tereo operation 63 Hz 12 5 kHz 0 7 T H D 6 Ω DIN IEC 130W 130 W Effective Output Power during surround operation Front 1 kHz 0 06 T H D at 6 Ω one channel driven 130 W 130 W Center 1 kHz 0 06 T H D at 6 Ω one channel driven 130 W Surround 1 kHz 0 06 T H D at 6 Ω one channel driven 130 W 130 W Total Harmonic Distortion 0 004 1 kHz 65 W 6 Ω Frequency Response IHF 66 CD1 5 Hz 80 kHz 0 5 dB 3 dB Signa...

Страница 49: ...er disc player 25 DVD player 17 laser disc player 25 27 second CD player 23 second tape deck 23 control modes mixing connections 30 mixing settings 30 switching between 30 D deleting PowerTouch setup codes 39 devices identifying to PowerTouch 37 digital cable CD player 15 DVD player 17 laser disc player AC 3 Output 25 laser disc player no AC 3 Output 27 digital connection warning 25 Dolby Digital ...

Страница 50: ...tal power amplifiers connecting 7 surround sound connecting speakers 5 system control cables 200 Disc CD Changer 15 CD player 15 connection warning 30 MD recorder 21 tape deck 21 system control chaining 30 T tape deck connecting 20 21 identifying to PowerTouch 37 turntable record player connecting 28 TV connecting 9 identifying to PowerTouch 37 watching without using receiver 9 V VCR connecting 12...

Страница 51: ...45 Index Audio Video Receiver KRF X9992D NOTES ...

Страница 52: ...ck of the unit in the spaces designated on the warranty card and the space provided below Refer to the model and serial numbers whenever you call upon your dealer for information or service on this product Model Serial Number For your records ...

Страница 53: ......

Страница 54: ...all your current audio and video components It allows you to control them all with Kenwood s remarkable PowerTouch touch screen remote a graphical user interface without having to use your TV NetFront by Access Co Ltd is adopted for this product Copyright 1996 1997 Access Co Ltd NetFront is registered trademark of Access Co Ltd in Japan ...

Страница 55: ...ouch 6 How Do I Move Around 7 How Do I Enter Text 7 Chapter Two Using PowerTouch 9 How Do I Adjust the Sound 10 Turning the Speakers On 10 Adjusting the Volume 10 Adjusting the Loudness Stereo Mode Only 11 Adjusting the Tone Stereo Mode Only 11 Adjusting Speaker Levels 13 Muting Sound 15 Midnight Theatre Function 15 What are Listen Modes 16 Switching to Analog Input 21 Applying Digital Signal Proc...

Страница 56: ...playing Disc and Track Titles 38 Single or Rotary CD Player 43 MD Recorder or Tape Deck 46 Turntable 49 Second CD Player or Tape Deck 49 Tuner 50 How Do I Record Edit Mode 56 How Do I Adjust PowerTouch s Display 60 How Do I See PowerTouch in the Dark 60 How Do I See PowerTouch s Screen More Clearly 61 How Do I Turn the Beeping On or Off 61 Using PowerTouch to Dim or Brighten the Receiver s Front P...

Страница 57: ...c or Dolby 3 Stereo is selected 73 Sound from one or more of my devices is abnormally loud or soft 73 There wasn t any sound recorded on tapes made on my VCR or tape deck 75 The initial sound is intermittent or non existent when I start to play from a Dolby Digital or DVD source 75 With a Dolby Digital program the loud sounds aren t very loud and the quiet sounds aren t very quiet 75 I hear a hum ...

Страница 58: ...set default condition 78 Receiver Tuner 79 My receiver won t turn on and the STANDBY indicator is flashing 79 The sound is distorted and the CLIP indicator on the receiver s front panel flashes red continually or stays red for more than 1 second at a time 80 I can t access any RDS Radio Data System functions 82 I can t receive a radio station 82 I m getting a lot of static interference 82 When I p...

Страница 59: ... can find on the front of the receiver and on the PowerTouch The chapter also includes an explanation of how to navigate the convenient graphical display on your new PowerTouch It includes the following sections What s on the Front Panel of Your Kenwood Audio Video Receiver page 2 What s on PowerTouch page 3 How is PowerTouch Powered page 5 How Do I Use PowerTouch page 6 ...

Страница 60: ...anel 4 Speaker selector buttons see page 10 5 Headphone jack 6 Mute button see page 15 7 IR indicator 8 IR transmitters 9 Volume control knob 10 Display Mode button see page 62 CLIP INDICATOR DOLBY DIGITAL SPEAKERS A B MUTE VOLU PHONES POWER ON STANDBY ON OFF What s on the Front Panel of Your Kenwood Audio Video ...

Страница 61: ...ode While the standby indicator of the unit is lit a small amount of current is flowing into the unit s internal circuitry to back up the memory This condition is referred to as the standby mode of the unit While the unit is in the standby mode it can be turned ON from the remote control unit MPEG THX UME DOWN UP INPUT SELECTOR DISPLAY MODE S VIDEO V AV AUX L AUDIO R CD2 TAPE2 MONITOR o Receiver ...

Страница 62: ...KLIGHT e dit m o vi e m u si c s o und l i s t e n mode m a cro 1 Joystick see page 7 2 Confirm button 3 Mute button see page 15 4 Volume up down button see page 10 5 Contrast button 6 On Standby button 7 Backlight button see page 60 8 Quick Access menu 9 Touch screen display 10 Stylus stored on top edge What s on PowerTouch ...

Страница 63: ... for each major area that will automatically clear and move to the next topic When it is finished it returns you to the main menu The Quick Access Menu The buttons in the Quick Access Menu are always available regardless of what else is displayed on the touch screen Touch these buttons for instant access to editing features Movie device controls such as DVD players or VCRs Music device controls su...

Страница 64: ...e advantage of on screen graphical display without having to use a TV screen For more information on using these icons see How Do I Use PowerTouch on page 6 How is PowerTouch Powered Your new PowerTouch uses 6 AA alkaline batteries and operates in the following range ENTER VO L U ME UP DOWN CONFIRM ON STANDBY CONTRAST REMOTE OFF e d i t m o v i e m u s i c s o u n d l i s t e n mode m a c ro If yo...

Страница 65: ... it PowerTouch appears and functions a little differently from traditional remotes Because it can control so many different devices it displays a separate set of controls for each device on an LCD screen Only devices you have identified and connected to the receiver appear as buttons on the touch screen If you are missing a device s icon on the movies or music screen make sure you have identified ...

Страница 66: ...uch the screen to active PowerTouch s display 2 Use the stylus or your finger to touch the menu or control button you want to use If you are looking at the Main menu you can use the joystick to move to a different menu Push the joystick to the right to access Music audio devices down to access Setup features to the left to access Movie video devices up to access Editing features How Do I Enter Tex...

Страница 67: ...se characters Touch it again to access special characters such as etc Touch it a third time to return to uppercase characters Touch or to move back and forth between the characters Touch to clear the last character you entered Touch to delete all the characters in the line Touch to save your title then touch to return to the previous menu ...

Страница 68: ...ht your selection then just press the joystick to activate Because PowerTouch maintains two way communication with your receiver it shows the result of your action right on its screen This chapter contains the following sections How Do I Adjust the Sound page 10 How Do I Operate Devices page 26 Movie Devices page 27 Music Devices page 36 How Do I Record Edit Mode page 56 How Do I Adjust PowerTouch...

Страница 69: ...eceiver s front panel The red light indicates that the speakers are on If you select SPEAKER B while listening to a surround mode the sound will automatically revert to stereo If you manually select a surround mode while SPEAKER B is on SPEAKER B will automatically shut off If you use speakers connected to amplifiers via the PRE OUT jacks choose Front A speakers Adjusting the Volume Use one of the...

Страница 70: ...ess and sparkle 1 Touch s o und on the Quick Access menu to open the Sound menu 2 Touch to turn the loudness setting on or off 3 Touch to return to the previous menu or touch any Quick Access menu button to access that menu Adjusting the Tone Stereo Mode Only Use the Sound menu to adjust the bass or treble tone of your front left and right speakers manually In addition to setting bass and treble t...

Страница 71: ...owerTouch 12 Audio Video Receiver KRF X9992D 1 Touch s o und on the Quick Access menu to open the Sound menu 2 Touch to open the Tone menu 3 Touch to turn the tone settings on or off How Do I Adjust the Sound ...

Страница 72: ...aker Levels You can use the Sound menu to temporarily adjust the speaker levels of your center speaker surround speakers and subwoofer For example if a particular movie has dialog that s hard to understand you can temporarily increase the center channel volume just for that movie For more information on adjusting speaker levels permanently see Chapter Two Setting Up PowerTouch in the Connections a...

Страница 73: ...ir level 3 Select a speaker by touching its button You have selected a speaker when its button darkens 4 Touch the up or down arrow to adjust the volume of the speaker you chose 5 Touch to return to the previous menu or touch any Quick Access menu button to access that menu These settings automatically return to the level you adjust on Chapter Two of Connection and Setup Guide whenever you select ...

Страница 74: ...r the receiver or PowerTouch A Mute Off message appears on the LCD screen for 3 seconds then disappears Midnight Theatre Function Any time you don t want to experience the loud and soft volume extremes of recorded sound for example late at night use midnight theatre function to reduce volume extremes This feature keeps loud dramatic sound from being too loud perhaps disturbing family members or ne...

Страница 75: ...t difference between the loudest and quietest sound 3 Touch to return to the previous menu or touch any Quick Access menu button to access that menu What are Listen Modes You can experience true home theater sound with your Kenwood Audio Video Receiver This receiver incorporates several listen modes to let you enjoy surround sound with a wide variety of program sources Each produces multiple chann...

Страница 76: ...immerse you in a movie Your receiver is equipped with a Dolby Pro Logic surround decoder to let you enjoy the wide variety of cur rently available Dolby Surround home video software DSP Digital Signal Processing DSP allows you to create your own custom surround sound environments and use them with any source except Dolby Digital and MPEG You can select the ambience of an Arena Jazz Club or Theater...

Страница 77: ...annel audio which provides the highest sound quality to deliver the best movie theater sound into the home THX Movie soundtracks are mixed in special movie theatres called dubbing stages and are designed to be played back in movie theatres with similar equipment and conditions The soundtrack created for movie theatres is then transferred directly onto Laserdisc VHS tape DVD etc and is not changed ...

Страница 78: ...d Your receiver can detect and switch between these formats automatically To check the Surround Play status 1 Touch l i s t e n mode on the Quick Access menu to open the Listen Mode menu 2 Touch This displays the Input Sound Status screen which shows the signal being displayed ...

Страница 79: ... previous menu or touch any Quick Access menu button to access that menu To set the listen mode manually 1 Touch l i s t e n mode on the Quick Access menu to open the Listen Mode menu 2 Touch until Manual appears 3 Select a listen mode The available surround modes may be restricted depending on the input signal MPEG and Dolby Digital are only available if a MPEG or Dolby Digital signal is present ...

Страница 80: ...y 3 Stereo When you use Digital Auto mode with certain DVD and LD players performing operations such as Skip or Stop may momentarily interrupt the output This could switch the Listen Mode automatically to the surround mode intended for the input signal if you have manually selected a different listen mode Switching to Analog Input To fully enjoy the sonic benefits of specially encoded 2 channel DV...

Страница 81: ...z club or theater from any PCM or analog input source These modes are particularly effective when used with stereo program sources like CD television and FM radio You might enjoy trying the ARENA mode the next time you watch a sporting event or concert You can adjust the following elements to create a customized environment The WALL TYPE parameter lets you adjust the brightness of the sonic enviro...

Страница 82: ... X9992D 23 How Do I Adjust the Sound 2 Touch 3 Touch a DSP mode icon button 4 Optional Touch Parameter to adjust the wall type and effect level to your taste 5 Select the item to be adjusted Wall Type changes the quality of the simulated walls ...

Страница 83: ...S tape DVD etc and is not changed for playback in a smal home theatre environment THX engineers developed patented technologies to accurately translate the sound from the movie theatre environment into the home correcting the tonal and spatial errors that occur On the KRF X9992D when the THX mode is on the THX technologies are automatically added after the decoded signal Movies which have been enc...

Страница 84: ...e THX is activating THX will be activated auto matically when in an effective surround mode 3 Touch to return to the previous menu or touch any Quick Access menu button to access that menu What if I Want to Use Headphones Insert your headphone jack into the receiver jack Adjust the sound as described earlier in this chapter If you want to listen to a Dolby Digital or MPEG program through headphone...

Страница 85: ...en 3 Touch a button on the device s control screen The rest of this manual assumes that you have connected your home entertainment devices and identified those devices to PowerTouch If you have not done so follow the instruc tions under Identifying Devices For PowerTouch Control on page 37 of the Connections and Setup Guide before reading any further in this manual If you do not you will not see c...

Страница 86: ...ch as DVD players VCRs etc This menu controls the following note which device you have connected to the jack in the space provided How Do I Operate Devices I should use this button to control this device use this space to note your devices The device icons will also appear in the button after you identify a device for it ...

Страница 87: ...on Touch to access any customized commands you have taught PowerTouch for this device and to access this device s macros Touch the command or macro name to use it For more information on teaching commands to PowerTouch see What if my device does not work with any of the codes on the list What if I Want PowerTouch to Control Additional Functions on page 39 of the Connections and Setup Guide For mor...

Страница 88: ...igned the satellite TV receiver This accesses the satellite controls 3 Use one of these screens as your satellite TV remote depend ing on the service you receive The available buttons may vary depending on the setup code you assigned to this icon Touch to access any customized commands you have taught PowerTouch for this device and to access this device s macros Touch the command or macro name to ...

Страница 89: ... and Setup Guide For more inforamtion on device macros see How Do I Perform Several Actions at Once on page 63 of this manual 4 Touch m o vi e on Quick Access menu to return to the Movie menu To operate cable TV 1 Touch on the main or Quick Access menu 2 Touch the TV or input icon button to which you assigned the cable TV tuner This accesses the cable TV controls 3 Use this screen as your cable TV...

Страница 90: ...ee What if my device does not work with any of the codes on the list What if I Want PowerTouch to Control Additional Functions on page 39 of the Connections and Setup Guide For more inforamtion on device macros see How Do I Perform Several Actions at Once on page 63 of this manual 4 Touch m o vi e on Quick Access menu to return to the Movie menu VCR To operate the VCR 1 Touch on the main or Quick ...

Страница 91: ...e s macros Touch the command or macro name to use it For more information on teaching commands to PowerTouch see What if my device does not work with any of the codes on the list What if I Want PowerTouch to Control Additional Functions on page 39 of the Connections and Setup Guide For more inforamtion on device macros see How Do I Perform Several Actions at Once on page 63 of this manual 4 Touch ...

Страница 92: ...ds you have taught PowerTouch for this device and to access this device s macros Touch the command or macro name to use it For more information on teaching commands to PowerTouch see What if my device does not work with any of the codes on the list What if I Want PowerTouch to Control Additional Functions on page 39 of the Connections and Setup Guide For more inforamtion on device macros see How D...

Страница 93: ...o operate a laser disc player 1 Touch on the main or Quick Access menu 2 Select the icon you assigned to the laser disc player This accesses the laser disc controls 3 Use this screen as your laser disc player remote The available buttons may vary depending on the setup code you assigned to this icon Touch to access any customized commands you have taught PowerTouch for this device and to access th...

Страница 94: ...n device macros see How Do I Perform Several Actions at Once on page 63 of this manual 4 Touch m o vi e on Quick Access menu to return to the Movie menu Camcorder or Additional VCR To operate auxiliary video input e g a camcorder or a VCR 1 Touch on the main or Quick Access menu 2 Touch to set the camcorder or VCR as the input source 3 Play your camcorder or VCR as normal Please note that you cann...

Страница 95: ... CD Changer Kenwood 200 Disc CD Changers have many different features that make them ideal complements to your Kenwood receiver Some changer models can store disc and track titles for all loaded discs and then download this information to your receiver for display on PowerTouch s screen You can easily activate all these features using just a few of PowerTouch s buttons How Do I Operate Devices I s...

Страница 96: ... this device s macros Touch the command or macro name to use it For more information on teaching commands to PowerTouch see What if my device does not work with any of the codes on the list What if I Want PowerTouch to Control Additional Functions on page 39 of the Connections and Setup Guide For more inforamtion on device macros see How Do I Perform Several Actions at Once on page 63 of this manu...

Страница 97: ... on its LCD display allowing you to choose discs and songs by title in a few simple steps You have to assign disc and track titles to the discs in your CD player before you can transfer them to PowerTouch See your CD player s instruction manual for more information about assigning disc and track titles To read the loaded disc titles and store them in PowerTouch 1 Touch on the main or Quick Access ...

Страница 98: ... receiver is done sending the information to PowerTouch and you may move PowerTouch again PowerTouch s memory now contains the disc titles of every CD in the changer with title information 6 Touch to return to the CD controls 7 Touch m u si c on Quick Access menu to return to the Music menu To read the loaded track titles and store them in PowerTouch 1 Make sure you have followed the previous inst...

Страница 99: ...s finished reading data 7 Touch to return to the CD controls 8 Touch m u si c on Quick Access menu to return to the Music menu Entering Disc and Track Titles You can also use PowerTouch to enter disc or track titles if they are not already stored on the changer The titles you add are stored in memory on both PowerTouch and the changer To enter disc or track titles 1 Touch on the main or Quick Acce...

Страница 100: ...to the CD controls 9 Touch m u si c on Quick Access menu to return to the Music menu If you rearrange or add new CDs to the changer you will need to repeat both the disc and track read process Otherwise disc information is stored in PowerTouch permanently The track title information is not stored permanently in Power Touch Each time you select a CD to play you have to download its track title info...

Страница 101: ...disc title you want to play 6 If you want to play the disc from the beginning touch 7 Optional Touch The track titles for that disc are displayed in numerical order 8 If you want to play the disc starting from a particular track use the up or down arrow to scroll through the track titles then touch the track title 9 When you ve highlighted the track you want to begin playing touch 10 Touch to retu...

Страница 102: ... on the main or Quick Access menu 2 Touch This accesses the CD controls 3 Use this screen as your CD player remote The available buttons may vary depending on the setup code you assigned to this icon Touch to access any customized commands you have taught PowerTouch for this device and to access this device s macros Touch the command or macro name to use it How Do I Operate Devices ...

Страница 103: ...ections and Setup Guide For more inforamtion on device macros see How Do I Perform Several Actions at Once on page 63 of this manual 4 Touch m u si c on Quick Access menu to return to the Music menu To operate rotary CD players 1 Touch on the main or Quick Access menu 2 Touch This accesses the CD controls 3 Use this screen as your CD player remote The available buttons may vary depending on the se...

Страница 104: ...any of the codes on the list What if I Want PowerTouch to Control Additional Functions on page 39 of the Connections and Setup Guide For more inforamtion on device macros see How Do I Perform Several Actions at Once on page 63 of this manual 4 Touch m u si c on Quick Access menu to return to the Music menu To play Video CDs if your CD player supports the Video CD format 1 Touch on the main or Quic...

Страница 105: ...ick Access menu to return to the Music menu MD Recorder or Tape Deck To operate an MD recorder 1 Touch on the main or Quick Access menu 2 Touch This accesses the MD recorder controls 3 Use this screen as your MD recorder remote The available buttons may vary depending on the setup code you assigned to this icon Touch to access any customized commands you have taught PowerTouch for this device and ...

Страница 106: ...the Music menu Entering Disc and Track Titles If you have Kenwood DMF 7020 or DMF 9020 you can also use PowerTouch to enter disc or track titles To enter disc or track titles 1 Touch on the main or Quick Access menu 2 Touch 3 Stop playing an MD if it is playing 4 Touch 5 See How Do I Ente Text on page 7 and enter a title 6 Press 7 While watching the MD recorder s display use or on the Mini Disc Ti...

Страница 107: ...ned to this icon Touch to access any customized commands you have taught PowerTouch for this device and to access this device s macros Touch the command or macro name to use it For more information on teaching commands to PowerTouch see What if my device does not work with any of the codes on the list What if I Want PowerTouch to Control Additional Functions on page 39 of the Connections and Setup...

Страница 108: ...lay your records as normal Please note that you cannot control the turntable with PowerTouch you must still operate the turntable manually Second CD Player or Tape Deck To operate a second CD player or tape deck 1 Touch on the main or Quick Access menu 2 Touch The commands appear for the device you connected to this jack set and identified to PowerTouch 3 Use the available commands as your CD play...

Страница 109: ...rk with any of the codes on the list What if I Want PowerTouch to Control Additional Functions on page 39 of the Connections and Setup Guide 4 Touch m u si c on Quick Access menu to return to the Music menu Tuner To tune in to a radio station 1 Touch on the main or Quick Access menu 2 Touch This accesses the tuner commands 3 Tune in the station Touch to change bands ...

Страница 110: ...ry see Storing Radio Stations in Memory optional on page 40 of the Connections and Setup Guide Touch to open the stored stations list Touch a storage button and touch to tune that station 4 Touch m u si c on Quick Access menu to return to the Music menu RDS Radio Data System RDS Radio Data System is a system where radio stations transmit digital data for FM broad casts along with the broadcast sig...

Страница 111: ...n be preset For more information about storing stations see Storing Radio Stations in Memory optional on page 40 of the Connections and Setup Guide Before using RDS functions be sure to perform Storing RDS Stations Automatically on page 40 of the Connections and Setup Guide To search for a specific type of music or radio program 1 Touch on the main or Quick Access menu 2 Touch 3 Touch at the top o...

Страница 112: ...pes until the type you want appears The program types cycle in the order shown in the table below How Do I Operate Devices Pop Music POP M Rock Music ROCK M Easy Music EASY M Light Classical Music LIGHT M Serious Classical Music CLASSICS Other Music OTHER M Weather WEATHER Finance FINANCE Children s programmes CHILDREN Social affaires SOCIAL Religion RELIGION Phone in PHONE IN Program Type Name Re...

Страница 113: ...y Music COUNTRY National Music NATION M Oldies Music OLDIES Folk Music FOLK M Documentary DUCUMENT News NEWS Current Affairs AFFAIRS Information INFO Sports SPORT Education EDUCATE Drama DRAMA Cultures CULTURE Science SCIENCE Varied Speech VARIED Program Type Name Receiver Display How Do I Operate Devices ...

Страница 114: ...appears on the receiver display The display returns to its original screen after several seconds If the tuner locates a station playing the program type you want reception begins The display changes to show the station name To change to a different program type repeat Steps 4 through 6 above To cancel the program search touch during the PTY search ...

Страница 115: ...Do I Record Edit Mode PowerTouch provides a simple yet powerful editing procedure that lets you quickly and easily specify the source and destina tion devices To record 1 Touch on the main or Quick Access menu to open the Edit menu How Do I Record Edit Mode ...

Страница 116: ...ontrol screen for the destination device with two additional buttons on the left hand side a Touch Source to switch to the control screen for the source device and get it ready to play b Touch Destination to switch to the control screen for the destination device and get it ready to record 4 Touch the record control on the destination device then switch to the source device and touch the play cont...

Страница 117: ...justing the volume may cause the sound to clip on the recording You cannot record from the component you are using to record For example if you re recording on a VCR connected to the VIDEO1 jacks select a source other than Video 1 If your source is a camcorder or other video unit refer to the instruction manual for the particular unit you re recording from Digital to Digital Recording The PCM digi...

Страница 118: ...etting listen modes see To set the listen mode manually on page 20 You can also do this procedure automatically by selecting AUTO REC MODE with DISPLAY MODE key on the front panel of the receiver Press the DISPLAY MODE key for more than 2 second and select it If the sound is cut or interrupted using AUTO REC MODE try MANUAL REC MODE When you want to select MANUAL REC MODE play the music first and ...

Страница 119: ...ion easier if you need to operate PowerTouch in dim or nonexistent light To use PowerTouch in the dark press BACKLIGHT To turn off the light and return to normal display press BACKLIGHT again Backlight is automatically turned off when PowerTouch goes to sleep you will need to turn it on again when you reactivate PowerTouch Keep the Back Light turned off during normal use to maximize the life of yo...

Страница 120: ...ck up or down to increase or decrease the contrast until you are satisfied 3 Touch to save the contrast setting and return to the control screen How Do I Turn the Beeping On or Off PowerTouch emits beeps under various circumstances for example to confirm your entry You can turn these sounds off if you don t want to hear them To turn the beeps off 1 Touch on the main menu then touch 2 Touch once to...

Страница 121: ... Front Panel 1 Touch on the main menu then touch 2 Touch until the brightness is adjusted as you want Changing the Front Panel Display Mode 1 Touch on the main menu then touch 2 Touch until the display mode that you want appears A Connected Device Input Type DVD DGTL B Input Terminal Connected Device Video 4 DVD C Listen Mode Dolby Digital ...

Страница 122: ...up to 6 macros These macros enable you to group multiple actions onto a single button For example You could create a macro to access a specific TV station like setting a button on the radio in your car You would most likely choose a macro associated with your TV or one with the jack set to which you connected your cable or satellite receiver You would then define a macro that entered the channel n...

Страница 123: ...n which devices should turn on first and how much time you think should pass between each step 2 Touch on the main menu then touch 3 Figure out what device you will be using when you want to run the macro and select a macro line associated with that device 4 Touch Enter a name for the macro See How Do I Enter Text on page 7 for more information on entering names How Do I Perform Several Actions at...

Страница 124: ...Using PowerTouch Audio Video Receiver KRF X9992D 65 5 Touch 6 Touch a blank space blank macro function line How Do I Perform Several Actions at Once ...

Страница 125: ...tep 7 to insert all the devices and functions you want to use 9 Touch to return to the Macro Function menu 10 Touch to test the macro 11 If some of the functions did not occur you need to insert delay before these functions To insert a delay which is stored on its own line as a separate action a Touch the device line whose function did not occur How Do I Perform Several Actions at Once ...

Страница 126: ...To delete a function a Touch a macro function line you want to delete b Verify that this is the correct function Touch Optional To insert a function a Touch a macro function line where you want to insert a function then touch b Touch a device then touch an available function 13 Repeat steps 7 through 9 until you have defined all the actions necessary for this macro How Do I Perform Several Actions...

Страница 127: ...cess button to return to the Music or Movie menu Using Macros Once you have defined macros you can use them directly from the Quick Access menu for one touch operation of several devices There are two ways to use the macros you defined from the Macro Summary menu which displays all the available macros from the More screen for each device which displays the macros associated with that device To ru...

Страница 128: ...displayed use the up or down arrow to scroll through the list until you see it 3 Touch to return to the previous menu To run a macro from a device s More screen 1 Follow the steps under the device name in this chapter to access the controls for that device 2 Touch 3 Choose the macro from the list on the right side of the screen How Do I Perform Several Actions at Once ...

Страница 129: ...ify the exact conditions when the problem occurs This is the most important step in troubleshooting Whether you fix it yourself or have to describe it to a technician you are much more likely to really solve the problem if you know the exact circumstances surrounding the problem For example if you don t hear anything through the speakers it s useful to know if it only happens when you are listenin...

Страница 130: ... Cables especially old ones go bad more frequently than devices do Always suspect the cable before its device For one thing it s easier to test simply swap the cable with one connected to a device you know is working If the problem device works now it was the cable You can generally purchase new cables at most home electronics stores or via the Internet 5 User error is more likely than device fail...

Страница 131: ...anel will be lit See What s on the Front Panel of Your Kenwood Audio Video Receiver on page 2 of this manual The input mode matches the input signal e g analog vs digital that has been set See Switching to Analog Input on page 21 of this manual The correct Listen Mode e g Auto has been set for the digital input See What are Listen Modes on page 16 The correct speakers have been activated See Turni...

Страница 132: ... from my surround or center speakers Check that The proper surround play mode Dolby 3 Stereo Dolby Pro Logic DSP MPEG or Dolby Digital has been selected See What are Listen Modes on page 16 of this manual All of the speaker wires are connected tightly See Chapter One of the Connections and Setup Guide I can hear sound only from the center speaker when Dolby Pro Logic or Dolby 3 Stereo is selected ...

Страница 133: ...92D Troubleshooting Sound 2 Touch on the main menu then touch 3 Select 4 Touch Every time you select the button the volume will cycle between 0dB 3dB 6dB and back up to 0dB Select the level that best matches that of the other sources ...

Страница 134: ...HS or audio tape See Switching to Analog Input on page 21 The initial sound is intermittent or non existent when I start to play from a Dolby Digital DVD source Some DVD players simply have intermittent start up sound Check that the correct digital cable is being used The cable must be a digital coaxial or optical cable See Chapter One of the Connections and Setup Guide With a Dolby Digital progra...

Страница 135: ...ignals cannot be transmitted via composite standard connections and vice versa Check that the correct video input on the TV is selected Check that the video software you record does not have copy guard protection PowerTouch I don t see icons for all my devices You must identify devices for PowerTouch control for them to appear in the icon bar on PowerTouch See Chapter Two of the Connections and Se...

Страница 136: ...irst but ton press wakes it up The second press performs the action Your PowerTouch supports 2 way communication with the receiver If the green light on the front of the receiver is lit PowerTouch is receiving information It cannot transmit your new command until it is finished receiving information from the receiver My PowerTouch is not responding Make sure you are within the operating range for ...

Страница 137: ...receiver a TV high frequency fluorescent lighting or other electrical appliance Learning may be carried out with some devices remote I want to clear all the items in PowerTouch and make it to the factory set default condition While pressing and holding the CONFIRM and VOLUME DOWN button use the stylus to press the blue button at the bottom of the battery case Number Tone Meaning 1 high Confirms yo...

Страница 138: ... the receiver back on If the STANDBY indicator stops flashing replace this wire If the STANDBY indicator does not stop flashing turn off the receiver reconnect the speaker wires and repeat the first step for the next speaker Continue until you have isolated and replaced the shorted wire See Chapter One of the Connections and Setup Guide If none of the above solutions work reset the microprocessor ...

Страница 139: ...ll need to reset your speaker settings see Chapter Two of the Connections and Setup Guide 4 Reset the cleared settings before operating the receiver again The sound is distorted and the CLIP indicator on the receiver s front panel flashes red continually or stays red for more than 1 second at a time Lower the analog input level for the source device you re lis tening to Setting the proper input le...

Страница 140: ...Touch Every time you select the button the volume will cycle between 0dB 3dB 6dB and back up to 0dB 5 While the source component is playing reduce the Input Level to 3dB If the CLIP indicator still flashes frequently or remains lit for 1 second or longer reduce the Input Level to 6dB Receiver Tuner ...

Страница 141: ... Guide I can t receive a radio station Check that The appropriate antenna is connected See Chapter One of the Connections and Setup Guide The broadcast band is correct See Tuner on page 50 of this manual The tuner is set to the correct frequency See Tuner on page 50 of this manual I m getting a lot of static interference Check whether the receiver or antenna is too close to a TV or other electrica...

Страница 142: ...ransmit one command at a time stagger the timings of the various macro settings so that the commands are given at different times On or Off command for audio devices may not work cor rectly if they are not Kenwood components connected via system control cables On or Off command for TV monitor may not work correctly If it is already on On command turns it off and if it is already off Off command tu...

Страница 143: ...stom macros operating 68 D devices checklist 27 36 operating 26 troubleshooting 70 Digital Signal Processor DSP effects 22 digital to analog recording 59 digital to digital recording 58 dimming receiver front panel 62 Display Mode button 2 display panel 2 display screen adjusting 60 devices displayed 4 Dolby Digital speakers for surround sound 17 troubleshooting AC 3 programs 75 DVD player operati...

Страница 144: ... troubleshooting 82 RDS Radio Data System definition 51 features 51 searching for radio stations using PowerTouch 50 troubleshooting 82 reading and storing CD titles 38 receiver changing display mode 62 dimming front panel 62 items on front panel 2 troubleshooting 79 recording 56 S satellite TV operating 29 searching specific radio programs 50 setting DSP effects 22 listen mode manually 20 signal ...

Страница 145: ...hooting 79 turntable operating 49 troubleshooting 76 TV operating 28 troubleshooting 76 U using joystick to move around 7 macros 68 PowerTouch in the dark 60 PowerTouch s interface 6 V VCR helpful hints when recording 58 operating 31 35 recording a program 56 troubleshooting 76 video CDs playing 45 volume adjusting 10 control knob 2 ...

Отзывы: