background image


13


Basic Operation


- General Contr

o

l -


General Control


n


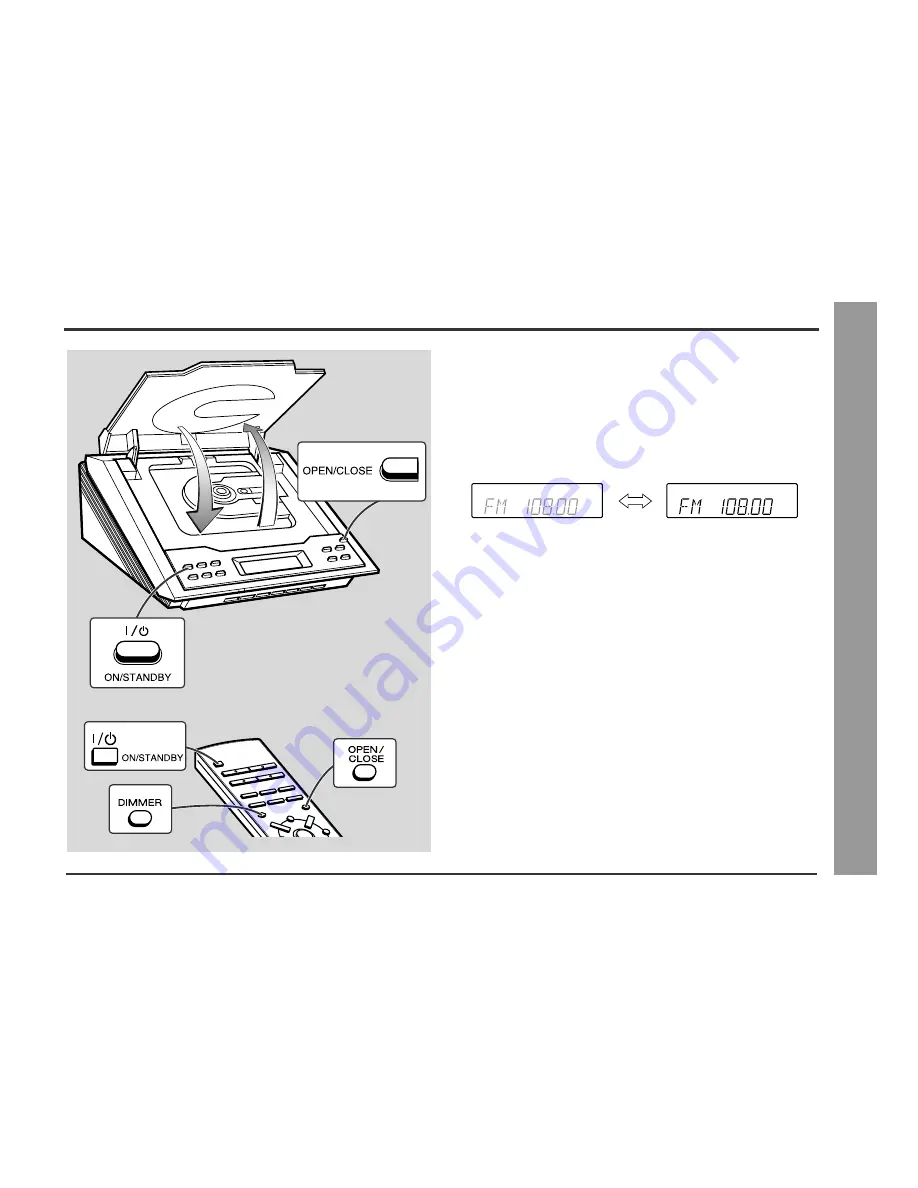
To turn the power on


Press the ON/STANDBY button to turn the power on.


To set the unit to stand-by mode:


Press the ON/STANDBY button again.


n


To change the display brightness (2 levels)


You can switch the display brightness by pressing the DIMMER button on the remote
control.


n


Opening and closing the CD compartment


The CD compartment cover is motorised.

When the power is turned on, you can open or close the CD compartment cover by
pressing the OPEN/CLOSE button.


Caution:


l


Do not stop or move the CD compartment cover manually. It may cause malfunc-
tions to the unit.


l


Be careful not to jam your fingers in the CD compartment cover.


Dimmed

Brightened

Содержание HM-233

Страница 1: ... product please read this manual carefully It will guide you in operating your KENWOOD product HM 233 Micro HI FI Component System consisting of RD M23 main unit and LS M23 speaker system MICRO HI FI COMPONENT SYSTEM HM 233 INSTRUCTION MANUAL KENWOOD CORPORATION B60 5125 08 00 CH T 0105 ...

Страница 2: ...ce is in proper operating condition Please read all of the safety and operating instructions before operating this appliance Adhere to all warnings on the appliance and in the instruction manual Follow all the safety and operating instructions These safety and operating instructions should be retained for future reference 1 Power sources The appliance should be connected to a power supply only of ...

Страница 3: ...s adjustments or performance of procedures other than those spec ified herein may result in hazardous radiation exposure l As the laser beam used in this compact disc player is harmful to the eyes do not attempt to disassemble the cabinet Refer servicing to qualified personnel only NOTE This equipment complies with the requirements of Directives 89 336 EEC and 73 23 EEC as amended by 93 68 EEC Con...

Страница 4: ...KENWOOD will not be held responsible for any damage resulting from use of this unit with a voltage other than that which is specified l CD players use a laser pickup which can damage the eyes if viewed directly Do not look at the pickup and do not touch the pickup directly n Volume control The sound level at a given volume setting depends on speaker efficiency location and various other factors It...

Страница 5: ... are read Do not mark this surface l Keep your discs away from direct sunlight heat and excessive moisture l Always hold the CDs by the edges Fingerprints dirt or water on the CDs can cause noise or mistracking If a CD is dirty or does not play properly clean it with a soft dry cloth wiping straight out from the centre along the radius Accessories Please confirm that the following accessories are ...

Страница 6: ...7 CD Play or Pause Tuning Up Button 16 20 8 CD Stop Tuning Down Button 16 20 9 CD Track Down or Fast Reverse Tuner Preset Down Button 17 21 10 CD Open Close Button 13 11 CD Track Up or Fast Forward Tuner Preset Up Button 17 21 n Display 1 Timer Play Indicator 2 Sleep Indicator 3 CD Random Play Indicator 4 Memory Indicator 5 FM Stereo Mode Indicator 6 CD Play Indicator 7 CD Repeat Play Indicator 8 ...

Страница 7: ...4 2 AM Aerial Terminal 10 11 3 Aerial Earth Terminal 10 11 4 FM 75 Ohms Aerial Socket 10 11 5 CD Digital Output Socket 24 6 Video Auxiliary Audio Signal Input Sockets 24 7 Speaker Terminals 10 11 8 AC Power Input Socket 10 11 2 1 3 4 5 6 7 8 The rating label is located on the bottom of the unit ...

Страница 8: ...3 14 Random Repeat Button 18 15 CD Open Close Button 13 16 Tuner Preset Up Button 21 17 CD Track Down Button 17 18 CD Fast Reverse Tuning Down Button 17 20 19 CD Play Button 16 20 CD Track Up Button 17 21 CD Fast Forward Tuning Up Button 17 20 22 CD Pause Button 16 23 CD Stop Button 16 24 Tuner Preset Down Button 21 25 Bass Up and Down Buttons 14 26 Treble Up and Down Buttons 14 1 2 3 4 5 6 7 8 9 ...

Страница 9: ...and Indicators n Speaker system 1 Tweeter 2 Woofer 3 Speaker Wire n Placing the speaker system There is no distinction between the right and the left speakers Note The speaker grille is not removable 3 2 1 Left speaker Right speaker ...

Страница 10: ...10 Preparation for Use System Connections System Connections Right speaker Left speaker FM aerial AM loop aerial VCR DVD etc Wall socket AC 230 V 50 Hz not supplied MD recorder not supplied ...

Страница 11: ...left channels The right speaker is the one on the right side when you face the unit l Do not let the bare speaker wires touch each other n Connecting the AC power lead After checking all the connections have been made correctly connect the AC power lead to the AC power input socket then plug the AC power lead of this unit into the wall socket Notes l Unplug the unit if it will not be used for a pr...

Страница 12: ...atteries UM 4 R03 HP 16 or similar l Periodically clean the transmitter on the remote control and the sensor on the unit with a soft cloth l Exposing the sensor on the unit to strong light may interfere with operation Change the lighting or the direction of the unit l Keep the remote control away from moisture heat shock and vibrations n Test of the remote control Face the remote control directly ...

Страница 13: ... the display brightness by pressing the DIMMER button on the remote control n Opening and closing the CD compartment The CD compartment cover is motorised When the power is turned on you can open or close the CD compartment cover by pressing the OPEN CLOSE button Caution l Do not stop or move the CD compartment cover manually It may cause malfunc tions to the unit l Be careful not to jam your fing...

Страница 14: ...SS appears on the display 2 Within 5 seconds press the VOLUME or button to adjust the bass Remote control operation Press the BASS or button to adjust the bass n Adjusting the treble Main unit operation 1 Press the BASS TREBLE button until TRE appears on the display 2 Within 5 seconds press the VOLUME or button to adjust the treble Remote control operation Press the TREBLE or button to adjust the ...

Страница 15: ... 00 23 59 AM 12 00 The 12 hour display will appear AM 12 00 PM 11 59 Note that this can only be set when the unit is first installed or it has been reset Refer to step 3 under If trouble occurs on page 26 3 Within 1 minute press the PRESET or button to adjust the hour and then press the MEMORY button l When the 12 hour display is selected AM will change automatically to PM 4 Within 1 minute press ...

Страница 16: ...on 2 Press the FUNCTION button until CD STOP or NO DISC ap pears on the display When operating with the remote control press the CD button 3 Press the OPEN CLOSE button to open the CD compartment 4 Place a CD on the spindle label side up Be sure to place 8 cm 3 disc in the middle of a disc holder 5 Press the OPEN CLOSE button to close the CD compartment Total number of tracks Total playing time 6 ...

Страница 17: ...ns may be covered with dust and the unit may not operate properly l If TV or radio interference occurs during CD operation move the unit away from the TV or radio n To locate the beginning of a track n To locate the desired portion Notes l Normal playback will resume when the or button is released l When the end of the last track is reached during fast forward END will appear on the display and CD...

Страница 18: ...the track selected next by the random operation On the other hand the button does not allow you to move to the previous track The beginning of the track being played will be located Caution After performing repeat or random play be sure to press the button Otherwise the disc will play continuously To cancel repeat or random play Press the RANDOM REPEAT button on the remote control repeatedly to se...

Страница 19: ... play is not possible 1 Whilst in the stop mode press the MEMORY SET MEMORY but ton to enter the programming save mode 2 Within 30 seconds press the or button to select the desired track Selected track number Playback time 3 Press the MEMORY SET MEMORY button to save the track number Playback order Total playback time 4 Repeat steps 2 3 for other tracks Up to 20 tracks can be pro grammed 5 Press t...

Страница 20: ...ing with the remote control press the TUNER button and then the BAND button to select FM or AM 3 Press the TUNING or button to tune in to the desired station Manual tuning Press the TUNING button as many times as required to tune in to the desired station Auto tuning When the TUNING button is pressed for more than 0 5 seconds scanning will start automatically and the tuner will stop at the first r...

Страница 21: ... the stations in memory in order starting with preset channel 1 4 Within 5 seconds press the MEMORY SET MEMORY button to store that station in memory If the MEMORY and preset number indicators go out before the station is mem orised repeat the operation from step 2 5 Repeat steps 1 4 to set other stations or to change a preset sta tion When a new station is stored in memory the station previously ...

Страница 22: ...ing timer 1 Press the CLOCK button to check that the clock is on time 2 Load a disc to be played 1 Press the ON STANDBY button to turn the power on 2 Press the CD or TUNER button to select the desired function When you selected the TUNER tune in to the desired station 3 Adjust the volume using the VOLUME buttons Do not turn the volume up too high 4 Press the TIMER button and within 6 seconds press...

Страница 23: ...start then press the MEMORY button l The timer playback starting time function and volume will be displayed and then the unit will enter the stand by mode automatically l will appear and the current time will be displayed To cancel the timer playback Press the ON STANDBY button to turn the power on 7 When the preset time is reached playback will start The volume will increase gradually until it re...

Страница 24: ...tomatically Adjust the volume using the VOLUME buttons VCR DVD etc MD recorder Connection cable for digital recording White White RCA lead not supplied Red Red To the line output sockets To the optical line input socket Headphones 1 Use a connection lead to connect the VCR DVD etc to the VIDEO AUX IN sockets When using video equipment connect the audio output to this unit and the video output to a...

Страница 25: ...isfy the standards l Is the disc distorted or scratched l Playback sounds are skipped or stopped in the middle of a track l Is the unit located near excessive vibra tions l Is the disc very dirty l Has condensation formed inside the unit Symptom Possible cause l Radio makes unusual noise con secutively l Is the unit placed near the TV or compu ter l Is the FM AM loop aerial placed properly Move th...

Страница 26: ...n it gently with a dry cotton swab n Cleaning the cabinet 1 Set the unit to the stand by mode and turn the power on again 2 If the unit is not restored in step 1 unplug and plug in the unit and then turn the power on 3 If neither step 1 nor 2 restores the unit do the following Press the ON STANDBY button to enter the power stand by mode Unplug the AC power lead from the AC INPUT socket on the unit...

Страница 27: ... 16 Height 128 mm 5 1 16 Depth 293 mm 11 9 16 Weight 2 7 kg 5 9 lbs Output power RMS 20 W 10 W 10 W 10 T H D Output terminals Speakers 8 ohms Headphones 16 50 ohms recommended 32 ohms CD digital output optical Input terminals Video Auxiliary audio signal 500 mV 47 kohms Type Compact disc player Signal readout Non contact 3 beam semiconductor laser pickup D A converter 1 bit D A converter Frequency...

Страница 28: ...ound on the bottom of the unit in the spaces designated on the warranty card and in the space provided below Refer to the model and serial numbers whenever you call upon your dealer for information or service on this product Model Serial Number ...

Отзывы: