background image

                                                                                                 - 19 -                                                     


11.1 Software installation 

PC system requirements: 
Windows XP or higher, monitor resolution min. 1024 x 600, one free USB port 

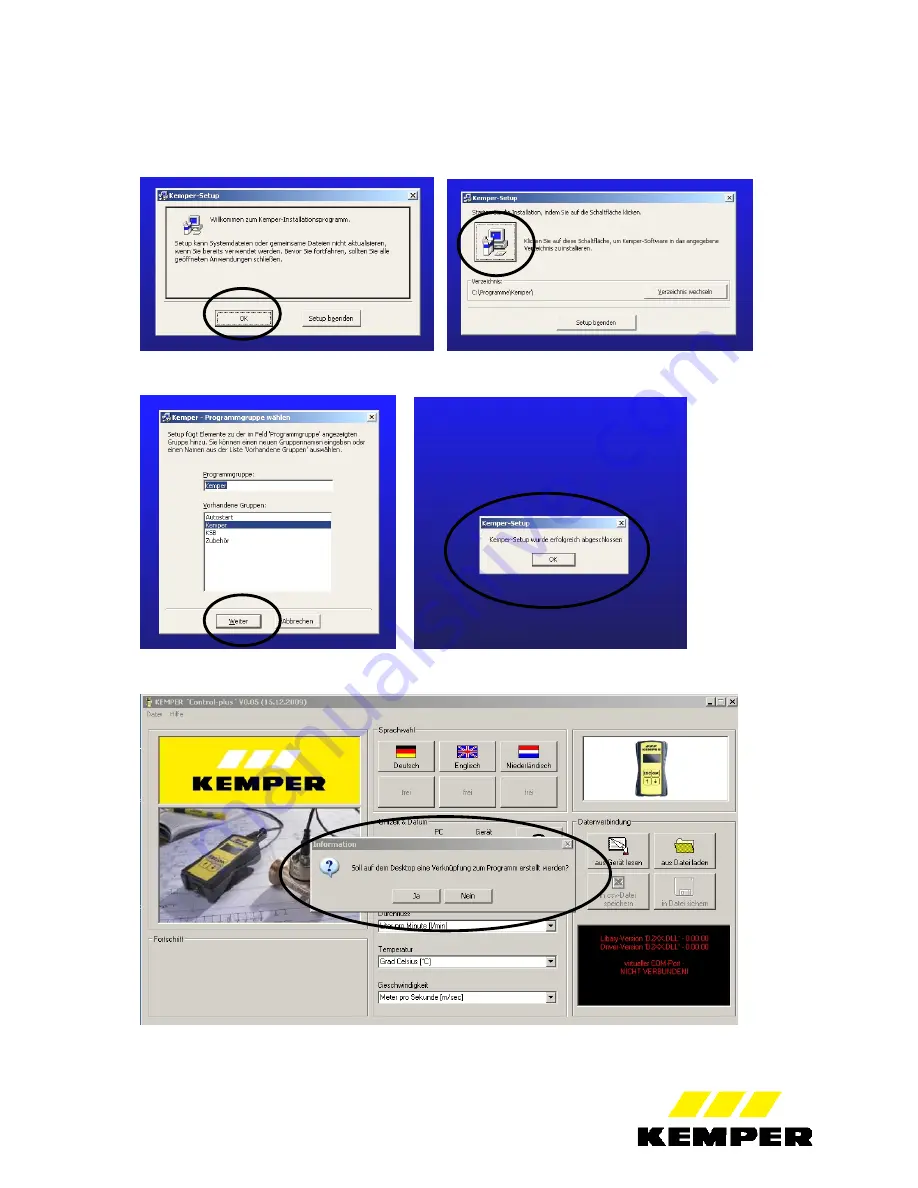
1. Insert CD ROM in a PC-CD ROM drive 
2. Start start.exe 
3. Confirm welcome message with OK 
4. Start installation with PC button 


5. Confirm Kemper program group with next 
6. Confirm completion of installation with OK 


7. Open software under: Start – Programs – Kemper – KEMPER ´Control-plus’ 
8. Create desktop shortcut with Yes. 


Содержание Figure 138 00 002

Страница 1: ...rement range Code letter P 8 7 3 Make measurement P 8 7 4 Allocation Sensor measurement range P 8 8 Connecting Control plus pressure sensor Figure 138 00 006 P 10 8 1 Connection with connection cable P 10 8 2 Make measurement P 10 9 Measuring with the sensor measurement module P 11 9 1 Application P 11 9 2 Connection of measurement module and the hand held measuring P 12 9 3 Structure of the measu...

Страница 2: ...lease contact Gebr Kemper GmbH Co KG Harkortstr 5 57462 Olpe Tel 02761 891 0 Fax 02761 891 175 E Mail info kemper olpe de 2 Safety instructions This safety data sheet contains basic instructions that must be complied with during storage operation and maintenance That means it is mandatory to read the operating instructions before installation and commissioning 2 1 Hazards if the safety instruction...

Страница 3: ...Figure 628 629 Measurement input for Temperature Sensor Pt100 Figure T5100 140 00 003 Measurement input Temperature Sensor Pt100 Measurement input 4 20mA optionally 0 20mA Measurement input 0 10 V Can save 4000 measurement data Measurement data storage optionally manual or as datalogger USB interface for PC link and measurement data analysis and evaluation Protection class IP65 Size 120x65x27 Hous...

Страница 4: ...umination is turned off Press any key to switch the display back on If no input is made for 180 sec factory setting time can be set in the system settings the device switches off 6 3 Power up with OK 1 Press OK key for 1 sec 2 KEMPER logo and the software version are displayed for approx 5 sec 3 The display switches into the measurement display 6 4 Measurement display window Sensor measurements o ...

Страница 5: ...nt display Example 3 Measurements with measurement module and various sensors General sensors 0 4 20 mA 0 10V Temperature Sensor Valve Pt1000 Figure Plug in temperature sensor Pt1000 Figure T5100 140 00 Temperature Temperature e g pressure Sensor measurement Figure 138 00 011 optional 16 digit sensor name ...

Страница 6: ...u Scroll back forward Select in the menu OK Confirm point change Esc back Arrow points to number selected to Scroll back forward OK Set and confirm number Arrow points to next number selected to set Scrollbars show position in the menu 1 x Esc switches from measurement display into the i Arrows indicate the selected 1 x OK Changes into the submenu Scrollbars show position in the menu ...

Страница 7: ...saved or overwritten in the measurement module Measurement module Load factory settings into measurement module Deletes the configuration in the measurement module 7 Connecting Control plus flow and temperature sensor valve Figure 138 4G 638 4G Sensor rating plate with measurement range Sensor in the test section Scroll back forward To select the submenu Arrows indicate the selected 1 x OK Changes...

Страница 8: ...in the display 7 3 Make measurement 1 Use Esc in the main menu to switch if not yet displayed in the main menu 2 Select submenu Select Sensor 3 Select submenu Figure 1384G 6384G 4 Select the rating plate measurement range that corresponds to the sensor with the code letter e g c 3 5 50l min 5 If applicable enter the inside pipe ø important for the flow velocity calculation 6 If applicable enter th...

Страница 9: ...rement range 5 85l min d Measurement range 5 85l min d Figure 138 4G 032 Figure 638 4G 025 Measurement range 9 150l min e Messbereich 9 150l min e Figure 138 4G 040 Measurement range 12 216l min f Figure 138 4G 050 Measurement range 17 298l min g ...

Страница 10: ... required to connect the hand held measuring instrument to the flow sensor optionally available both ends are marked yellow 8 2 Make measurement 1 Use Esc in the main menu to switch if not yet displayed in the main menu 2 Select submenu Select Sensor 3 Select submenu Figure 138 00 006 4 Go back to measurement display 5 Measurement are shown OK 2 X 1 X OK ...

Страница 11: ...hout having to make new settings directly on the display and can be saved with the datalogger The configuration can be adapted and changed with the hand held measuring instrument All Pt temperature measurements with Figure 138 638 4G Figure 628 629 and Figure T5100 140 00 003 are evaluated by the hand held measuring instrument as 2 conductor measurements The measurements will be falsified by the c...

Страница 12: ...range cable compensation etc 4 Important Write in the measurement module The settings will be applied to the measurement module To permanently save the configuration set in the hand held measuring instrument to the measurement module after entering the sensor settings the function Write in Measuring Module must be carried out If you do not carry out the writing and the measurement cable or the han...

Страница 13: ...applicable enter inside pipe ø important for the flow velocity calculation If applicable enter the glycol proportions The glycol additive changes the Qmin of the sensor Comply with the installation and operating instructions Figure 138 4G and Figure 638 4G If applicable enter the cable compensation e g Cable length x Cross section 6 Save measurement module Settings will be saved to the internal me...

Страница 14: ...dule Settings will be saved to the internal measurement module memory 7 Return to measurement display Jumps directly to the measurement display 9 6 Measurement module configuration for Pt100 1 Use Esc in the main menu to switch if not yet displayed in the main menu 2 Select measuring module submenu 3 Enter module name e g ROOM 3 0 4 Sensor selection Pt100 5 If applicable enter cable compensation e...

Страница 15: ...e g ROOM 3 0 4 Sensor selection 0 20mA or 4 20mA 5 Stipulate value at 0 4 mA 20mA and unit of measurement e g 4mA 0 5 bar and 20mA 10bar 6 Save measurement module Settings will be saved to the internal measurement module memory 7 Return to measurement display Jumps directly to the measurement display OK 1 X OK OK 1 X 2 X OK 1 X OK OK ESC OK OK OK OK OK OK OK OK OK OK OK OK OK OK ESC OK OK OK ...

Страница 16: ...odule name e g ROOM 3 0 4 Sensor selection 0 10V 5 Stipulate value at 0V 1 0V and unit of measurement e g 0V 0 5 bar and 1 0V 1 0bar 6 Save measurement module Settings will be saved to the internal measurement module memory 7 Return to measurement display Jumps directly to the measurement display 2 X OK 1 X OK OK ESC OK OK OK OK OK OK OK OK ESC OK OK OK OK OK OK OK OK ...

Страница 17: ...surement 1 Use Esc in the main menu to switch if not yet displayed in the main menu 2 Select datalogger menu 3 Single measurement function select save actual measurement 4 Enter optional no of the measurement 5 Data record is saved 10 2 Single measurement function Start long term measurement 1 Use Esc in the main menu to switch if not yet displayed in the main menu 2 Select datalogger menu 3 Selec...

Страница 18: ...n menu to switch if not displayed in the main menu 2 Select datalogger menu 3 Select menu Free memory xx erase memory 4 Enter password and confirm with OK factory setting 0000 5 Use ESC to exit the menu again 11 Control plus software for PC evaluation The Control plus PC software facilitates connecting and activating the customer s PC to the hand held measuring instrument The stored measurements c...

Страница 19: ... USB port 1 Insert CD ROM in a PC CD ROM drive 2 Start start exe 3 Confirm welcome message with OK 4 Start installation with PC button 5 Confirm Kemper program group with next 6 Confirm completion of installation with OK 7 Open software under Start Programs Kemper KEMPER Control plus 8 Create desktop shortcut with Yes ...

Страница 20: ...Yes 10 In the status window the software indicates in red letters that no connection has been established to the MASTER 11 2 Connecting hand held measuring instrument to PC USB cable Hand held measuring instrument scope of delivery ...

Страница 21: ...lect the language for the PC software desktop 2 Time and date Apply from PC to the controller automatic daylight savings time standard time switchover enabled or inactive 4 Select the unit display in the flow temperature and velocity record 1 2 3 After connection the status window displays the word CONNECTED in green letters ...

Страница 22: ...ta from the hand held measuring instrument 1 Select units for test record 2 Read the measurements from the device 3 Wait until all data have been completely read Acknowledge message 5 Save measurements in csv file 2 3 1 4 5 csv file open with Excel ...

Страница 23: ...1 2 3 15 12 2009 09 39 21 10 28 0 57 55 2 2 4 15 12 2009 09 39 22 10 28 0 57 55 2 2 5 15 12 2009 09 39 23 10 28 0 57 55 2 2 6 15 12 2009 09 39 24 10 28 0 57 55 2 2 7 15 12 2009 09 39 25 10 09 0 56 55 2 2 8 15 12 2009 09 39 26 10 28 0 57 55 2 2 9 15 12 2009 09 39 27 10 28 0 57 55 2 2 10 15 12 2009 09 39 28 10 27 0 57 55 2 Test record Measuring point Pt1000 Measurement No Date Time PT1000 C 3 1 15 1...

Отзывы: