background image

Vehicle PTZ Camera 


  User Manual 

31 


31 


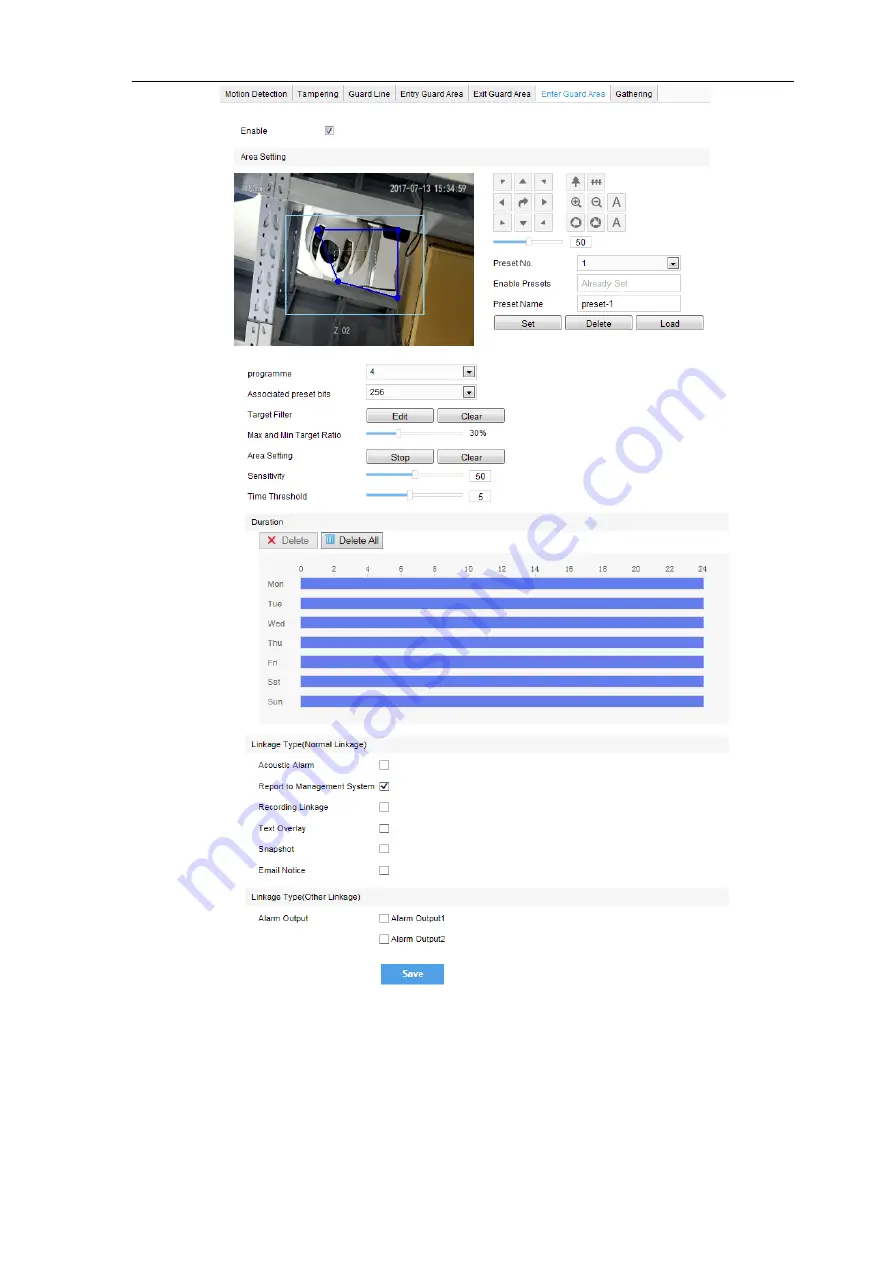
Picture 4-19 Enter guard area


4.3.5  *Exit Guard Area 

Enable this function in the interface to detect specific area at real time. Once any moving object leaves the 

area, an alarm will be triggered.   

Go  to 

Settings  >  Event  >  Intelligent Function  >  Exit  Guard  Area

  and  configure.  Setting  steps can  be 

referred to in 

Enter Guard Area

Содержание IPC52X Series

Страница 1: ...KEDACOM User Manual for Vehicle PTZ Camera IPC52X Series Version 02 June 2018...

Страница 2: ...y Co Ltd 131 Jinshan Road New District Suzhou 215011 People s Republic of China http www kedacom com en Tel 86 512 68418188 Fax 86 512 68412699 2018 Suzhou Keda Technology Co Ltd All rights reserved W...

Страница 3: ...ttings Camera Safety Instruction These instructions are intended to ensure that the user can use the product correctly to avoid danger or property loss Please read this Guide carefully before using th...

Страница 4: ...The camera adopts built in anti thunder technology and can withstand instant 4KV thunder when it is well grounded To prevent damage caused by thunders exceeding the built in anti thunder level an ind...

Страница 5: ...PTZ Control 16 4 2 1 Basic Configuration 17 4 2 2 Preset Position 18 4 2 3 Guard Tour 19 4 2 4 Restricted Patrol 20 4 2 5 Path Mode 20 4 2 6 Mixed Mode 21 4 2 7 Scheduled Task 22 4 2 8 Positioning 23...

Страница 6: ...5 1 3 Mobile Network 39 5 1 4 Positioning 40 5 1 5 Bluetooth 41 5 2 Access Protocol 41 5 2 1 VSIP 41 5 2 2 ONVIF 42 5 2 3 Access Public Network by 4G 42 5 2 4 Access Private Network by 4G 44 5 3 User...

Страница 7: ...ecurity IP66 rated protection anti thunder anti surge and etc Starlight movement effect Enhancing night view effect H 264 H 265 SVAC video encoding support triple streams Support 4G WiFi wired network...

Страница 8: ...Vehicle PTZ Camera User Manual 2 2 Support local recording user can query and playback videos on PC Support max 128G TF card storage...

Страница 9: ...Vehicle PTZ Camera User Manual 3 3 2 Appearance Picture 2 1 IPC521 F120 G Picture 2 2 IPC522 G230 G Note The camera can be either white or black and the above pictures are for your reference only...

Страница 10: ...t processors RAM Memory 4GB or above DirectX 9 0c This manual will take IE8 0 as an example 3 2 Initial Configuration 3 2 1 Activation When the device is used for the first time user needs to activate...

Страница 11: ...k parameters please follow the steps below 1 Select a camera to be configured click Modify Params or right click the mouse Interface is shown in Picture 3 3 Modify parameters and fill admin user name...

Страница 12: ...t camera and click Modify Params to view device IP address 2 Open browser and input the IP address to go to the activation interface as shown in the following picture 3 Configure admin user name passw...

Страница 13: ...device on internet it is strongly recommended that you set a strong password which is composed of at least 2 kinds of the following digits case sensitive letters or specific symbols and whose length r...

Страница 14: ...ps up with the Serial Number filled by default Please input Email address and Verification Code manually Click Get Security Code 3 Login to the email address to get the security code and fill in Comma...

Страница 15: ...Vehicle PTZ Camera User Manual 9 9 Picture 3 9 Password reset...

Страница 16: ...ce The default image effect is Standard Mode When the camera is used on vehicle edit it as Vehicle Mode manually 4 1 1 Toolbar Buttons Picture 4 1 Toolbar Buttons Play Pause Click this button to play...

Страница 17: ...cal PC User can set or modify snapshot or recording save path in Settings Local Setting EPTZ Click this button to enable the e PTZ function Left click and drag toward lower right to draw an area The p...

Страница 18: ...e pan and tilt rotation of the PTZ Click and the camera will rotate continuously in pan click again to stop it Step length means the rotation speed upon every click on the direction buttons Drag the s...

Страница 19: ...hicle Mode Indoor Mode and custom mode Select any mode and configure parameters accordingly Auto mode is to switch modes by day night or duration schedule If you want to customize select Save paramete...

Страница 20: ...age will be Auto mode is suggested Note If the target object is moving fast this method is not applicable Go to Settings Camera Image Exposure user can set Shutter Mode Auto Manual and Shutter Lower T...

Страница 21: ...to Settings Camera Image Image Enhancement select SmartIR in the drop down list of Dynamic Adjustment and drag the slide bar of SmartIR Sensitivity Anti flicker When there are floating cross strips i...

Страница 22: ...edit Day Mode Start Time and Day Mode End Time in the popup interface Alarm Triggered Cut Under this mode night cut is triggered by alarm input After selecting Alarm Triggered Cut mode select day or n...

Страница 23: ...pport display according to azimuth angle or PT position Last Spot Recovery Check it to enable last spot recovery function Last Spot Recovery Before the dome camera is powered off it stays at a positio...

Страница 24: ...g steps 1 Go to Settings Camera PTZ Preset adjust PTZ to expected position 2 Select Preset No from the drop down list and input Preset Name 3 Click Set to finish preset setting User can define differe...

Страница 25: ...urable Please refer to the part of Preset Position for setting steps Path Mode After user stops operation on the camera for a certain period of time camera will enable Path Mode automatically The Wait...

Страница 26: ...Adjust the PTZ again to another position and set it as the Right Limit 3 Settings take effect right after configuration To clear limits set one position both as the left and the right limit then the l...

Страница 27: ...n list of Patrol Path 3 Click Add Set Patrol Spots and Stay Time in the popup interface Each path allows max 32 presets 4 Click Save 5 Click Delete Load or Stop to perform respective operations 4 2 6...

Страница 28: ...TZ operations Each path records max 10 minutes 3 Click Preview to browse all recorded PTZ operations 4 Click Stop to stop previewing 5 Select a path and click Delete records to delete all the recorded...

Страница 29: ...duration Set the start time and end time and click Save to finish Click the icon behind the timeline and the Copy window will pop up Check several weekdays or Select All and click Copy to copy task du...

Страница 30: ...tion and click Azimuth Positioning Save this position and set it as the due north direction To display the compass on Live View interface go to Settings Camera OSD and check PTZ 4 3 Alarm Linkage Note...

Страница 31: ...on when an alarm is triggered send an e mail to the e mail address automatically Note Go to Settings Network Other Protocols SMTP to set the e mail address SMTP Simple Mail Transfer Protocol is a grou...

Страница 32: ...nable 2 Click Clear All and then Edit and the image will be divided into 16 columns and 12 lines of small squares Click a square drag toward lower right and click Stop Then the area is the detected ar...

Страница 33: ...eekdays or Select All and click Copy to copy durations to the weekdays Click Delete button or icon to cancel scheduled task Click to cancel all the scheduled tasks in one week Picture 4 16 Edit durati...

Страница 34: ...re 4 17 Tampering 4 3 3 Guard Line Enable this function in the interface to detect specific area at real time Once any object enters the guard line an alarm will be triggered Go to Settings Event Inte...

Страница 35: ...Vehicle PTZ Camera User Manual 29 29 Picture 4 18 Guard Line Setting steps 1 Check Enable...

Страница 36: ...interface to detect specific area at real time Once any moving object enters the guard area an alarm will be triggered Go to Settings Event Intelligent Function Enter Guard Area and configure Setting...

Страница 37: ...Guard Area Enable this function in the interface to detect specific area at real time Once any moving object leaves the area an alarm will be triggered Go to Settings Event Intelligent Function Exit...

Страница 38: ...d Area 4 3 8 Gathering Enable this function in the interface to detect specific area at real time When moving objects exceed the sensitivity an alarm will be triggered After setting the area and the s...

Страница 39: ...ndwidth Go to Settings Camera Video Encoding Format as shown in the following picture In the dropdown list of Multi Stream select Single Stream or Dual Stream or Triple Stream and the setting takes ef...

Страница 40: ...3 During upgrading please do nothing but waiting 4 After upgrading if it is necessary to upgrade the web client the system will prompt to download the plug in Please refer to the Web Client Upgrade fo...

Страница 41: ...firmware upgrade please login web client again The page will prompt to download a new plug in control After downloading it web client upgrade will be completed Login again to enter the latest web cli...

Страница 42: ...parameters through the web client 5 1 1 Ethernet Go to Settings Network IP and Port LAN as shown in the picture to configure IP Address Subnet Mask and Default Gateway Picture 5 1 LAN 5 1 2 Wireless G...

Страница 43: ...nd input the IP address default is 192 200 1 200 to go to the login interface Input user name and password admin admin123 to login Note If logging in to a non activated device for the first time under...

Страница 44: ...esh till it shows that the router has been connected to which means the WiFi is available 3 Go back to the Wireless Configuration interface The Hot List displays all available networks as shown below...

Страница 45: ...Port Mobile Network to configure mobile network 1 Check Enable Mobile Network and Enable Default APN and select Verification Protocol If it accesses to VPDN private network or foreign operator you ne...

Страница 46: ...same time 4 When 4G signal strength is medium or weak it will affect image transmission when the network isn t 4G type image transmission is unavailable 5 1 4 Positioning Go to Settings Network IP an...

Страница 47: ...fore Click Refresh to search the devices available within current range Picture 5 7 Bluetooth Note 1 Suggest using the attached bluetooth headset in the kit to connect to the camera 2 The Available De...

Страница 48: ...ic Network by 4G The steps for the camera to access public network when using 4G signal 1 Insert a SIM card in the camera and power it on Open the web client and go to Settings Network IP and Port Mob...

Страница 49: ...n the IP address after 4G dial up 17230 port show4ginfo command or login to device 23 port ifconfig to view usb0 interface 4 Click OK and the camera will be added to the device list automatically 5 Go...

Страница 50: ...on Open the web client and go to Settings Network IP and Port Mobile Network Check Enable Mobile Network and uncheck Enable Default APN Picture 5 13 Enable mobile network 2 Input APN for private netwo...

Страница 51: ...he camera has been added to the VMS automatically User needs not to operate but the VMS address IPv4 camera UUID and camera password have all been filled Picture 5 15 VSIP protocol 6 Login to the CU c...

Страница 52: ...d If the device is used in highly risky environment suggest modifying the password monthly or weekly 3 Please keep your user name and password safe Delete Select user IP and click Delete to delete the...

Страница 53: ...try Times and Illegal Login Lock Time Click Save When user logs in and input wrong user name or password for the configured times the user IP will be locked up for a certain period of time during whic...

Страница 54: ...pe on the popup interface and click OK to save Static Select Static and edit Text The text can be viewed on the window Magnification Select Magnification to view the zoom times on the window Navigatio...

Страница 55: ...s Experts Group CIF Resolution of 352 288 pixels QCIF Resolution of 176 144 pixels QXGA Resolution of 2048 1536 pixels 4 3 UXGA Resolution of 1600 1200 pixels 4 3 PC Personal Computer PPPoE Point to P...

Отзывы: