manualshive.com logo in svg
background image

3

II INSTALLATION

This Custom Pasta

System MUST

be installed, inspected, calibrated
and serviced by qualified and/or
certified and/or licensed service
personnel – you may void your
Keating warranty if installation is not
completed per current local, national
and Keating specifications. Contact
your dealer for assistance.

DAMAGE DURING 
SHIPMENT

The Custom Pasta

System has been assembled,

tested and inspected at the factory. Upon arrival, the
complete Pasta System should be checked for any
damage that may have occurred during shipment.

IF EQUIPMENT ARRIVES DAMAGED

Keating does not assume responsibility for loss or
damage incurred in transit.

IMPORTANT

This merchandise has been thoroughly inspected and
carefully packed before leaving our plant. Responsibility
for its safe delivery was assumed by the carrier at the
time of shipment. Claims for loss or damage to the
contents should, therefore, be made upon the carrier,
as follows:

CONCEALED LOSS OR DAMAGE

Concealed loss or damage means loss or damage
which does not become apparent until the merchandise
has been unpacked. The contents may be damaged in
transit due to rough handling even though the carton
may not show external damage. When the damage is
discovered upon unpacking, make a written request for
inspection by the carrier’s agent within fifteen days of
the delivery date. Then file a claim with the carrier since
such damage is the carrier’s responsibility. By following
these instructions carefully, we guarantee our full
support of your claims to protect you against loss from
concealed damage.

VISIBLE LOSS OR DAMAGE

Any external evidence of loss or damage must be noted
on the freight bill or express receipt, and signed by the
carrier’s agent. Failure to adequately describe such
external evidence of loss or damage may result in the
carrier refusing to honor a damage claim. The form
required to file such a claim will be supplied by the
carrier.

DO NOT RETURN DAMAGED MERCHANDISE TO
KEATING. FILE YOUR CLAIM AS ABOVE.

IT MAY BE NECESSARY TO INSTALL A BACK FLOW
OR CHECK VALVE ON THE WATER SUPPLY LINE
TO THE PASTA COOKER. CHECK WITH EITHER
YOUR LOCAL WATER OR HEALTH DEPARTMENT
TO DETERMINE IF THIS IS NECESSARY IN YOUR
SPECIFIC AREA.

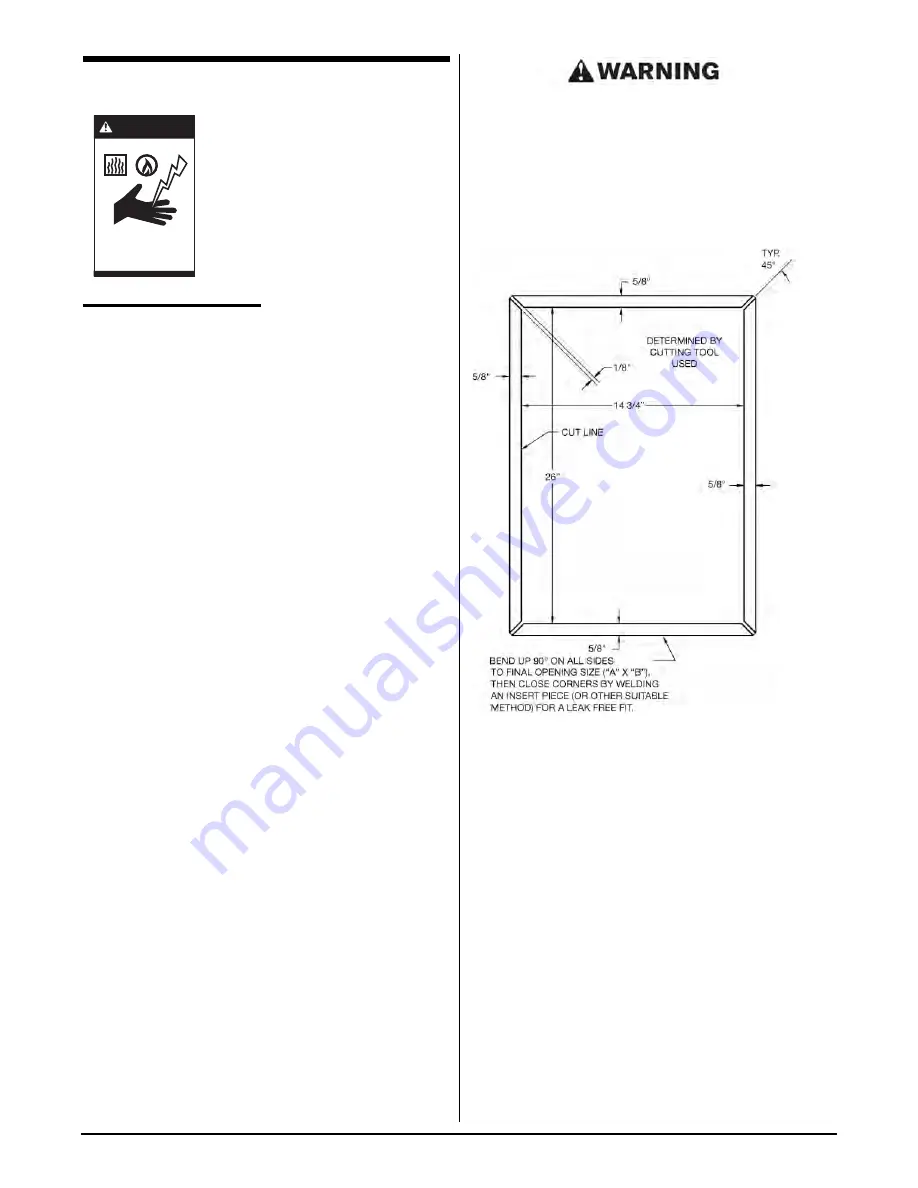
DROP-IN PASTA COUNTER

CUTOUT/INSTALLATION

INSTALLATION NOTES

1. Minimum of 130 sq. in. unobstructed vent area near
pasta cooker required for combustion.

2. All Drop-In Pasta must be 16” from any open flame.

3. Pasta must be located no more than 5” from counter
top front.

4. Cabinet must be reinforced to support full weight of
past in use (pasta, water, food, etc.).

5. Pasta cooker must be properly ventilated and located

under an exhaust hood.

DROPPING THE PASTA COOKER INTO THE 

It is only necessary to place the pasta cooker in such a
position that the front edge overlaps the front raised
edge of the opening.

COUNTER TOP

WARNIN

G

Improper installation

can cause damage,

injury or death.

Shock

Burns

Gas

Содержание INSTANT RECOVERY SERIES 2009

Страница 1: ...CTION VII WIRING DIAGRAMS 14 ELECTRIC PASTA WITHOUT TIMERS 15 14 ELECTRIC PASTA WITH DIGITAL TIMERS 16 14 ELECTRIC PASTA WITH 138 BLACK DIAL TIMERS 17 14 ELECTRIC PASTA WITH BASKET LIFT DIGITAL TIMERS...

Страница 2: ...er of all warrant and liability Keating of Chicago Inc manufacturer reserves the right to change specifications at any time IMPROPER INSTALLATION ADJUSTMENT ALTERATION SERVICE OR MAINTENANCE CAN CAUSE...

Страница 3: ...ic timers Low water safety shutoff 1 full port front drain valve on 14 11 4 for 18 and larger High temperature limit control with manual reset Patented accurate temperature control system 2 F Ideal 35...

Страница 4: ...anel before servicing NEVER leave a pasta system unattended during operation NEVER move a pasta system when full of hot water NEVER introduce objects or liquids into pasta system while operational whi...

Страница 5: ...a claim with the carrier since such damage is the carrier s responsibility By following these instructions carefully we guarantee our full support of your claims to protect you against loss from conce...

Страница 6: ...device or its associated piping to limit the appliance movement Connectors must comply with ANSI Z21 69 CAN1 CAN CGA 6 16 latest edition for connectors for movable gas appliances Quick disconnect dev...

Страница 7: ...difference between the two thermostats Having less than a twenty degree difference will increase the possibility of a boil over and cause the pasta cooker to short cycle The recommended starting tempe...

Страница 8: ...t Lift Model 1 Fill Pasta System as described on page 6 Filling 2 Set primary left thermostat to 212 F 100 C and secondary right thermostat to 190 F 87 8 C 3 Fill basket s to proper level and place on...

Страница 9: ...turn ON and the display will now be indicating OR The BEEPER will BEEP 4 times NOTE If STEP 1 was OK proceed to STEP 2 If not retry Step 1 making sure the power was OFF for at least 30 seconds or more...

Страница 10: ...any maintenance problem is directly or indirectly related to cleanliness NOTE Water level problems caused by the sensors not being cleaned adequately will not be covered under warranty NOTE Use of sod...

Страница 11: ...cleaning Control of the water level is fully automatic with the auto fill system The water level is controlled by two circuit boards and two sensors The sensors are located in the tube on the right si...

Страница 12: ...it The potentionmeter adjusts the sensitivity of the probe Adjusting this sensor will not increase the depth of the water Improper adjustments can effect the operation of the cooker and cause damage...

Страница 13: ...not minutes or seconds 1 Reset the timer see pages 8 9 Water leaking in the rear of the pasta cooker 1 Replace fill hose Part 037390 sold per foot Breakers continue to trip 1 Ensure all wires to the c...

Страница 14: ...echanism does not operate a Connections are loose or timer is faulty b Motor limit switch is faulty c Lift motor is faulty d Actuator is faulty e Control circuit fuse has blown f Relay is faulty a Tig...

Страница 15: ...Fig 7 1 Custom Pasta System Electric Control Panel 1 2 3 2 4 5 6 6 7 7 ORDERING PARTS Parts may be ordered by part number by calling Keating at 1 800 KEATING or your local servce company You may also...

Страница 16: ...SMALL 002565 CIRCUIT BREAKER 40AMP 1P 012129 4 6 6 4 FUSE 300V 3AMP 004334 2 2 2 2 CONTACTOR 110V 3P 50AMP 011225 3 3 3 2 CONTRACTOR 110V 4P 40AMP 005597 1 TRANSFORMER STEPDOWN 004376 1 1 1 1 220 110V...

Страница 17: ...15 VII WIRING DIAGRAMS 14 ELECTRIC PASTA 2 THERMOSTAT WIRING DIAGRAM WITHOUT TIMERS 2...

Страница 18: ...14 ELECTRIC PASTA WITH DIGITAL TIMERS WIRING DIAGRAM 16...

Страница 19: ...17 14 ELECTRIC PASTA WITH 138 TIMERS WIRING DIAGRAM PRE 2000 SERIES BLACK DIAL TIMER NOT DIGITAL...

Страница 20: ...18 14 ELECTRIC PASTA WITH BASKET LIFT AND DIGITAL TIMERS WIRING DIAGRAM...

Страница 21: ...19 18 20 ELECTRIC PASTA WITH 138 TIMERS WIRING DIAGRAM PRE 2000 SERIES BLACK DIAL TIMER NOT DIGITAL...

Страница 22: ...20 18 ELECTRIC PASTA 2 THERMOSTAT WIRING DIAGRAM WITHOUT TIMERS...

Страница 23: ...21 24 ELECTRIC PASTA WITH DIGITAL TIMERS WIRING DIAGRAM...

Страница 24: ......

Страница 25: ...______________ INVOICE NUMBER __________________________ SERIAL NUMBER ______________________________ FRYER FILTER SYSTEM GRIDDLE REMARKS ____________________________________ TOP SIDE COOKER HOT PLATE...

Отзывы: