background image

70

Note

●If your phone is set at Smart Mode, you can only receive data using Infra

   red communication function.  In order to send data, you need to change 

   modes to normal mode.  Please refer to “Infrared communication” section 

   on the attached “Manual” for more information. 

●Infrared communication function might not work correctly with some 

   handsets even if they are equipped with infrared port. 

●Infrared communication function may not work properly under the direct 

   sunlight or under a fluorescent light. 

●If infrared ports move during Infrared communication, this may 

   interrupt the data exchange.

●Avoid covering infrared ports with objects and fingers while data is 

   being exchanged. 

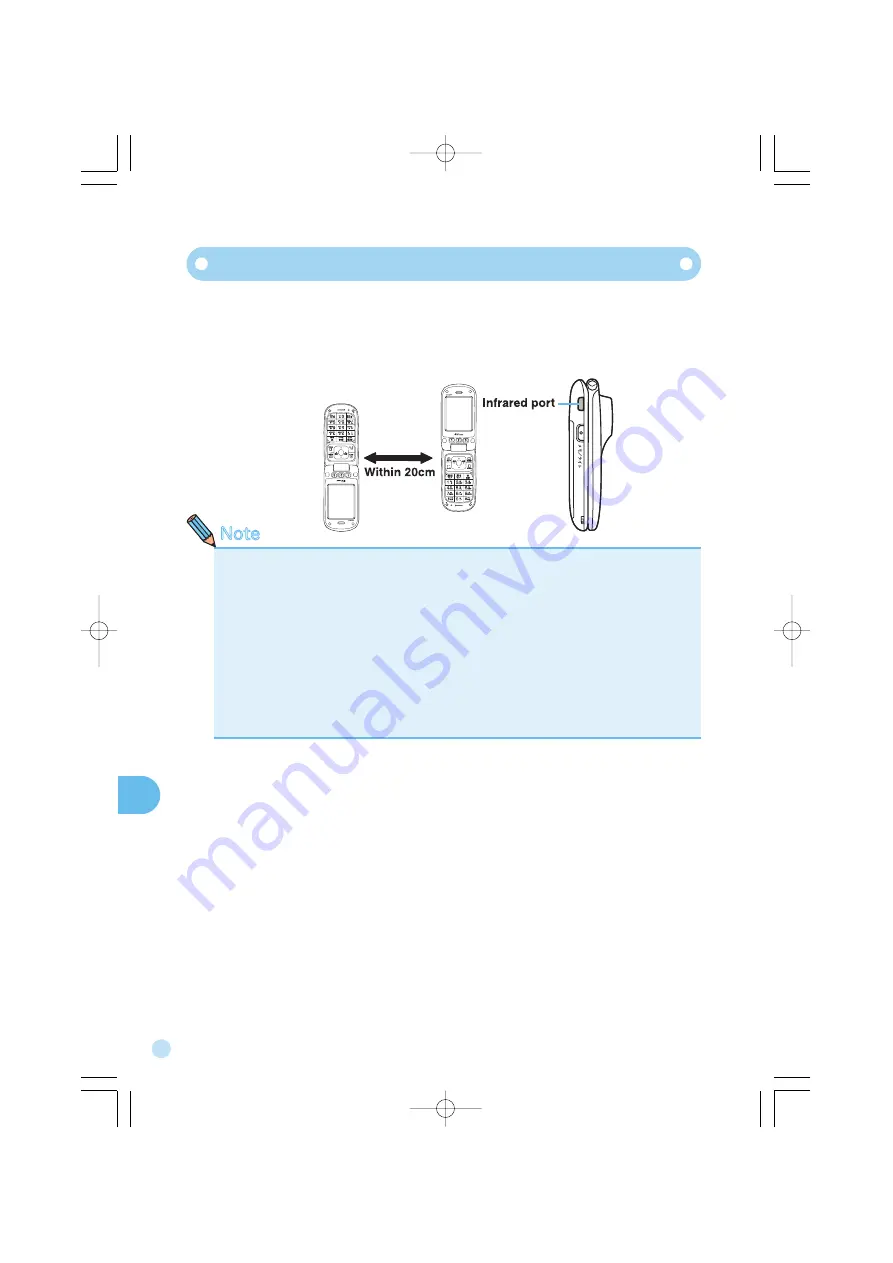
When using Infrared communication, both the sending and receiving 

handsets need to be set up for Infrared communication.  While data is 

being exchanged, infrared ports on the two phone have to be facing 

each other in a straight line, and the distance between the ports need 

to be less than 20cm. 

Infrared communications 

Other Features

Содержание A1407PT

Страница 1: ...sed telephones batteries and battery chargers at stores bearing the logo regardless of brand and manufacturer to protect the environment and reuse valuable resources Sales KDDI CORPORATION OKINAWA CEL...

Страница 2: ...n the attached A1407PT Manual carefully to use your cellphone correctly If you think there is a fault with your cellphone please check conditions with the below Troubleshooting guide found on Customer...

Страница 3: ...et to manner mode to avoid disturbing others with ringtones In a crowded place like inside a packed train there may be somebody wearing a heart pace maker near you please keep your cellphone power off...

Страница 4: ...mode p 22 Smart Mode screen Smart Mode How to Use Smart Mode A1407PT is pre set at Smart Mode when purchased Smart Mode is a mode where only frequently used functions such as call mail and camera are...

Страница 5: ...Certain Places How to Register Numbers on One Touch Keys Push and hold down One Touch Keys for more than 1 second will connect you to pre registered numbers If you would like to check the registered...

Страница 6: ...o numbers you register as Pair Function easily You can make a call to or send an E Mail to numbers you register with a simple function Sound can be delivered via vibration on your bones You can make a...

Страница 7: ...ake your calls it will play an auto reply and prompts the caller to leave messages To make and receive calls leave your power on Press down for more than 1 second There may be areas where you cannot r...

Страница 8: ...ne off or use drive mode when driving Reading mail or looking at the display Holding a cellphone in your hand to talk When the cellphone is set to drive mode it will not release any ringtones when an...

Страница 9: ...to filter Spoof e mail There is a danger that this may be a trick to make you call back to an expensive paying number Please be careful When a caller hangs up in less than 3 seconds this will be marke...

Страница 10: ...saster Message Board you can register information on your safety news on damages received and your comments After registering information notification E Mails will be sent to pre registered family mem...

Страница 11: ...n Note Registered information can be stored for up to 72 hours Maximum of 10 messages can be registered per number If you register more than 10 messages the old ones will be overwritten by the new mes...

Страница 12: ...h Your Cellphone 21 Switching the Display Language to English 22 Initializing EZweb E Mail 24 Check Your Own Telephone Number and E Mail Address 25 Changing Your E Mail Address 26 1 12 2 Making a call...

Страница 13: ...ering a Pair Partner to a One Touch Keys 44 Calling from One Touch Keys 45 Checking and Calling Pair Partner from One Touch Keys 45 42 What You Can do with The Camera 55 How to Take a Good Photograph...

Страница 14: ...klet Warranty Japanese Notice for using your cellphone Japanese Manual Desktop holder Getting Ready Checking Contents of Package Note AC power adapter is not included in the package Please purchase AC...

Страница 15: ...ra Key Back Manner Mode Key Mail Key Call Pair Key Microphone Easy light for taking Battery pack cover Please do not cover built in antenna when making or receiving calls and using EZ web Sub display...

Страница 16: ...1 10 26 AM 14 Getting Ready 100V AC outlet Power plug AC Adapter 01 Connector External connection jack Desktop holder When disconnecting Press lock buttons on both sides and pull out Charging Your Cel...

Страница 17: ...g Directly via the AC Adapter 01 Getting Ready 100V AC outlet When disconnecting the connector Press lock buttons on both sides and pull out AC Adaptor 01 Power plug External connection jack Connector...

Страница 18: ...long time more than 1 second Press down for a long time more than 2 seconds Electronic signal condition Battery level Strong Plenty Little Needs charging No battery Charging Medium Weak Very weak No...

Страница 19: ...ceiving a call Pair Function Entering cellphone numbers and letters EZ menu Connecting to users only website for more than 1 second Manner menu Manner mode on off Press and hold for approx 1 sec or lo...

Страница 20: ...oming in Placing call or talking EZweb starting up Unanswered call Unread E Mail Easy Voice Memo Vibrator on Manner mode on Key operation is disabled Incoming ring tone o Alarm on Bone Conduction Spea...

Страница 21: ...splay on the Sub Screen How to Use Your Cursor Key and Center Key cursor key center key Cursor key Choosing items Moving cursors when composing an E Mail message To confirm items selected Confirm Retu...

Страница 22: ...e key in the location corresponding to the location on the display For example in order to activate Address Book press Camera Key Soft Key Address Book Key Center Key When you want to go back to the p...

Страница 23: ...dinary phones To make inquiries apply for or make changes using the automated guidance of the au Customer Service Center au website or EZweb To change settings under Other Settings in E Mail Set up Su...

Страница 24: ...selected from the normal mode Therefore the first thing to do is to turn the smart mode off and set the normal mode as follows 1 When the normal mode standby screen is displayed press 2 Select Setting...

Страница 25: ...es with and press Select A warning on changing the setting appears on the display therefore press OK or wait a moment A confirmation message appears on the display followed by the smart mode menu 3 Se...

Страница 26: ...purchased your cellphone please contact your nearest au shop or au customer center for information You need to initialize your setting before using the service Your E Mail address is automatically as...

Страница 27: ...25 1 2 Your cellphone number and E Mail address will be displayed Getting Ready Check Your Own Telephone Number and E Mail Address Press Menu on the standby screen Select My number and press Select...

Страница 28: ...7 21 10 26 AM 24 Getting Ready Changing Your E Mail Address in your E Mail address ezweb ne jp can be changed Press Menu on the standby screen Select Mail and press Select Select E Mail and press Sel...

Страница 29: ...ept and press Choose a column press Edit and input E Mail address then press OK Select Send and press Send Select OK and press Select Note If the E Mail address you entered is already taken by another...

Страница 30: ...standby screen and enter the number of the person you want to call Press When you finish your call press Note How to make a call using Bone Conduction speakers Enter the number you would like to call...

Страница 31: ...ode When an area code begins with 0 dial eacluding 0 005345 1 212 123 XXXX Country code USA Area code Phone number 001 KOKUSAI MOBILE TALK Application required For inquiries please contact the KDDI Cu...

Страница 32: ...rm Please refer to How to return a call from the list of missed calls calls made on the page 31 for how to return a missed call 30 If the caller is registered in your address book by name and telepho...

Страница 33: ...menu when the standby screen is displayed Select Call and press Select Select Outgo History or Incom History and press Select Select the phone number you want to call on and press Select Note The outg...

Страница 34: ...byte symbol Some writing methods may not be available for certain letter input screens When registering contacts on your phone book or writing E Mail you can use and to write letters and numbers In th...

Страница 35: ...l screen switching Capital Small case letter switching 1 byte alphabet To switch between capital and small case letters enter the letter and then press Key Number of times to press the key 1 2 3 4 5 6...

Страница 36: ...nce press twice How to Input Letters Basic Letter Input Method When you go over the letter you want to type Reverse function To input letters assigned to the same key one after another To switch betwe...

Страница 37: ...t u v T U V 8 w x y z W X Y Z 9 0 Note The characters in the shaded boxes cannot be used when changing your own address Character Entry 1 Display address input screen by following the processes expla...

Страница 38: ...played 2 Select Call and press Select 3 Select AddressBook and press Select 4 Press New entry Registering Entries in the Address Book Address Book You can store up to 700 phone numbers and E Mail addr...

Страница 39: ...elect 6 Enter name and press OK 8 Make correction to phonetic alphabet and press OK Phonetic alphabets are automatically entered Example Alan Ford 9 Select Direct input and press Select 7 Select Edit...

Страница 40: ...area code Example 090xxxxxxxx Example aikawa ezweb ne jp 10 Enter the phone number and press Save 11 Select Do not input and press Select 12 Select Direct input and press Select 13 Enter E Mail addre...

Страница 41: ...addresses can be stored Each new entry will be stored with the least unused memory number between No 000 No 699 In order to register an entry using the list of received and dialled calls select Histo...

Страница 42: ...screen is displayed 2 Select Call and press Select 3 Select AddressBook and press Select Making a Call to an Entry in the Address Book 4 Select the person you would like to call and press p36 41 qxd...

Страница 43: ...calling method You can choose whether or not to disclose your phone number to the receiver 184 Call This will withhold the caller s number 186 Call This will notify the caller s number 5 Select the ca...

Страница 44: ...Address Book In order to cancel Pair Partner registration please follow the below procedure When the standby screen is displayed Select the Pair Partner you would like to cancel Cancel Select Yes If...

Страница 45: ...rocess explained in How to compose an E Mail and send it Page 47 after the process 5 For sending C Mail please refer to How to compose a C Mail and send it Page 53 after the process 5 2 Select the Pai...

Страница 46: ...lso possible to register a Pair Partner using One Touch Keys 3 Select the person you would like to register and press Reg Note You cannot register a person who is not entered in the Address Book as a...

Страница 47: ...d like to make a call to for a long time about 1 second 1 When the standby screen is displayed press the One Touch Keys for the Pair Partner you would like to make a call to 2 Check the Pair Partner n...

Страница 48: ...unt of data exchanged You need to register with EZweb in order to use E Mail services If you have not made an application at the time of purchase of this cellphone please contact your nearest au shop...

Страница 49: ...omposing and Sending E Mail 3 Select E Mail and press Select 4 Select Create New and press Select 5 Select Address Book and press Select You can copy the address to send the message to from the list o...

Страница 50: ...e registered more than one addresses with this person Select Input and press Select then enter the body of the message and press OK 8 1 byte katakana cannot be inserted Select Do not attach then press...

Страница 51: ...lect E Mail and press Select 4 Select Inbox and press Select 5 Choose a message you would like to read and press Select This will show the body of the message This will show all the mails in the Inbox...

Страница 52: ...essages previous to and following the message selected If you press you can go back to the inbox folder Some photographs and movies may be displayed instead of their le names If this happens select th...

Страница 53: ...nswering a set of questions Recommended if you would like to set up a filter while checking filtering standard Blocks E Mail sent from PCs Recommended if you intend to exchange E Mail only with other...

Страница 54: ...cellphone If you would like to receive messages that contain URL addresses and cellphone numbers you can disable this function For details please refer to the About C Mail Security Block Function sec...

Страница 55: ...press Select Composing and Sending C Mail 3 Select C Mail and press Select 4 Select Create New and press Select 5 Select Address Book and press Select You can copy the address to send the message to...

Страница 56: ...e C Mail sent will be saved in your sent messages folder 6 Select the person you want to send a message to and press Select If there are more than one cellphone numbers registered choose a cellphone n...

Страница 57: ...ndby screen or be registered on your Address Book Photos and movies of less than 300KB can be attached to E Mail messages to be sent It may take a while to send and receive mail messages depending on...

Страница 58: ...otographs in VGA or SXGA size hold your camera in a landscape position Picture Size and Memory Size Different photograph sizes and example of their usage and memory size Movie size To take good pictur...

Страница 59: ...isplayed 2 Select Camera and press Select Press Shot Press Save 3 Select Photo and press Select 4 You will hear a shutter and a photograph is taken 5 This will save the photo you took onto a data fold...

Страница 60: ...ze 071012 1030 01 01 is the sequence number for photographs taken on the same day at the same time VGA and SXGA sizes 10120001 0001is the sequence number for photographs taken on the same day The mini...

Страница 61: ...au shop or au customer center for information You need to initialize your setting before using the service Please refer to Initializing E Mail EZweb on the page 24 On EZweb you can access Chaku Uta se...

Страница 62: ...ws and weather and other latest information Area guide Offers regional information Life Useful information that helps your life Shopping and auction Offers shopping information you can use from your c...

Страница 63: ...fore the screen is loaded This will display EZ web menu 3 Select Top menu and press Select 4 Select the site you would like to access and press Select Note You can scroll the screen up and down using...

Страница 64: ...62 EZweb p58 62 qxd 06 7 21 10 48 AM 60 1 Show favourite sites you would like to register and press Browser Press Resistering to Bookmark Press Reg 2 3 Resistering to Bookmark EZweb...

Страница 65: ...when the standby screen is displayed Press Bookmark Select the site you would like to view using and press Select 2 3 1 Viewing the Bookmark Checking Information on Paying Services Press when the stan...

Страница 66: ...will be saved on the Sound folder in your data folder 1 Display au one top screen following instruction on process 1 3 of How to access an information site on page 61 2 Select Serch by category and p...

Страница 67: ...ium EZ Password in order to access paying information sites EZ Password The 4 digit number you chose when lling in the application form Premium EZ Password The 4 digitnumber you chose when lling in th...

Страница 68: ...at the time of purchase When the Bone Conduction Speakers are activated the close function to end a call is disabled Bone Conduction Speakers and standard speakers will be alternated each time you op...

Страница 69: ...ed and pressing Note You can adjust the volume while the call is connected by pressing the side volume keys Volume adjustment can be done in 6 levels Using the Bone Conduction Speakers will shorten th...

Страница 70: ...No Safety Buzzer Note The Safety Buzzer function is set at OFF when you purchase your handset In order to use the safety buzzer function you need to set this up while the phone is on normal mode For...

Страница 71: ...emote Auto Lock You may set the auto lock function by making repeated calls to your A1407PT from a pre set telephone number within the pre set slot of time Auto lock function can be set when the phone...

Страница 72: ...unication function may not work properly under the direct sunlight or under a uorescent light If infrared ports move during Infrared communication this may interrupt the data exchange Avoid covering i...

Страница 73: ...the power on Are keypads locked Battery is going flat Is Easy Voice Memo function on Isn t the volume set low Please charge your battery pack Press down for a long time more than 1second to disable E...

Страница 74: ...SPAM 7 Mail lter 7 E Mail Address 25 Changing 26 Disaster Message Board Service 8 Charge the battery pack 14 Initializing process 24 Infrared communications 70 Desktop holder 12 Calls 28 Making a Call...

Страница 75: ...Send an E Mail 43 P R T Index Remote Auto Lock 69 S Power On 16 Power O 16 Troubleshooting 71 Smart Mode Menu 2 20 Safety Buzzer 68 Smart Mode 2 O One ring Calls 7 One Touch Keys 3 13 Calling from One...

Страница 76: ...ycle unused telephones batteries and battery chargers at stores bearing the logo regardless of brand and manufacturer to protect the environment and reuse valuable resources Sales KDDI CORPORATION OKI...

Отзывы: