background image

PRODIGY Technical Manual 

37 

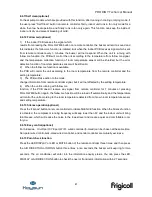
Setting fan

speed

Actual fan speed

H+(H+=H+G)

A

H(=H)

B
C

M+(M+=M+Z)

D

M(M=M)

E
F

L+(L+=L+D)

G

L(L=L)

H
I

T1-Td 

(°F)

L

L-(L-=L-D)

H

H-(H-=H-G)

M

M-(M-=M-Z)


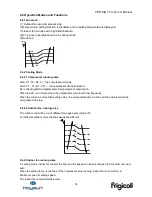
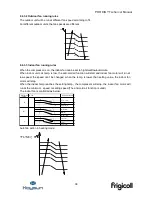
The auto fan acts as below rules: 

a

b

c

d

T1

e


8.4.2.4 Condenser temperature protection 

T3

Resume

Off

Decrease

Hold


When condenser temperature temp. is more than setting value, the compressor will stop. 


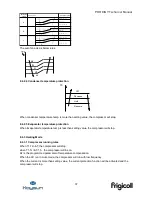
8.4.2.5 Evaporator temperature protection 

When Evaporator temperature temp.is less than setting value, the compressor will stop. 


8.4.3 Heating Mode 

8.4.3.1 Compressor running rules 

When T1-Ts>-

ΔT, the compressor will stop, 

when T1-T

S

<ΔT-1.5

the compressor will be on. 

ΔT is the programmed parameter of temperature compensation. 
When the AC run in mute mode, the compressor will run with low frequency. 

When the current is more than setting value, the current protection function will be activated and the 

compressor will stop. 


Содержание KAY-26 DN7

Страница 1: ...PRODIGY 3D Inverter Technical Manual...

Страница 2: ...r the first time 21 5 5 Adding the refrigerant after running the system for many years 23 5 6 Re installation while the indoor unit need to be repaired 24 5 7 Re installation while the outdoor unit ne...

Страница 3: ...Be sure the installation area does not deteriorate with age If the base collapses the air conditioner could fall with it causing property damage product failure and personal injury Do not let the air...

Страница 4: ...on particularly on the condenser and evaporator fins could cause product malfunction or inefficient operation Operational Do not expose the skin directly to cool air for long time Do not sit in the dr...

Страница 5: ...al 5 2 Function and specifications Model Names of Indoor Outdoor Units 3D inverter Capacity Indoor units Outdoor units 9k KAY 26 DN7 KAE 26 DN7 12k KAY 35 DN7 KAE 35 DN7 18k KAY 52 DN7 KAE 52 DN7 24k...

Страница 6: ...verage Pdesignh kW 2 4 2 6 SCOP W W 4 1 4 2 Energy Efficiency Class A A Tbiv 7 7 Heating Warmer Pdesignh kW 3 0 3 0 SCOP W W 5 1 5 2 Energy Efficiency Class A A Tbiv 2 2 Tol 15 15 Moisture Removal L h...

Страница 7: ...m 21x13 37 21x13 37 c Fin spacing mm 1 2 1 2 d Fin type code Hydrophilic aluminium Hydrophilic aluminium e Tube outside dia and type mm 7 innergroove tube 7 innergroove tube f Coil length x height x w...

Страница 8: ...Efficiency Class A A Tbiv 7 7 Heating Warmer Pdesignh kW 4 7 7 2 SCOP W W 5 4 5 2 Energy Efficiency Class A A Tbiv 5 4 Tol 15 15 Moisture Removal L h 1 7 2 3 Max input consumption W 2550 3700 Max cur...

Страница 9: ...Hydrophilic aluminium Hydrophilic aluminium e Tube outside dia and type mm 9 52 innergroove tube 9 52 innergroove tube f Coil length x height x width mm 860x508x44 730x660x44 g Number of circuits 4 4...

Страница 10: ...PRODIGY Technical Manual 10 3 Dimensions 3 1 Indoor Unit Model W D H KAY 26 DN7 717 193 302 KAY 35 DN7 805 193 302 KAY 52 DN7 964 222 325 KAY 71 DN7 1106 232 342...

Страница 11: ...PRODIGY Technical Manual 11 For KAY 26 DN7...

Страница 12: ...PRODIGY Technical Manual 12 For KAY 35 DN7 For KAY 52 DN7...

Страница 13: ...PRODIGY Technical Manual 13 For KAY 71 DN7...

Страница 14: ...PRODIGY Technical Manual 14 3 2 Outdoor Unit...

Страница 15: ...PRODIGY Technical Manual 15 For KAE 26 DN7...

Страница 16: ...PRODIGY Technical Manual 16 For KAE 35 DN7 KAE 52 DN7...

Страница 17: ...PRODIGY Technical Manual 17 For KAE 71 DN7...

Страница 18: ...m LIQUID SIDE GAS SIDE HEAT EXCHANGE EVAPORATOR HEAT EXCHANGE CONDENSER COMPRESSOR 2 WAY VALVE 3 WAY VALVE 4 WAY VALVE COOLING HEATING T2 Evaporator temp sensor T1 Room temp sensor ACCUMULATOR INDOOR...

Страница 19: ...79kgf cm 19 3 4 6500 663kgf cm 6700 683kgf cm 5 2 Connecting the cables The power cord of connect should be selected according to the following specifications sheet Rated current of appliance Nominal...

Страница 20: ...Additional refrigerant g m Gas Liquid KAY 26 DN7 KAE 26 DN7 3 8 9 52 1 4 6 35 5 10 25 15 KAY 35 DN7 KAE 35 DN7 3 8 9 52 1 4 6 35 5 10 25 15 KAY 52 DN7 KAE 52 DN7 1 2 12 7 1 4 6 35 5 20 30 15 KAY 71 DN...

Страница 21: ...position 2 Connect the charge hose with the push pin of handle lo to the 3 way valves gas service port 3 Connect the charge hose of handle hi connection to the vacuum pump 4 Fully open the handle Lo...

Страница 22: ...age 5 Discharge the refrigerant Close the valve on the charging cylinder and discharge the refrigerant by loosening the flare nut on the 2 way valve approximately 45 until the gauge indicates 0 3 to 0...

Страница 23: ...he refrigerant after running the system for many years Procedure 1 Connect the charge hose to the 3 way service port open the 2 way valve and the 3 way valve Connect the charge hose to the valve at th...

Страница 24: ...charge hose for 5 seconds and then close it quickly 4 Set the 2 way valve to the close position 5 Operate the air conditioner at the cooling cycle and stop it when the gauge indicates 0 1MPa 6 Set th...

Страница 25: ...set the 2 way and 3 way valves to the open position Be sure to use a hexagonal wrench to operate the valve stems 7 Mount the valve stems nuts and the service port cap Be sure to use a torque wrench t...

Страница 26: ...the valves Low side on the charge set and charge the system with liquid refrigerant If the system cannot be charge with the specified amount of refrigerant or can be charged with a little at a time a...

Страница 27: ...the filter a little to loosen the fastener Step2 Pull the filter gently along the horizontal direction Step3 Pull out the filter 6 2 How to Remove the horizontal louver Step1 Open the horizontal louve...

Страница 28: ...ps A and B remove the two screws Step2 Open the panel assembly move the slider to fix the panel Step3 Press the locker A and B to lose the indoor from the installation plate Step4 Unfold the supporter...

Страница 29: ...o Remove the panel assembly Step1 Open the screw caps A and B remove the two screws Step2 Open the panel assembly loosen the display board connector Step3 Pull the panel assembly along the direction i...

Страница 30: ...sary to remove the panel to remove the PCB in order to show clearly inside these pictures are without panel 6 6 How to Remove the Electrical control box Step1 Remove screw A B C pull out the coil temp...

Страница 31: ...ake for this sample you need to remove screw X to lift the E box a little Then you can remove the Screw E This problem will be solved before mass production Step3 Open the E box to lose the fan motor...

Страница 32: ...N Because the 24K indoor unit is relatively large and heavy it must have two persons to implement the following steps Step1 Remove the Electric control box Step2 Remove the Chassis assembly Step3 Unfo...

Страница 33: ...ay come into operation and cause the unit to operate abnormally 2 The room relative humidity should be less than 80 If the air conditioner operates beyond this figure the surface of the air conditione...

Страница 34: ...s the room temperature in Fan and Drying mode Displays the self diagnostic codes Dispalys for three seconds when Timer ON Fresh Swing Turbo or Silence feature is activated Dispalys for three seconds w...

Страница 35: ...out current voltage and temperature If these protections happen the corresponding code will display on indoor unit and the unit will stop working 8 3 6 Indoor fan delayed open function When the unit s...

Страница 36: ...perature compensation When the AC run in mute mode the compressor will run with low frequency When the current is more than setting value the current protection function will be activated and the comp...

Страница 37: ...e compressor will stop 8 4 2 5 Evaporator temperature protection When Evaporator temperature temp is less than setting value the compressor will stop 8 4 3 Heating Mode 8 4 3 1 Compressor running rule...

Страница 38: ...the anti cold air function will start and indoor fan motor will run at low speed the speed can t be changed when the temp is lower than setting value the indoor fan motor will stop When the indoor te...

Страница 39: ...8 4 3 5 Evaporator coil temperature protection T2 Resume Off Decrease Hold When evaporator temperature temp is more than the setting protection value the compressor will stop 8 4 4 Auto mode This mode...

Страница 40: ...mperature stops rising and indoor fan is fixed at low speed Anti cold wind function has the priority 8 4 7 3 Operation time in sleep mode is 7 hours After 7 hours the AC quits this mode and turns off...

Страница 41: ...nge information from remote controller signal but it will not affected by the setting temperature 4 When the unit is running with follow me function if the PCB doesn t receive any signal from remote c...

Страница 42: ...emp Targeted Frequency FT Targeted Frequency Actual Frequency Fr Actual Frequency Indoor fan speed IF Indoor fan speed Outdoor fan speed OF Outdoor fan speed EXV opening angle LA EXV opening angle Com...

Страница 43: ...bo For some big capacity motors 14 FF Actual fan speed Display value turns to decimal value and then multiply 10 The unit is RPM For some small capacity motors display value is from 14 FF hexadecimal...

Страница 44: ...the unit will run in Auto mode Auto fan speed 24 setting temp When ON OFF control closed it will send switch off signal 8 5 3 3 Dip switch F2 setting status are as below Dip switch 2 Dip switch 1 Rem...

Страница 45: ...oard must be set differently The connection method must be Bus type 8 5 2 The setting state are the same for all the indoor units connected to the same Non polar wired controller 8 5 6 Alarm port outp...

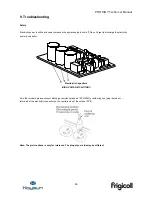
Страница 46: ...ischarge the electricity power in capacitor Electrolytic Capacitors HIGH VOLTAGE CAUTION For other models please connect discharge resistance approx 100 40W or soldering iron plug between terminals of...

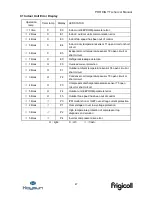
Страница 47: ...n 1 times O F0 Overload current protection 2 times O F1 Outdoor ambient temperature sensor T4 open circuit or short circuit 3 times O F2 Condenser coil temperature sensor T3 open circuit or short circ...

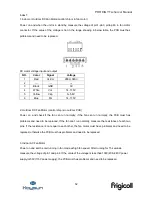
Страница 48: ...sed causes Installation mistake PCB faulty Trouble shooting Yes Replace the indoor outdoor main PCB Power off then restart the unit 2 minutes later EEPROM a read only memory whose contents can be eras...

Страница 49: ...S Black pan N Yes Power off then restart the unit 2 minutes later Power off then restart the unit 2 minutes later No Replace the outdoor main PCB Power on Is the error extinguished Replace the outdoor...

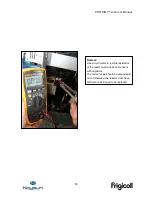
Страница 50: ...nual 50 Remark Use a multi meter to test the resistance of the reactor which does not connect with capacitor The normal value should be around zero ohm Otherwise the reactor must have malfunction and...

Страница 51: ...e failure Supposed causes Wiring mistake Fan ass y faulty Fan motor faulty PCB faulty Trouble shooting Power off then restart the unit 2 minutes later Shut off the power supply Rotate the fan by hand...

Страница 52: ...Fan Motor control chip is in outdoor PCB Power on and check if the fan can run normally if the fan can run normally the PCB must has problems and need to be replaced If the fan can t run normally mea...

Страница 53: ...tinuous 3 minutes and this situation happens 3 times the display area will show EC and AC will turn off Supposed causes T2 sensor faulty Indoor PCB faulty System problems such as leakage or blocking T...

Страница 54: ...0 06V or higher than 4 94V the LED will display the failure Supposed causes Wiring mistake Sensor faulty PCB faulty Trouble shooting Check the connection between temperature sensor and PCB Correct th...

Страница 55: ...posed causes Power supply problems System blockage PCB faulty Wiring mistake Compressor malfunction Check the power supply Check the connections and wires Stop the unit No Yes No Correct the connectio...

Страница 56: ...PM malfunction Outdoor fan ass y faulty Compressor malfunction Outdoor PCB faulty Trouble shooting Check the wiring between main PCB and compressor Correct the connection or replace the wires and conn...

Страница 57: ...rror Code P1 Malfunction decision conditions An abnormal voltage rise or drop is detected by checking the specified voltage detection circuit Supposed causes Power supply problems System leakage or bl...

Страница 58: ...PCB faulty Trouble shooting Check the air flow system of indoor and outdoor units Clear up the air inlet and outlet or the heat exchanger of indoor and outdoor units Yes No Yes Yes Power off then rest...

Страница 59: ...causes Wiring mistake IPM malfunction Outdoor fan ass y faulty Compressor malfunction Outdoor PCB faulty Trouble shooting Check the wiring between main PCB and compressor Correct the connection or rep...

Страница 60: ...ature sensor from PCB measure the resistance value with a tester Temperature Sensors Room temp T1 sensor Indoor coil temp T2 sensor Outdoor coil temp T3 sensor Outdoor ambient temp T4 sensor Compresso...

Страница 61: ...59 77 171 1 29078 117 243 0 38991 2 28 39 8239 38 100 5 62961 78 172 1 25423 118 244 0 37956 1 30 37 1988 39 102 5 39689 79 174 1 2133 119 246 0 36954 0 32 35 2024 40 104 5 17519 80 176 1 17393 120 24...

Страница 62: ...084 115 239 2 422 4 25 222 8 36 97 34 32 76 169 7 82 116 241 2 357 3 27 211 4 37 99 32 94 77 171 7 566 117 243 2 294 2 28 200 7 38 100 31 62 78 172 7 321 118 244 2 233 1 30 190 5 39 102 30 36 79 174...

Страница 63: ...nual 63 2 Compressor checking Measure the resistance value of each winding by using the tester Position Resistance Value ASN98D22UFZ ASM135D23UFZ ATF235D22UMT Blue Red 1 57 20 68 1 75 20 68 0 75 20 68...

Страница 64: ......
Отзывы: