Kawai Z1000 Скачать руководство пользователя страница 43

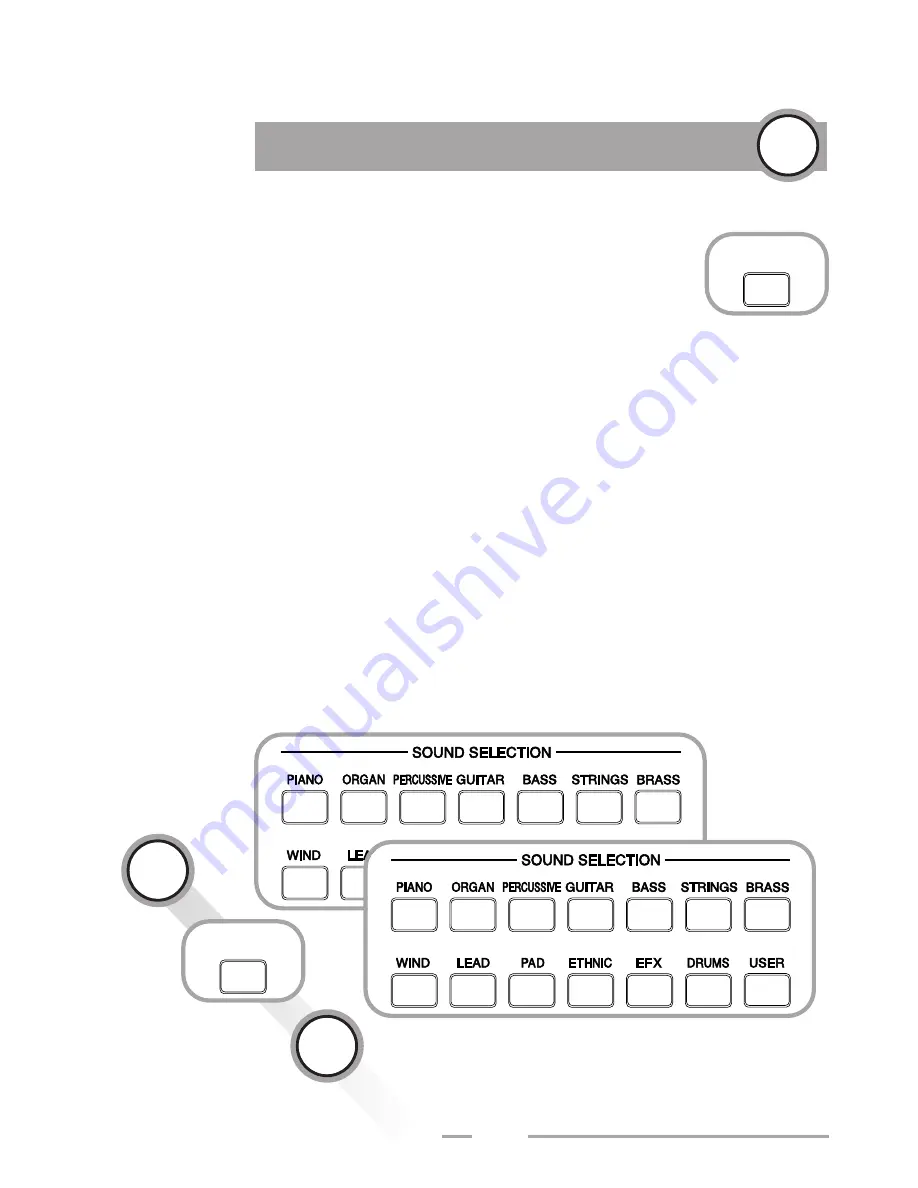
Sound Selection/Alternate Sounds

You can choose from a total of 14 instrumental groups and the
names of the sound categories are printed on the front panel
(e.g. "Piano", "Organ/Accordion", "Mallet/Percussion", "Guitar).
This division groups the timbres according to the General MIDI
Standard (GM).  You can select an additional memory area for 14
alternate instrumental groups by pressing the Alternate Sounds
button; the LED lights up to indicate that this area has been
activated.  The arrangement of the timbres corresponds to the
same instrumental groups that are listed on the front panel.
Each of the first 13 memory areas form a fixed part of your
sound library; being stored in ROM (Read-Only Memory), they
cannot be overwritten. In each memory area 10 locations are
available for storing your own sound programs. These are
designated with the term "User" (user sounds) and can be
rewritten.

Sounds in Practice

10 

43

MORE

SOUNDS

MORE

SOUNDS

Содержание Z1000

Страница 1: ...Owner s Manual Digital Keyboard...

Страница 2: ...rom heat sources such as radiators heat registers or other products that produce heat 9 Keep the instrument away from electrical motors neon signs fluorescent light fixtures and other sources of elect...

Страница 3: ...its are designed to provide reasonable protection against harmful interference in a residential installation This equipment generates uses and can radiate radio frequency energy and if not installed a...

Страница 4: ...the substructure was laid with the General MIDI Standard in order to set up different formats for broad communication capabilities when exchanging songs between units Looking to the future Kawai has...

Страница 5: ...ng instructions contain important information which will enable you to make optimal use of the instrument s numerous functions Please read and observe all safety precautions and operating instructions...

Страница 6: ...room basement or at a swimming pool etc 2 Volume Damage When this keyboard is used in combination with loudspeakers or headphones sound levels may be generated of an intensity sufficient to cause perm...

Страница 7: ...by Kawai or sold with the product If malfunctions occur as a result please refer service to a Kawai factory authorized service technician WARNING do not attempt to repair or service the keyboard yours...

Страница 8: ...s indicates a need for service In case of necessary service use only Kawai authorized service technicians and replacement parts recommended by Kawai Use of incorrect or inadequate replacement parts ma...

Страница 9: ...an electrical line already overloaded or to the same AC outlet to which a noise generating appliance is connected Unplug the keyboard from the AC outlet before cleaning it Do not use liquid detergent...

Страница 10: ...t Stop Sync 2 System Disk Sequencer Sound 3 Conductor Easy Style Edit Advanced Style Edit Style Reset 4 Style Selection 5 L Buttons L1 L2 Main Screen 8 7 6 5 4 3 2 1 Parts and names 3 Front panel 10 6...

Страница 11: ...R Button R1 R2 Exit 11 Sound Selection 12 More Sounds 13 Sustain Duet 14 Registration One Two Play 3 D Transpose 15 Left Right 2 1 16 Selector Ziffernblock Tasten 17 Dial 9 10 11 12 13 14 15 16 17 Pa...

Страница 12: ...Audio output jack L MONO 5 Volume pedal jack 6 Foot pedal jack 7 MIDI THRU jack 8 MIDI OUT jack 9 MIDI IN jack 1 2 3 4 5 6 7 8 9 The Z1000 are shipped with the following items AC Power Cable 1 pc Musi...

Страница 13: ...ll every time you play the keyboard Use this disk only when the Z1000 gives you a message for installation See page 122 There are some accessories sold separately from Kawai that will enhance the Z100...

Страница 14: ...buttons marked with the indications L1 L2 R1 and R2 are at both sides of the display and are used for direct selection of a source if changes need to be made These buttons are also used to shift the h...

Страница 15: ...reated or changed in several ways 3 methods are available using the dial using the numerical keyboard or using either the or buttons The keyboard may also be used to set the values contained within ce...

Страница 16: ...the Z1000 There are two types of demos Song and Concert Magic There are 5 preset songs included in the the Song demo and 100 well known pieces in Concert Magic format By pressing the DEMO button F6 y...

Страница 17: ...t the demo and press STOP F6 to quit the demo In the Concert Magic section you can choose between playback of the songs of the same group such as Christmas songs children s songs with F1 Group and pla...

Страница 18: ...ighlighted You can choose a sound using the numeric keys Example Press 05 to choose the sound E Piano 1 Alternatively you can select the desired sound by using the Dial or the and buttons The L2 butto...

Страница 19: ...previous group menu you will find the last selection remains selected The last selected style or sound is activated simply by pressing the group button The Z1000 remembers the selection as long as the...

Страница 20: ...in accordance with your chord The Z1000 is capable of chord recognition and begins to interpret the chords you play You will notice that the new harmony is integrated into Using Styles 7 20 Style Styl...

Страница 21: ...ending phrase with the last recognized chord processed in either a major or minor key B Intro Start Using Styles 7 21 C Structure of the Styles The accompaniment styles available with the Z1000 consi...

Страница 22: ...Rock Jazz and Standard Dance contain more than 12 styles each Since the display can show only 12 styles at a time these groups are subdivided into two further groups each Page 1 and Page 2 which are...

Страница 23: ...plexity some of them possess very different characteristics within a given style In some cases variations of the same style may be suited for completely different songs or a medley in a certain genre...

Страница 24: ...tro Ending Start Stop and Synchronization Start Stop As soon as the START STOP button is pressed the Z1000 provides a rhythmic pattern consisting of percussive instruments and or drums At this stage o...

Страница 25: ...niment with Variation 1 If you pre select any variation prior to pressing the Intro Ending button the selected variation will begin after the introduction is completed Sync If the SYNC button is press...

Страница 26: ...nu item Auto Split Setting After pressing the AUTO button a new section opens in the display in which the interpreted chord is shown To start the accompaniment with an introduction it is necessary to...

Страница 27: ...chord recognition and you do not hear the sound If no settings of the Split function have been made after turning on the instrument the note F2 represents the upper limit for chord recognition Refer...

Страница 28: ...ent in this mode to specify a single note or two with the left hand Left keyboard in order to cause a change in harmony Single notes are interpreted as major chords built on the note played which beco...

Страница 29: ...When it is on the Z1000 will keep playing the accompaniment in the key that has been most recently recognized after releasing your fingers from the keys It will stop when another chord is entered The...

Страница 30: ...the time you made the change if the change was made early the transition is held over if late only the end of the fill in phrase is played The Automatically starting fill in corresponds to the associ...

Страница 31: ...etermined This setting is effective only when the Split Mode is activated for Right 1 and Right 2 You can make this setting also by using the Tempo value dial the or buttons or by pressing the key of...

Страница 32: ...The structure of a registration will be explained in greater detail later In addition to recalling your own registrations the One Two Play button may be used to recall the preset combinations of style...

Страница 33: ...epresents the combination of instrumental arrangements called phrase used in the tracks for the style You can change the combination for the currently selected style as follows the individual phrases...

Страница 34: ...turns automatically to the bottom line When the cursor comes to the bottom of the column which is labeled OFF in this case only the track name is highlighted the corresponding arrangements is set to M...

Страница 35: ...is being played are updated at every new measure 2 Stored First press the Easy Style button and then start the style After you have made the changes and exiting the Easy Style Edit mode by pressing t...

Страница 36: ...red changes Because the settings are made separately for each of the 6 variations it is necessary to select the desired variation before it can be reset If you want to restore all 6 variations to thei...

Страница 37: ...built into the keyboard Select your favorite song from the variety of musical selections Children s songs Christmas music traditional folk songs and famous classical pieces There are also Song Disks a...

Страница 38: ...rs of all levels Easy Beat songs are very simple to play It is now prepared for performance Just start pressing a key with a certain rhythm and hear the music play If you are not sure what the song so...

Страница 39: ...he Concert Magic songs The F4 button toggles the mode between Auto and Legato Auto mode automatically controls the note duration regardless of the user s key control In this mode the Z1000 sustains th...

Страница 40: ...cert Magic data structure Generally speaking the songs in which each part has notes on the beat will perform better First load the song data into the keyboard using the disk drive Please refer to the...

Страница 41: ...alf to Right 2 4 Three way split For division into the 3 zones Left Right 1 and Right 2 5 Layer The sounds assigned to Right 1 and Right 2 are played simultaneously 6 Split Layer For division between...

Страница 42: ...Activation of Left in addition to the 2 Right modes To change the sound assigned to a certain zone select the desired zone with the corresponding S button i e L1 L2 R1 R2 If you now select the first...

Страница 43: ...by pressing the Alternate Sounds button the LED lights up to indicate that this area has been activated The arrangement of the timbres corresponds to the same instrumental groups that are listed on th...

Страница 44: ...lable in the form of a split The keyboard is divided into 2 zones Left for the left hand Right 1 or Right 2 for the right hand The active timbres are indicated by the LED Of course if the sounds for t...

Страница 45: ...struck note has the same duration This makes it possible to apply an automatic pedal performance to sounds such as organs and strings which do not decay naturally when the pedal is depressed The fixe...

Страница 46: ...s pressed it transposes the key down by a half tone while pressing the right button raises the pitch by a half tone When the instrument is turned on the Transpose function is automatically reset to 0...

Страница 47: ...nction enables a quick balancing between relative volumes of the 3 sounds and the selected style You can make settings for the volumes of the 3 sounds Vol with the L2 button and their positioning in t...

Страница 48: ...tons L1 and L2 to switch between the functions Panorama Mixer 12 48 B Style Mixer F2 Style Pan Vol Drum Bass ACC1 ACC2 ACC3 ACC4 Effect Pops1 1980 Pop 100 positioning in the stereo image and Volume vo...

Страница 49: ...ected style sound is activated together with its preset effect assignments Changes made to the current effect assignment which have not been stored as part of a registration are lost when the style so...

Страница 50: ...ct is turned On and Off by pressing the F1 button Other global effects available are EQ Equalizer which is activated and deactivated using the 2 Panel current settings of the Z1000 Specifying Panel de...

Страница 51: ...xers as R Hi F4 button and the Super 3D effect whose switch is located above the keyboard Additional effects are available for sound and style The switches used to control it are F2 for the 3 keyboard...

Страница 52: ...obtain a clearer original signal so that notes played on the keyboard are initially sounded without the reverb signal being Effect Settings 13 52 EFFECT Setting Room Reverb HiDept LoDept Time S mS Pre...

Страница 53: ...yond the loudspeakers The 3D symbol is intended to provide you with a visual aid in estimating the degree of signal dispersion The most reliable indication of how this effect works however can be obta...

Страница 54: ...et individually This model is a graphic equalizer The buttons F5 and F6 are used to select the desired frequency band We recommend that you use the Tempo Value dial as the input method for attenuating...

Страница 55: ...etting R2 Used to set the effect for the melody voices which applies to R1 2 and Left whereby the ON OFF setting is made separately in the Sound Mixer under Effect Used to set the effect type for the...

Страница 56: ...cho in the room F1 Level Balance effect original signal F2 Slope Control density of the reflections F3 Pre Delay Pre delay before the start of the reflections F4 Feedback Return of the original signal...

Страница 57: ...original signal F2 Amount Effect intensity F3 Pre Delay Pre delay 6 Tremolo amplitude modulation tremolo effect F1 Length Balance effect original signal F2 Speed Modulation rate frequency F3 Amount Ef...

Страница 58: ...low frequency range F3 Equalizer High Tone control for high frequency range F4 Pre Delay Pre delay F5 Drive Degree of distortion 10 Dual Delay stereo echo F1 Length Balance effect original signal F2 T...

Страница 59: ...mplitude F4 Pre Delay Pre delay F5 Feedback Return of the mixed signal 14 Celeste frequency modulation similar to Chorus effect F1 Length Balance effect original signal F2 Speed Modulation rate freque...

Страница 60: ...where the path is determined by which each of the 3 sounds constituting the melody voice passes through the effects Select the desired components Left Right 2 or Right 1 with buttons F1 through F3 On...

Страница 61: ...exclusively alternately or are used in the Split mode If Right 1 and Right 2 are used in the Layer mode both LEDs are lit the assignment of Right 1 applies to both Right zones Hint In practice this c...

Страница 62: ...ct used The intensity corresponds to the present High value the setting applies to the degree of intensity determined for the reverb under Hi Depth For further information about its assignment please...

Страница 63: ...are used simultaneously For further information about the sound effect please refer to the section EFX R1 2 L Setting On this page the display provides you with information about further assignments...

Страница 64: ...e floppy disk or select a different song for playback you can scroll through the list by using the buttons F1 Down and F2 Up Playback is started with the F3 button and stopped with the F4 button F6 Mu...

Страница 65: ...his feature for karaoke or for singing along with your performance on the keyboard Hint If you have purchased a song disk of SMF Format 1 and want to use it together with Quick Play you can load the s...

Страница 66: ...ce of any piece of music The basic setup of the styles provides first an assignment of the melody voices and the corresponding effects but can be changed according to your wishes During a live perform...

Страница 67: ...no longer required If you now move the mark to the right using the R2 button you can change the first letter of the registration name using the dial To input a complete name move through the line usi...

Страница 68: ...re are already familiar to you from the functions of the Style Mixer With regard to customizing and modifying styles these parameters do not however apply only to arrangements you have created yoursel...

Страница 69: ...tion which initially seems precise becomes less and less so as the value is increased until at the other end of the scale it has become a quantization based on 12th or 24th notes 1 Groove No L1 This i...

Страница 70: ...e settings made here can be stored in the form of new style programs If you have questions on how to operate the Mixer with Style Edit please refer to the section Style Mixer The R2 button opens anoth...

Страница 71: ...change numbers and the name of the instrument are shown Note that instruments with chromatic assignment Bass and ACC 1 through 4 have a program change range of 199 steps in the case of the Drums track...

Страница 72: ...r pattern of The store command F1 allows you to reach a submenu in which you can determine details concerning the memory location and name of the new Conductor style The number of the memory location...

Страница 73: ...t the top of the page Style Make Record you will find the information about your specifications Bar number of measures and Beat As on the previous display page you select the functions shown in the bo...

Страница 74: ...programs for the two drum tracks For example you can switch between the snare drums of 2 drum kits across the tracks Drum 1 and Drum 2 3 Bass Although this track is called Bass this does not mean tha...

Страница 75: ...choose dictates the type of adjustment unit used to round off the notes You can start your recording immediately with the preset quantization type The following settings are available 1 Off No quanti...

Страница 76: ...not necessary to define transposition at this time During playback of the accompaniment the new user style is played in the selected key It is necessary to record the arrangements for style variation...

Страница 77: ...select the individual track of the pattern Drum 1 2 Bass Acc 1 Main Sub Acc 2 through 4 as well as the option All for copying all tracks The 2 definitions of the target area are selected directly wit...

Страница 78: ...e style name using the dial To input a complete name you move through the line using the buttons L2 and R2 When you press F6 Exec the new style is stored in the specified memory location 10 Control F6...

Страница 79: ...ariations as well as the fill ins and can be defined for the harmony instruments Acc 1 through 4 Intro and Ending are the exceptions for the style parts Drums and Bass are instrumental tracks not cove...

Страница 80: ...ne hand approx within one octave You can vary the setting of the keyboard register range see Turn Range below Chordal Open With open voicing also known as open harmony which produces a relatively wide...

Страница 81: ...meter works in conjunction with the setting made for Chordal close open and is used to determine the keyboard register for the chords of the accompaniment You can choose between 3 voicing models 1 Low...

Страница 82: ...nd keep F1 Erase depressed until the note has been erased Example If you have already recorded 3 instruments of the Drums part bass drum snare hi hat and afterwards you want to erase the snare track p...

Страница 83: ...th the Style Convert Software disk for information on the format that works on the Z1000 Operation Begin by selecting a free memory location in the style group User the converted will be written to th...

Страница 84: ...from the ones you are familiar with from the original unit since the components are designed for different system requirements Please use the functions available in Easy Style Edit and Advanced Style...

Страница 85: ...oices On the left side of the display you can select the waveform for a sound you want to create from scratch by using the L1 button Reference The first 128 options in the list provide the digitalized...

Страница 86: ...u to eliminate the attack noise of the sample waveform or with a higher setting to apply the attack characteristics of strings to waveforms with a percussive attack When the Cutoff value is in the pos...

Страница 87: ...move through the individual characters of the sound s name to change it for your new sound Execute confirms that the storing operation Cancel or the Exit button cancel the writing operation and return...

Страница 88: ...on the pages Mixer and Track so you can operate them from those pages as well As you will notice these functions work in the same way as the operating buttons of a tape recorder Sequencer 20 88 REC ST...

Страница 89: ...till necessary to stop it using the Start Stop button 3 Play F 3 Play specifies the play mode Playback of the recording is controlled with the Start Stop button 4 Rewind F 4 It is possible using Rewin...

Страница 90: ...dial Tempo indications appear above these boxes You can change the tempo by using the Dial or the and buttons 8 Position Display The indication L Location of the position of the sequencer s current b...

Страница 91: ...be found in the Style Sequencer Style Maker functions This method is suitable for creating drum and percussion tracks when the individual instruments are to be recorded successively Hint in leading yo...

Страница 92: ...I events offers the following possibilities The tracks of the accompaniment can be edited Just as in the case of recorded tracks you can make changes for each track on a case by case basis When saving...

Страница 93: ...uantize The ON setting causes the notes played on the keyboard to be quantized During this process rhythmically imprecise notes are straightened and written on the track after their rhythmic timing ha...

Страница 94: ...a 3 Setup Effect R1 The page for assigning effects is an extension of the Mixer page Here you can determine for each track the way in which the effects are applied to the respective sequencer track E...

Страница 95: ...again the actual editing of the sequence takes place After the operation has been completed the Undo box appears above F5 If you want to undo the last operation you can now return to the previous vers...

Страница 96: ...f the cut Hint You can also use the Delete function to shift the contents of tracks For example by deleting bars 001 through 003 in order to shift the phrase of bar 4 to position 001 2 Insert insertin...

Страница 97: ...ix This function is used to combine the contents of two tracks by specifying from source track and to target track The mixed data are stored together on the target track In this way you can for exampl...

Страница 98: ...ation C1 C1 for example would affect only the bass drum of a drums track while leaving the other instruments unquantized The next setting width resolution applies to the adjustment unit used for quant...

Страница 99: ...on Notes outside of these two zones are ignored in the quantizing process and remain on their real time positions The steps available in the Range parameter correspond to the specified quantization re...

Страница 100: ...tes in the form of percentages Any change made applies to all notes and makes it possible to shorten or extend the lengths by the specified percentage 100 means that there is no change to the note len...

Страница 101: ...ng the term Groove can be thought of as a type of interpretation that lies between a straight and a swinging phrasing of the rhythm On the upper line you select the track and the range of bars The par...

Страница 102: ...on function Open ACC encounters a recorded track its contents are overwritten with the data of the accompaniment track 2 Event Edit On the Event Edit page you can edit the MIDI events of the recorded...

Страница 103: ...ght side indicates the note length Each quarter note is divided into 96 parts The value 0096 corresponds to a quarter note accordingly the length 0048 designates an eighth note and you would input 019...

Страница 104: ...changing sounds ChPres Channel Pressure or monophonic aftertouch Only a specification of the intensity is required for Channel Pressure Bender Pitch Wheel event The value for the center position is 00...

Страница 105: ...hronized start the recording begins as soon as you play the first note on the keyboard In this case you start the recording directly i e without using a countdown 1 Automatic recording start Press the...

Страница 106: ...w assigned the status recorded and show the symbol If during the recording only one of the sound components for example Right 1 was activated sequencer data are present only on the corresponding track...

Страница 107: ...activate the recording mode for the track to be overwritten and start a new recording 5 Merge mode during recording If you intend to record several times on a track for example in order to overdub dru...

Страница 108: ...YNC button then start the accompaniment and the recording at the same time If required you can start the recording with an introduction in this case you would also press the Intro Ending button before...

Страница 109: ...are recorded with the transferred accompaniment data and show the symbol 3 Saving A volatile memory is available for recording with the sequencer the recorded sequencer song must be saved to floppy d...

Страница 110: ...ely made on tracks 2 and 3 If you want to prevent tracks 2 and 3 from running concurrently with the recording on track 1 you can deactivate the Rec function for these tracks in the Track window The un...

Страница 111: ...age WAIT appears After calling up the System MIDI functions you can access the desired function by pressing the corresponding L or R buttons 111 System MIDI 22 A System L1 The buttons L1and L2 are use...

Страница 112: ...Bank Alternate Sounds Program changes stored or transmitted in this mode are interpreted differently by the MIDI units of other manufacturers so that compatibility is not assured 3 Effect Here you ca...

Страница 113: ...the function of an expression pedal to the wheel when no expression pedal is connected to the Z1000 Reverb Depth allows you to control the reverb intensity using the wheel This function applies to the...

Страница 114: ...ng Rotary slow fast lets you assign the switching between slow and fast Leslie effect to the foot switch 3 Pedal Polarity The settings Normal and Reverse reverse polarity can be used to switch the cha...

Страница 115: ...e functions are divided among 3 pages Using the buttons F6 next and F5 back you can move back and forth between the pages The Exit button returns you to the display page System MIDI All settings made...

Страница 116: ...nce in such a case 2 tracks would access the same sound 2 Setting 2 NEXT On the next MIDI page you can activate on or deactivate off the reception and transmission of data for the internal tracks The...

Страница 117: ...which consist of few data On and Off or program number and which hold information and program changes are associated 2 Continuous controllers which register continuous changes in the position of a con...

Страница 118: ...repare disks in the double sided format with high density 2 HD In this case a storage capacity of 1 44 MB is obtained Please check the required format on the disk s label and select the corresponding...

Страница 119: ...the Load operation You can select the desired file type with the buttons L1 and L2 After pressing F6 Load the disk drive starts searching for the files present on the disk and lists the found names o...

Страница 120: ...of the sequencer memory in the Z1000 format or loads a song into the working memory of the sequencer 2 Conductor This file format is used for settings made in Easy and Advanced Style Edit All 120 Easy...

Страница 121: ...file 5 Sound This format can be used to save all 10 User sounds to floppy disk and to later load them from disk 6 SMF The Standard MIDI File format applies exclusively to the sequencer The Z1000 is c...

Страница 122: ...he System Disk that comes with the Z1000 Turn off the power of the Z1000 Insert the System Disk into the floppy disk drive and keep the Style Selection button Pops depressed while you turn on the powe...

Страница 123: ...ations 14 A The Display Multi Function Monitor Screen 14 B Input 15 5 Demos 16 A Song Demo 17 B Concert Magic 17 6 The First Steps 18 A Selecting a Sound 18 B Selecting a Style 18 C Quick Select last...

Страница 124: ...nd Effects to Keyboard Zones 41 B Performance Modes of Sounds 44 C Dual Sound 44 11 Performance Effects 45 12 Mixer 46 A Sound Mixer F3 46 B Style Mixer F2 48 13 Effect Settings 49 A Presets 49 B Glob...

Страница 125: ...72 2 Recording 73 3 Starting the Recording 82 4 Erase F1 82 18 Style Convert Floppy Disk Operations 2 83 19 Sound Edit 84 A CutOff 85 B Attack 86 C Decay 86 D Release 87 E Write 87 20 Sequencer 88 A...

Страница 126: ...ge mode during recording 107 B Recording with accompaniment 108 1 Preparing the tracks 108 2 Transferring MIDI events 109 3 Saving 109 C Track assignment track management 110 22 System MIDI 111 A Syst...

Страница 127: ...ckup 122 C Loading the system software 122 25 Table of Contents 123 26 Index 128 27 Appendix 131 A Chord Form Chart 131 B Concert Magig Song List 134 C Style List Intros Endings 136 D Specifications 1...

Страница 128: ...59 94 113 Dial 15 18 19 31 36 38 47 54 55 77 86 87 89 80 91 93 96 97 112 Display LCD 14 15 Index 26 128 Distortion 58 62 DOS Disk Operation System 64 Drive 62 Drum Drums Drumkit 21 22 24 27 29 33 34...

Страница 129: ...4 65 71 94 120 Sound 14 18 27 29 31 32 37 41 42 43 44 45 47 48 51 56 60 61 62 63 70 71 85 87 90 92 94 112 115 121 Speed 56 57 58 59 Split 24 26 27 28 29 31 41 42 44 61 Start Stop 20 24 25 82 H High Hi...

Страница 130: ...14 115 116 118 121 Sustain 45 113 117 Swing 69 Sync Synchronisation 24 25 26 113 114 T Tempo 15 18 31 37 38 47 54 76 89 90 95 96 97 Time 52 53 58 59 100 Transpose 45 46 77 82 Tremolo 57 U User 23 43 5...

Страница 131: ...Appendix 27 131 A Chord Form Chart C Maj C7 C 7 C6 C sus4 C b5 C aug C6 9 C add9 C9 C11 C13 C7 b5 C7 5 C7 sus4 C7 b9...

Страница 132: ...Appendix 27 C7 9 C7 11 C7 b9 11 C7 b9 11 C7 9 11 C9 13 C9 11 13 Cm Cm7 Cm 7 Cm6 Cm6 9 Cm add9 Cm 5 Cm9 Cm7 11 Cm9 11 C7 9 13 C9 11 13 C7 b13 C7 b9 b13 C7 9 b13 C7 b9 13 C9 b13 C7 b9 11 13 132...

Страница 133: ...Appendix 27 133 Cm7 b13 Cm7 11 b13 Cm7 b5 Cm7 b5 b9 Cm7 b5 11 Cm7 b5 9 C 7 5 C 7 b5 C 9 13 C 9 11 C 9 C 7 13 C 7 11 13 C 9 11 13 C 9 11 13 Cm 9 C dim C dim 7 C dim b13 C dim 9 C dim 11...

Страница 134: ...w Roses Of Texas Skillful 100 HYMNS AND CHRISTMAS SONGS Amazing Graze Skillful 51 Angels We Have Heard On High Skillful 52 Ave Maria Skillful 54 ARRANGEMENT NO Deck The Halls Melody Play 23 First No l...

Страница 135: ...relude In A Melody Play 40 Romeo And Juliet Skillful 84 Rondeau Skillful 85 Skater s Waltz Skillful 86 Sleeping Beauty Skillful 87 Surprise Symphony Melody Play 18 Thunder And Blazes Skillful 89 Torea...

Страница 136: ...id3 4 3 4 Acid4 4 4 5 House 4 4 6 Disco1 3 5 7 Disco2 2 2 8 Rap1 4 4 9 Rap2 5 4 10 Techno1 4 4 11 Techno2 4 4 12 Hiphop 4 5 1 Fusion1 4 4 2 Fusion2 5 4 3 Fusion3 5 3 4 Modern_Jazz1 4 4 5 Modern_Jazz2...

Страница 137: ...ca2 4 4 9 Salsa1 4 4 10 Salsa2 4 4 11 Beguine1 4 4 12 Beguine2 4 4 1 Lambada1 4 4 2 Lambada2 4 4 3 Bolero1 4 4 4 Bolero2 4 3 5 Hawaiian1 4 4 6 Hawaiian2 4 4 7 March1 4 4 8 March2 4 4 9 Jamaican 1 1 10...

Страница 138: ...St ty yl le e M Ma ak ke er r Bar Length Sound Assign Mixer Groove Quantize Copy Preset Tempo etc S St ty yl le e C Co on nv ve er rt te er r 7 modules provided by EMC Software S So ou un nd d E Ed d...

Страница 139: ...Ch s Pitch Bend 0 32 Bank Select 1 Modulation 6 Data Entry 7 Volume Control 10 Panpot Change 11 Expression 64 Hold 91 Reverb Low High 92 93 Effect1 2 Off On 100 101 RPN 120 All sounds off 121 Reset a...

Страница 140: ...Digital Keyboard Z1000 OM936E L Printed in Japan...

Отзывы: