background image

Steps

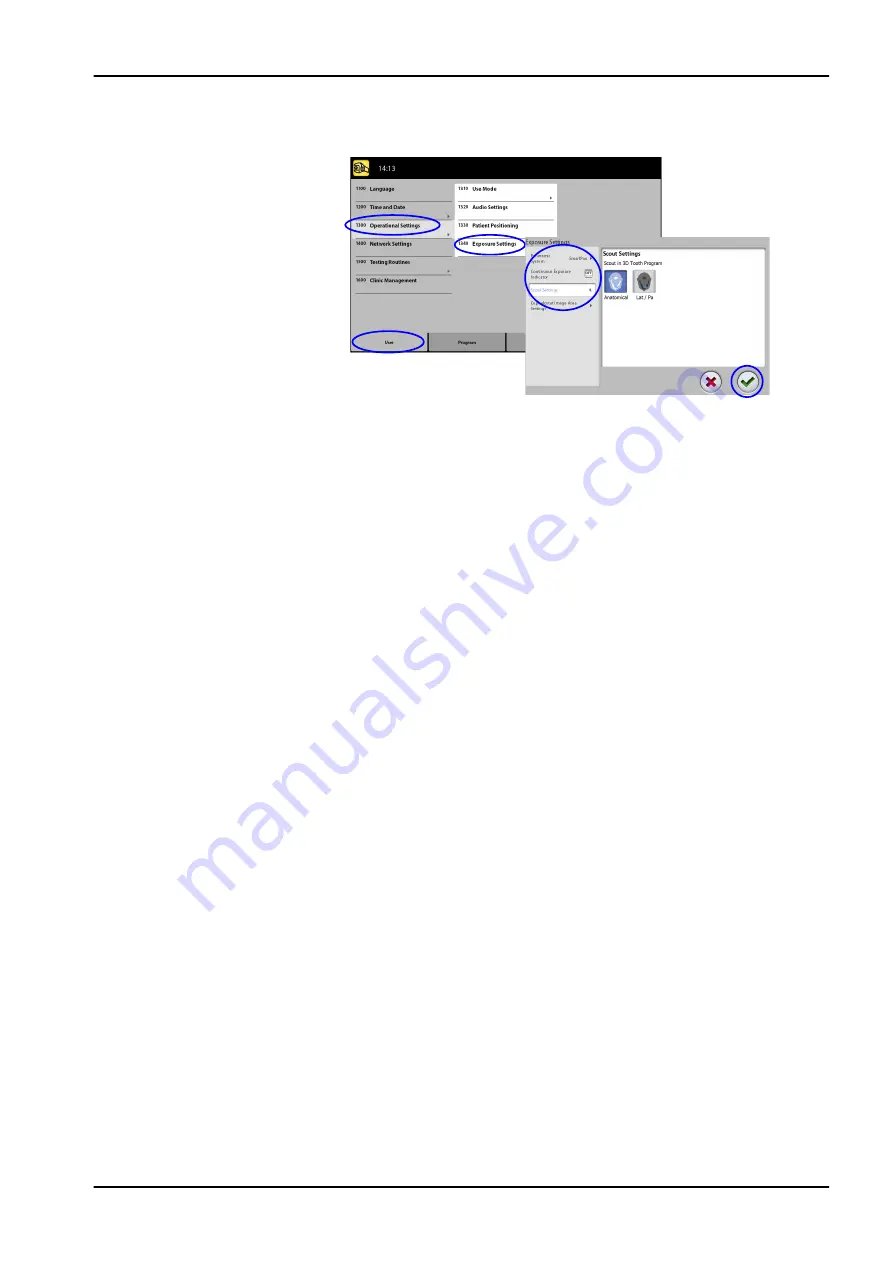
1. Select User > 1300 Operational Settings > 1340 Exposure Settings.

2. Select:

Continuous Exposure Indicator
Turn this option ON if you wish to set the X-ray unit so that the yellow

radiation warning light stays on continuously (instead of flashing)

when you take an exposure.
Note that the setting affects all indicator lights that are connected to

your X-ray system (indicator light on the hand-held exposure switch,

wall exposure switch(es) and remote exposure lamp).

Scout Settings
Select the default angle (anatomical or LAT-PA) for scout images in

3D Tooth Program.

3. Select the green check mark button.

9.1.4 Network settings (1400)

About this task

Follow these steps to view network settings.

Steps

1. Select User > 1400 Network Settings.
2. Select the network settings you wish to view.

9  Settings

Instructions for use

KaVo ProXam 59

Содержание ProXam 3DQ

Страница 1: ...KaVo ProXam 3DQ Instructions for use 3D imaging EN...

Страница 2: ...to the appropriate requirements such as IEC 60364 equipment is used according to the operating instructions Planmeca pursues a policy of continual product development Although every effort is made to...

Страница 3: ...15 6 9 ProTouch desktop application 19 6 10 Patient positioning controls 21 6 10 1 X ray unit up down 21 6 10 2 Positioning joystick 22 6 10 3 Image volume up down 22 6 10 4 Open close temple supports...

Страница 4: ...1 1 Language 1100 52 9 1 2 Time and date 1200 53 9 1 3 Operational settings 1300 56 9 1 4 Network settings 1400 59 9 1 5 Testing routines 1500 60 9 2 Program settings 62 9 2 1 Programs 2100 62 9 2 2 P...

Страница 5: ...at your X ray unit may not feature all the options described in these instructions Refer to section Licences 2300 on page 64 for a list of available licences These instructions include options that ma...

Страница 6: ...se Instructions for use are intended to be used in conjunction with the documentation for the Romexis program The Romexis package contains the following manuals User s Manual Technical Manual The orig...

Страница 7: ...electrical and electronic equipment according to Directive 2012 19 EU WEEE Consult electronic instructions for use Standard ISO 7000 1641 Refer to instruction manual booklet Standard ISO 7010 Emergenc...

Страница 8: ...General warning Standard ISO 7010 3 Symbols on product labels 4 KaVo ProXam Instructions for use...

Страница 9: ...fety requirements are met CAUTION The patient positioning lights are laser lights Do not stare into the laser beam CAUTION Do not drop the sensor KaVo limited warranty does not cover damage which is d...

Страница 10: ...nt conventional CT or MR medical imaging should be used rather than CBCT NOTE Before taking an exposure ask any female patient of childbearing age whether she might be pregnant The X ray unit is not i...

Страница 11: ...fety requirements for medical electrical systems Equipment not complying to IEC 60601 shall be kept outside the patient area more than 2m 79 in from the X ray unit Any person who connects external equ...

Страница 12: ...ients are not allowed to hang on the patient handles NOTE FOR X RAY UNITS WITH ROTATING TUBE HEAD Do not touch the metal parts in the middle of the tube head They might be hot NOTE Portable mobile dev...

Страница 13: ...X ray system off when it is not in active use 5 1 Switching X ray unit on The on off switch is located on the underside of the column top 5 2 Switching 3D reconstruction PC on The on off switch is lo...

Страница 14: ...of X ray system 1 X ray unit 2 3D reconstruction PC 3 Romexis program 4 ProTouch desktop application optional see section ProTouch desktop application on page 19 5 Ethernet switch 6 Main parts 10 KaV...

Страница 15: ...nt supports on page 13 5 Patient support table 6 Patient handles 7 Patient positioning controls see section Patient positioning controls on page 21 8 Touch screen see section Touch screen on page 15 9...

Страница 16: ...6 3 Sensor 1 3D sensor for KaVo ProXam 3DQ 6 4 Tube head 1 Non rotating tube head 2 Rotating tube head 6 Main parts 12 KaVo ProXam Instructions for use...

Страница 17: ...s 6 5 1 Head supports option A or B Option A 1 Adjustable head support 2 Temple pads for children 3 Fastening straps 4 Support bars Option B 1 Head band 25 2 Support bars 6 Main parts Instructions for...

Страница 18: ...osure button and on the touch screen when the X ray system is getting ready for an exposure The green lights stop flashing and stay on continuously when the X ray system is ready for an exposure Durin...

Страница 19: ...The X ray unit may be delivered with physical or virtual control panel or both This Instructions for use is valid for all set ups NOTE The options shown on the touch screen depend on the unit configu...

Страница 20: ...where you can take an exposure Program group buttons To view all the programs that are available for a program group select the program group button Making selections To make a selection on the touch...

Страница 21: ...symbol at the bottom of the screen Moving backward To go back to a previous screen select a previous symbol at the bottom of the screen Scrolling lists To scroll a list down or up slide your finger on...

Страница 22: ...e The touch screen automatically switches to stand by mode if you do not touch the screen or the exposure button for more than thirty minutes In stand by mode the green light on the on off switch indi...

Страница 23: ...lication for moving to the ready status Contact your dealer for help To use the virtual control panel double click the ProTouch icon on your computer screen Then click your mouse on the function that...

Страница 24: ...working Restart the X ray unit if the icon is red To move the control panel screen drag it with your mouse To close the application click on the small red cross in the top right corner of the screen...

Страница 25: ...on either of the buttons gets stuck during operation you can stop the up down movement by pressing any of the other control buttons or the positioning joystick This is a safety measure that guarantees...

Страница 26: ...you position the patient in the unit 6 10 2 Positioning joystick 6 10 3 Image volume up down Use the image volume up and down buttons for vertical adjustment of the image volume in 3D imaging Use the...

Страница 27: ...lose temple supports Press the temple support button to open the temple supports in 2D imaging Close the temple supports by pressing the temple support button again 6 Main parts Instructions for use K...

Страница 28: ...mm Face 190 x H90 mm 190 x H90 mm 190 x H150 mm 190 x H150 mm Two vertical image volumes 7 2 3D Ear Nose Throat NOTE The values in parentheses represent the child size volumes Program KaVo ProXam 3Dq...

Страница 29: ...ng the sensor neglect or any cause other than ordinary use If you have any reason to believe that the sensor might be faulty take a test exposure before taking a patient exposure NOTE The available se...

Страница 30: ...ush in the C arm electrical connector button on the other side This will make the electrical connection between the sensor and C arm 8 1 1 2 Detaching sensor from C arm About this task NOTE Do not rem...

Страница 31: ...ectrical connector This will disconnect the electrical connection between the sensor and C arm 2 Turn the locking knob 180 degrees This will release the locking mechanism 8 3D patient exposure Instruc...

Страница 32: ...has to switch off first 8 1 2 Attaching patient supports NOTE The available head supports are shown in section Head supports option A or B on page 13 8 1 2 1 Attaching support bars Steps 1 Insert the...

Страница 33: ...around 8 1 2 2 Head support A Attaching adjustable head support About this task Follow these steps if you use the adjustable head support Steps 1 Slide the adjustable head support onto the support bar...

Страница 34: ...one side only You can use fastening straps for additional head support if needed Attach one strap in front of the forehead and two at the back of the head as shown NOTE Be careful when you handle the...

Страница 35: ...t this task Follow these instructions if you use the head band Steps 1 Attach the head band to the support bars as shown Set the side with the large openings against the patient s forehead 8 3D patien...

Страница 36: ...p Use these patient supports ProMax_UM_048_1 NOTE FOR ORTHODONTISTS Use these patient supports if you wish to see the hyoid bone and neck bones better ProMax_UM_049_2 8 3D patient exposure 32 KaVo Pro...

Страница 37: ...ese can produce shadows or reflections in the image The patient should also remove any loose items of clothing e g scarf tie that might get caught in the arm structures of the X ray unit NOTE High con...

Страница 38: ...Steps 1 Use this button to select the patient size XS Child S Small adult M Medium sized adult L Large adult XL Extra large adult NOTE Selecting child patient XS automatically reduces the volume size...

Страница 39: ...ptions may be available 2 Press the green checkmark button to confirm selections NOTE The available options depend on the selected program For more information on KaVo ProXam 3DQ programs see section...

Страница 40: ...m 8 3 5 Selecting jaw side Steps 1 Use this button to select the jaw side right left both sides that you wish to expose NOTE The available options depend on the selected program and image resolution 8...

Страница 41: ...rections Select this button to position the C arm around the patient support table This is the traditional closed patient entry position NOTE If needed the full view position top button can be disable...

Страница 42: ...d is firmly positioned in the head support You can adjust the head support by turning the adjusting knob at the top You can use fastening straps for additional head support if needed Refer to section...

Страница 43: ...automatically change according to the selected patient size image resolution and ULD setting 8 5 2 Selecting Ultra Low Dose ULD Steps 1 Select the ULD button to take an exposure with a very low dose...

Страница 44: ...resolution Low dose in other programs Patient size kV value mA value mA value with ULD Child XS 90 4 2 Small adult S 90 5 2 5 Medium sized adult M 90 6 3 3 2 Large adult L 90 8 4 Extra large adult XL...

Страница 45: ...e values for this exposure 1 Select the kV mA field 2 Use the minus or plus buttons to set the exposure values you wish to use To improve the image contrast reduce the kV value To reduce the radiation...

Страница 46: ...the preset position covers the area of interest for this patient If this is not the case adjust the volume position according to the patient s anatomy The positioning lights and the illustrations on t...

Страница 47: ...ss the positioning joystick 8 7 1 Moving image volume vertically Z laser About this task The volume bottom light Z laser indicates the position where the lower edge of the image volume is Steps 1 Chec...

Страница 48: ...laser of your patient s head Check that the image volume is positioned correctly for your patient If you need to adjust the volume position proceed as follows 8 7 2 1 Front light X laser If you need...

Страница 49: ...ht 8 7 2 2 Side light Y laser First rotate the C arm 90 degrees clockwise by selecting the 90 button at the bottom of the screen This will give you a better view for checking the volume position Selec...

Страница 50: ...will move accordingly on your patient s face NOTE FOR PROGRAMS TOOTH AND TEETH The incisor light indicates the front edge of the image volume when the front position is selected NOTE Moving the posit...

Страница 51: ...available for all programs NOTE Make sure that you have selected the correct patient and exposure mode in the Romexis program Steps 1 Select the view you wish to take To take LAT PA views select both...

Страница 52: ...e yellow radiation warning lights illuminate on the exposure switch and on the touch screen and you hear a radiation warning tone Additionally a radiation warning symbol is shown on the touch screen T...

Страница 53: ...on yields results for Jaw and Face programs that look different to the scouts for Tooth and Teeth programs NOTE See section Operational settings 1300 on page 56 for setting default scout angle for Too...

Страница 54: ...own the exposure button for the entire duration of the exposure During exposure yellow radiation warning lights illuminate on the exposure switch and on the touch screen and you hear a radiation warni...

Страница 55: ...immediately Results The image is shown on the computer screen The image processing time depends on the selected settings For example if you selected the ULD Ultra Low Dose function you have to wait l...

Страница 56: ...o enter the settings menu Settings that can be entered by the user User Program About Settings that can be entered by service personnel only password required Technical To return to the main screen se...

Страница 57: ...h 3 Select the green check mark button 9 1 2 Time and date 1200 9 1 2 1 Time display format About this task Follow these steps to set time display format Steps 1 Select User 1200 Time and Date 1210 Se...

Страница 58: ...lay format Steps 1 Select User 1200 Time and Date 1210 Set System Time and Time Date Display Format Date Display Format 2 Select the display format you wish to use 3 Select the green check mark button...

Страница 59: ...time is set to the local time at the factory Change the time setting to show the correct time before you start using the X ray unit 9 1 2 4 Setting date About this task Follow these steps to set date...

Страница 60: ...steps to select mode Steps 1 Select User 1300 Operational Settings 1310 Use Mode 2 Select the mode you wish to use In demo mode you can practice or demonstrate the functions of the X ray unit without...

Страница 61: ...ce or increase the volume Touch Volume This setting adjusts the volume of the audible signal that you hear when you make a selection on the touch screen Use the minus or plus button to reduce or incre...

Страница 62: ...you take 3D exposures Temple Supports Turn this option OFF if you do not wish to use the temple supports Return C arm Automatically Turn this option ON if you wish to set the X ray unit so that the C...

Страница 63: ...icator lights that are connected to your X ray system indicator light on the hand held exposure switch wall exposure switch es and remote exposure lamp Scout Settings Select the default angle anatomic...

Страница 64: ...hese steps to take a test exposure Steps 1 Select User 1500 Testing Routines 1510 Test Exposure 2 Use the minus or plus buttons to set the exposure values you wish to use 3 Select the SET button 4 Mov...

Страница 65: ...X ray tube 2 Select the Start button 3 Move to a protected area 4 Press the exposure button when the word Ready appears You can press and hold down the exposure button for the whole duration of the p...

Страница 66: ...a program group e g 2110 2D Panoramic 3 Select a program type e g Interproximal 4 Select the exposure values you wish to adjust e g 70kV 10 mA for patient size M In 2D panoramic programs select also...

Страница 67: ...E You can adjust the preset exposure values temporarily as described in section Adjusting exposure values for current exposure on page 39 9 2 2 Program features 2200 About this task Follow these steps...

Страница 68: ...n licence SmartPan Basic 2D panoramic TMJ and sinus programs with 3D sensor Horizontal and Vertical Segmenting Reduced exposure area for 2D panoramic programs Bitewing Panoramic Program True extraoral...

Страница 69: ...efaults Steps 1 Select Program 2500 Reset to Factory Defaults The function will restore the exposure values that have been preset at the factory i e overrule your own settings in menu Programs 2100 Th...

Страница 70: ...rs are shown in chronological order with the latest error message on top To view exposure statistics Select About 4200 Archive Exposure Statistics to view statistical data about the X ray unit 9 3 3 P...

Страница 71: ...button 4 Follow the instructions on the registration page Note that when you enter the X ray unit serial number you have to include any letters shown at the beginning of the number 9 Settings Instruc...

Страница 72: ...n needs to be closed Restart the application H105 Emergency stop button The emergency stop button has been activated All movements of the X ray unit are blocked and no radiation is generated Guide the...

Страница 73: ...igh Wait for a few minutes for the lift motor to cool down H163 The temperature of the tube head is too high Please wait for tube head to cool down for beam check Wait for tube head to cool down for b...

Страница 74: ...ueue full Retry or contact technical support if problem persists H193 Invalid scan settings Retry or contact your service technician for help H194 X ray connection not established Operating in standal...

Страница 75: ...message e g E201 appears on the touch screen An error message indicates that the X ray unit has a problem that needs to be solved before further exposures can be taken The X ray unit will not accept...

Страница 76: ...turers NOTE Follow the instructions provided by the manufacturer of the cleaning agent disinfectant and autoclave NOTE FOR SPRAYS LIQUIDS AND FOAMS Do not apply sprays liquids or foams directly on the...

Страница 77: ...Panoramic patient supports Cephalometric patient supports 12 Cleaning and disinfection Instructions for use KaVo ProXam 73...

Страница 78: ...Patient handles and touch screen 12 Cleaning and disinfection 74 KaVo ProXam Instructions for use...

Страница 79: ...oft cloth Do not use disinfectants 12 2 Other surfaces Wipe the other surfaces regularly using a surface disinfectant approved by the manufacturer Use a cleaning agent approved by the manufacturer for...

Страница 80: ...NOTE The parts in the figure below can be autoclaved at 134 C 273 F The parts can be autoclaved up to 100 times 12 Cleaning and disinfection 76 KaVo ProXam Instructions for use...

Страница 81: ...al maintenance service includes inspection of the following X ray unit adjustments and quality control checks Data security updates Exposure switch Exposure indicator lights and warning signals Emerge...

Страница 82: ...ry specifications The warranty does not usually cover bulbs glassware rubber parts software scanner tips batteries tubes screws nuts and other fasteners imaging plates and the colourfastness of plasti...

Страница 83: ...ing hazardous materials must be disposed of in accordance with waste legislation and instructions issued by the local environmental authorities The following parts contain hazardous waste X ray tube a...

Страница 84: ...according to IEC 60336 2005 2D 3D 3DQ 0 5 x 0 5 mm Filtration Pan ceph Total 2 5 mm Al 3D Total 2 5 mm Al 0 5 mm Cu SmartPan Total 2 5 mm Al Tube housing front cover quality equivalent filtration not...

Страница 85: ...3D 1 27 3DQ 1 4 Ceph 1 13 3D 3D 1 58 3DQ 1 38 1 40 1 42 1 43 or 1 8 Duty cycle for height adjustment 25 s ON 400 s OFF Line voltage 100 220 V 50 60 Hz 230 240 V 50 Hz Line current 8 17 A Line harmoni...

Страница 86: ...1 25 miles Image properties Pan ceph CCD Pixel size 48 m Pan active surface 6 x 146 mm 0 24 x 5 74 in Ceph active surface 6 x 292 mm 0 24 x 11 15 in 3D Flat panel pixel size 127 m Flat panel active s...

Страница 87: ......

Страница 88: ...KaVo Dental GmbH Bismarckring 39 88400 Biberach Deutschland www kavo com 1 015 1242...

Отзывы: