background image


27

5.18.4 Anti-tipper setting for a wheelchair equipped with 20” rear wheels

Seat Depth:    17”and 18” 

Seat Depth: 16” 

Not used 

5.19 Foldable handgrip 

5.19.1 The foldable handgrip can be Flip up to 90°. 

When it reaches this position, a click sound 
will be heard.   


5.19.2 Press the release button to fold the handgrip. 


5.20 Freewheel Hub 

The position of the freewheel hub is at the center of the rear wheel. 
The purpose of it is to allow the chair to roll freely when the chair is not 
switched on or when there is no electricity.   

  5.20.1 Freewheel Mode:to allow the chair to roll freely when the chair 

is not switched on or when there is no electricity, set the chair 
into freewheel mode according to the following instructions: 

5.20.1.1 Pull the two freewheel hubs out (Figure 5. 41) 
5.20.1.2 Rotate the freewheel hubs for about 45 degrees. 
5.20.1.3 Let go the freewheel hub, and note that do not let it 

insert into the slot. The chair will now roll freely.   

5.20.2 To engage the motors:The wheels do not roll freely   

Содержание eFlexx Series

Страница 1: ...Powered Wheelchair Owner s Manual eFlexx Series...

Страница 2: ......

Страница 3: ...WITHOUT NOTICE BY KARMA WARNING As a manufacturer of powered wheelchairs KARMA endeavors to supply a wide variety of powered wheelchairs to meet the many needs of the user However the responsibility o...

Страница 4: ...objects behind you as this may cause the powered wheelchair to tip over DO NOT shift your weight or sitting position toward the direction you are reaching as the powered wheelchair may tip over DO NO...

Страница 5: ...he power wheelchair will not drive Turn the power OFF while the wheelchair is not in use Otherwise injury and or damage to the wheelchair and surrounding property may occur DO NOT connect any medical...

Страница 6: ...f ISO 7176 14 The force necessary to operate the freewheel lever is less than 60N DO make sure the surface temperatures can increase when the wheelchair is exposed to external sources of heat e g sunl...

Страница 7: ...wheelchair will roll backwards approximately one foot before the brake engages If the joystick is released while in reverse the powered wheelchair will roll backwards approximately two and a half feet...

Страница 8: ...ion prior to installing servicing or operating the wheelchair Rain Test KARMA has tested the powered wheelchair in accordance with ISO 7176 Part 9 Rain Test This test provides the end user or his her...

Страница 9: ...is advised when it is necessary to move an UNOCCUPIED powered wheelchair up or down stairs Karma recommends disassembling the wheelchair and transporting the components independently up or down stairs...

Страница 10: ...d scheduled maintenance Customers should go to their dealership for all service needs to guarantee their warranty is not void Always go to an authorized service provider Unauthorized repairs will void...

Страница 11: ...egal requirements to drive on public roads have been met i e a pelvic belt lighting registration or licensing CE MARKING This powered wheelchair complies with the requirements of the Medical Devices D...

Страница 12: ...pes 10 3 3 Powered Vehicle Electromagnetic Interference EMI 10 3 4 Warnings 11 4 PARTS 12 5 OPERATION 14 5 1 Preparing for Use 14 5 2 Unfolding the Wheelchair 15 5 3 Folding the Wheelchair 16 5 4 Gett...

Страница 13: ...s of Battery Level while Charging the Battery 47 6 9 Abnormal indicators and Actions 47 7 INSPECTION AND MAINTENANCE 53 7 1 Daily Check 53 7 2 Regular Maintenance Record 54 7 3 Tires 56 7 4 General Ma...

Страница 14: ...ser to severe injury and or damage to your wheelchair SUGGESTION Follow these instructions to keep the wheelchair in good condition 1 3 This manual includes the repair and maintenance chart as well as...

Страница 15: ...tremely cautious when driving your wheelchair in heavy traffic or the shopping mall 2 2 5 DO NOT drive your wheelchair when you feel tired or consume alcohol 2 2 6 Please do not drive your wheelchair...

Страница 16: ...inspections Refer to section DAILY CHECK 2 8 General Warning 2 8 1Do not lean over the side of the wheelchair as such an action may cause you to lose balance and fall 2 8 2Use caution to assure your c...

Страница 17: ...ONS for your wheelchair s maximum climbing angle 2 12 2 When climbing up to an inclined road please set the speed higher than the medium speed and drive carefully Figure 2 3 2 12 3 When going down an...

Страница 18: ...arranty WARNING Do not set the wheelchair in freewheel mode when on an incline or decline If the chair breaks down on railroad tracks first check for an oncoming train If a train is coming get out of...

Страница 19: ...7 Figure 2 4 Figure 2 5 Figure 2 6 2 14 Labeling Please carefully read all the labeling on the wheelchair before driving it Do not remove them Protect them for future reference...

Страница 20: ...8 Freewheel Lever Follow the label to engage or release it Wiring Diagram Do not change the wiring Charging socket 3 EMI RFI This section provides the user with basic information about the...

Страница 21: ...s two way radios and cellular phones The interference from radio wave sources can cause the powered vehicle to release its brakes move by itself or move in unintended directions It can also permanentl...

Страница 22: ...is usually having the antenna mounted on the outside of the vehicle and 3 2 3 Long range transmitters and transceivers such as commercial broadcast transmitters radio and TV broadcast antenna towers a...

Страница 23: ...hand held transceivers receivers such as citizens band CB radios or turn ON personal communication devices such as cellular phones while the powered vehicle is turned ON 3 4 2 2 Be aware of nearby tr...

Страница 24: ...ehicle dealer or KARMA and note whether there was a source of EMI nearby 4 PARTS 1 Backrest 2 Armrest 3 Side Panel 4 Rear Wheel 5 Caster 6 Joystick Controller 7 Charger Socket 8 Seat 9 Footrest 10 Cal...

Страница 25: ...tery Pack Assembly 4 Motor 5 Anti Tipper CAUTION As designs change some illustrations and pictures in this manual may not correspond to the vehicle that you purchased We reserve the right to make desi...

Страница 26: ...onsult this owner s manual for complete instructions of the installation and operation of your wheelchair 5 1 2 Installing Swing Away Detachable Footrests Please follow the instructions to install the...

Страница 27: ...seat pan and press it to the bottom Be careful not to get your fingers pinched Make sure the frame is firmly seated in its holder Figure 5 8 5 2 3 Install the footrests Figure 5 9 5 2 4 Flip the foot...

Страница 28: ...lip up the footplates Figure 5 13 5 3 3 Pull up the seat by holding the front and the back edges of it Figure 5 14 5 3 4 Hold the armrests and push those inwards Figure 5 15 5 3 5 Fold the backrest tu...

Страница 29: ...locker lift the armrest up and flip it back Figure 5 17 and 5 18 5 6 2 To adjust the height of the armrest 5 6 2 1 Press the spring lock of the armrest and adjust the height of the armrest to meet the...

Страница 30: ...adjustment is 20 from 4 to 16 WARNING When the angle has been adjusted the wheelchair must be evaluated by a qualified therapist The position of the anti tippers must be adjusted to guarantee your saf...

Страница 31: ...tional extension tubes See Figure 5 23 5 8 5 Tighten the screws to fix the extension tubes See Figure 5 24 Figure 5 22 Figure 5 23 Figure 5 24 5 8 6 Position back the axle plate of quick release rear...

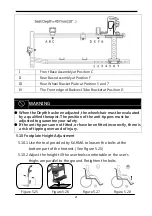
Страница 32: ...Position D III Rear Wheel Bracket Plate at Position 4 and 6 IV The Front edge of Backrest Tube Bracket at Position E I Front Base Assembly at Position B II Rear Base Assembly at Position D III Rear W...

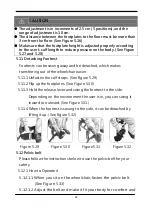
Страница 33: ...of the anti tippers must be adjusted to guarantee your safety If the anti tippers are not fitted or have been fitted incorrectly there is a risk of tipping over and of injury 5 10 Footplate Height Adj...

Страница 34: ...asier 5 11 1 Unfasten the calf straps See Figure 5 29 5 11 2 Flip up the footplates See Figure 5 30 5 11 3 Hold the release lever and swing the footrest to the side Depending on the environment the us...

Страница 35: ...ger through between the pelvic belt and the user Kindly check the pelvic belt position is fitted to the place as we recommend If it is not able to be this way please consult your supplier 5 13 Pelvic...

Страница 36: ...pelvic belt however please check if the edge of the pelvic belt is worn or torn before you use it Meanwhile please adjust the pelvic belt properly to fit the user If the pelvic belt is damaged please...

Страница 37: ...hen re tighten the bolts Figure 5 39 CAUTION After each adjustment of the rear wheels check the interval between the tires and the brakes and re adjust the brakes if necessary 5 16 Wheel Do not touch...

Страница 38: ...y installed CAUTION Anti tippers MUST be equipped If they are not fitted or have not been fitted correctly there is a risk of tipping over and of injury The anti tippers have to be adjusted according...

Страница 39: ...The purpose of it is to allow the chair to roll freely when the chair is not switched on or when there is no electricity 5 20 1 Freewheel Mode to allow the chair to roll freely when the chair is not s...

Страница 40: ...ne Only use freewheel mode on flat surfaces since your electromagnetic brakes are not engaged in this mode Without these brakes it will roll down a hill causing injury or damage 5 21 Freewheel Levers...

Страница 41: ...er joystick is central with a delay of approximately 1 2 second The controller automatically provides progressive deceleration before the electro magnetic brakes come into operation 5 22 2 To check th...

Страница 42: ...ersion 5 23 2 The battery is fixed in the pack by two extra screws 5 23 2 1 When removing the battery loosen the two screws and the strap which are used to fasten it Hold the handle of the battery and...

Страница 43: ...s factory default setting The setting is made to ensure that the controller have the best performance in every condition Should there s any need to modify the parameter setting due to medical consider...

Страница 44: ...ing the wheelchair please perform inspections according to the Section 9 Have Karma s professional to modify the parameter setting of the controller to ensure the safety of users 5 25 Controller Panel...

Страница 45: ...ing according to the environment in which you are operating the wheelchair 5 26 3 After adjusting the maximum speed setting operate the joystick to drive the wheelchair and control the direction of mo...

Страница 46: ...ing distance on slopes can be significantly greater than that on level ground To park the wheelchair be sure to park on flat ground and then turn the power to OFF 5 27 Locking the wheelchair The contr...

Страница 47: ...the proper position you desire Finally tighten the screw 6 BATTERIES AND CHARGER Before you attempt charging ensure you read and understand the instruction manual supplied with the battery charger and...

Страница 48: ...ng charged It will automatically trigger the protecting procedure to inhibit charging if the temperature is too high When the battery is cooled down it will trigger the charging automatically 1 AC Pow...

Страница 49: ...ocedures listed below precisely 6 2 1 1 Make sure the charger has been set to the correct voltage setting Figure6 1 Figure6 1 Figure6 2 Figure6 3 6 2 1 2 Power Switch is labeled with I and O symbols T...

Страница 50: ...10 Do not stop charging the battery before it is fully charged 6 2 1 11 The battery is fully charged when the status indicator stops flashing and is always on The battery capacity indicators will ind...

Страница 51: ...r cable of the charger to the AC power socket Figure6 4 6 2 2 6 Ensure all cables are properly connected Turn on the charger as I labeled on the button is pressed down Figure6 5 6 2 2 7 The green stat...

Страница 52: ...6 2 6 2 3 2 Remove the AC power cable of the charger from the AC power socket 6 2 3 3 Wait until the status indicator of the charger is off 6 2 3 4 Remove the DC power cable of the charger from the ch...

Страница 53: ...the wheelchair 6 4 2 The charging time is about 6 hours depending on the status of the batteries Remove the charger after the battery is fully charged 6 4 3 If it takes more than 7 hours to fully cha...

Страница 54: ...le objects while charging as it may lead to fire or explosion of the battery Do not expose the batteries to temperatures below 10 or above 45 when charging or storing the vehicle Never connect or disc...

Страница 55: ...is critical not to let them run low at any time and if doing so it will reduce the life of the batteries The drive range will be shortened when driving frequently on slopes or uneven ground as this c...

Страница 56: ...up in landfills that are already low on space From these landfills lead and other chemicals may leach into streams and rivers destroying ecosystems and poisoning local water resources Improper dispos...

Страница 57: ...n Part of the Battery 4 Warning 2 Indicator 5 Charging Socket 3 ON OFF Switch 6 Discharging Socket 6 7 Functions of Switch 6 7 1 Activate or Deactivate Sleep Mode The batteries are set in sleep mode w...

Страница 58: ...the sleep mode cannot be deactivated by charging the battery disconnect the charger from the controller or the battery Press the ON OFF button for 5 to 8 second 6 7 1 2 3 If the sleep mode cannot be d...

Страница 59: ...ry level can be seen from the indicators Indicators 75 100 50 75 25 50 0 25 WARNING If the battery is installed on the wheelchair be sure to charge it through the charger socket of the controller and...

Страница 60: ...Continuous beeping 1 Disconnect the charger from the battery 2 The indicators and the buzzer will be off 6 9 2 The charging current is too high during charging Indicators Buzzer Action Continuous beep...

Страница 61: ...10 3 Disconnect the charger from the battery 4 The indicators and the buzzer will be off when the temperature of the battery is between 0 and 60 6 9 4 The temperature of the battery is too high or too...

Страница 62: ...5 seconds Charge the battery immediately 6 9 6The current of the battery is too high when operating the wheelchair Indicators Buzzer Action Continuous beeping 1 Do not operate the wheelchair on a slop...

Страница 63: ...ll be off CAUTION Exceeding the specified temperature range can lead to either freezing or overheating of the batteries This will damage the batteries and shorten its service life Failure to use the c...

Страница 64: ...freezing temperatures When driving on an incline the battery indicator light might move up and down This is normal Even if the batteries are used properly their capacity will decay over time thereby...

Страница 65: ...function well Does the wheelchair stop when the joystick is released completely Does it light up when the power is ON Is there enough power for your trip Does the horn work well Motor Is there any abn...

Страница 66: ...for a long time the wheelchair should still be maintained regularly You should clean your wheelchair inside and out regularly to keep it beautiful and safe I Inspection A Adjustment Repair 3 Replacem...

Страница 67: ...I 3 Charger Charging Function and LED Light I I I I I I Socket Plug and Cords I I Fan Functions Properly if applicable I I Driver s Seat Recline Function I L I L Tires Cracks Surface Damage I 3 I 3 I...

Страница 68: ...ons to clean your wheelchair Be sure NOT to spray the vehicle with water as not to damage the electronic components and PCB circuit board 7 4 3 Please clean the vehicle by wiping it with either a dry...

Страница 69: ...f necessary 7 5 3 Check all parts for proper adjustment 7 5 4 Ensure that the batteries are properly maintained and charged as required 7 5 5 Inspect the brake for proper operation 7 5 6 The wheels an...

Страница 70: ...BLESHOOTING Trouble or Problems with Your Wheelchair You can inspect the following before taking your wheelchair to a KARMA wheelchair dealer If you cannot solve the problem by yourself contact your K...

Страница 71: ...again 8 2Error Indication Table Flash code Error description Possible action 1 Remote joystick error Check cables and connectors Replace the Remote 2 Network or configuration error Check cables and co...

Страница 72: ...all LEDs lit and signifies that the battery level is somewhere between 81 and 100 of full capacity Batt Gauge Maximum A low battery warning is generated when the battery voltage falls below the Batt...

Страница 73: ...tery Gauge will indicate the system is being charged by cycling between a left to right chase sequence and then displaying the approximate battery charge state at the end of the chase sequence Battery...

Страница 74: ...Angle 5 Battery Ah 26 1 657 7Wh Optional 11 5 290Wh Controller Dynamic DLX PM40 Caster Wheel inch 8 PU Rear Wheel inch 14 PU RUBBER 20 PU RUBBER Max Speed km hr 8 Max Safe Slope 6 Turning Radius 900...

Страница 75: ...following conditions 20 68 an 80 kg 176 lb driver brand new fully charged batteries and a constant driving speed of 8km hr 5mph 10 OPTIONAL ACCESSORIES Adjustable Footplate Stump Footrest Headrest col...

Страница 76: ...while waiting it out 11 1 4 If you can t find shelter proceed to your destination 11 1 5 However we do not recommend you do this often as it may shorten the life of your wheelchair or cause damage 11...

Страница 77: ...information highway to help less fortunate individuals and protect our planet for future generations 11 2 5 If you do not have access to the world wide web please use your local phone directory ask f...

Страница 78: ...Parts Covered by the Warranty 12 3 1 Please contact your local dealer 12 4 Items Not Covered The items listed below are not covered 12 4 1 Consumable parts such as brake shoes or pads clutch shoe and...

Страница 79: ...are not approved by KARMA 12 5 4 Damage caused by using non KARMA genuine parts or other parts not recommended by KARMA 12 5 5 Abuse or misuse of the vehicle such as driving over curbs and overloading...

Страница 80: ...ual 12 7 Warranty Effectiveness The warranty form must be completely filled out and stamped by the KARMA dealership where the wheelchair was purchased 12 8 Transfer of Warranty Rights If you purchase...

Страница 81: ...Name of the Store Phone No and Address If you have any suggestions on how to improve our products please don t hesitate contacting your local dealer to let us know what you think of your wheelchair Th...

Страница 82: ......

Страница 83: ......

Страница 84: ...110400000531 Rev 08 2018 05...

Отзывы: