

-
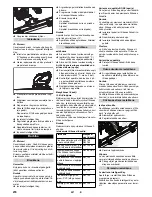
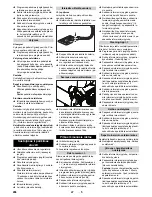
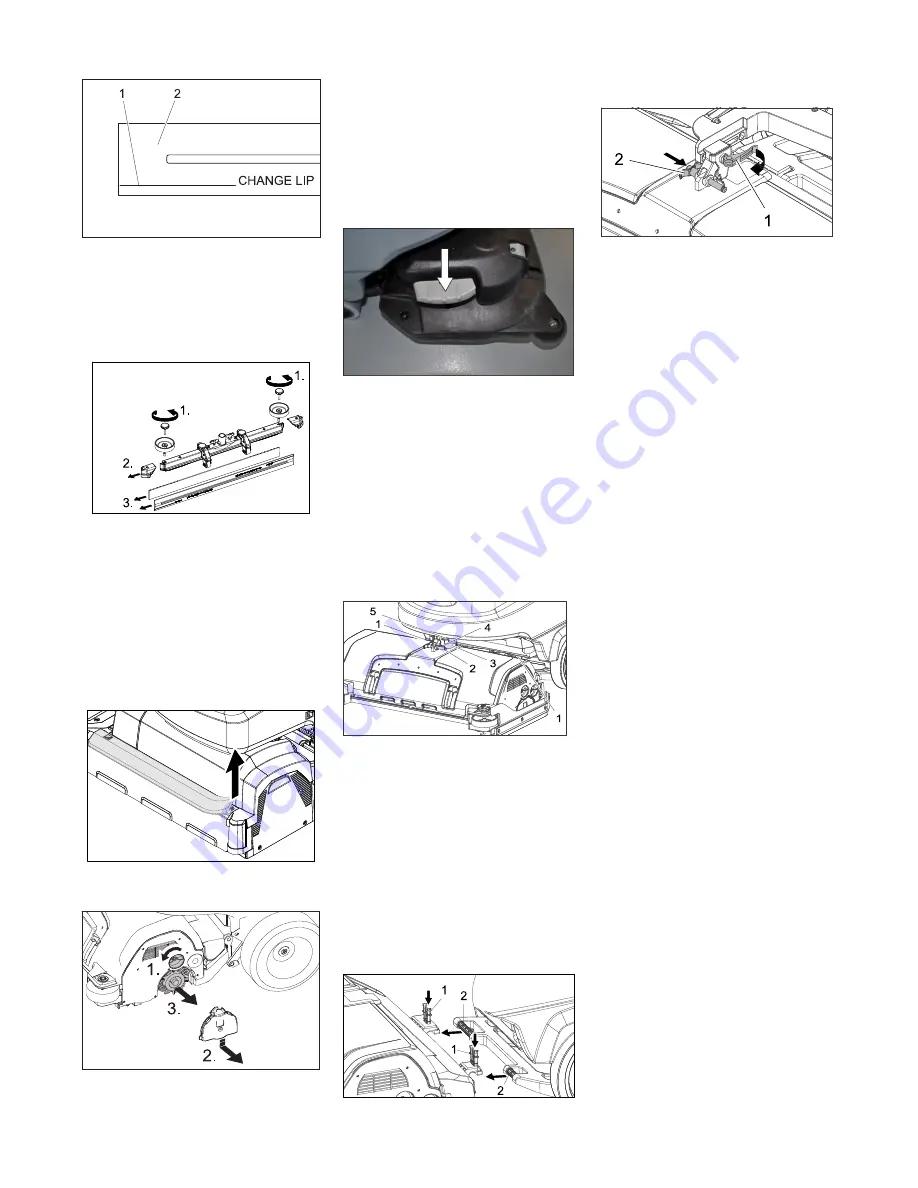
7
1 Nusid
ė
v
ė
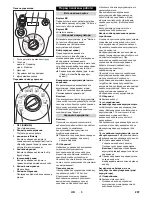
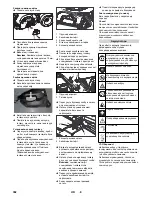
jimo ribos žym
ė
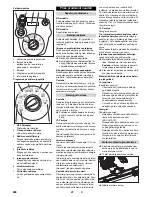
2 Siurbimo juostel
ė
Siurbimo juostel
ė
turi b
ū
ti pakeista, jei ji nu-
sid
ė
v
ė
jusi iki žym
ė
s.
Nuimkite siurbimo r
ė
mel
į
.
Atsukite žvaigždines ranken
ė
les.
Nuimkite apdail
ą
.
Ištraukite siurbimo juostel
ę
.
Į
stumkite nauj
ą
arba apverst
ą
siurbimo
juostel
ę
.
Užd
ė
kite apdail
ą
.
Į
sukite ir tvirtai užveržkite žvaigždines
ranken
ė
les.
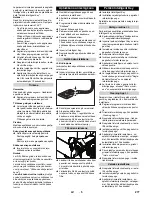
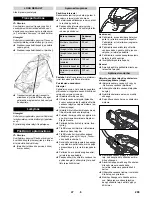
Nutraukite gumos juost
ą
ir šluoste išva-
lykite griovel
į
. Išval
ę
v
ė
l tolygiai
į
spaus-
kite gumos juost
ą
.
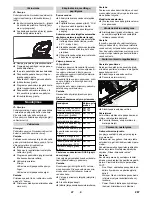
Pakelkite valymo galv
ą
.
Atleiskite guoli
ų
dangtelio fiksatori
ų
.
Guoli
ų
dangtel
į
paspauskite žemyn ir iš-
traukite.
Ištraukite šepe
č
io velen
ą
.
Pastaba
: Jei šeri
ų
ilgis pasiek
ė
10 mm,
pakeiskite šepe
č
i
ų
velen
ų
.
Į
d
ė
kite nauj
ą
šepe
č
io velen
ą
.
Guoli
ų
dangtel
į
pritvirtinkite atvirkštine
tvarka.
Pakartokite proced
ū
r
ą
kitoje pus
ė
je.
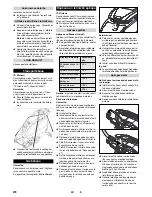
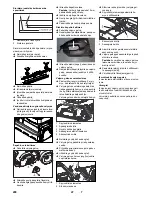
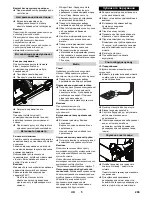
Pakelkite valymo galv
ą
.
Nepaisydami pasipriešinimo, paspaus-
kite šepe
č
io keitimo pedal
ą
žemyn.
Ištraukite diskin
į
šepet
į
, esant
į
šone po
valymo galv
ą
.
Nauj
ą
diskin
į
šepet
į
laikykite po valymo
galv
ą
, paspauskite j
į
aukštyn ir užfik-
suokite.
Pastumkite
į
rengin
į
maždaug 2 m pir-
myn, kad ratukai b
ū
t
ų
nukreipti atgal.
Valymo galvos nuleidimo pedal
ą
šiek
tiek paspauskite žemyn, po to pasukite
į
kair
ę
. Šitaip atblokuojamas pedalas. Iš
l
ė
to atleiskite pedal
ą
aukštyn.
Valymo galvos str
ė
l
ė
nukreipta žemyn.
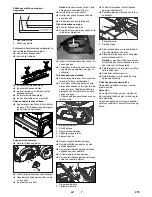
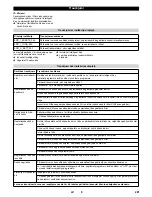
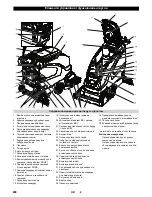
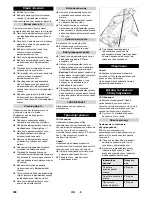
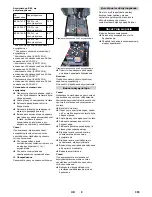
1 Spyruoklinis elementas
2 Apsauginis kaištis
3 Gnybt
ų
d
ė
ž
ė
s dangtelis
4 Apsauginio kaiš
č
io fiksatorius
5 Ekscentrin
ė
svirtis
Nuimkite gnybt
ų
d
ė
ž
ė
s dangtel
į
.
Valymo galv
ą
pad
ė
kite prieš prietais
ą
centre.
Prijunkite prie prietaiso valymo galvos
maitinimo kabel
į
.
Užd
ė
kite gnybt
ų
d
ė
ž
ė
s dangtel
į
.
Valymo galvos žarnos jungt
į
sujunkite
su prietaiso žarna.
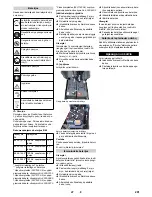
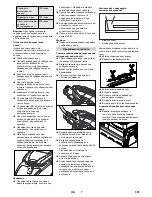
1 Spyruoklinis elementas
2 St
ū
mimo rankena
St
ū
mimo rank
ą
į
stumkite
į
valymo gal-
vos ang
ą
.
Spyruoklin
į
element
ą
pastumkite že-
myn ir užfiksuokite.
1 Ekscentrin
ė
svirtis
2 Apsauginis kaištis
Atverkite str
ė
l
ė
s perstumiamo laikiklio
ekscentrin
ę
svirt
į
.
Valymo galv
ą
paspauskite iki galo prieš
st
ū
mimo ranken
ą
.
Pastaba
: kuo mažesnis valymo galvos
laisvumas pritvirtinus, tuo mažesn
į
vi-
bracija valant.
Pastumkite laikikl
į
,
į
kiškite ir užfiksuoki-
te apsaugin
į
kaišt
į
.
V
ė
l uždarykite fiksuojam
ą
j
ą
svirt
į
.
Išmontuojama atvirkš
č
iai nei buvo montuo-
jama.
Atsargiai
Išmontuojant valymo galv
ą
,
į
renginys gali
tapti nestabilus, tod
ė
l užtikrinkite, kad jis
stov
ė
t
ų
tvirtai.
Jei reikia, pad
ė
kite k
ą
nors apa
č
ioje, kad
neapvirst
ų
.
Siurbimo juostel
ė
s keitimas arba
apvertimas
Vandens skirstytuvo griovelio valymas
Šepe
č
i
ų
volo keitimas
Diskinio šepe
č
io keitimas
Valymo galvos sumontavimas
Išmontuokite valymo galv
ą
290
LT
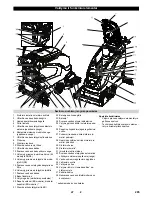
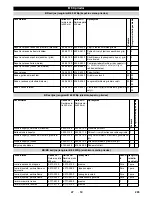
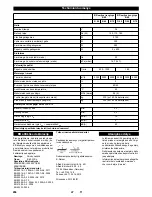
Содержание B 60 W Bp
Страница 2: ...2...
Страница 131: ...7 BR BR BR 30 2 3 1 2 10 mm 131 EL...
Страница 132: ...8 2 m 1 2 3 K 4 5 1 2 1 2 132 EL...
Страница 150: ...3 1 2 3 4 5 1 OFF 2 3 eco efficienty 4 5 6 7 Karcher 10 15 BD BR 150 RU...
Страница 151: ...4 EN 50272 T3 R ss 15 60 C 60 C 5 3 RM 746 RM 780 RM 755 es RM 69 ASF RM 753 RM 751 RM 732 PVC RM 752 RM 754 DOSE 151 RU...
Страница 153: ...6 Cleaning App 10 10 K rcher 10 Cleaning App LOAD DEFAULT 153 RU...
Страница 154: ...7 BR BR BR 30 2 3 1 2 20 20 50 100 100 200 154 RU...
Страница 155: ...8 10 2 1 2 3 4 5 1 2 1 2 155 RU...
Страница 157: ...10 10 ERR_I_B RSTE_049 ERR_I_TURB_050 ERR_U_BATT_001 R OFF 157 RU...
Страница 252: ...3 1 2 3 4 5 1 OFF 2 3 eco 4 5 6 7 reset 10 15 BD BR 252 BG...
Страница 254: ...5 5 FACT Fine Clean Whisper Clean Power Clean 10 10 254 BG...
Страница 255: ...6 Cleaning App 10 10 K rcher 10 Cleaning App LOAD DEFAULT T o 255 BG...
Страница 256: ...7 reset BR BR BR 30 2 3 1 2 20 20 50 100 100 reset 200 256 BG...
Страница 257: ...8 10 2 1 2 3 4 5 1 2 1 2 257 BG...
Страница 259: ...10 10 ERR_I_B RSTE_049 ERR_I_TURB_050 ERR_U_BATT_001 Stand by R OFF 259 BG...
Страница 297: ...3 1 2 3 4 5 1 OFF 2 3 eco efficienty 4 5 6 7 10 15 BD BR 297 UK...
Страница 298: ...4 EN 50272 T3 R 15 60 C 60 C 5 3 RM 746 RM 780 RM 755 es RM 69 ASF RM 753 RM 751 RM 732 RM 752 RM 754 DOSE 298 UK...
Страница 299: ...5 5 FACT Fine Clean Whisper Clean Power Clean 10 10 299 UK...
Страница 300: ...6 Cleaning App 10 10 K rcher 10 Cleaning App LOAD DEFAULT 20 20 50 300 UK...
Страница 301: ...7 BR BR BR 30 2 3 1 2 100 100 200 301 UK...
Страница 302: ...8 10 2 1 2 3 4 5 1 2 1 2 302 UK...
Страница 304: ...10 10 ERR_I_B RSTE_049 ERR_I_TURB_050 ERR_U_BATT_001 R OFF 304 UK...
Страница 307: ......
Страница 308: ......
Страница 309: ......
Страница 310: ......
Страница 311: ......
Страница 312: ...http www kaercher com dealersearch...


