background image

INSTRUCTION MANUAL

BUTTON CONTROL

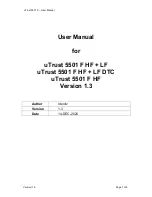
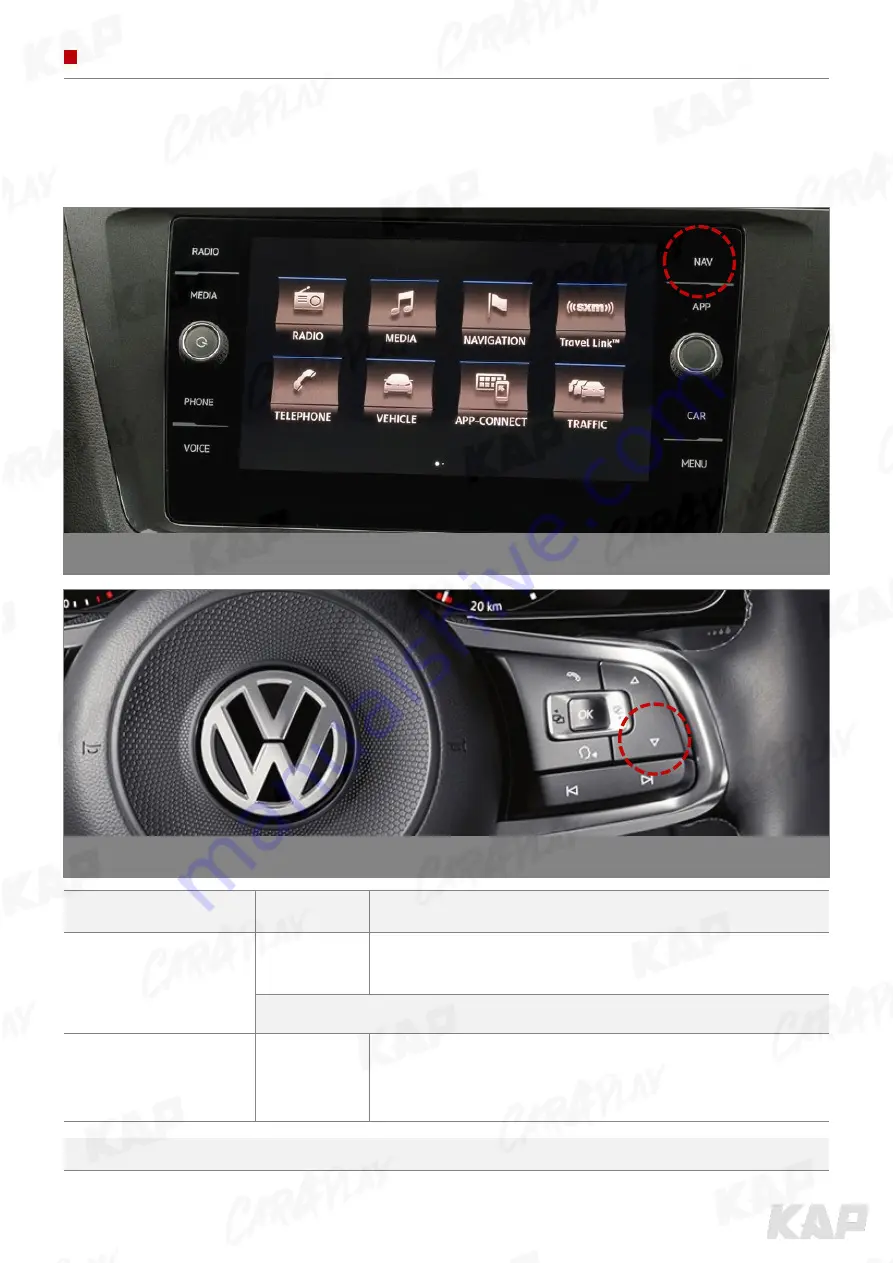
VOLKSWAGEN – TIGUAN / T-ROC

DOWN

Warning

To use the steering wheel button, “Hand wheel" must be “DOWN“ in the OSD menu

DOWN

BUTTON

PRESS

FUNCTION

NAV / DOWN

Long press

OEM screen to interface screen
Interface screen to the OEM screen

Screen change sequence : 

OEM > NAVI > AV1 > AV2 > OEM

RADIO / MEDIA / 

PHONE / APP / 

SOUND / CAR / MENU

Short press

to OEM screen

Содержание AUDI 4G HIGHEND

Страница 1: ...aptrader com E kap kaptrader com A 05854 A 912 RM Tera tower2 201 Songpa Dearo Songpa gu Seoul Korea F 82 6204 0913 DATA Video Interface and Wireless CarPlay Wired Android Auto AUDI 4G HIGHEND 2021 09 30 4G SYSTEM CARPLAY INTERFACE ...

Страница 2: ...R AUDI A3 5 8 7 0 MMI Control A4 7 0 Additional Touch Panel required A6 8 0 Q2 7 0 2017 Q7 7 0 TT 12 0 BENTLEY Mulsanne 8 0 2017 2018 Bentayga 8 0 2018 PORSCHE PCM 4 0 7 0 Touch Control 2016 VOLKSWAGEN Golf 5 8 6 5 8 0 Additional Touch Panel required Polo 6 5 Tiguan 8 0 T Roc 8 0 ...

Страница 3: ...ct your dealer if any component is missing Warning Please contact your dealer if any component is missing KPLAY KPLAY POWER CABLE HDMI CABLE MIC WIFI BLUETOOTH ANTENNA AUX CABLE INTERFACE POWER CABLE LVDS CABLE OSD BOARD RGB NAVI CABLE A V CABLE 24PIN ...

Страница 4: ...S AUDIO VIDEO IN 1 x CVBS FRONT CAM IN 1 x CVBS REAR CAM IN 1 x LVDS IN CAMMAND SYSTEM 3 OUTPUT 2 x CVBS VIDEO OUT 1 x CVBS AUDIO OUT 1 x LVDS OUT OPERATION 5 POWER Input Power 8VDC 24VDC Consumption Power 12Watt Max 6 SWITCH INPUT MODE Possible to select CAR model while switching mode by DIP S W By button on the Commander in the car via CAN 4 TOUCH UART DIGITAL TOUCH VIRTUAL ANALOG TOUCH 4PIN ...

Страница 5: ...INSTRUCTION MANUAL EXTERNAL DEVICE SPECIFICATIONS 1 2 3 4 5 6 7 8 9 10 11 1 LCD OUT 2 DIP SWITCH 3 LCD IN 4 PROGRAM 5 LED 6 IR 7 DIGITAL RGB 8 TOUCH 9 ANALOG RGB 10 AUDIO VIDEO 11 POWER CAN ...

Страница 6: ...1 NAVIGATION USE Do not use 2 AV1 DVB T USE Do not use 3 AV2 DVD USE Do not use 4 No function 5 8 Car Type ON 1 ON 1 2 2 3 3 AUDI A3 5 8 AUDI A3 7 0 AUDI A4 Q7 7 0 AUDI A6 8 0 AUDI TT 12 0 AUDI Q2 2017 7 0 ON 5 6 7 8 ON 5 6 7 8 ON 5 6 7 8 ON 5 6 7 8 ON 5 6 7 8 ON 5 6 7 8 ...

Страница 7: ...ulsanne 2017 8 0 BENTLEY Mulsanne 2018 8 0 BENTLEY Bentayga 2018 8 0 PORSCHE PCM4 0 7 0 VOLKSWAGEN Polo 6 5 ON 5 6 7 8 ON 5 6 7 8 ON 5 6 7 8 ON 5 6 7 8 ON 5 6 7 8 VOLKSWAGEN Golf 5 8 VOLKSWAGEN Golf 6 5 VOLKSWAGEN Golf 8 0 VOLKSWAGEN Tiguan T Roc 8 0 ON 5 6 7 8 ON 5 6 7 8 ON 5 6 7 8 ON 5 6 7 8 ...

Страница 8: ...l Assignment 1 Red R DATA 2 Green G DATA 3 Blue B DATA 4 White SYNC 5 Black GND 6 Green DVB T IR 7 Orange DVD IR 1 2 3 4 5 6 7 1 2 3 No Color Signal Assignment No Color Signal Assignment 1 Red ACC 2 3 Blue REAR POWER 4 Brown REAR DET 5 Green CAN B L 6 Orange CAN B H 7 White CAN OUT L 8 Purple CAN OUT H 9 Blue CAN IN L 10 Red CAN IN H 11 Yellow MMI 12 Black GND 1 3 5 7 9 11 2 4 6 8 10 12 ...

Страница 9: ...INSTRUCTION MANUAL EXTERNAL DEVICE SPECIFICATIONS 1 2 3 4 5 6 7 8 1 DIP SWITCH 2 DIGITAL 3 POWER 4 USB 5 MICROPHONE 6 RESISTIVE TOUCH 7 SPEAKER 8 WIFI BLUETOOTH ANTENNA 4PIN Touch Smartphone USB storage ...

Страница 10: ...ION 1 DIP SWITCH 2 POWER 3 TOUCH No Color Signal Assignment 1 Red ACC 2 Black GND 1 2 1 2 3 4 1 2 3 No FUNCTION 1 800x480 Resolution 2 1280x480 Resolution ON 1 2 ON 1 2 Warning DIP switch No 2 has no function No Color Signal Assignment 1 Black Y 2 Green X 3 White Y 4 Red X ...

Страница 11: ...PLAY CONTROL MAIN SCREEN 1 2 3 4 1 APPLE CARPLAY 2 ANDROID AUTO 3 USB MEDIA 4 SETTINGS VIDEO MUSIC IMAGE Wireless Cable Cable Apple CarPlay 800 x 480 Apple CarPlay 1280 x 480 Android AUTO 800 x 480 Android AUTO 1280 x 480 ...

Страница 12: ...roid AUTO or Apple CarPlay Driver Position Left Use when driver s position is left Right Use when driver s position is right Wireless Carplay Activation Connect Apple CarPlay wirelessly Bluetooth Disabled Used to wire Apple CarPlay Use touch on Android Auto Activation Touch is available when running Android Auto Disabled Touch not available when running Android Auto Link Type Android Android Auto ...

Страница 13: ... s microphone No INFORMATION Can be used CONTROL NOTICE 1 Apple CarPlay Wireless connection Use all Apple CarPlay Functions AUX MIC TOUCH Multiple connections are not supported Only one device can be connected unconditionally Cable Connection 2 Android AUTO Cable Connection Use all Android AUTO Functions 3 USB Media Connection Music Photo Video USB Media ANDROID AUTO or ...

Страница 14: ...etti ngs Menu If Wireless Carplay is enabled you cannot connect by wire 2 Choose CarPlay BT in Bluetooth on iPhone 3 PIN Number 0000 enter 4 Allow select 5 Use CarPlay select Once connected Bluetooth will be disconnected and connected via Wi Fi 6 Enjoy CarPlay In KPLAY on iPhone on iPhone on iPhone on iPhone In KPLAY ...

Страница 15: ...arPlay records as shown below 3 disable and re enable WiFi and Bluetooth then try to connect again Forget CarPlay History Warning Due to the nature of the wireless connection sometimes the connection is not working properly If you follow the same procedure as above but the connection is not working properly reboot KPLAY and iPhone and try again ...

Страница 16: ...uto may not run even if the cable is not broken If you follow the same procedure as above but the connection is not working properly reboot KPLAY and iPhone and try again ANDROID AUTO APP Download 1 Check if your smartphone has ANDROID AUTO application 2 Replace the cable Changing the cable ...

Страница 17: ...B media will be scanned automatically Press the Home button on the top right corner of the USB Media screen and select the Settings menu 4 After the device reboots check the message and wait for the update to complete firmware files Root folder Root folder Top level folder without adding folder Warning If USB with firmware is connected the update will be performed every time the device is rebooted...

Страница 18: ...TION NAV Long press OEM screen to interface screen Interface screen to the OEM screen Screen change sequence OEM NAVI AV1 AV2 OEM TEL RADIO MEDIA CAR Short press to OEM screen NAV NAV Warning To use the steering wheel button Hand wheel must be NAV in the OSD menu ...

Страница 19: ... BUTTON PRESS FUNCTION NAV MODE Long press OEM screen to interface screen Interface screen to the OEM screen Screen change sequence OEM NAVI AV1 AV2 OEM NAV MODE Warning To use the steering wheel button Hand wheel must be MODE or NAV in the OSD menu ...

Страница 20: ...OLO BUTTON PRESS FUNCTION DOWN MUTE Long press OEM screen to interface screen Interface screen to the OEM screen Screen change sequence OEM NAVI AV1 AV2 OEM MUTE DOWN Warning To use the steering wheel button Hand wheel must be MUTE or DOWN in the OSD menu ...

Страница 21: ... steering wheel button Hand wheel must be DOWN in the OSD menu DOWN BUTTON PRESS FUNCTION NAV DOWN Long press OEM screen to interface screen Interface screen to the OEM screen Screen change sequence OEM NAVI AV1 AV2 OEM RADIO MEDIA PHONE APP SOUND CAR MENU Short press to OEM screen ...

Страница 22: ...TROL PORSCHE PCM 4 0 BUTTON PRESS FUNCTION NAV Long press OEM screen to interface screen Interface screen to the OEM screen Screen change sequence OEM NAVI AV1 AV2 OEM TUNER MEDIA SOURCE PHONE CAR HOME Short press to OEM screen NAV ...

Страница 23: ...TROL BENTLEY MULSANNE BUTTON PRESS FUNCTION NAV Long press OEM screen to interface screen Interface screen to the OEM screen Screen change sequence OEM NAVI AV1 AV2 OEM RADIO TEL MEDIA SOURCE SOUND CAR Short press to OEM screen NAV ...

Страница 24: ...CONTROL BENTLEY BENTAYGA BUTTON PRESS FUNCTION NAV Long press OEM screen to interface screen Interface screen to the OEM screen Screen change sequence OEM NAVI AV1 AV2 OEM RADIO HOME MEDIA TEL BACK Short press to OEM screen NAV ...

Страница 25: ...Softkey upper left In Android Auto Press Go to navigation bar In Apple CarPlay Press Back 3 MENU In Interface Long press OSD Control Menu Launch 4 MMI Multimedia Volume Control Button In all modes Only when playing music Press left Play previous track Press right Play next track 5 MMI Main Control Wheel In all modes Turn left Move left or up Turn right Move right or down Press Selection 1 2 3 4 5 ...

Страница 26: ...ibration MENU Config NAVI OSD Factory Reset Execute Cancel IR Ctrl Calibration Execute Cancel Utility Version Interface version Select OSD menu Utility Calibration Touch according to the shape coordinates Warning Touch control icon in DVBT DVD ...

Страница 27: ...KING CONTROL Parking Line OPS Display Parking Line ON Screen Parking Line OFF Screen 1 Parking Line Display PDC Display ON Screen PDC Display OFF Screen 2 PDC Display Grid Type Split Screen Grid Type Full Screen 3 Grid Type ...

Страница 28: ...sition to the left SEL Move the guideline position to the right UP Move the guideline position upwards DOWN Move the guideline position downward MENU Parking REAR Config OPS Display Off Option Line Display Off Image Warnings Lang English Screen Horizontal 50 Parking Vertical 50 5 Det Setting MENU Parking REAR Config RearCam Type ExtDevice Option RearCam Power AUTO Image RearCam Det PDC GEAR ExtWir...

Страница 29: ...Y ON 1 2 3 4 5 6 7 8 ON 1 2 KPLAY POWER DIGITAL DIP_S W USB MIC TOUCH SPK ANT MENU Option NAVI Config NAVI RGB DIGITAL KPLAY Option DVB T DMB Image DVD Screen RearCam Parking FrontCam MENU Option NAVI Config NAVI COM KPLAY Option Reset Image Screen Parking Please set in the OSD menu ON 1 2 Speaker Microphone WiFi BT Antenna Smart Phone 800x480 1280x480 ...

Страница 30: ...or To Calibrate Touch Touch and hold for 10 seconds INSTALL MANUAL KPLAY TOUCH KPLAY POWER DIGITAL DIP_S W USB MIC TOUCH SPK ANT HDMI HDMI MENU Option NAVI Config NAVI COM KPLAY Option Reset Image Screen Parking TOUCH CALIBRATION IN KPLAY Touch and hold anywhere on the screen for 10 seconds Touch in the center of the icon ...

Страница 31: ...OFF CONNECTION DIAGRAM DVB T DMB ON 1 2 3 4 5 6 7 8 MENU Option NAVI Config NAVI RGB Option DVB T DMB DMB MODEL Image DVD Screen RearCam Parking FrontCam Please set in the OSD menu DVB T IR MENU Option NAVI Config Option Image Screen UI DVB T DMB On Off Parking UI DVD GND ACC POWER Battery DMB MODEL ANALOG RGB POWER ...

Страница 32: ...ONNECTION DIAGRAM DVD No 3 OFF ON 1 2 3 4 5 6 7 8 DVD IR MENU Option NAVI Config NAVI RGB Option DVB T DMB Image DVD DVD MODEL Screen RearCam Parking FrontCam Please set in the OSD menu MENU Option NAVI Config Option Image Screen UI DVB T DMB Parking UI DVD On Off DMB MODEL ANALOG RGB POWER GND ACC POWER Battery ...

Страница 33: ...OUCH NAVI A V LCD OUT LCD IN DIP_S W PROGRAM LED CAR REAR CAMERA CONNECTION DIAGRAM REAR CAM MENU Option NAVI Config NAVI RGB AVM VIDEO Option DVB T DMB AVM DIGITAL Image DVD Default Screen RearCam Parking FrontCam Please set in the OSD menu REAR POWER REAR DETECT ...

Страница 34: ...NUAL INSTALL MANUAL LVDS CONNECTION Use only gray Blue and Green are not used 1 3 5 7 9 11 2 4 6 8 10 12 Rear Camera Display AUDI 4G HIGHEND POWER CAN IR DIGITAL NAVI TOUCH NAVI A V LCD OUT LCD IN DIP_S W PROGRAM LED ...

Страница 35: ...INSTRUCTION MANUAL INSTALL MANUAL Installation CAN connection Remove the original gray connector Check the gray area Be careful of the protruding part connect the connector ...

Страница 36: ...n Display Board Control 7 MENU The OSD screen can be switched ON OFF Return to previous menu 8 SEL Select the currently active item If the OSD screen is off mode changes can be made 9 UP Move up from the menu Increase the selected item value 10 DOWN Move down from the menu Decrease the selected item value 10 9 8 7 OSD On Screen Display Menu 1 MENU 2 Mode State 3 Interface Status 4 First Menu 5 Sec...

Страница 37: ...on Config NAVI RGB DIGITAL Setting the Connected NAVI Model DVB T DMB Default Setting the Connected DVB T Model DVD Default Setting the Connected DVD Model RearCam AVM VIDEO Setting the Connected RearCam Model Reset Execute Cancel Reset to default value of Config menu Config ...

Страница 38: ... ExtDevice Equipped with external camera RearCam Power On 12V continuous supply AUTO 12V supply only in Rear camera mode Off 12V off RearCam Det PDC Rear detection control using Car Audio Box Button GEAR Rear detection control using gear ExtWire Detected by Rear Det Wire FrontCam RcvOpt On The time 1 30 seconds that FrontCam is displayed before returning to the previous state in RearCam Off Disabl...

Страница 39: ...es output the output of AV OUT to the final screen DecK Button MENU MENU Switching screen by using Screen button SETUP SETUP Switching screen by using Screen button SteeringWheel Btn MODE Mode Switching screen by using Steering wheel button NAV Nav Switching screen by using Steering wheel button OFF Disable feature Steering Channel On Use DVB T Channel Up Down with Steering wheel button Off Disabl...

Страница 40: ...iption Option UI DVD On DVD device control UI output function Off Disable feature Camera On Video CVBS Input Port Front Off Disable feature ScrChg Wheel On Turn the button to show the oem screen for 3 seconds Off Disable feature Reset Execute Option Menu all Reset Option ...

Страница 41: ...AV REAR FRONT DVD DVBT MENU Adjust the value of Saturation Hue AV REAR FRONT DVD DVBT MENU Adjust the value of Hue Sharpness AV REAR FRONT DVD DVBT MENU Adjust the value of Sharpness Color RED NAVI MENU ONLY Adjust the value of RED Color GREEN NAVI MENU ONLY Adjust the value of GREEN Color BLUE NAVI MENU ONLY Adjust the value of BLUE Reset Execute Image Menu all Reset Image ...

Страница 42: ...nu Description Screen Horizontal Output screen horizontal movement Vertical Output screen vertical movement Scale X Up Reduce increase output screen width Scale X Down Scale Y Up Reduce Increase Output Screen Height Scale Y Down Reset Screen menu all reset Screen ...

Страница 43: ...g line OFF Do not show parking lines OPS Display ON Show OPS OFF Do not show OPS Grid Type Full Do not show OPS SPLIT Show OPS Warnings Lang Set warning text language Horizontal Moving a parking line horizontally Vertical Moving a parking line vertically Transparency Parking line transparency Reset Parking menu all reset ...

Страница 44: ...Description OSD Horizontal value OSD Menu Horizontal Shift Vertical value OSD menu vertical Shift Display Time value OSD Menu Display Time in seconds Transparency value OSD menu transparency Language OSD menu display language Reset Execute Initialize OSD settings OSD ...

Страница 45: ...function a separate IR cable is required 1 In DVB T DVD menu select User in Sys OSD list or User learned contents 2 Select Learn from the OSD menu 3 Before using IR learning function select All Clear to delete existing stored data 4 Press the remote control button to be used in each ICON once in New Code press once again in Cfm Code to confirm it is the same and save it IR Ctrl ...

Страница 46: ...tion Execute Calibration mode Execute Version AD4P52KRX 200681 Check for future upgrades A D 4 P 5 2 K R X 2 0 0 6 8 1 Motor Model FD FORD BM BMW BE BENZ MA MASERATI LX LEXUS PIP Model S3 Sync3 PP PIP V LVDS Hardware Version National CN CHINA KR KOREA JP JAPAN US U S A Special Version Software Year Software Month Software Version Utility ...

Страница 47: ...A 912 Rm Tera tower2 201 Songpa daero Songpa gu Seoul Korea F 82 6204 0913 E kap kaptrader com ...

Отзывы: