background image


Page 5 of 25 


5. TEST  INSTRUCTIONS 

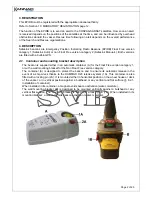
Test of 406 / 121.5 MHz frequencies. 

It is recommended to perform a self-test once a month. The self-test may be performed with the 
beacon inside its bracket or container. 

NOTE: This check shall only be conducted during the first five minutes of any UTC hour. 

1.  Press TEST / READY push button (3) for 2 seconds. 

2.  During the test, the strobe lights (5) blink, the buzzer transmits an audible signal, and the red 

programming led (7) flashes once. 

3.  At the end of the test, the result is displayed by green (6a) or red (6b) leds: 

Green led (6a), 1 flash indicates the system is operational; 

Red led (6b), 1 flash indicates the test has failed. 

Repeat 3 times to confirm failure before contacting agent. 

NOTE: Do not confuse the red programming led (7) and the «default» red led (6b). 

6. INSTRUCTIONS  FOR  USE 

WARNING: It is unlawful to transmit a distress signal unless an emergency exists. Do not 
operate inside life raft or under any similar cover of canopy. Do not obstruct GPS antenna's 
view of sky to maximize self-locating performance (do not place the hands over the 
transparent dome of the beacon). 

6.1. Automatic activation 

IMPORTANT: Only for SafeLink Auto Float Free version, category 1. 
If the vessel sinks, the release system ejects the cover to enable the beacon to rise to the surface. 
The beacon is automatically activated when submerged in water and out of its container. 
The beacon should be recovered and tied to a life raft to locate the survivors and not the wreck 
location. 


6.2. Manual activation 

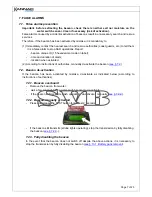
6.2.1. Beacon removal 

SafeLink Auto category 1 (Float Free) 

Remove the beacon from its container: 

(1)  Lift up the red locking pin of the container; 

(2)  Remove the locking pin; 

(3)  Remove the cover of the container and extract the beacon. 


Содержание SafeLink EPIRB

Страница 1: ...SAFELINK EPIRB User Manual ...

Страница 2: ...SafeLink Category 1 ...

Страница 3: ...SafeLink Category 2 ...

Страница 4: ...onthly stered with y user servic her service ium batterie dispose of th requency ra visable not t td The inf ge correct a nstallation duct develo retrieval sys m McMurdo on although vital that th Search and m may con the housing e and cons Instead t OTICES for use only to prevent false alerts stalling tes your local a ceable part es do not hese batter adiation whe to handle th formation a at the t...

Страница 5: ... plate 8 8 2 SafeLink Auto Category 1 Float Free 9 8 2 1 Installation of container 9 8 2 2 Installation of beacon into container 10 8 3 SafeLink Manual Category 2 11 8 3 1 Mounting bracket installation 11 8 3 2 Installation of beacon into its mounting bracket 12 9 TECHNICAL SPECIFICATIONS 13 10 MANDATORY REGISTRATION 13 10 1 Overview 13 10 2 How to register 14 10 3 Radio licence 15 10 4 Sale or tr...

Страница 6: ...e Local User Terminals L U T Thanks to the geostationary satellites GEOSAR the distress is received within minutes and transmitted anywhere in the world Thanks to the orbital satellites LEOSAR the position of the distress is calculated within one nautical mile anywhere in the world using Doppler techniques The typical waiting time for calculating a position in average latitudes is less than one ho...

Страница 7: ...nting bracket description The beacon is supplied either in an automatic container A for the Float Free version category 1 or with a wall mounting bracket for the Non Float Free version category The container A is designed to protect the beacon and to ensure its automatic release in the event of a ship wreck thanks to the HAMMAR H20 release system 1A This container is also fitted with a locking pin...

Страница 8: ... the beacon by the SAR operations 6 Beacon control lamps red and green to check good operation when activating the beacon to check good operation when performing a self test 7 Programming led to program the beacon by manufacturer or authorized programming stations 8 Water switch contact to activate automatically the beacon when submerged in water 9 Retroreflective tape 10 Tether line to secure the...

Страница 9: ...Page 4 of 25 ...

Страница 10: ...ault red led 6b 6 INSTRUCTIONS FOR USE WARNING It is unlawful to transmit a distress signal unless an emergency exists Do not operate inside life raft or under any similar cover of canopy Do not obstruct GPS antenna s view of sky to maximize self locating performance do not place the hands over the transparent dome of the beacon 6 1 Automatic activation IMPORTANT Only for SafeLink Auto Float Free ...

Страница 11: ...erged water switch sensor activation TO STOP BEACON remove the beacon from water Transmission will stop 10 seconds after 6 2 3 Manual Activation by ON pushbutton 1 Break the seal by pushing the locking system up 2 Press ON pushbutton for 1 at least second 3 The buzzer transmits an audible signal every second 4 The beacon performs a self test 5 After the self test only the white strobe lights blink...

Страница 12: ...ording to instructions of authorities manually de activate the beacon see 7 2 7 2 Beacon de activation If the beacon has been activated by mistake de activate as indicated below according to instructions of authorities 7 2 1 Beacon overboard Remove the beacon from water wait a few seconds for the water switch sensor to de activate if the beacon still transmits flash operating de activate it manual...

Страница 13: ...his is a rigid plate with basic visual instructions for how to operate the beacon in an emergency The instruction plate should be mounted next to the beacon so that it is easily visible in an emergency Use four screws not supplied to mount the plate Important do not paint the plate do not use strong degreasing solvent to clean it ...

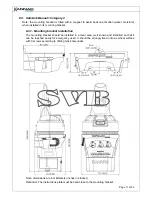
Страница 14: ...ng instructions horizontal or vertical position clear area to allow the beacon to rise the surface should the vessel sink Caution watch rigging antenna or shroud that could build obstacles easy access to the crew for manual operation strongly fix to the vessel with 4 screws according to drilling mask hereunder Note dimensions are in millimeters inches in bracket Reminder The instructions plate mus...

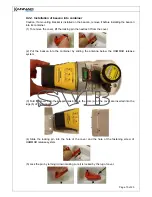
Страница 15: ...act it from the cover 2 Put the beacon into the container by sliding the antenna below the HAMMAR release system 3 Fold the cover onto the support making sure the slots a of the cover are inserted into the lugs b of the support 4 Slide the locking pin into the hole of the cover and the hole of the fastening screw of HAMMAR release system 5 Lock the pin by turning it down making sure it is locked b...

Страница 16: ...ng bracket installation The mounting bracket should be installed in a clear area well known and identified so that it can be reached easily for emergency used It should be strongly fixed onto a vertical surface with 3 screws according to drilling mask hereunder Note dimensions are in millimeters inches in bracket Reminder The instructions plate must be fixed close to the mounting bracket ...

Страница 17: ... beacon into its mounting bracket 1 Insert the beacon into its mounting bracket 2 Insert the locking pin in the locking sleeve of the mounting bracket 3 Turn downwards the locking pin up to hear a click that proves the bracket is locked ...

Страница 18: ... EPIRB with the appropriate authorities Failure to register may slow the rescue and lead to loss of life You are legally required to register your EPIRB 10 1 Overview The EPIRB is pre programmed with a unique identity before it reaches the end customer This is done by the manufacturer or in some cases the distributor The identity includes a 3 digit country code This is the country that takes respo...

Страница 19: ...istration noaa gov Canada Beacon Registration Canadian Beacon Registry CFB Trenton PO Box 1000 Stn Forces Astra ON K0K 3W0 Tel 1 877 406 SOS1 7671 Fax 1 877 406 FAX8 3298 Email CBR sarnet dnd ca On line registration www canadianbeaconregistry forces gc ca UK EPIRB Registry The Epirb Registry Falmouth MRCC Pendennis Point Castle Drive Falmouth Cornwall TR11 4WZ Tel 44 0 1326 211569 Fax 44 0 1326 31...

Страница 20: ...enter service immediately complete the registration card and fax the information to the MSA The original card must still be mailed to the MSA for hard copy reference and filing If the current owner is transferring the beacon to a new owner the current owner is required to inform the MSA by letter fax or telephone of the name and address of the new owner The subsequent owner of the beacon is requir...

Страница 21: ...nt You can find your nearest service agent from The Kannad Marine web site www kannadmarine com Contacting Kannad Marine direct see Warranty Statement page 24 Contacting a Kannad Marine distributor Always retain the original packaging carton as it will be needed when sending the EPIRB for service 11 3 GMDSS inspections If your vessel is subject to GMDSS regulations then you can expect to get regul...

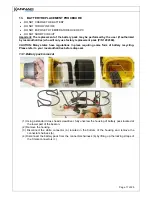
Страница 22: ...ny states have regulations in place requiring some form of battery recycling Please refer to your local authorities before disposal 13 1 Battery pack removal 1 Using a standard cross head screwdriver fully unscrew the housing of battery pack located at the lower part of the beacon 2 Remove the housing 3 Disconnect the white connector a located in the bottom of the housing and remove the connectors...

Страница 23: ...e locking straps e of each male connector c and fix them to the positioning lugs f of each female connector 2 Connect the connectors harness b to the white connector a located in the bottom of the housing 3 Insert the battery pack into the housing of the beacon taking care not to pinch the wires CAUTION the wires must be positioned on the opposite side of the white connector a 4 Reassemble and scr...

Страница 24: ...plate D of the beacon and its blocking piece E 2 Remove the automatic release system assembly 3 On the new HAMMAR release system tick the new replacement date actual month year 2 years Example on drawing next page release system replaced on Nov 2008 valid until Nov 2010 4 4 Press down the ejection plate D and maintain it pressed with its blocking piece E 5 Screw the new automatic release system as...

Страница 25: ...Page 20 of 25 ...

Страница 26: ...io Code Serialised code Owner s name ID CODE HEX Vessel name MMSI Radio Code Serialised code Owner s name ID CODE HEX Vessel name MMSI Radio Code Serialised code Owner s name ID CODE HEX Vessel name MMSI Radio Code Serialised code Owner s name ID CODE HEX ...

Страница 27: ...Page 22 of 25 SBM BATTERY REPLACEMENT Date Signature Next replacement SBM Battery SBM Battery SBM Battery SBM Battery SBM Battery SBM Battery SBM Battery SBM Battery SBM Battery SBM ...

Страница 28: ...Page 23 of 25 RELEASE SYSTEM REMPLACEMENT Date Signature Next remplacement ...

Страница 29: ... kind sustained from any cause In no event shall McMurdo Ltd be liable for any breach of warranty or other claim in an amount exceeding the purchase price of the product This warranty does not affect any statutory rights of the consumer In order to be valid claims must be made under the above warranty in writing as soon as practicable after discovery of the defect or failure and within the warrant...

Страница 30: ... 25 BEACON FIRST ASSIGNMENT Vessel Name MMSI Radio Code Serialized Code Owner s name ID CODE HEX Next release system replacement Next SBM date Next battery replacement date Cachet Date IDENTIFICATION OF CATEGORY ...

Страница 31: ......
Страница 32: ...McMurdo Ltd Silver Point Airport Service Road Portsmouth PO3 5PB United Kingdom Phone 44 0 23 9262 3900 Fax 44 0 23 9262 3998 Email customerservice kannadmarine com Website www kannadmarine com DOC09028B 94 220 Iss 1 ...

Отзывы: