background image

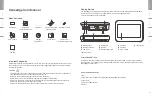
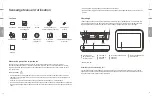
The Sensedge utilizes a modular design to allow for easy control and replacement of sensors.  A CO

2


sensor is built into the core of the device, and a variety of other sensors may be inserted using the 

two sensor bays on the lower side of the device.

To insert a sensor module, simply slide it into the bay, ensuring the Kaiterra logo on the aluminium 

casing is facing the front of the Sensedge. When inserted correctly, the module will click into place, 

and an LED light on the module’s front will briefly flash.

To remove a module, gently push on the left side of it. The module will slide further into the bay, 

before popping out. Do not push on the air intake of a module to remove it.

Sensors may be inserted in either sensor bay, and in any order. They may be swapped both when the 

Sensedge is powered on and operational, and when the device is turned off.  We recommend 

inserting KM-100 on the left and KM-103 on the right across all your devices.

By default, the Sensedge is shipped with the KM-100 and KM-103 sensor modules, which together 

measure PM

2.5

, TVOC, temperature, and relative humidity.

Sensor Modules

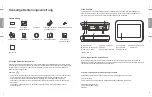
Before turning the Sensedge on for the first time, connect it to a power source using the USB 

Type-C cable and adapter supplied. Upon connection to power, a battery level will be displayed on 

the screen. Ensure that the battery level is above 50% before powering on for the first time.

Power on the device by holding down the power button for 10 seconds, until the Kaiterra logo 

appears on the screen.  Follow the instructions on the screen to set up the device. 
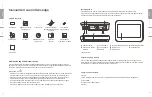
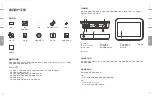
Control

Steady OFF

Flash once

Steady ON

Sensor working normal

Sensor module successfully inserted

Sensor module needs to be changed

Sensor Module Status Light Indications:

3

4

Kaiterra provides a 1-year limited manufacturer warranty on the Sensedge.  To obtain a copy of the 

warranty for this product, please visit https://support.kaiterra.com/policies.

Warranty Information

The Sensedge may be used as a portable device, or mounted on a wall.

Important: 

for detailed instructions on installation, power, and connectivity setup, please visit our 

support center website at https://support.kaiterra.com/sensedge or scan the QR code below.
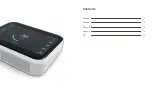
Installation

For additional support, please contact your sales representative or email us 

at [email protected].

Troubleshooting

中文

Fr

an

çai

s

Españo

l

En

glish

Deut

sch

中文

Fr

an

çai

s

Español

En

glish

Deut

sch

Содержание Sensedge

Страница 1: ...www kaiterra com support kaiterra com Smart Air Quality Monitor Sensedge...

Страница 2: ...English Espa ol Deutsch Fran ais 1 5 9 13 17 Contents...

Страница 3: ...read the safety warnings before use and take the necessary precautions to reduce the risk of re electric shock or injury The Kaiterra limited warranty applies only if the unit is used according to th...

Страница 4: ...nsor Modules Before turning the Sensedge on for the rst time connect it to a power source using the USB Type C cable and adapter supplied Upon connection to power a battery level will be displayed on...

Страница 5: ...Sensedge Lo que incluye Medidas de seguridad importantes Manual del usuario Tornillos y anclajes para paneles de Drywall 4 pares Tornillo de la placa trasera Certi cado de calibraci n y prueba M dulos...

Страница 6: ...que juntos miden PM2 5 el TVOC la temperatura y la humedad relativa M dulos Sensores Antes de encender el Sensedge por primera vez con ctelo a una fuente de alimentaci n mediante el cable USB tipo C...

Страница 7: ...r hrungssensitiver Bildschirm 1 2 3 Ethernet Port MicroSD Kartenschlitz USB C Anschluss 1 3 2 4 7 8 9 6 10 5 Sensedge Bedienungsanleitung Lieferumfang Wichtige Sicherheitshinweise Benutzerhandbuch Sch...

Страница 8: ...TVOC Temperatur und relative Luftfeuchtigkeit messen Sensormodule Bevor Sie das Sensedge zum ersten Mal einschalten schlie en Sie es ber das USB Typ C Kabel und den mitgelieferten Adapter an eine Str...

Страница 9: ...our cloisons s ches 4 paires Vis de plaque arri re Certi cat d talonnage et d essai Modules de capteur Sensedge x 2 Chargeur Adaptateurs chargeur x 5 Fa ade Sensedge C ble USB C Sac ESD Veuillez lire...

Страница 10: ...st livr par d faut avec les modules de capteurs KM 100 et KM 103 qui mesurent ensemble la PM2 5 TVOC temp rature et d humidit relative Modules de capteurs Avant d allumer le Sensedge pour la premi re...

Страница 11: ...Kaiterra USB C GHz Wi Fi b g n Mini Kaiterra 17 18 English Fran ais Espa ol Deutsch English Fran ais Espa ol Deutsch x x x USB C 4 5 6 USB A 7 8 9 10 1 2 3 MicroSD USB C GB 1 3 2 4 7 8 9 6 10 5...

Страница 12: ...Kaiterra KM KM KM PM KM TVOC USB Type C Kaiterra 19 20 English Fran ais Espa ol Deutsch English Fran ais Espa ol Deutsch Kaiterra https support kaiterra com policies Kaiterra support kaiterra com...

Отзывы: