(P/N) 541.1212 Rev B 07/15 • © copyright 2012-2015
Kaba Mas LLC
Page 9 of 12
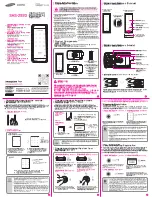
STRIKE INSTALLATION
1. Refer to the enclosed Strike Information Sheet for your specific strike
mounting details.
2. Mount the strike on the door jamb at a convenient height above the floor. This
should not exceed 47 inches from the floor to the center of the strike.
3. Make sure the strike is mounted so its bolt opening is parallel to the face of
the door and positioned to allow for the bolt elevation from the face of the door.
REFER TO THE “INSTALLATION DETAIL TEMPLATE”. Please note that the 7/8"
dimension includes the 0.125" thick hardplate.
TEMPLATE
An “INSTALLATION DETAIL TEMPLATE” with dimensional information is included in
this kit. An actual size, cardboard, cut-out template is also included for
your convenience.
DEAD BOLT INSTALLATION
1. Use the center of the strike as a reference to position the cardboard TEMPLATE on
the door.
NOTE: The door must be ajar and free to swing while positioning the template to the
strike and the door.
2. Fit the strike opening of the template over the strike (i.e., center the strike in the
opening) and tape the template to the door.
3. Center punch all hole positions onto the door.
4. Drill the 1/2" diameter spindle hole through the door.
5. Drill the two (2) CDX-10 attaching screw holes nearest the strike opening (No. 25
drill, 0.149" diameter). Drill holes only 1.25" deep.
DO NOT
DRILL THROUGH.
6. Drill the other four (4) CDX-10 attaching screw holes (11/32" drill, 0.344"
diameter) through the door. The Exterior Mounting Plate posts will extend into
these holes from the opposite side of the door.
7. Install the inner cable tube onto the X-10 lock case. Refer to the “Installation
Instructions for the X-10 Type 1F High Security Electronic Lock.”
8. Remove the protective padding from the end of the cables.
9. Place the outer tube over the cable and onto the tube retainer on the back of the
lock case with the flared end toward the lock case.
10. Place the 3.5 X 5 x 1/8" hardplate against the back of the CDX-10 base.
11. Feed the cable and outer tube through the 1/2" hole in the door while positioning
the CDX-10 and hardplate against the door. Insert the two (2) #10 screws
nearest the strike opening to attach the CDX-10 and hardplate to
the
door.
12. Position the Exterior (Dial ring) Mounting Plate and insert the four (4) #10-
32 x 1.25 pan head machine screws. Longer or shorter screws may be required
depending on door thickness as follows: