Getting started
12
Getting
star
ted
XV-515GD [UX, 3U, 4U, US, A, UT, UB] EN
LVT0336-014A
Connections
*In the following despription, "TV" may be substituted with "monitor" or "projector."
*Before using the unit, you have to connect the unit to a TV and/or amplifier.
Before making any connections
• Do not connect the AC power cord until all other connections have been made.
• Since different components often have different terminal names, carefully read the instructions supplied with the
component you are going to connect.
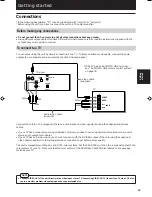
To connect to a TV
You can enjoy using the unit by simply connecting it to a TV. To improve audio sound quality, connect the audio
outputs to your separate audio equipment. (See the following pages.)
Getting started
Connect the unit to a TV equipped with stereo audio input and video input jacks using the supplied audio/video
cables.
• If your TV has a monaural audio input instead of stereo, you need to use an optional audio cable which converts
stereo audio output to monaural.
• If your TV has an S-video input, you should connect it with the S-VIDEO output of the unit using the supplied S-
video cable in addition to the (standard) video connection to get better picture quality.
The unit is compatible with the PAL and NTSC color systems. Set the PAL/NTSC switch on the rear panel to match the
color system of your TV. Make sure that the color system of the DVD/Video CD/SVCD disc labeled on the package
matches your TV.
• Connect VIDEO OUT of the unit directly to the video input of your TV. Connecting VIDEO OUT of the unit to a TV via a VCR may
cause a monitor problem when playing back a copy-protected disc.
NOTE
VIDEO
AUDIO
RIGHT
LEFT
IN
S-VIDEO
PCM/STREAM
OPTICAL
VIDEO S-VIDEO
AV COMPU LINK
VIDEO OUT
DIGITAL OUT
LEFT
RIGHT
AUDIO OUT
NTSC
PAL
Audio/video cable
(supplied)
S-video cable
(supplied)
The unit
TV
White
Red
Yellow
* If the TV has an AV COMPU LINK terminal,
see “AV COMPU LINK remote control system”
on page 39.
White
Red
Yellow


